🛏️ How To Make A Headboard
Creating your own headboard can transform a bedroom from ordinary to extraordinary.
I’ve built several headboards over the years, each one adding a unique touch and personality to the space.
This guide draws on that hands-on experience, making the process straightforward and enjoyable for you.
Quick Overview
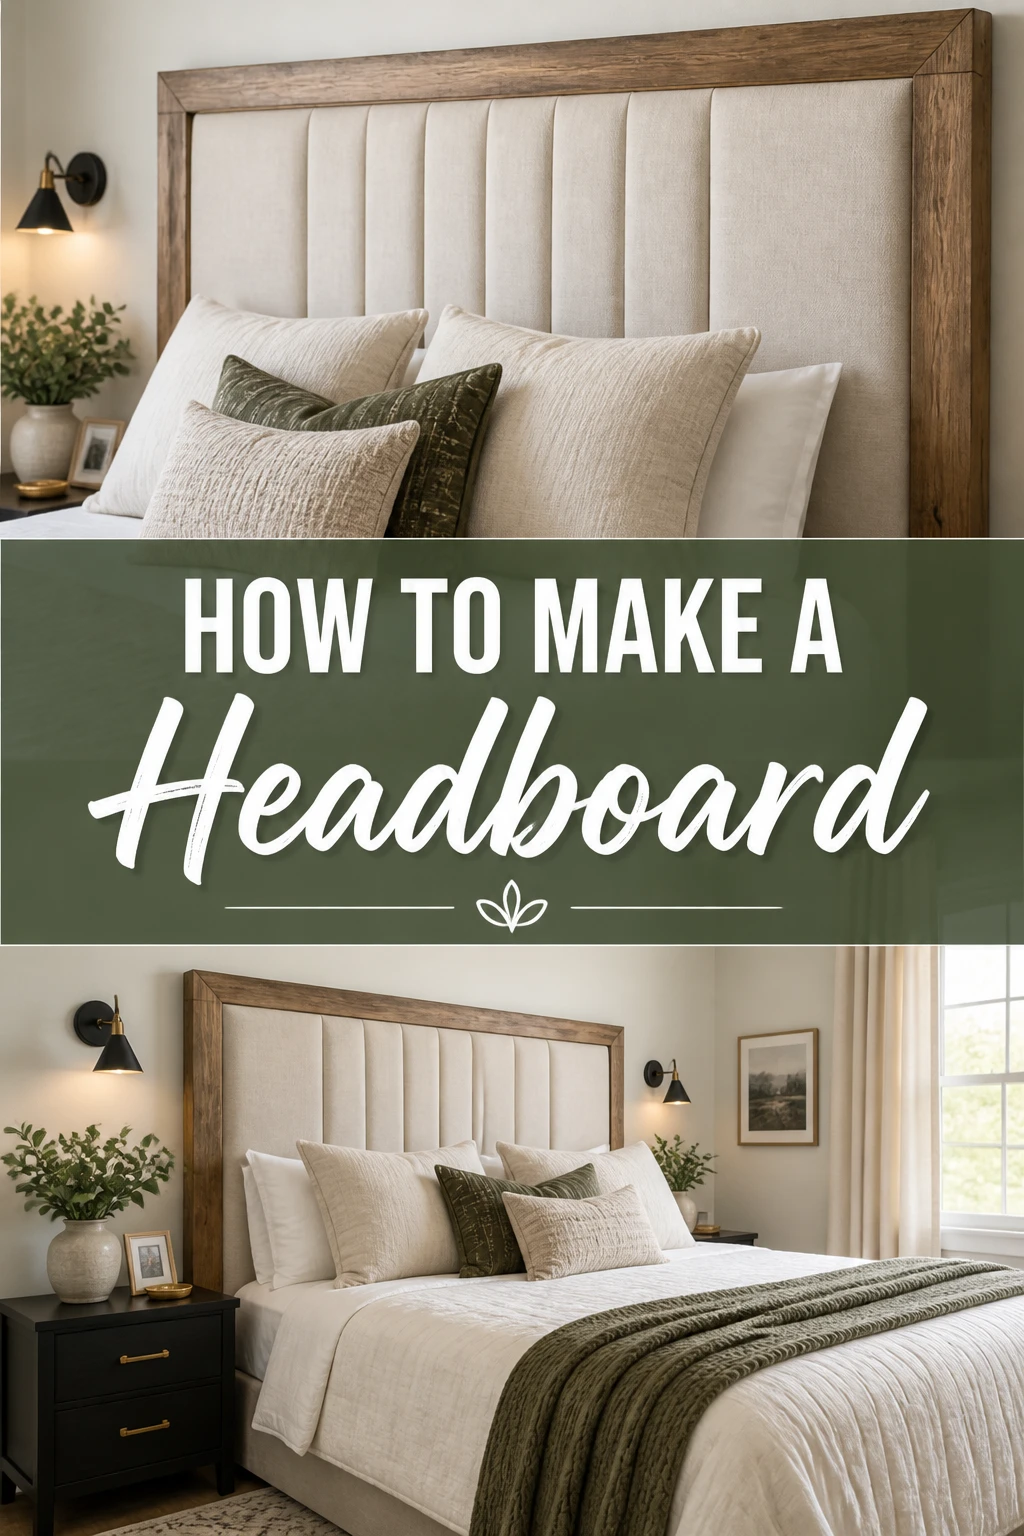
You’re about to embark on a rewarding DIY project, crafting a custom upholstered headboard that perfectly matches your room’s aesthetic.
It’s a fantastic way to introduce a focal point and add comfort to your sleeping area.
- Time needed: 4-8 hours (depending on experience and drying times)
- Difficulty: Intermediate
- What you’ll need: Plywood, foam, batting, fabric, staple gun, adhesive, basic tools
Step-by-Step Instructions
Step 1: Measure and Plan Your Design
Before any cutting begins, precise measurements are key to a successful headboard project.
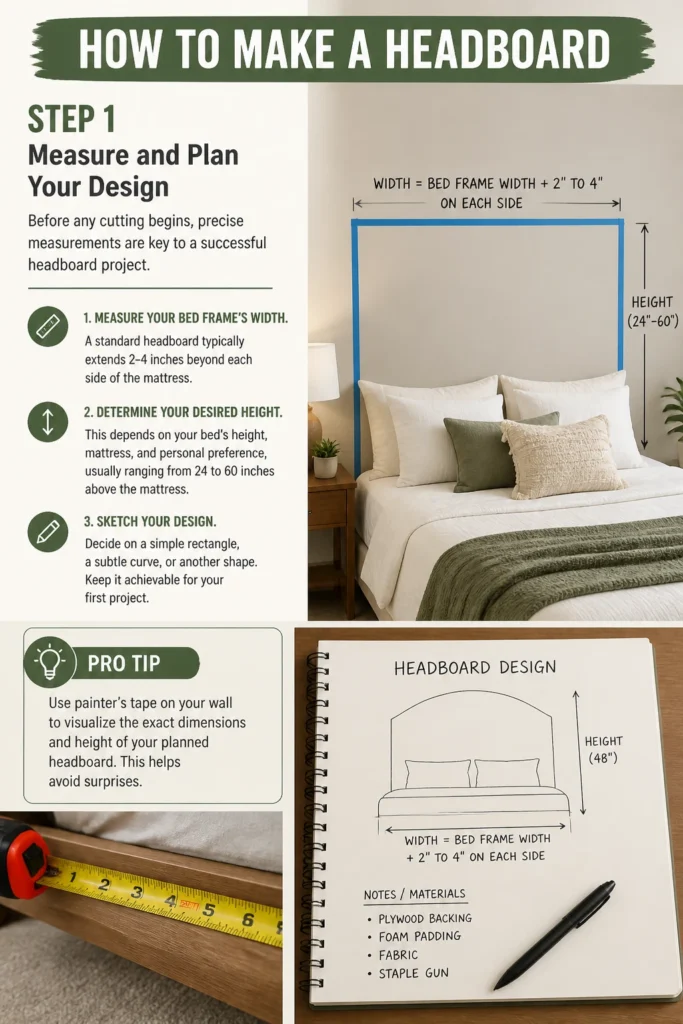
Consider the width of your bed and how much overhang you desire on each side.
- Measure your bed frame’s width. A standard headboard typically extends 2-4 inches beyond each side of the mattress.
- Determine your desired height. This depends on your bed’s height, mattress, and personal preference, usually ranging from 24 to 60 inches above the mattress.
- Sketch your design. Decide on a simple rectangle, a subtle curve, or another shape. Keep it achievable for your first project.
Pro Tip: Use painter’s tape on your wall to visualize the exact dimensions and height of your planned headboard. This helps avoid surprises.
Step 2: Cut the Plywood Base
The plywood forms the structural backbone of your headboard, so accuracy here is essential.
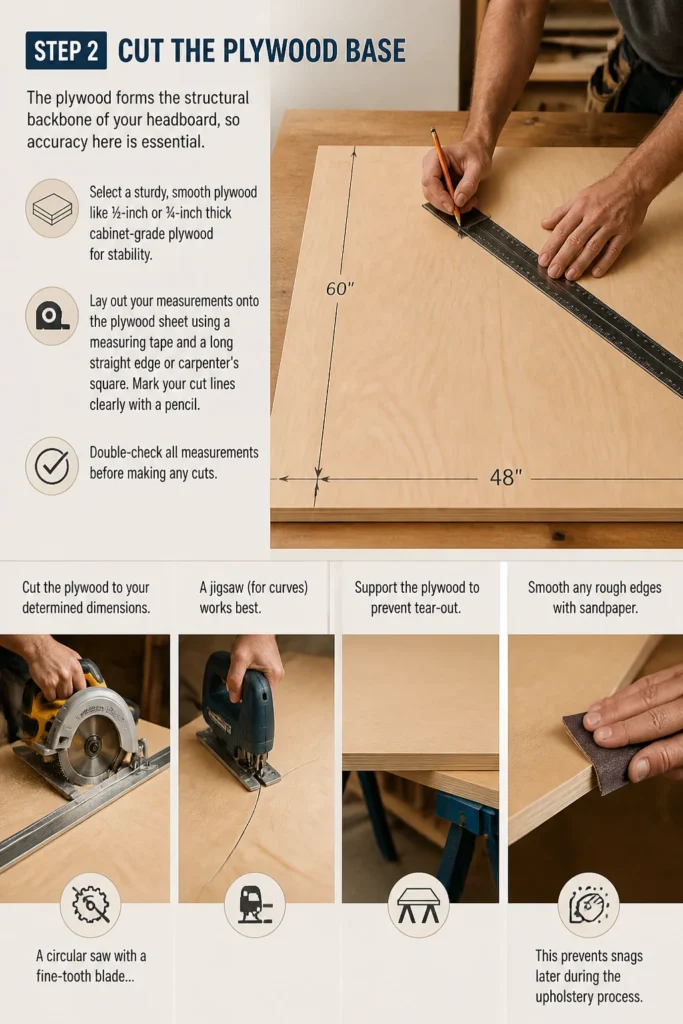
Select a sturdy, smooth plywood like ½-inch or ¾-inch thick cabinet-grade plywood for stability.
- Lay out your measurements onto the plywood sheet using a measuring tape and a long straight edge or carpenter’s square.
- Mark your cut lines clearly with a pencil. Double-check all measurements before making any cuts.
- Cut the plywood to your determined dimensions. A circular saw with a fine-tooth blade or a jigsaw (for curves) works best. Support the plywood to prevent tear-out.
- Smooth any rough edges with sandpaper. This prevents snags later during the upholstery process.
Step 3: Attach the Foam Padding
Foam provides the plush comfort and shape for your upholstered headboard.
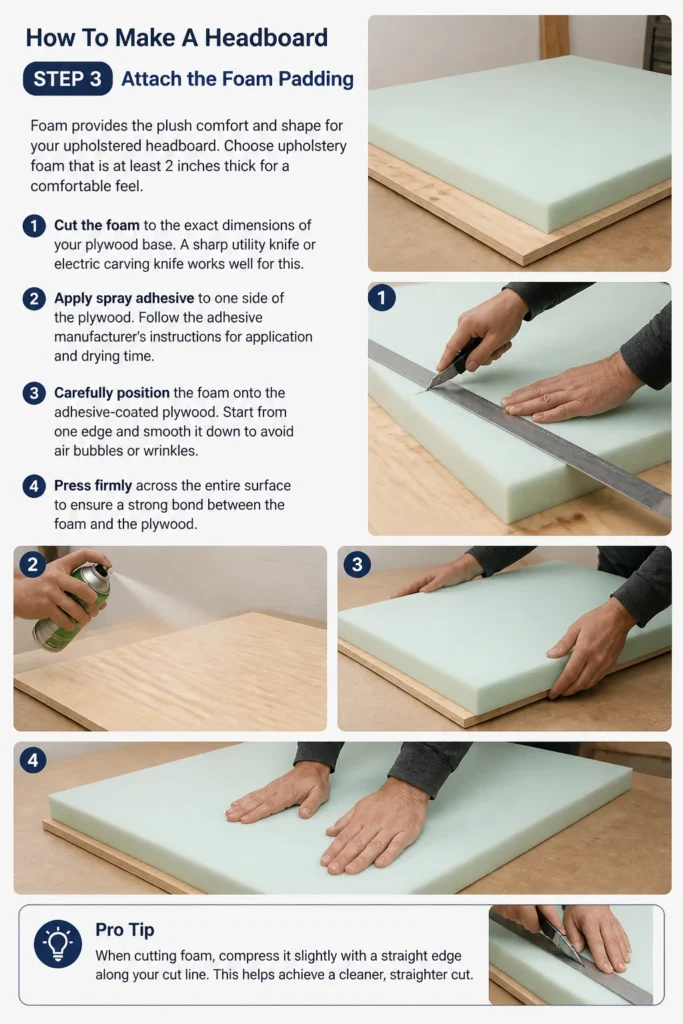
Choose upholstery foam that is at least 2 inches thick for a comfortable feel.
- Cut the foam to the exact dimensions of your plywood base. A sharp utility knife or electric carving knife works well for this.
- Apply spray adhesive to one side of the plywood. Follow the adhesive manufacturer’s instructions for application and drying time.
- Carefully position the foam onto the adhesive-coated plywood. Start from one edge and smooth it down to avoid air bubbles or wrinkles.
- Press firmly across the entire surface to ensure a strong bond between the foam and the plywood.
Pro Tip: When cutting foam, compress it slightly with a straight edge along your cut line. This helps achieve a cleaner, straighter cut.
Step 4: Wrap with Batting
Batting adds a layer of softness, smooths out the foam, and provides a crisp, finished look under your fabric.
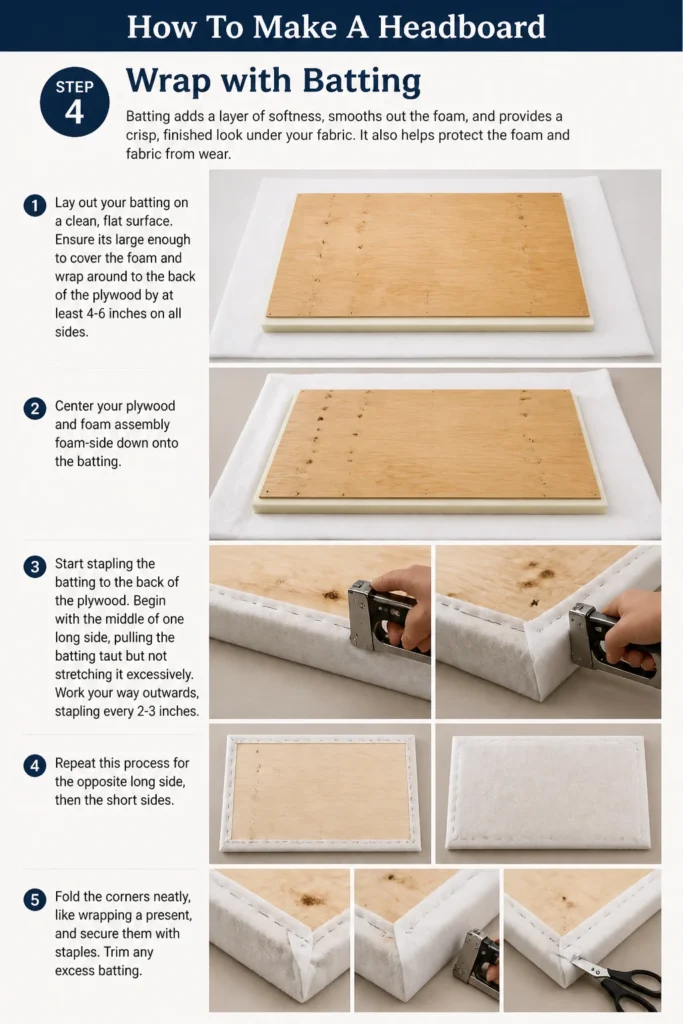
It also helps protect the foam and fabric from wear.
- Lay out your batting on a clean, flat surface. Ensure it’s large enough to cover the foam and wrap around to the back of the plywood by at least 4-6 inches on all sides.
- Center your plywood and foam assembly foam-side down onto the batting.
- Start stapling the batting to the back of the plywood. Begin with the middle of one long side, pulling the batting taut but not stretching it excessively.
- Work your way outwards, stapling every 2-3 inches. Repeat this process for the opposite long side, then the short sides.
- Fold the corners neatly, like wrapping a present, and secure them with staples. Trim any excess batting.
Step 5: Upholster with Fabric
This is where your headboard truly comes to life, reflecting your personal style.
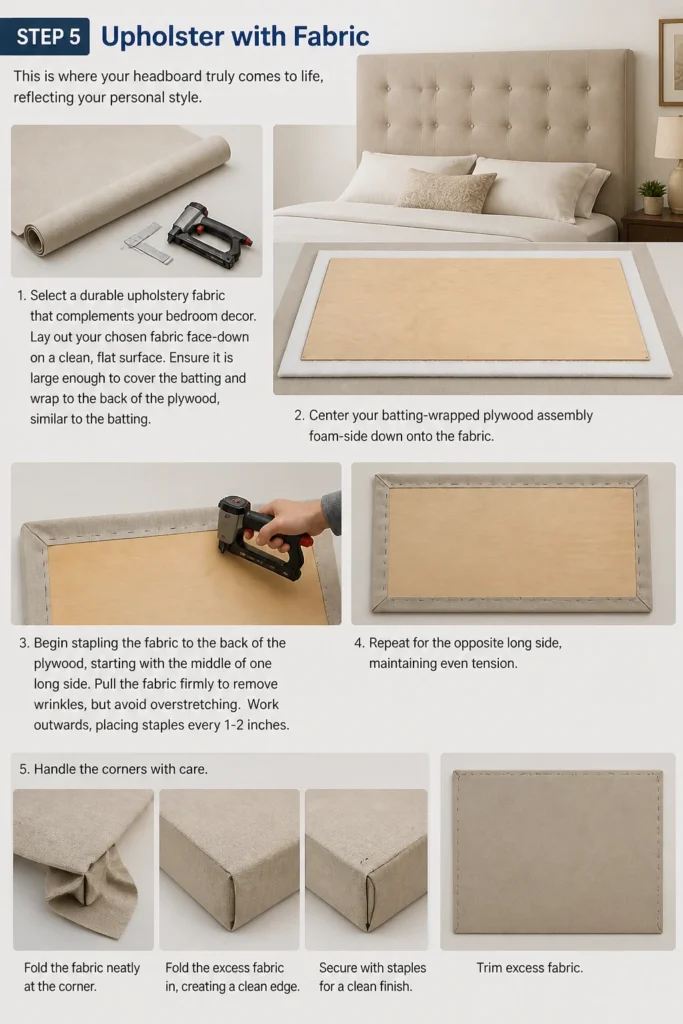
Select a durable upholstery fabric that complements your bedroom decor.
- Lay out your chosen fabric face-down on a clean, flat surface. Ensure it is large enough to cover the batting and wrap to the back of the plywood, similar to the batting.
- Center your batting-wrapped plywood assembly foam-side down onto the fabric.
- Begin stapling the fabric to the back of the plywood, starting with the middle of one long side. Pull the fabric firmly to remove wrinkles, but avoid overstretching.
- Work outwards, placing staples every 1-2 inches. Repeat for the opposite long side, maintaining even tension.
- Handle the corners with care. Trim excess fabric, fold it neatly, and secure with staples for a clean finish.
Step 6: Trim and Finish Edges
A tidy back and clean edges are hallmarks of a professionally finished headboard.
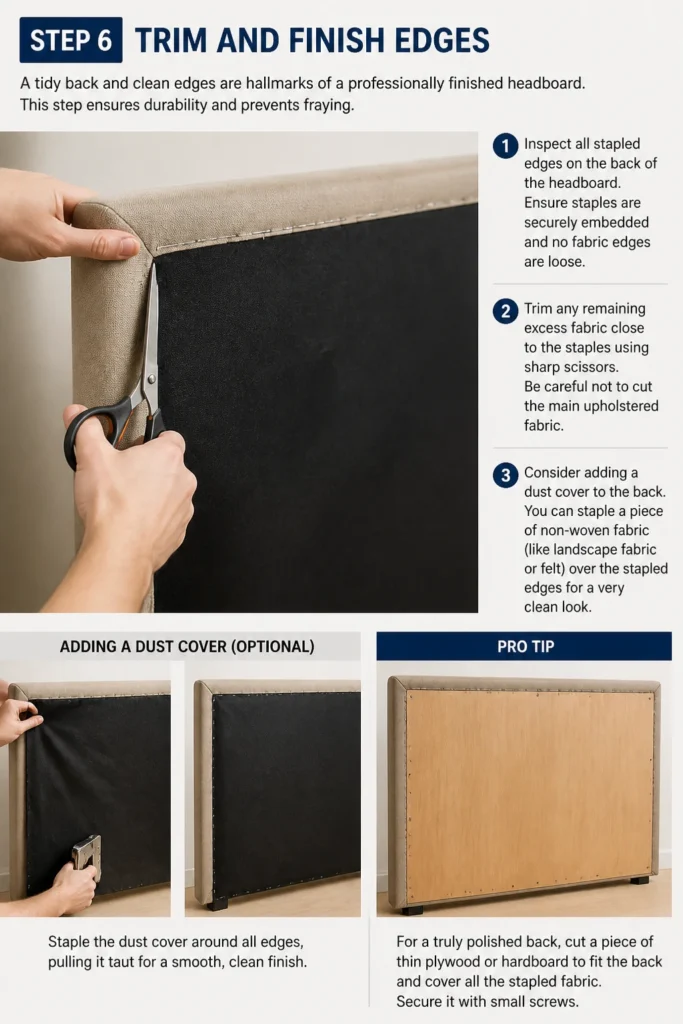
This step ensures durability and prevents fraying.
- Inspect all stapled edges on the back of the headboard. Ensure staples are securely embedded and no fabric edges are loose.
- Trim any remaining excess fabric close to the staples using sharp scissors. Be careful not to cut the main upholstered fabric.
- Consider adding a dust cover to the back. You can staple a piece of non-woven fabric (like landscape fabric or felt) over the stapled edges for a very clean look.
Pro Tip: For a truly polished back, cut a piece of thin plywood or hardboard to fit the back and cover all the stapled fabric. Secure it with small screws.
Step 7: Prepare for Mounting
Choosing the right mounting method is crucial for safety and stability.
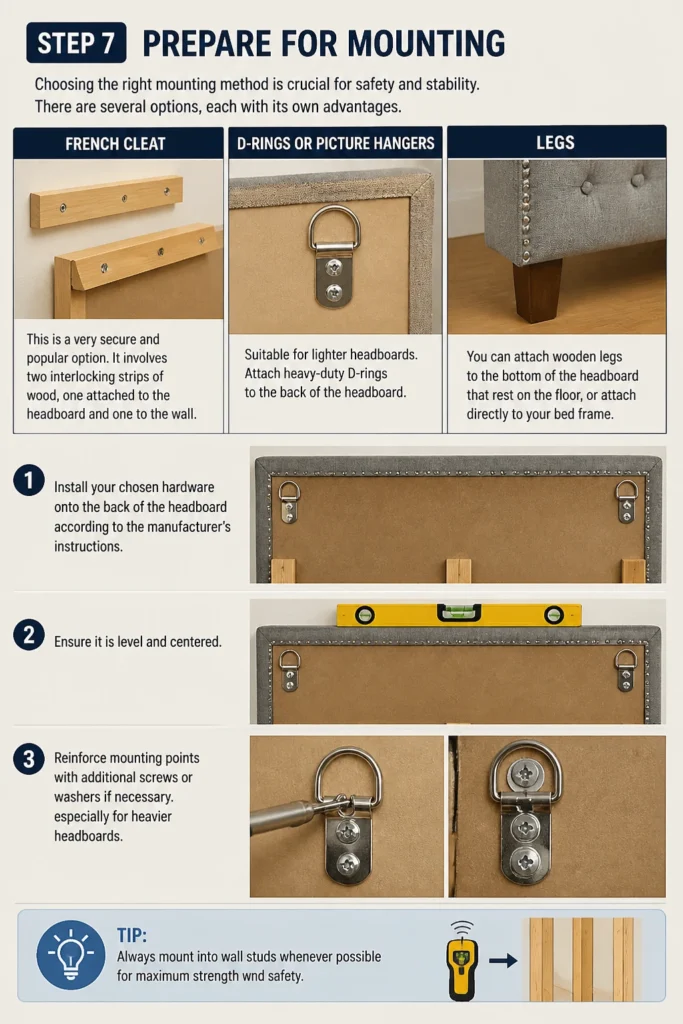
There are several options, each with its own advantages.
-
Choose a mounting method:
- French Cleat: This is a very secure and popular option. It involves two interlocking strips of wood, one attached to the headboard and one to the wall.
- D-Rings or Picture Hangers: Suitable for lighter headboards. Attach heavy-duty D-rings to the back of the headboard.
- Legs: You can attach wooden legs to the bottom of the headboard that rest on the floor, or attach directly to your bed frame.
- Install your chosen hardware onto the back of the headboard according to the manufacturer’s instructions. Ensure it is level and centered.
- Reinforce mounting points with additional screws or washers if necessary, especially for heavier headboards.
Step 8: Install the Headboard
The final step brings your beautiful creation into its rightful place.
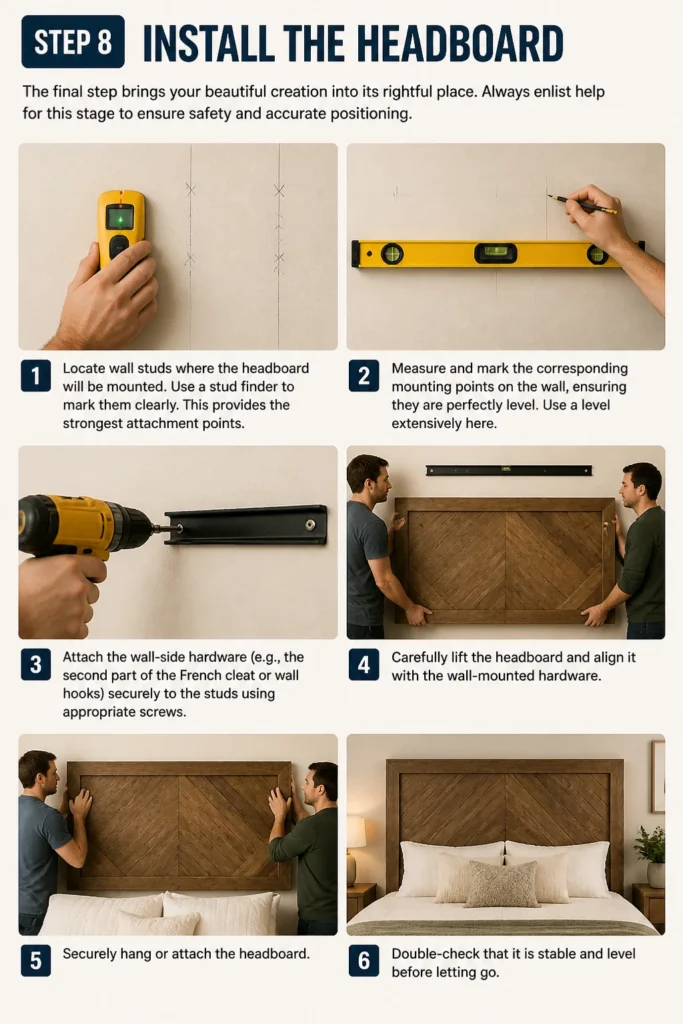
Always enlist help for this stage to ensure safety and accurate positioning.
- Locate wall studs where the headboard will be mounted. Use a stud finder to mark them clearly. This provides the strongest attachment points.
- Measure and mark the corresponding mounting points on the wall, ensuring they are perfectly level. Use a level extensively here.
- Attach the wall-side hardware (e.g., the second part of the French cleat or wall hooks) securely to the studs using appropriate screws.
- Carefully lift the headboard and align it with the wall-mounted hardware.
- Securely hang or attach the headboard. Double-check that it is stable and level before letting go.
Common Mistakes to Avoid
Skipping Proper Measurement
Many DIYers rush into cutting without thoroughly measuring their space and bed. This often results in a headboard that is too wide, too narrow, or sits awkwardly high or low.
Always measure twice, sketch your design, and even tape out the dimensions on the wall to visualize the final look before making any cuts.
Insufficient Batting or Foam
Using foam that is too thin or skimping on batting can lead to a flimsy, uncomfortable, and unprofessional-looking headboard. The plywood might show through the fabric, or the headboard could feel too hard.
Invest in at least 2-inch thick upholstery foam and a generous layer of batting to ensure a plush, smooth, and durable finish.
Uneven Fabric Tension
When stapling the fabric, it’s easy to pull too hard in some areas and not enough in others. This results in wrinkles, puckers, or a lopsided appearance that detracts from the headboard’s aesthetic.
Maintain consistent, firm tension across the entire fabric surface. Work from the center outwards on each side, ensuring an even pull as you staple.
Ignoring Wall Studs for Mounting
Mounting a headboard directly into drywall without hitting studs is a common and dangerous mistake. The headboard can pull away from the wall, causing damage or injury.
Always use a stud finder to locate and mark wall studs. Secure your mounting hardware directly into these studs for maximum stability and safety.
Troubleshooting
Headboard Sags or Feels Loose
If your headboard doesn’t feel sturdy or sags after installation, the mounting points might not be adequate. This could be due to insufficient hardware or not securing it to wall studs.
Carefully remove the headboard and re-evaluate your mounting. Ensure all hardware is rated for the weight of your headboard and is securely fastened into at least two wall studs. Use larger screws or a more robust mounting system like a French cleat.
Fabric Has Wrinkles or Bumps
Wrinkles or small bumps appearing in the fabric indicate uneven tension during upholstery or insufficient padding. This can detract from the smooth finish you desire.
Carefully remove staples from the affected area, smooth out the fabric and underlying batting, and re-staple with consistent, firm tension. For persistent bumps, ensure your foam and batting layers are smooth and free of debris before applying fabric.
Headboard is Not Level
An unlevel headboard is a common issue that can be frustrating to fix once installed. This usually stems from inaccurate wall measurements or uneven hardware installation.
Use a long level to re-measure and re-mark your wall mounting points precisely. If using a French cleat, ensure the wall-mounted piece is perfectly level. Adjust the wall hardware until your headboard hangs straight and true.
Key Takeaways
- Precise measurements are the foundation of a successful headboard project.
- Invest in quality foam and batting for optimal comfort and a smooth finish.
- Maintain consistent fabric tension during upholstery to avoid wrinkles.
- Always mount your headboard securely into wall studs for safety and stability.
- Don’t rush the process; take your time at each step for the best results.
- A custom headboard adds significant personal style and comfort to your bedroom.
Frequently Asked Questions
Can I make a headboard without a staple gun?
While a heavy-duty staple gun is highly recommended for efficiency and strength, you could theoretically use strong upholstery tacks or a hammer and small nails. However, this is much more labor-intensive and may not provide as secure or clean a finish as staples.
What type of fabric is best for a headboard?
Durable upholstery fabrics like linen blends, velvet, canvas, or even faux leather are excellent choices. Consider fabrics with a tight weave that can withstand some stretching and are easy to clean. Avoid very thin or delicate fabrics that might tear or show imperfections easily.
How do I clean an upholstered headboard?
The cleaning method depends on your fabric. For most upholstery, a light vacuuming with an upholstery attachment is good for regular maintenance. For spills, blot immediately with a clean cloth and use a mild fabric cleaner, spot-testing first in an inconspicuous area. Always check your fabric’s care instructions.
Can I attach the headboard directly to my bed frame?
Yes, many bed frames have pre-drilled holes for headboard attachment. You would typically need specific bolts and washers to secure the headboard legs (which you would add to the plywood base) to your bed frame. Ensure the headboard is adequately supported and doesn’t wobble.
Our Top Recommended Finds
- Heavy-Duty Electric Staple Gun: Essential for quickly and securely attaching fabric and batting. Look for one with adjustable power.
- High-Density Upholstery Foam: Ensures your headboard is comfortable and retains its shape over time. Aim for at least 2 inches thick.
- Fabric Spray Adhesive: Crucial for bonding the foam to the plywood base smoothly and permanently.
Craft Your Comfort Zone
You now have a detailed roadmap to create a beautiful, custom headboard that elevates your bedroom.
This project is more than just building; it’s about crafting a personal sanctuary.
Gather your materials, clear your workspace, and begin building the headboard of your dreams today!