👒 How To Make Derby Hats
The Kentucky Derby is a spectacle of fashion, and the iconic Derby hat is its crowning glory. Crafting your own allows for unparalleled personal expression. I remember the immense satisfaction of wearing my first handmade creation, knowing it was truly unique. This guide will walk you through every practical step to create a stunning hat of your own.
Quick Overview
You’re about to embark on a creative journey that results in a magnificent, custom-made Derby hat. This process involves shaping, covering, and embellishing, transforming simple materials into a wearable work of art.
- Time needed: 6-10 hours (plus drying time)
- Difficulty: Intermediate
- What you’ll need: Buckram, millinery wire, fabric, glue, scissors, basic sewing kit, embellishments
Step-by-Step Instructions
Step 1: Gather Your Materials and Workspace
Before beginning, ensure you have all your tools and materials laid out. A tidy and organized workspace makes the entire process smoother and more enjoyable. Think about the colors and textures you want for your hat.
Collect: Your buckram, millinery wire, chosen outer fabric, lining fabric, hat elastic or ribbon for the inner band, fabric glue, sharp fabric scissors, wire cutters, needle and thread, pins, a thimble, and your embellishments like feathers, flowers, and ribbon.
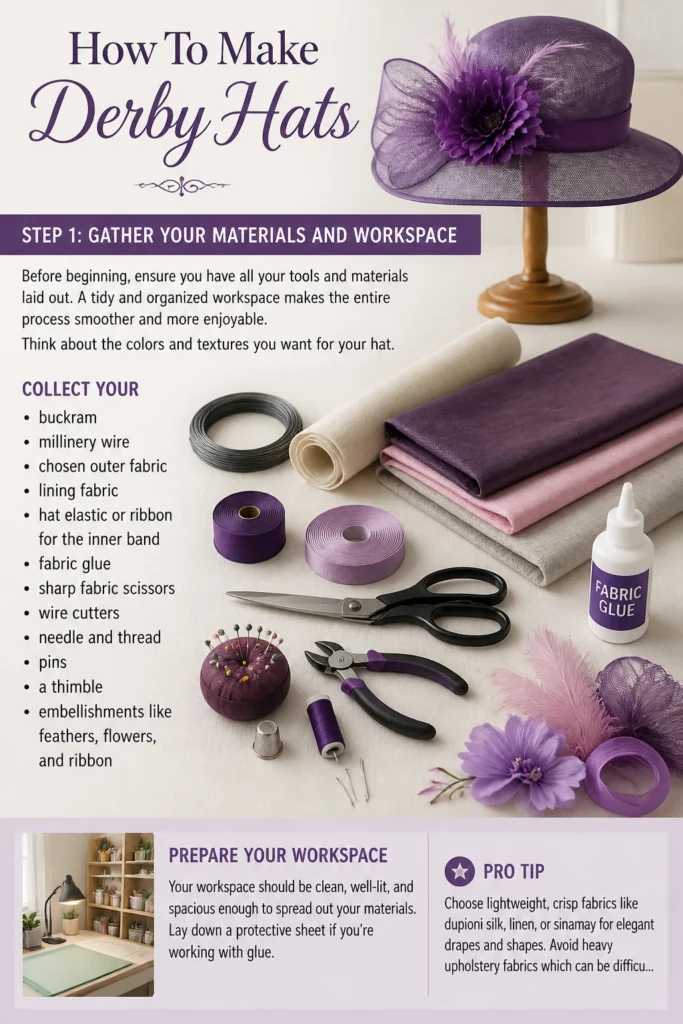
Prepare: Your workspace should be clean, well-lit, and spacious enough to spread out your materials. Lay down a protective sheet if you’re working with glue.
Pro Tip: Choose lightweight, crisp fabrics like dupioni silk, linen, or sinamay for elegant drapes and shapes. Avoid heavy upholstery fabrics which can be difficult to work with and add unnecessary weight.
Step 2: Create Your Hat Pattern
A good pattern is the foundation of a well-shaped hat. You’ll need patterns for the crown and the brim. This step ensures your hat fits and looks proportional.
Determine: Your head circumference. Measure around your head where the hat will sit, usually just above the eyebrows and ears. Add about 1/2 inch for comfort and seam allowance.
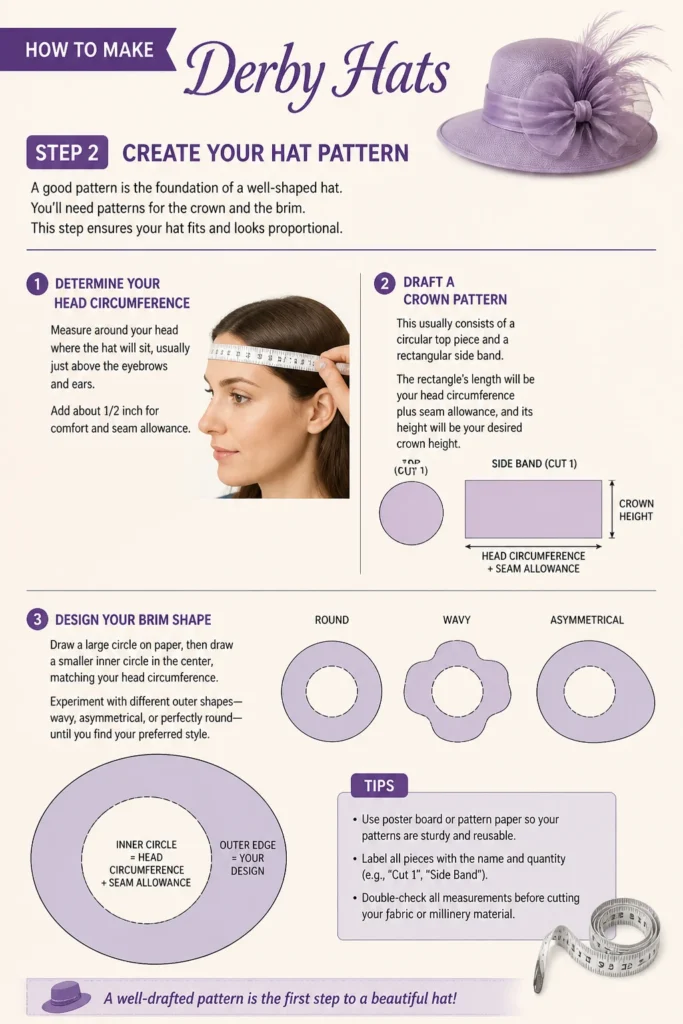
Draft: A crown pattern. This usually consists of a circular top piece and a rectangular side band. The rectangle’s length will be your head circumference plus seam allowance, and its height will be your desired crown height.
Design: Your brim shape. Draw a large circle on paper, then draw a smaller inner circle in the center, matching your head circumference. Experiment with different outer shapes—wavy, asymmetrical, or perfectly round—until you find your desired look. Remember to add seam allowance.
Step 3: Shape the Buckram Crown
Buckram is a stiffened fabric that provides the structural integrity of your hat. Shaping it correctly is crucial for the crown’s form. This gives your hat its initial solid shape.
Cut: Your buckram pieces according to your crown pattern. You’ll have a crown top and a crown side band.
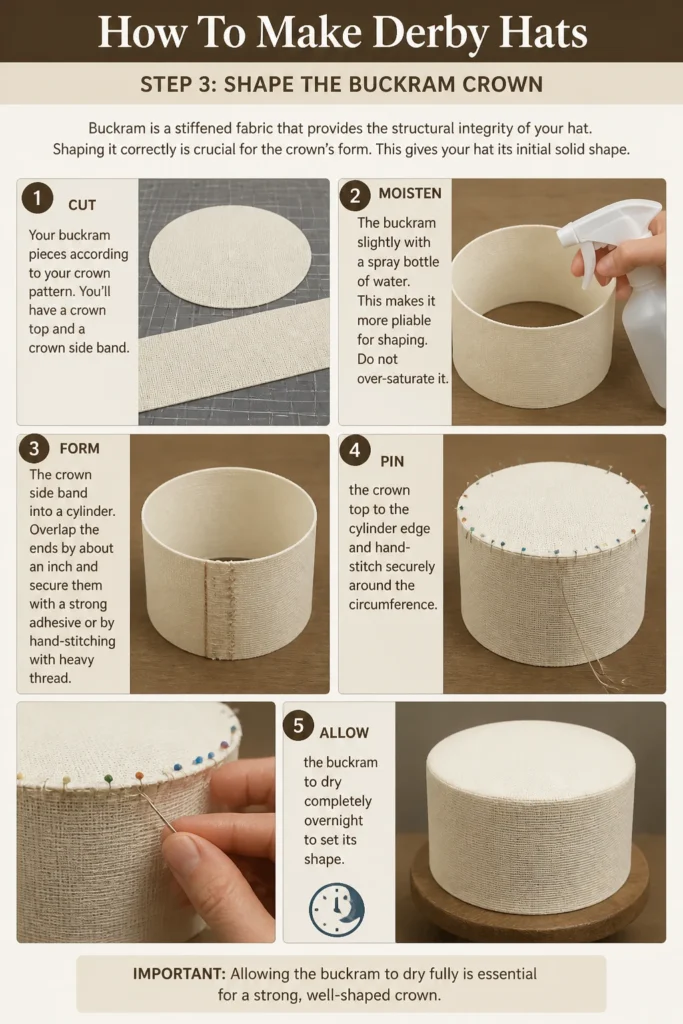
Moisten: The buckram slightly with a spray bottle of water. This makes it more pliable for shaping. Do not over-saturate it.
Form: The crown side band into a cylinder. Overlap the ends by about an inch and secure them with a strong adhesive or by hand-stitching with heavy thread. Pin the crown top to the cylinder edge and hand-stitch securely around the circumference. Allow the buckram to dry completely overnight to set its shape.
Step 4: Form the Buckram Brim
The brim is often the most dramatic part of a Derby hat. Its shape defines much of the hat’s character. Careful shaping here ensures a beautiful, lasting silhouette.
Cut: Your buckram brim using your pattern. Ensure the inner hole matches your crown base.
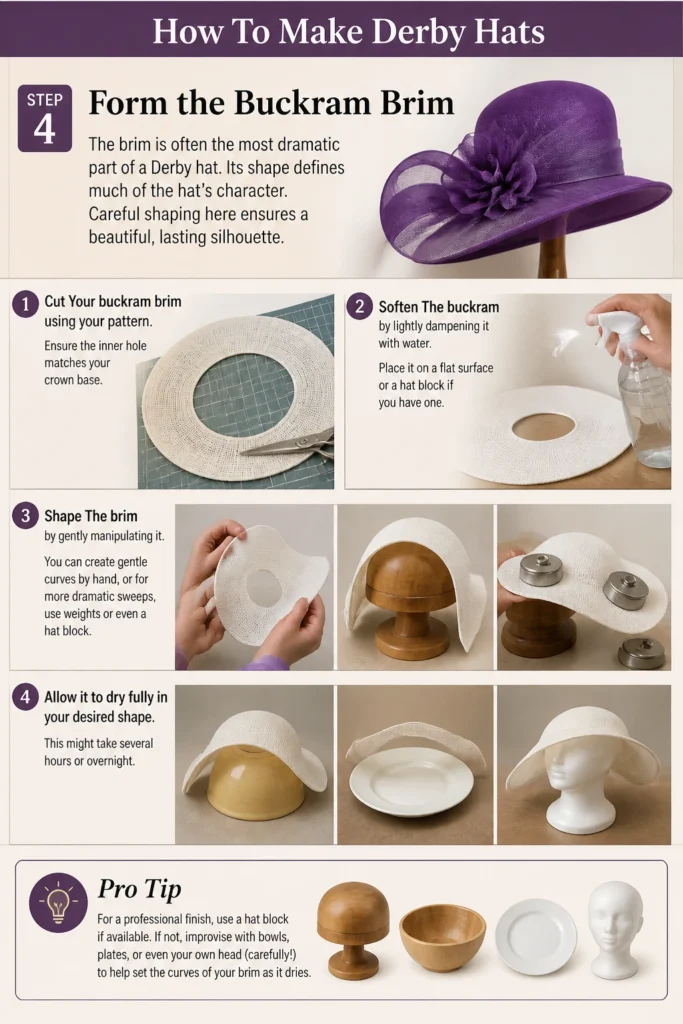
Soften: The buckram by lightly dampening it with water. Place it on a flat surface or a hat block if you have one.
Shape: The brim by gently manipulating it. You can create gentle curves by hand, or for more dramatic sweeps, use weights or even a hat block. Allow it to dry fully in your desired shape. This might take several hours or overnight.
Pro Tip: For a professional finish, use a hat block if available. If not, improvise with bowls, plates, or even your own head (carefully!) to help set the curves of your brim as it dries.
Step 5: Wire the Brim Edge
Wiring the brim edge adds stability and helps maintain its shape over time. This step prevents your brim from drooping or losing its form. It’s a mark of quality millinery.
Cut: A length of millinery wire slightly longer than the outer circumference of your buckram brim. Use wire cutters.
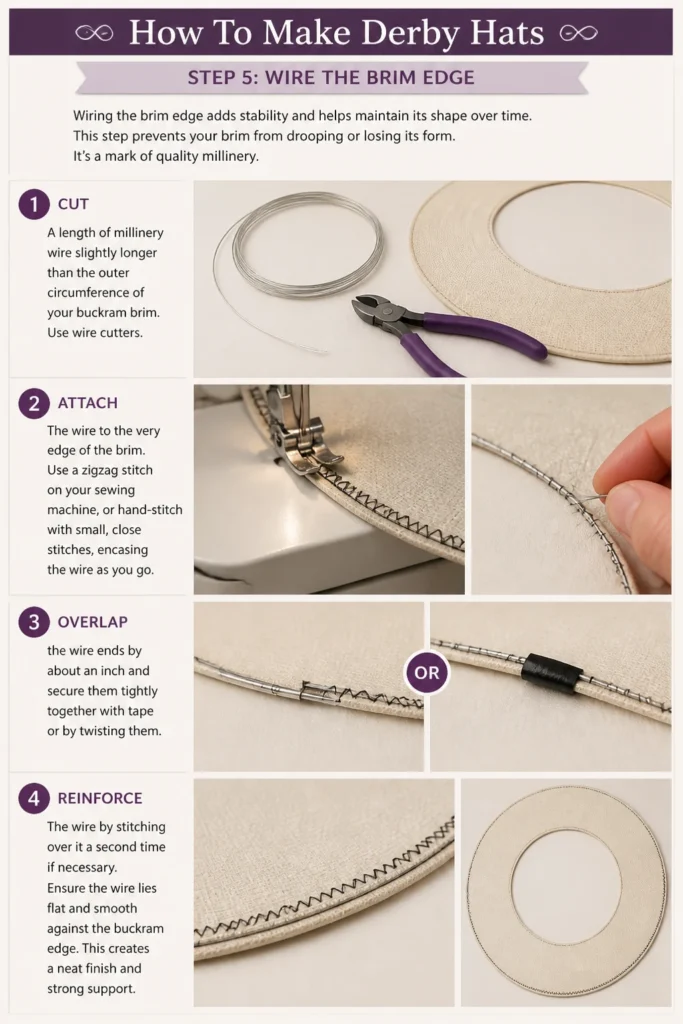
Attach: The wire to the very edge of the brim. Use a zigzag stitch on your sewing machine, or hand-stitch with small, close stitches, encasing the wire as you go. Overlap the wire ends by about an inch and secure them tightly together with tape or by twisting them.
Reinforce: The wire by stitching over it a second time if necessary. Ensure the wire lies flat and smooth against the buckram edge. This creates a neat finish and strong support.
Step 6: Cover the Crown
Now it’s time to bring your hat to life with your chosen outer fabric. Covering the crown smoothly is key to a polished look. This is where your hat starts to gain its aesthetic appeal.
Cut: Your outer fabric pieces for the crown, adding a generous seam allowance of about 1 inch all around. Cut a separate piece for the crown top and the crown side band.
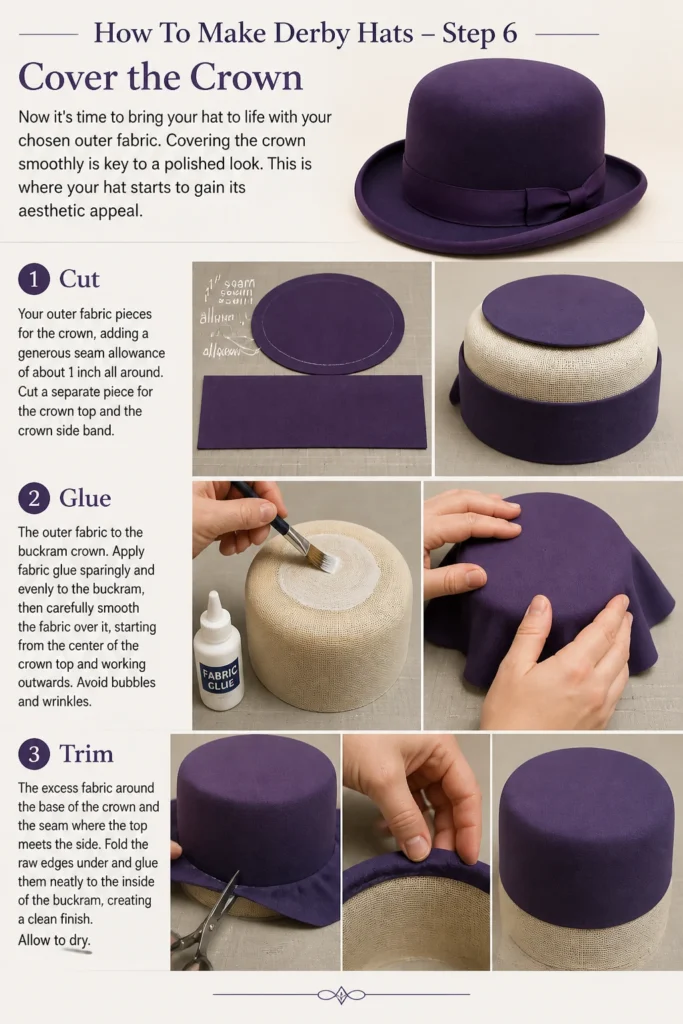
Glue: The outer fabric to the buckram crown. Apply fabric glue sparingly and evenly to the buckram, then carefully smooth the fabric over it, starting from the center of the crown top and working outwards. Avoid bubbles and wrinkles.
Trim: The excess fabric around the base of the crown and the seam where the top meets the side. Fold the raw edges under and glue them neatly to the inside of the buckram, creating a clean finish. Allow to dry.
Step 7: Cover the Brim
Covering the brim requires precision, especially if your brim has complex curves. You’ll cover both the top and underside of the brim. This is often the most visible part of the hat.
Cut: Two pieces of your outer fabric for the brim, each with a generous seam allowance. One for the top, one for the underside. If using a different lining fabric for the underside, cut one from each.
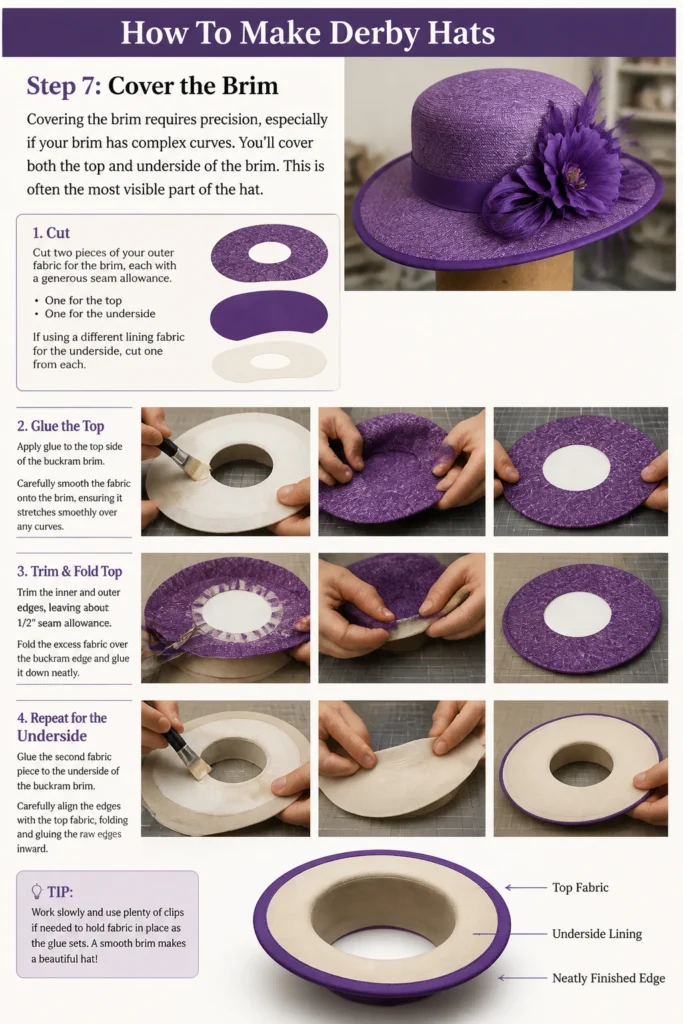
Glue: The top fabric to the buckram brim first. Apply glue, then carefully smooth the fabric, ensuring it stretches smoothly over any curves. Trim the inner and outer edges, folding the excess over the buckram edge and gluing it down.
Repeat: For the underside. Glue the second fabric piece to the underside of the buckram brim. Carefully align the edges with the top fabric, folding and gluing the raw edges inward to create a crisp, enclosed finish. Ensure the wired edge is completely covered and smooth.
Step 8: Assemble Hat Components
With the crown and brim covered, it’s time to join them together. This step brings your hat’s main structure into its final form. A secure attachment is vital.
Align: The covered crown squarely onto the covered brim, ensuring it’s centered. Use pins to hold it in place temporarily.
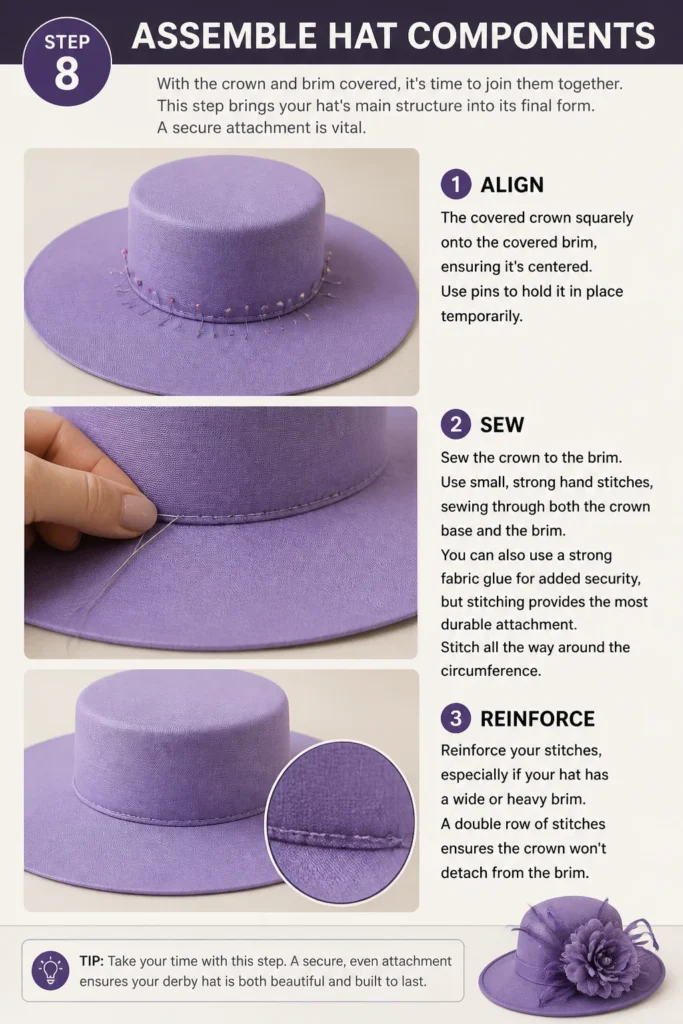
Sew: The crown to the brim. Use small, strong hand stitches, sewing through both the crown base and the brim. You can also use a strong fabric glue for added security, but stitching provides the most durable attachment. Stitch all the way around the circumference.
Reinforce: Your stitches, especially if your hat has a wide or heavy brim. A double row of stitches ensures the crown won’t detach from the brim.
Step 9: Add Inner Finishing Touches
A well-finished hat includes a comfortable inner band and a neat lining. These details add to the wearer’s comfort and the hat’s professional appearance. This completes the structural integrity.
Cut: A piece of lining fabric to fit the inside of the crown. You can also add a hat elastic or a grosgrain ribbon for the inner head band. The inner band should be cut to your exact head measurement, plus seam allowance.
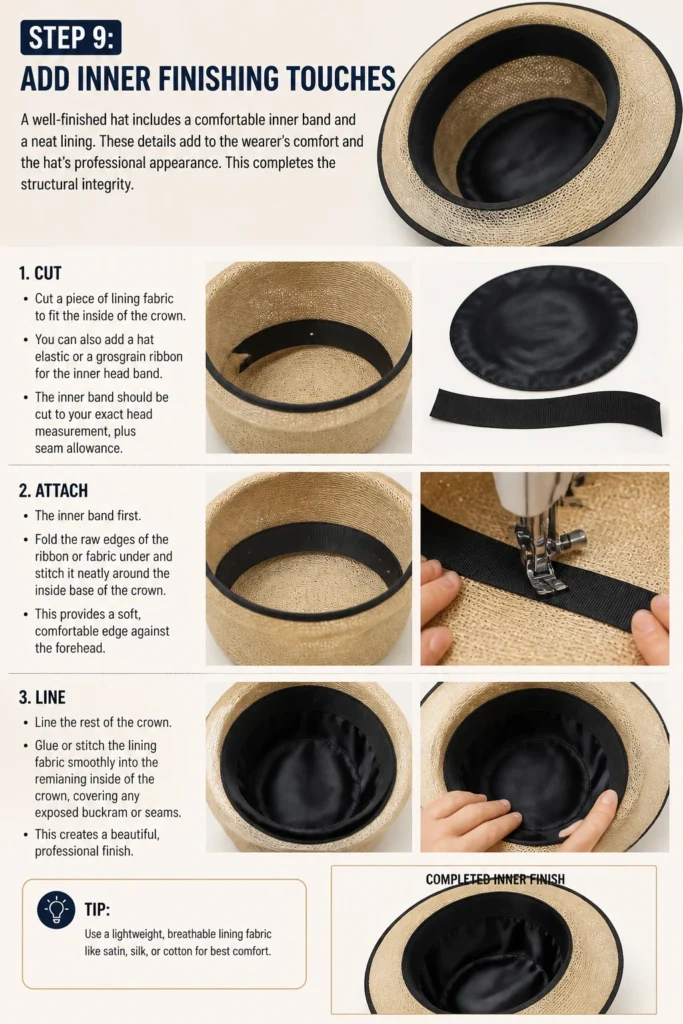
Attach: The inner band first. Fold the raw edges of the ribbon or fabric under and stitch it neatly around the inside base of the crown. This provides a soft, comfortable edge against the forehead.
Line: The rest of the crown. Glue or stitch the lining fabric smoothly into the remaining inside of the crown, covering any exposed buckram or seams. This creates a beautiful, professional interior.
Step 10: Embellish Your Masterpiece
This is where your hat truly becomes a Derby showstopper. Let your creativity shine! Embellishments are what give a Derby hat its signature flair.
Plan: Your embellishment layout. Arrange feathers, silk flowers, ribbons, netting, and other decorative elements on your hat. Try different configurations before committing. Consider balance and flow.
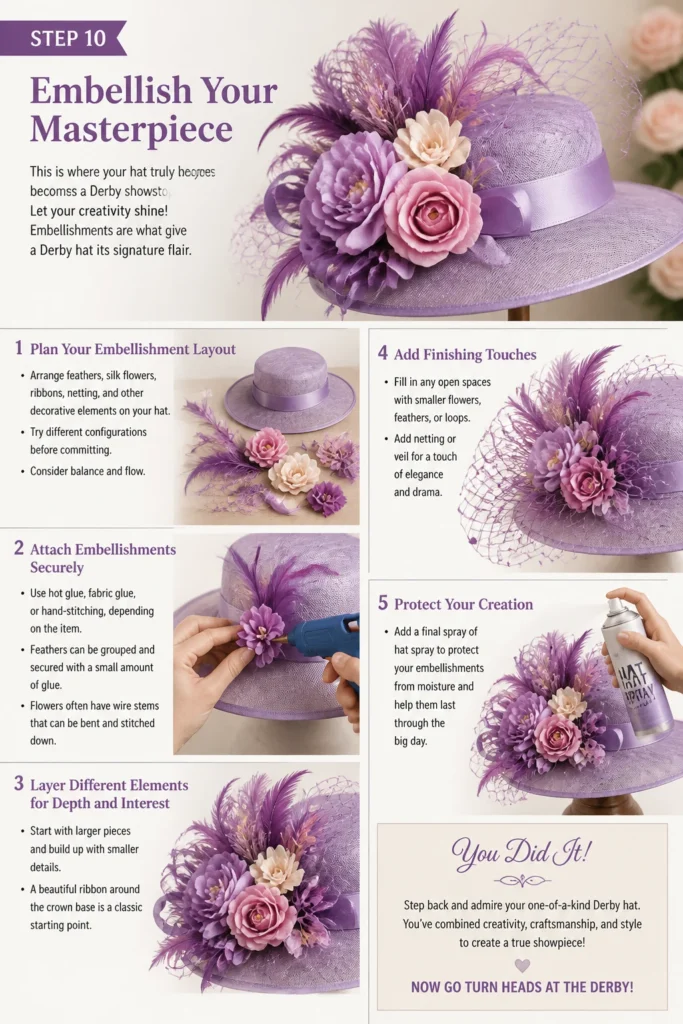
Attach: Embellishments securely. Use hot glue, fabric glue, or hand-stitching, depending on the item. Feathers can be grouped and secured with a small amount of glue. Flowers often have wire stems that can be bent and stitched down.
Layer: Different elements for depth and interest. Start with larger pieces and build up with smaller details. A beautiful ribbon around the crown base is a classic starting point. Add a final spray of hat spray to protect and set your embellishments if desired.
Common Mistakes to Avoid
Rushing the Drying Time
Impatience is a hat maker’s enemy. Buckram and fabric glue need adequate time to dry and cure completely. Rushing this step can lead to a flimsy hat, fabric bubbles, or the hat losing its intended shape. Always allow each glued or shaped component to dry fully, often overnight, before moving to the next step. This patience ensures a strong, lasting structure.
Improper Fabric Grain Alignment
Cutting fabric against the grain or without considering its stretch can result in a hat that looks distorted or wrinkles easily. Fabrics have a natural direction of stretch. Always lay your patterns on the fabric with attention to the grainline, usually parallel to the selvage. This ensures the fabric drapes and shapes correctly, giving your hat a professional and smooth appearance.
Over-gluing or Under-gluing
Using too much glue can saturate the fabric, leaving stiff, visible stains or making the hat heavy. Using too little glue can result in fabric peeling, bubbling, or components detaching. Apply glue sparingly and evenly, spreading it thinly across the buckram. Test glue on a scrap piece of fabric first to understand its absorption and drying properties. A consistent, thin layer is ideal.
Ignoring Wirework Quality
The millinery wire around the brim is crucial for its shape and stability. Sloppy wirework, such as uneven stitching or poorly joined ends, will lead to a wobbly or misshapen brim. Take your time to ensure the wire is securely stitched all the way around, lying flat against the buckram. Overlap wire ends neatly and secure them tightly. This attention to detail prevents drooping and maintains the hat’s elegant silhouette.
Troubleshooting
Hat Feels Flimsy or Loses Shape
If your hat feels less sturdy than desired, it often points back to the buckram drying process or insufficient wiring. Ensure the buckram was fully saturated and completely dry in its desired shape before covering. For brims, reinforce the millinery wire by stitching it more securely or even adding a second layer of wire if the brim is very wide. You can also apply a fabric stiffener to the buckram before covering for extra rigidity.
Fabric Wrinkles or Bubbles After Gluing
This usually happens when the fabric isn’t smoothed properly during application or if too much glue was used. When applying fabric, start from the center and gently smooth outwards, pushing any air bubbles towards the edges. Use a soft cloth or your fingers. If bubbles appear after drying, you can sometimes carefully inject a tiny amount of glue with a syringe and re-smooth, but prevention is key. Ensure your glue application is thin and even.
Embellishments Won’t Stay Attached
The type of adhesive or stitching method might not be strong enough for the embellishment’s weight or material. For heavier items like large flowers, hot glue provides a strong, quick bond, but stitching them directly to the buckram (before lining) offers the best security. For delicate items like netting, fabric glue or small, discreet hand stitches work well. Always test the attachment method on a hidden spot or scrap material first to ensure it holds and doesn’t damage the embellishment.
Key Takeaways
- Plan Your Design: Sketching your hat and choosing materials carefully sets the stage for success.
- Master the Buckram: Proper wetting, shaping, and drying of buckram is fundamental to the hat’s structure.
- Precision in Covering: Smooth, even application of fabric glue and careful trimming prevent wrinkles and ensure a professional finish.
- Secure Wiring: Millinery wire is essential for brim stability; take time to attach it neatly and securely.
- Patience is Key: Allow adequate drying time between steps to ensure durability and prevent shape distortion.
- Embellish Thoughtfully: Arrange and attach decorations with balance and security in mind to create a stunning final piece.
Frequently Asked Questions
Can I use different base materials instead of buckram?
Yes, while buckram is traditional, you can explore other stiffening materials. Sinamay is another popular millinery choice, known for its open weave and flexibility. Heavy interfacing or even plastic canvas can be used for very specific, less traditional designs, but buckram offers the best balance of moldability and rigidity for classic Derby hats.
How do I ensure symmetry in my hat design?
Symmetry starts with your pattern. Use a ruler and compass to draw precise circles and lines. When shaping the buckram brim, fold it in half to check for evenness before it dries completely. For embellishments, place your hat on a stand and step back to view it from all angles. Use a mirror to check the overall balance of your decorative elements.
What fabrics work best for covering a Derby hat?
Light to medium-weight fabrics with some body are ideal. Silk dupioni, linen, shantung, gabardine, and even lightweight felt are excellent choices. Avoid very stretchy knits or overly heavy fabrics that can be difficult to mold and add unnecessary bulk. Consider fabrics that hold a crease well and are easy to glue without showing through.
How should I store my finished Derby hat?
To maintain its shape and protect embellishments, store your Derby hat in a hat box. If a hat box isn’t available, place it on a clean, stable surface or a hat stand, away from direct sunlight and humidity. Stuff the crown with tissue paper to help it retain its form. Avoid stacking other items on top of it, which could crush the brim or decorations.
Our Top Recommended Finds
- Millinery Buckram: Essential for a sturdy, shapable base. Look for medium-weight buckram for versatility.
- Fabric Glue with Precision Applicator: A strong, quick-drying fabric glue with a fine tip allows for neat, controlled application.
- Assorted Millinery Wires: Having a range of gauges (e.g., 18-gauge for brims, finer gauges for shaping embellishments) is incredibly useful.
Your Hat, Your Statement
You’ve now learned the foundational steps to craft a magnificent Derby hat. This isn’t just about following instructions; it’s about infusing your unique style into every stitch and embellishment. Each hat tells a story, and yours is ready to begin.
Why not take your skills further? Explore different brim shapes, experiment with bold color combinations, or try matching your hat to a specific outfit. The world of millinery is vast and full of creative possibilities. Start gathering your materials today and bring your vision to life!