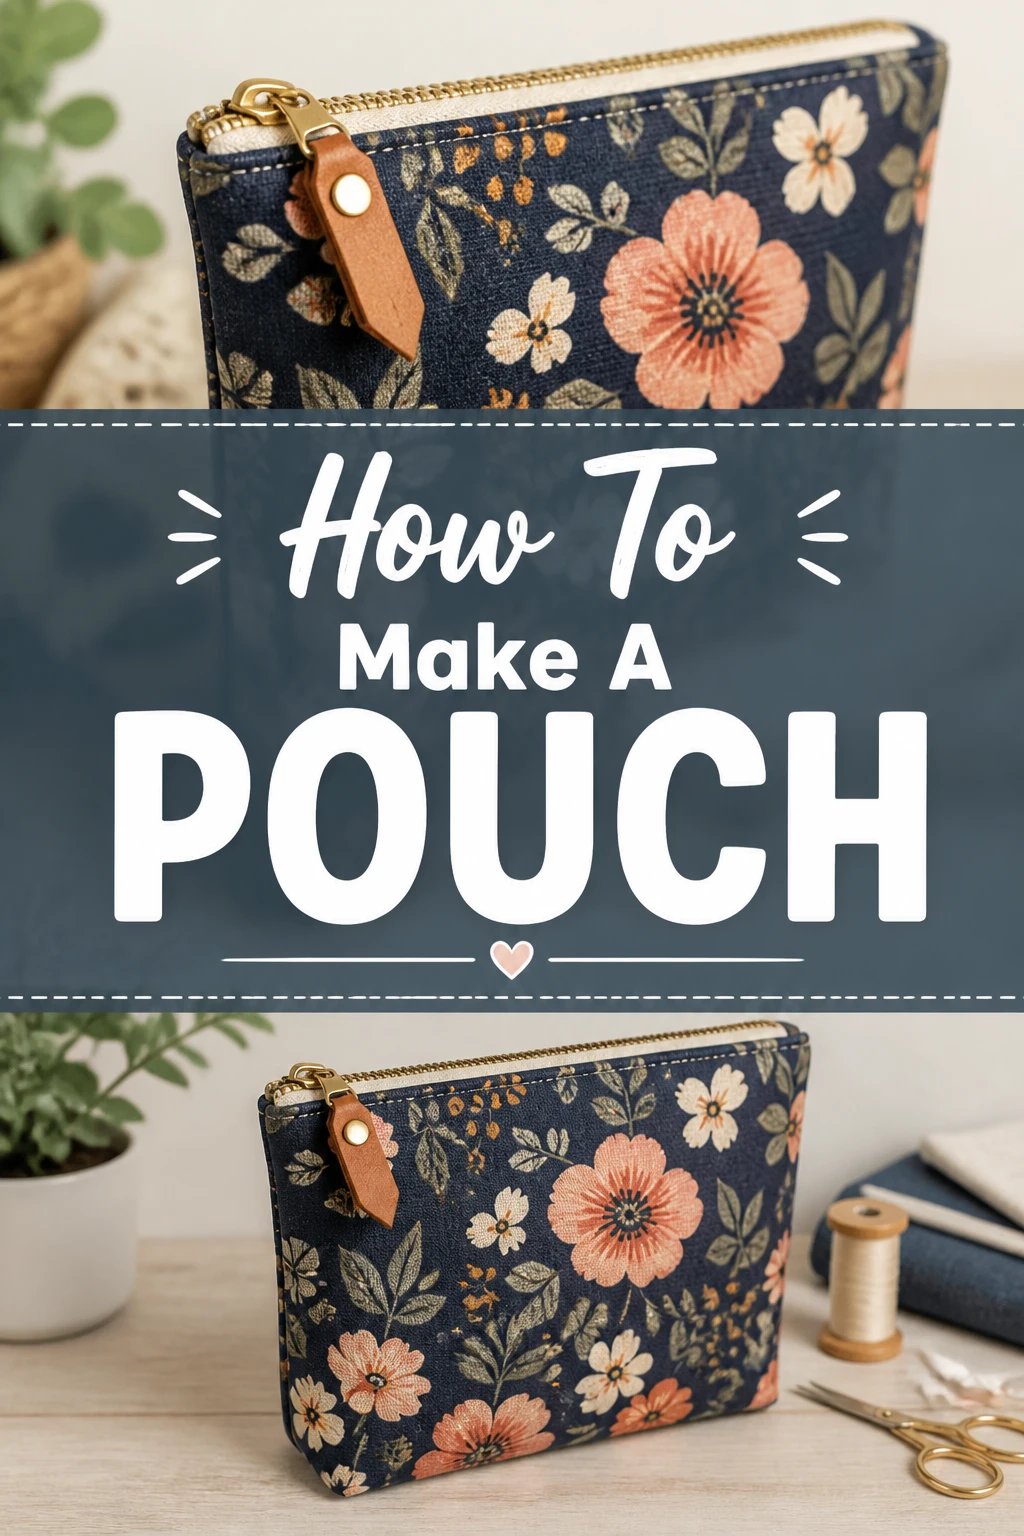
🧵 How To Make A Pouch
I remember making my first pouch out of an old pair of jeans and a salvaged zipper from a broken jacket.
It was a messy, lopsided little thing, but it taught me the fundamentals of construction that I still use today after a decade of sewing professionally.
This guide breaks down the process into manageable pieces so you can create a professional-looking accessory on your very first try without the usual frustration.

Quick Overview
A zippered pouch is the “gateway project” for most sewists because it introduces you to zippers and linings without requiring complex garment fitting.
- Time needed: 45 to 60 minutes
- Difficulty: Beginner
- What you’ll need: Two types of fabric (outer and lining), a nylon zipper, thread, a sewing machine, and basic cutting tools.
Step 1: Select Your Fabric
Choose a medium-weight cotton or canvas for the exterior of your pouch to give it some natural structure.
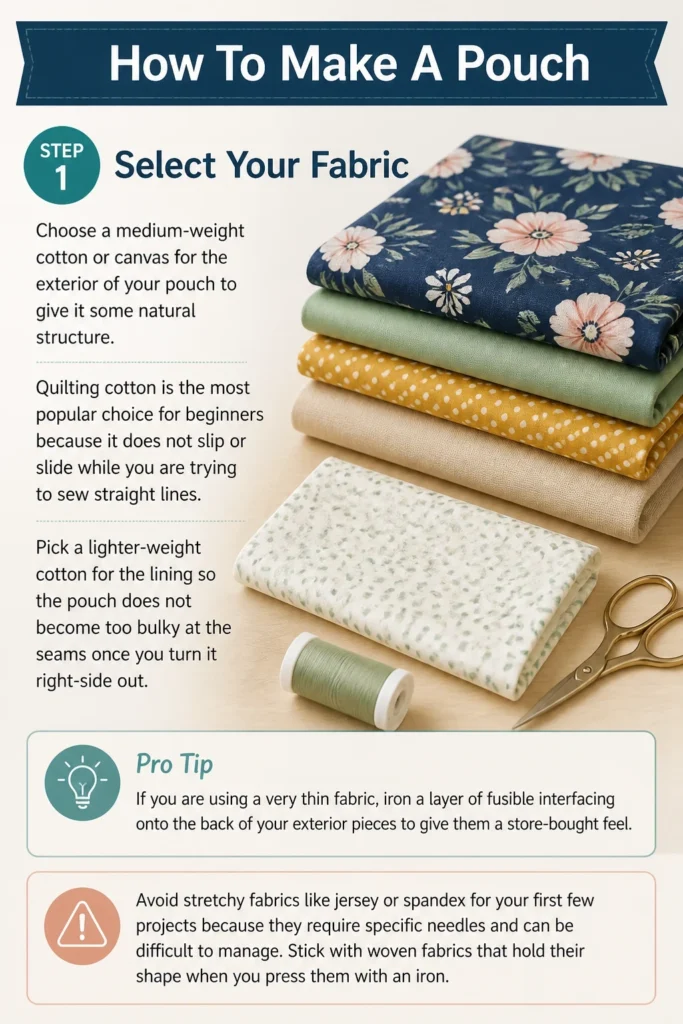
Quilting cotton is the most popular choice for beginners because it does not slip or slide while you are trying to sew straight lines.
Pick a lighter-weight cotton for the lining so the pouch does not become too bulky at the seams once you turn it right-side out.
Pro Tip: If you are using a very thin fabric, iron a layer of fusible interfacing onto the back of your exterior pieces to give them a store-bought feel.
Avoid stretchy fabrics like jersey or spandex for your first few projects because they require specific needles and can be difficult to manage.
Stick with woven fabrics that hold their shape when you press them with an iron.
Step 2: Cut Your Pieces
Measure and cut two rectangles of your exterior fabric and two rectangles of your lining fabric.
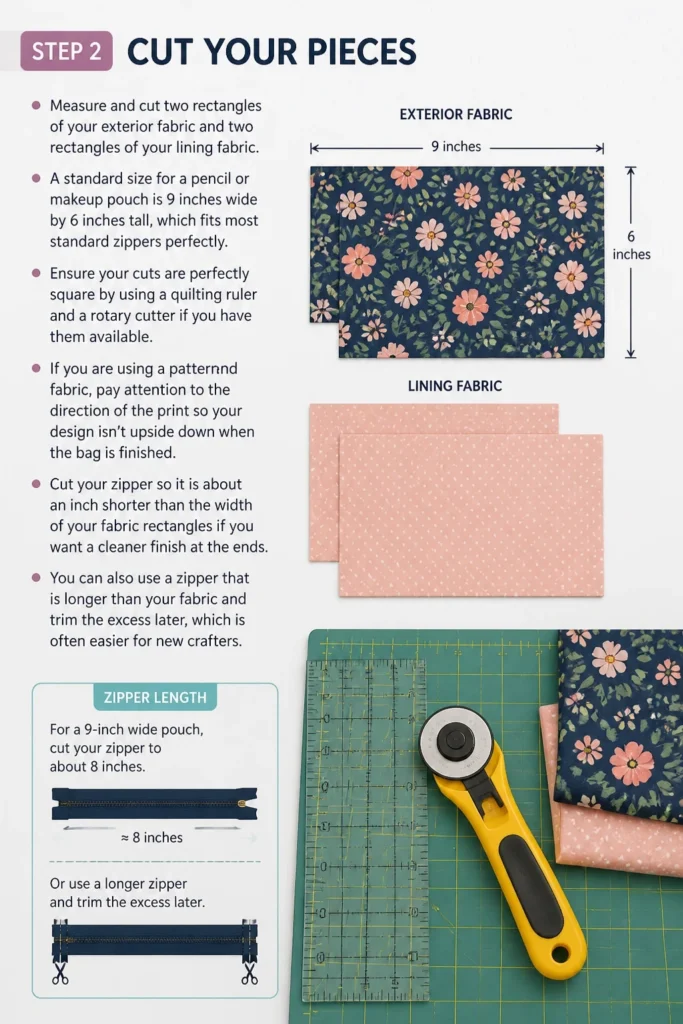
A standard size for a pencil or makeup pouch is 9 inches wide by 6 inches tall, which fits most standard zippers perfectly.
Ensure your cuts are perfectly square by using a quilting ruler and a rotary cutter if you have them available.
If you are using a patterned fabric, pay attention to the direction of the print so your design isn’t upside down when the bag is finished.
Cut your zipper so it is about an inch shorter than the width of your fabric rectangles if you want a cleaner finish at the ends.
You can also use a zipper that is longer than your fabric and trim the excess later, which is often easier for new crafters.
Step 3: Prepare the Zipper
Place your zipper face down on a flat surface to get a feel for how the teeth move and where the stops are located.
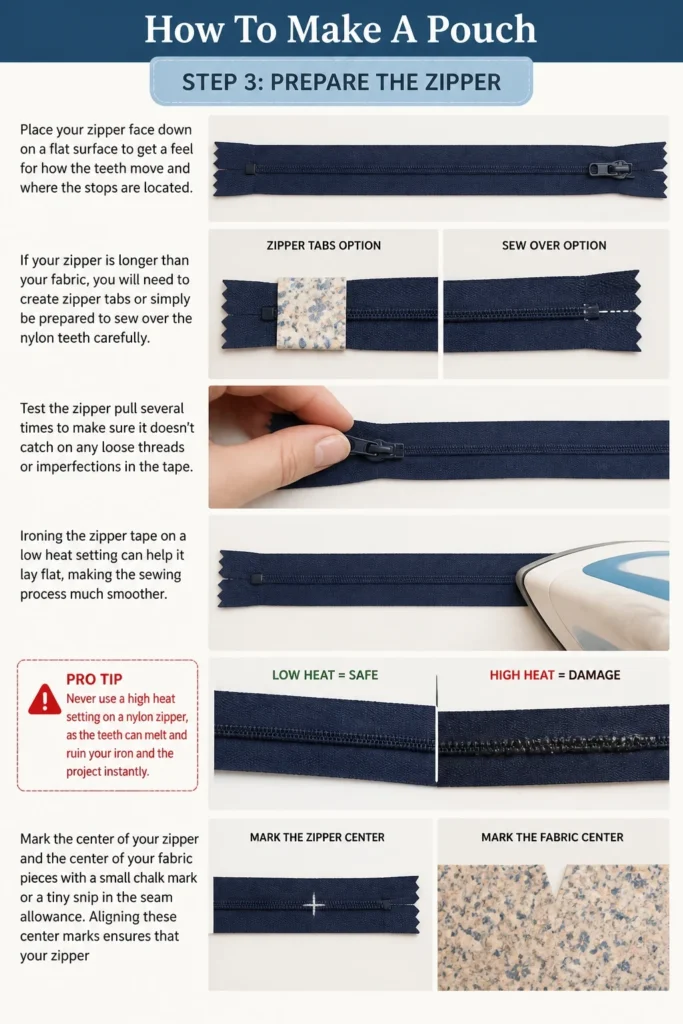
If your zipper is longer than your fabric, you will need to create “zipper tabs” or simply be prepared to sew over the nylon teeth carefully.
Test the zipper pull several times to make sure it doesn’t catch on any loose threads or imperfections in the tape.
Ironing the zipper tape on a low heat setting can help it lay flat, making the sewing process much smoother.
Pro Tip: Never use a high heat setting on a nylon zipper, as the teeth can melt and ruin your iron and the project instantly.
Mark the center of your zipper and the center of your fabric pieces with a small chalk mark or a tiny snip in the seam allowance.
Aligning these center marks ensures that your zipper pull won’t look off-center when the bag is closed.
Step 4: Create the Fabric Sandwich
Lay one piece of your exterior fabric right-side up on your workspace.
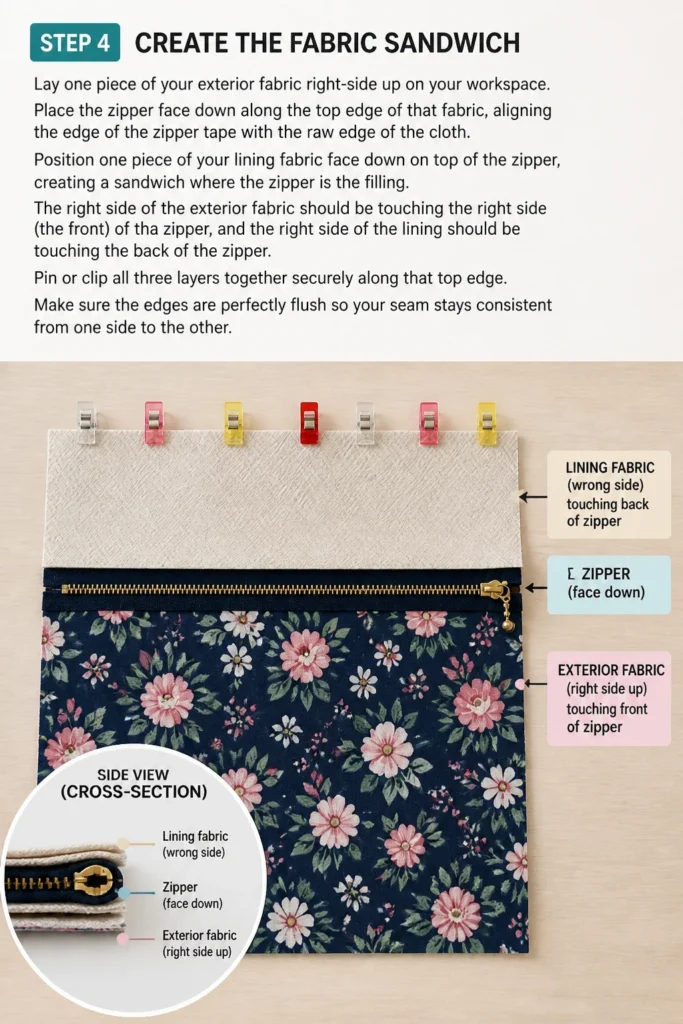
Place the zipper face down along the top edge of that fabric, aligning the edge of the zipper tape with the raw edge of the cloth.
Position one piece of your lining fabric face down on top of the zipper, creating a “sandwich” where the zipper is the filling.
The right side of the exterior fabric should be touching the right side (the front) of the zipper, and the right side of the lining should be touching the back of the zipper.
Pin or clip all three layers together securely along that top edge.
Make sure the edges are perfectly flush so your seam stays consistent from one side to the other.
Step 5: Sew the First Side
Attach your zipper foot to your sewing machine, as this allows you to sew very close to the zipper teeth without the foot getting stuck.
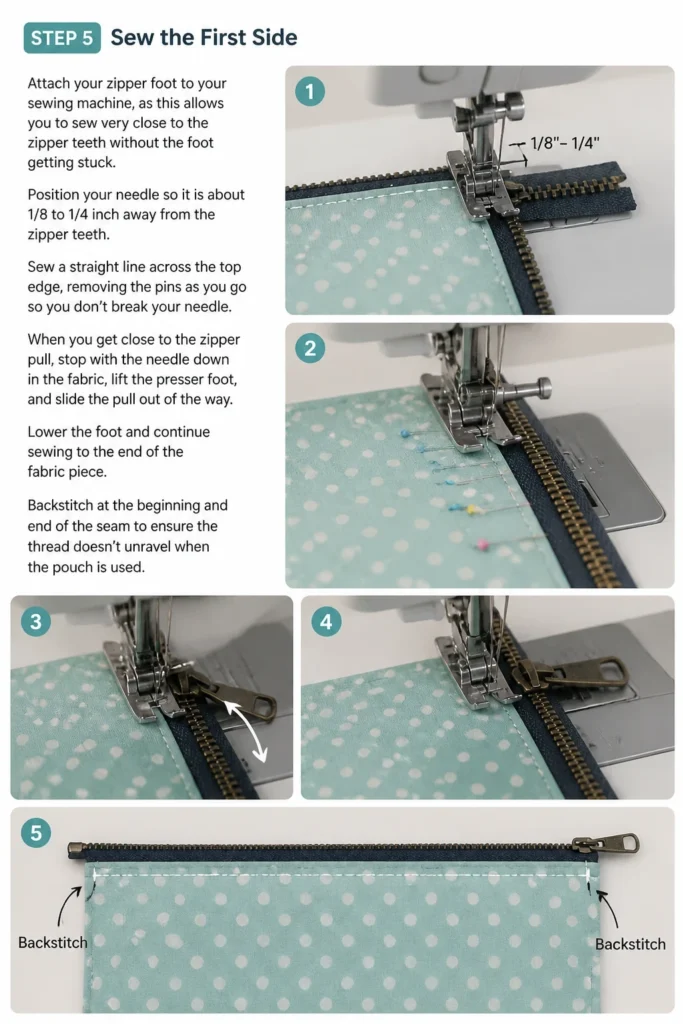
Position your needle so it is about 1/8 to 1/4 inch away from the zipper teeth.
Sew a straight line across the top edge, removing the pins as you go so you don’t break your needle.
When you get close to the zipper pull, stop with the needle down in the fabric, lift the presser foot, and slide the pull out of the way.
Lower the foot and continue sewing to the end of the fabric piece.
Backstitch at the beginning and end of the seam to ensure the thread doesn’t unravel when the pouch is used.
Step 6: Repeat for the Second Side
Fold the fabric pieces you just sewed so they are away from the zipper, revealing the other side of the zipper tape.
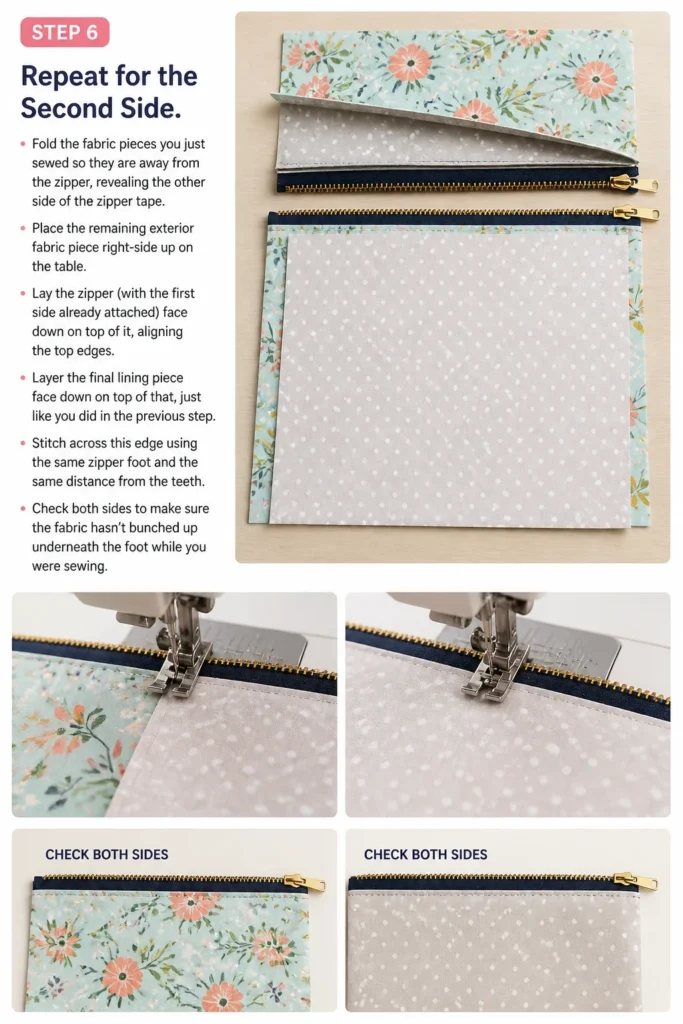
Place the remaining exterior fabric piece right-side up on the table.
Lay the zipper (with the first side already attached) face down on top of it, aligning the top edges.
Layer the final lining piece face down on top of that, just like you did in the previous step.
Stitch across this edge using the same zipper foot and the same distance from the teeth.
Check both sides to make sure the fabric hasn’t bunched up underneath the foot while you were sewing.
Step 7: Press and Topstitch
Open the fabric pieces so the lining pieces are on one side and the exterior pieces are on the other, with the zipper in the middle.
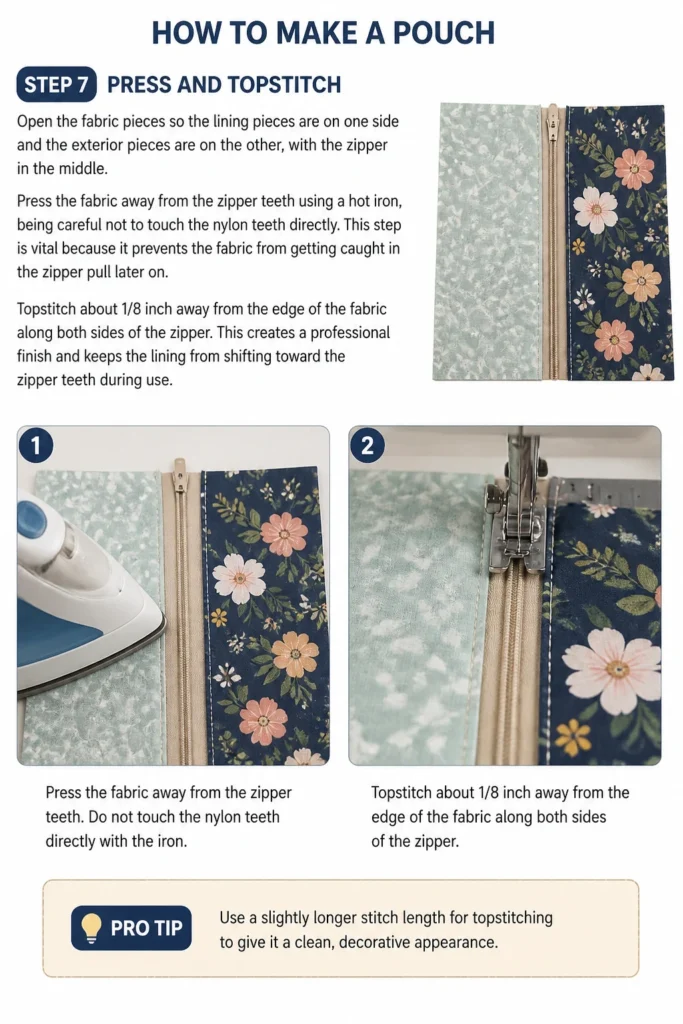
Press the fabric away from the zipper teeth using a hot iron, being careful not to touch the nylon teeth directly.
This step is vital because it prevents the fabric from getting caught in the zipper pull later on.
Topstitch about 1/8 inch away from the edge of the fabric along both sides of the zipper.
This creates a professional finish and keeps the lining from shifting toward the zipper teeth during use.
Pro Tip: Use a slightly longer stitch length for topstitching to give it a clean, decorative appearance.
Step 8: Join the Main Pieces
Open the zipper at least halfway; this is the most important part of the entire process.
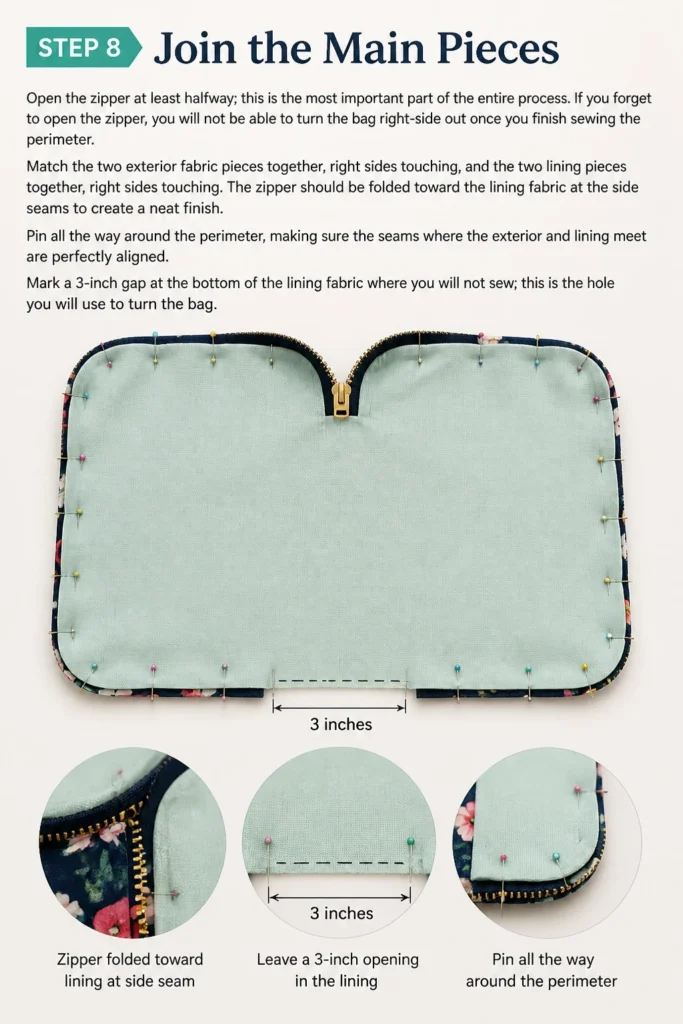
If you forget to open the zipper, you will not be able to turn the bag right-side out once you finish sewing the perimeter.
Match the two exterior fabric pieces together, right sides touching, and the two lining pieces together, right sides touching.
The zipper should be folded toward the lining fabric at the side seams to create a neat finish.
Pin all the way around the perimeter, making sure the seams where the exterior and lining meet are perfectly aligned.
Mark a 3-inch gap at the bottom of the lining fabric where you will not sew; this is the hole you will use to turn the bag.
Step 9: Sew the Perimeter
Stitch around the entire rectangle, starting at one side of the gap you marked in the lining.
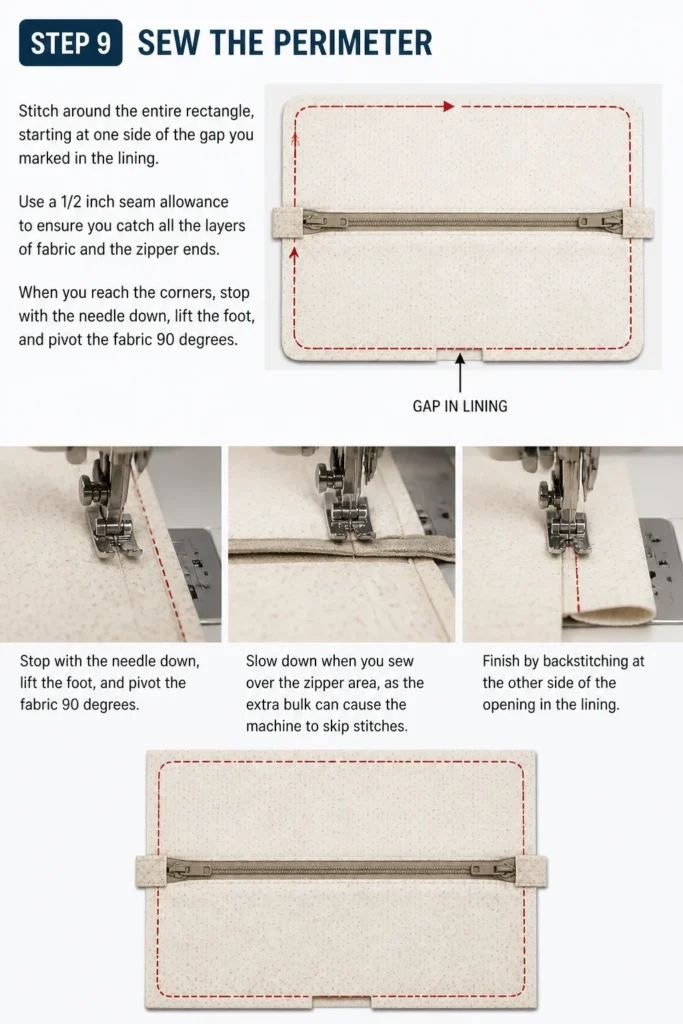
Use a 1/2 inch seam allowance to ensure you catch all the layers of fabric and the zipper ends.
When you reach the corners, stop with the needle down, lift the foot, and pivot the fabric 90 degrees.
Slow down when you sew over the zipper area, as the extra bulk can cause the machine to skip stitches.
Finish by backstitching at the other side of the opening in the lining.
Step 10: Turn and Close
Trim the excess fabric from the corners of the pouch, being careful not to cut through your stitches.
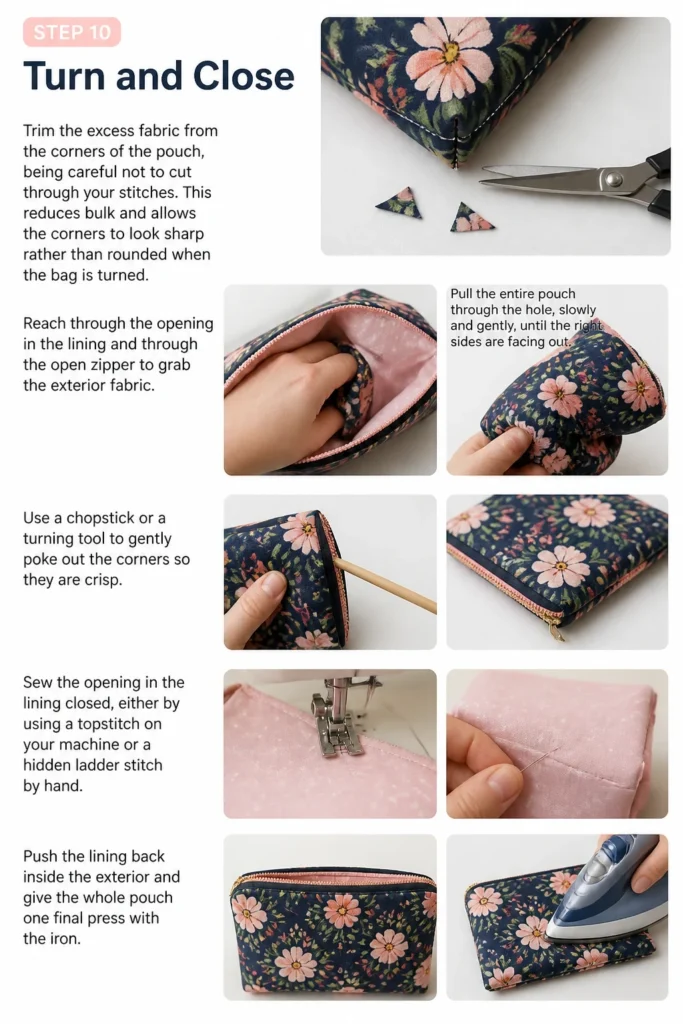
This reduces bulk and allows the corners to look sharp rather than rounded when the bag is turned.
Reach through the opening in the lining and through the open zipper to grab the exterior fabric.
Pull the entire pouch through the hole, slowly and gently, until the right sides are facing out.
Use a chopstick or a turning tool to gently poke out the corners so they are crisp.
Sew the opening in the lining closed, either by using a topstitch on your machine or a hidden ladder stitch by hand.
Push the lining back inside the exterior and give the whole pouch one final press with the iron.
Common Mistakes to Avoid
Forgetting to Open the Zipper
This is the most frequent error for beginners. If the zipper is closed when you sew the perimeter, the pull is trapped inside the “wrong” side of the bag, making it impossible to turn. You will have to use a seam ripper to open the bottom and reach the pull, which can damage your fabric.
Skipping the Ironing Steps
Many new sewists think ironing is optional, but it is actually what separates a homemade-looking project from a professional one. Pressing your seams flat makes the fabric behave and ensures your topstitching is straight. Without ironing, the fabric tends to “bubble” near the zipper, which often leads to the zipper getting stuck.
Using the Wrong Needle
If you are using a heavy canvas for the exterior, a standard universal needle might struggle or even snap. Using a denim or heavy-duty needle ensures the machine can punch through the multiple layers of fabric and zipper tape at the side seams. A dull needle will also cause skipped stitches, which can weaken the structure of your pouch.
Troubleshooting
The Zipper Pull is Stuck
If the zipper won’t move after you turn the bag, a piece of the lining is likely caught in the teeth. Check the inside of the bag to see if the fabric was pressed far enough away from the zipper before topstitching. You can often wiggle the fabric out, but if it is sewn too close, you may need to rip out the topstitching and try again.
Corners are Bunchy and Not Sharp
This usually happens because there is too much fabric left inside the seam allowance at the corners. Go back inside the bag and trim the corners closer to the stitching line, making sure not to cut the thread. Removing that tiny triangle of excess fabric allows the corner to fold flat when it is turned right-side out.
Uneven Side Seams
If the front and back of your pouch don’t line up at the zipper, your fabric shifted during the “sandwich” phase. Use more pins or specialized sewing clips to hold the layers together. You can also use a bit of wash-away sewing tape to stick the zipper to the fabric before you ever get to the machine.
Key Takeaways
- Always use a zipper foot to get close to the teeth for a clean look.
- Interfacing is the secret to making a floppy pouch feel sturdy and high-quality.
- The “sandwich” method ensures all raw edges are hidden inside the lining.
- Leave the zipper half-open before sewing the final perimeter to avoid getting locked out.
- Pressing with an iron is just as important as sewing with a machine.
- Backstitching at every start and stop prevents the pouch from falling apart under stress.
Frequently Asked Questions
Can I make a pouch without a sewing machine?
Yes, you can hand-sew a pouch using a backstitch, which is very strong and mimics the look of a machine stitch. It will take significantly longer, but the construction steps remain exactly the same. Just be sure to keep your stitches small and consistent to ensure the zipper stays secure.
What if my zipper is too long for my fabric?
A zipper that is too long is actually easier to work with than one that is too short. You can sew right over the nylon teeth of a zipper with a standard sewing machine needle. Once you have sewn across the zipper, you can simply cut off the excess length with regular scissors.
Do I have to use a lining?
You can make a single-layer pouch, but the inside will have raw fabric edges that may fray over time. Using a lining hides those edges and makes the pouch much more durable and attractive. It also allows you to use a fun contrasting print on the inside for a pop of color.
What is the best way to clean my fabric pouch?
Most cotton pouches can be tossed in the washing machine on a gentle cycle. However, if you used fusible interfacing, it is better to spot clean or hand wash the pouch. Air dry the pouch and give it a quick press with an iron to restore its shape after it is dry.
Our Top Recommended Finds
- Rotary Cutter and Mat: This tool set allows for much more precise fabric cuts than traditional scissors, which helps your pouch stay perfectly rectangular.
- Wonder Clips: These are often better than pins for pouches because they hold thick layers of fabric and zipper tape together without bending or pricking your fingers.
- Fusible Fleece: If you want a padded pouch for electronics or sunglasses, use this instead of standard interfacing to add a soft, protective layer.
Master Your Craft and Beyond
Now that you have mastered the basic zippered pouch, the possibilities for customization are endless.
You can experiment with different sizes to create everything from tiny coin purses to large laptop sleeves.
Try adding a wrist strap to the side seam or sewing decorative lace over the zipper tape for a vintage look.
The skills you learned today—layering fabric, installing zippers, and turning projects—are the building blocks for more complex bags and garments.
Grab your favorite fabric scraps today and see how many unique designs you can create in a single afternoon.