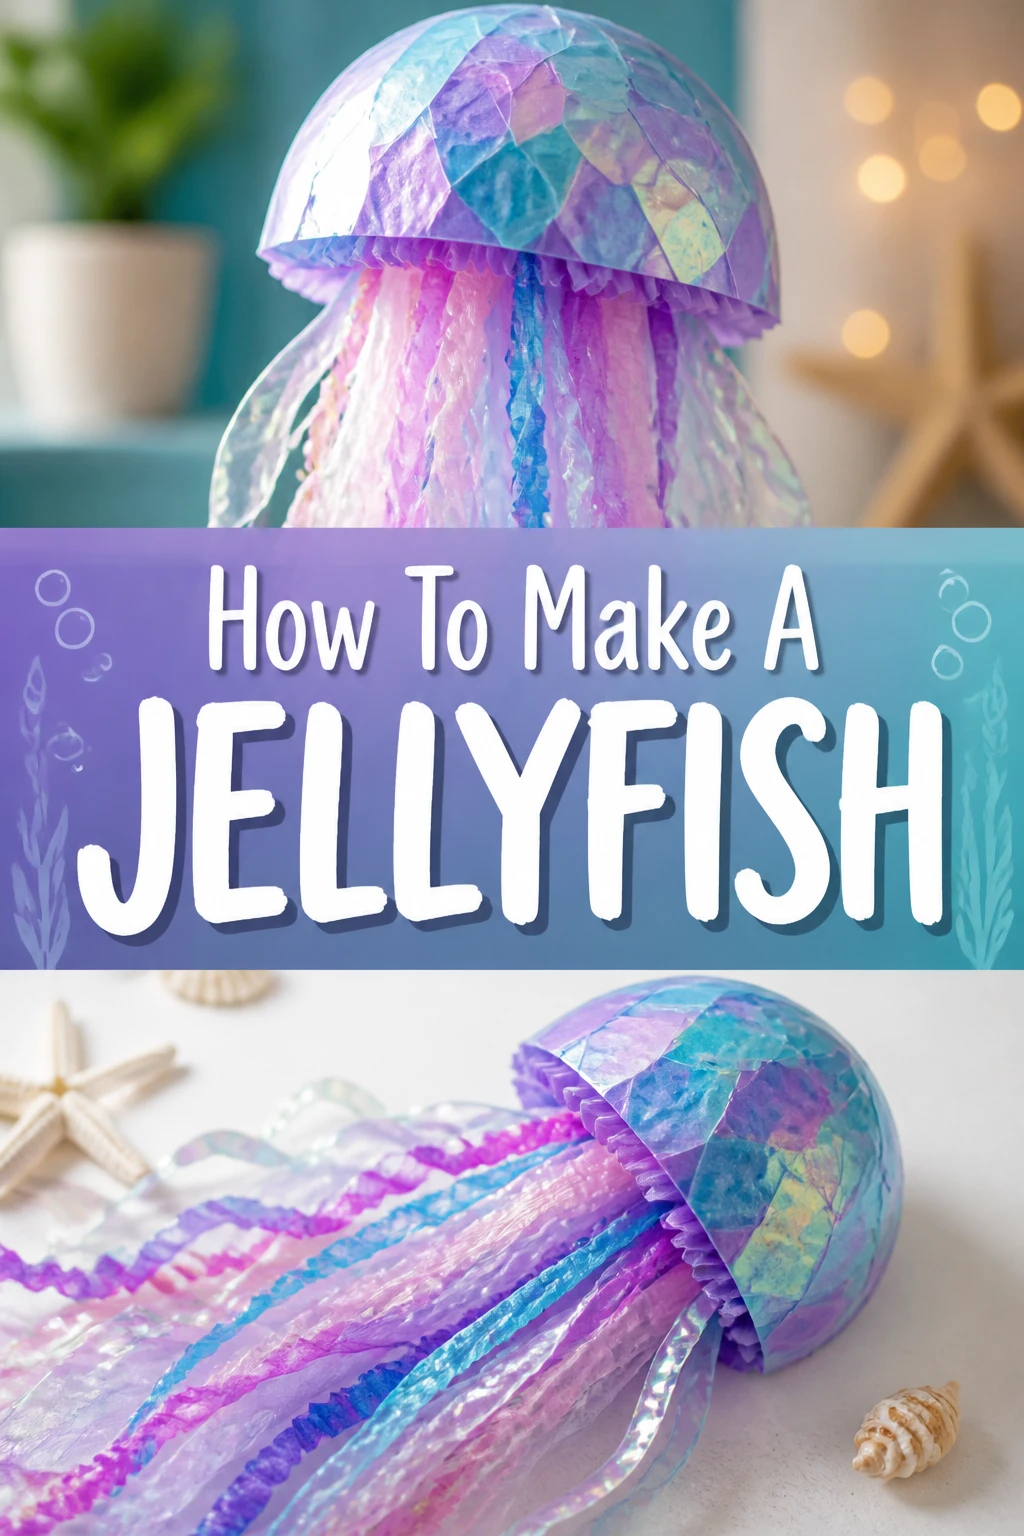
👍 How To Make A Jellyfish
Ever wanted to bring a piece of the serene ocean into your home?
Creating your own captivating jellyfish is a surprisingly simple and deeply rewarding craft project.
Having led numerous craft sessions, I’ve refined this method to ensure you achieve beautiful, long-lasting results every time.
Quick Overview
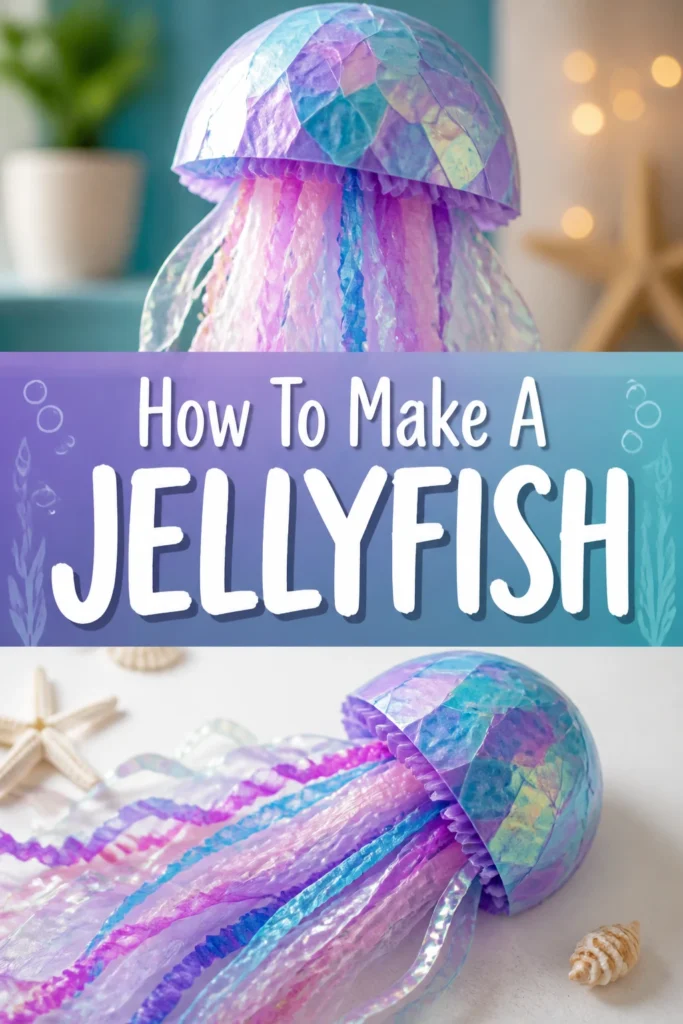
This guide will walk you through crafting a charming jellyfish using everyday materials, perfect for decorating a room or gifting to a friend. You’ll transform a simple plastic bottle into a graceful underwater creature.
- Time needed: 1.5 – 2.5 hours (plus drying time)
- Difficulty: Beginner
- What you’ll need: A clear plastic bottle, plastic bags, scissors, strong clear glue, fishing line, and markers.
Step-by-Step Instructions
Step 1: Gather Your Ocean Craft Supplies
Before you begin, lay out all your materials on a clean, protected surface. This ensures you have everything within reach, making the process smooth and enjoyable.
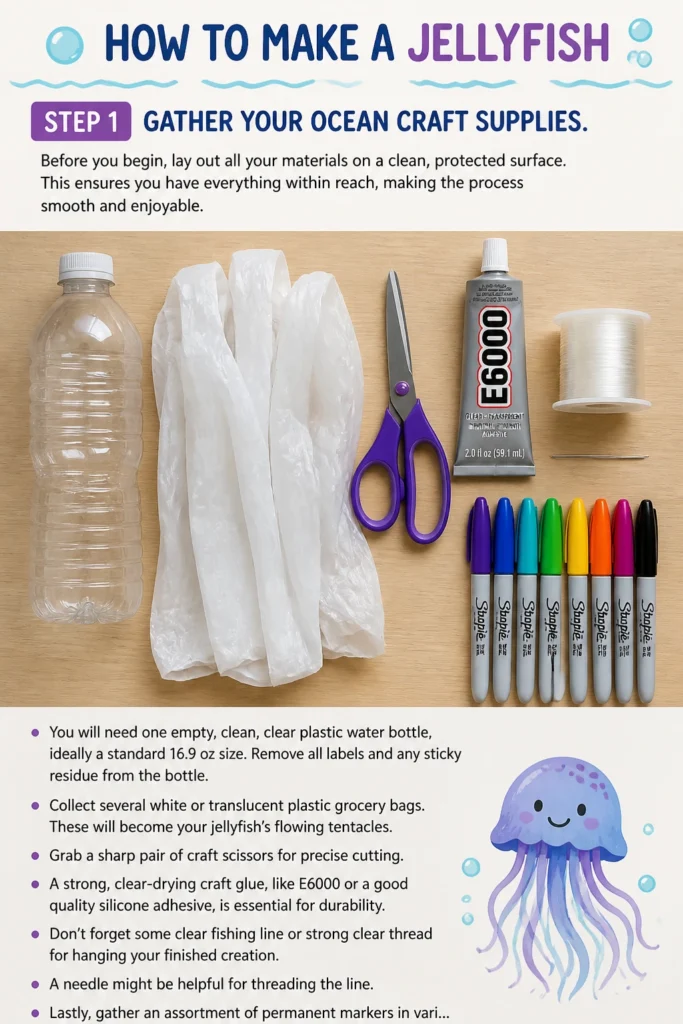
You will need one empty, clean, clear plastic water bottle, ideally a standard 16.9 oz size. Remove all labels and any sticky residue from the bottle.
Collect several white or translucent plastic grocery bags. These will become your jellyfish’s flowing tentacles.
Grab a sharp pair of craft scissors for precise cutting. A strong, clear-drying craft glue, like E6000 or a good quality silicone adhesive, is essential for durability.
Don’t forget some clear fishing line or strong clear thread for hanging your finished creation. A needle might be helpful for threading the line.
Lastly, gather an assortment of permanent markers in various colors for decorating. Googly eyes and glitter are optional additions for extra personality.
Step 2: Prepare the Jellyfish Bell
The plastic bottle will form the main body, or ‘bell,’ of your jellyfish. Start by carefully cutting the bottom off your plastic bottle.
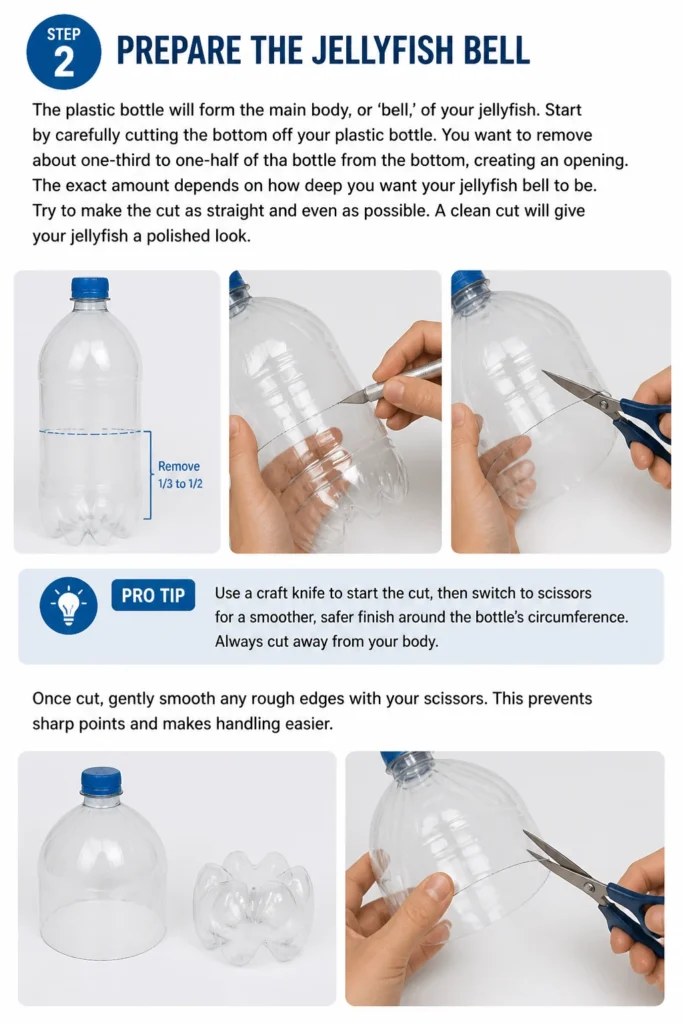
You want to remove about one-third to one-half of the bottle from the bottom, creating an opening. The exact amount depends on how deep you want your jellyfish bell to be.
Try to make the cut as straight and even as possible. A clean cut will give your jellyfish a polished look.
Pro Tip: Use a craft knife to start the cut, then switch to scissors for a smoother, safer finish around the bottle’s circumference. Always cut away from your body.
Once cut, gently smooth any rough edges with your scissors. This prevents sharp points and makes handling easier.
Step 3: Craft the Flowing Tentacles
Now it’s time to bring your jellyfish to life with its iconic tentacles. Take your plastic grocery bags and lay them flat, smoothing out any wrinkles.
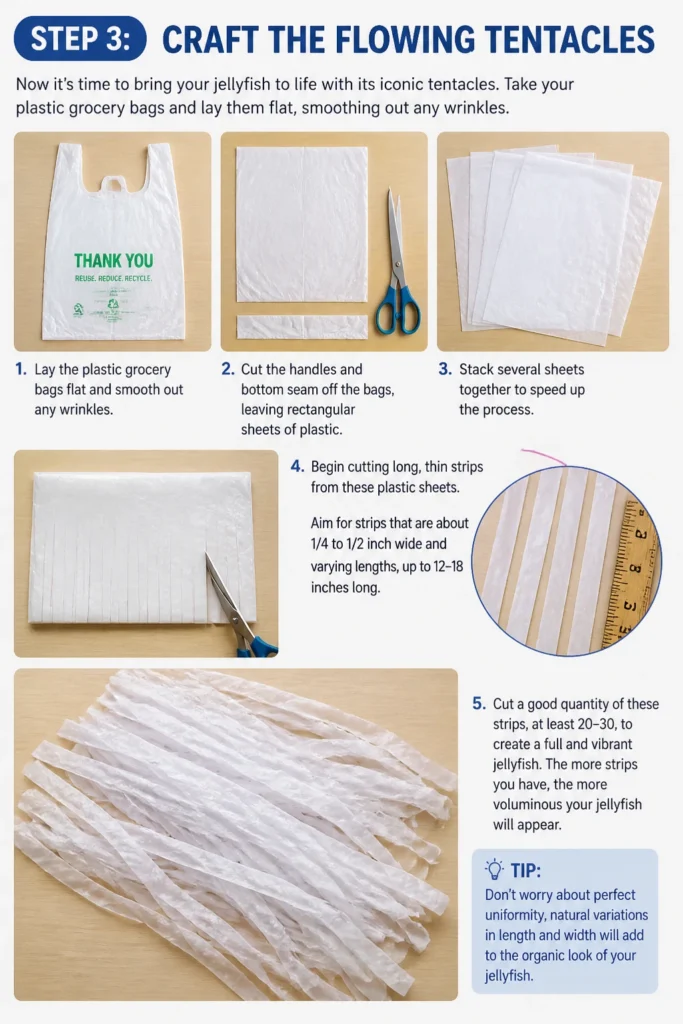
Cut the handles and bottom seam off the bags, leaving you with rectangular sheets of plastic. Stack several sheets together to speed up the process.
Begin cutting long, thin strips from these plastic sheets. Aim for strips that are about 1/4 to 1/2 inch wide and varying lengths, up to 12-18 inches long.
Cut a good quantity of these strips, at least 20-30, to create a full and vibrant jellyfish. The more strips you have, the more voluminous your jellyfish will appear.
Don’t worry about perfect uniformity; natural variations in length and width will add to the organic look of your jellyfish.
Step 4: Attach the Tentacles to the Bell
This step requires a steady hand and a bit of patience. Apply a thin line of strong clear glue along the inside rim of your plastic bottle bell.
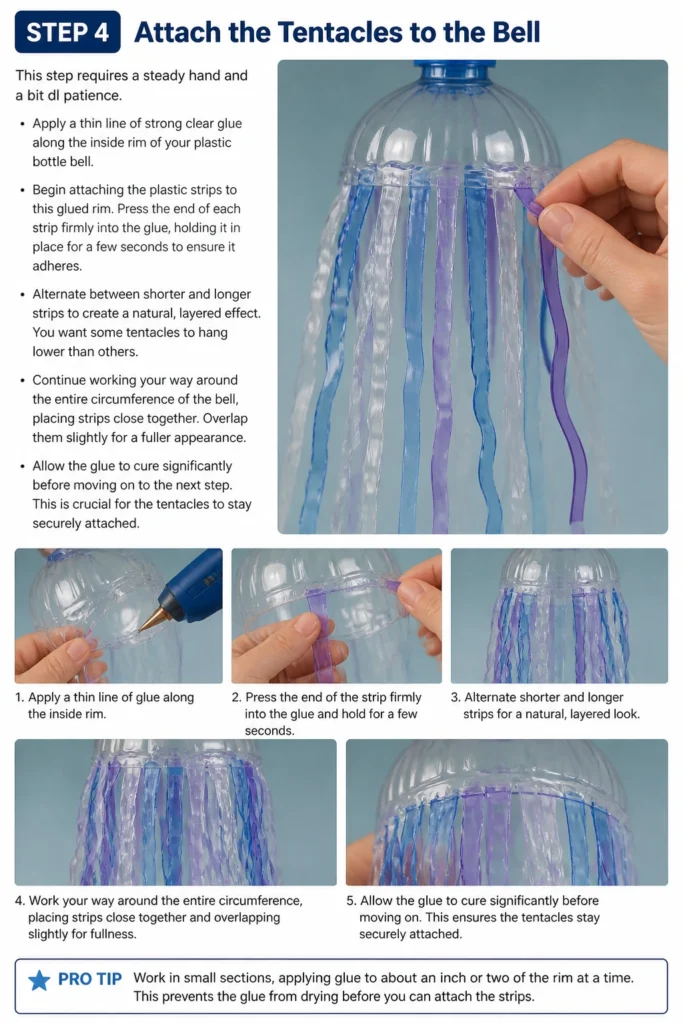
Begin attaching the plastic strips to this glued rim. Press the end of each strip firmly into the glue, holding it in place for a few seconds to ensure it adheres.
Alternate between shorter and longer strips to create a natural, layered effect. You want some tentacles to hang lower than others.
Continue working your way around the entire circumference of the bell, placing strips close together. Overlap them slightly for a fuller appearance.
Allow the glue to cure significantly before moving on to the next step. This is crucial for the tentacles to stay securely attached.
Pro Tip: Work in small sections, applying glue to about an inch or two of the rim at a time. This prevents the glue from drying before you can attach the strips.
Step 5: Create Inner Oral Arms (Optional but Recommended)
To add more depth and realism to your jellyfish, consider adding shorter, thicker ‘oral arms’ inside the bell. These mimic the structures jellyfish use for feeding.
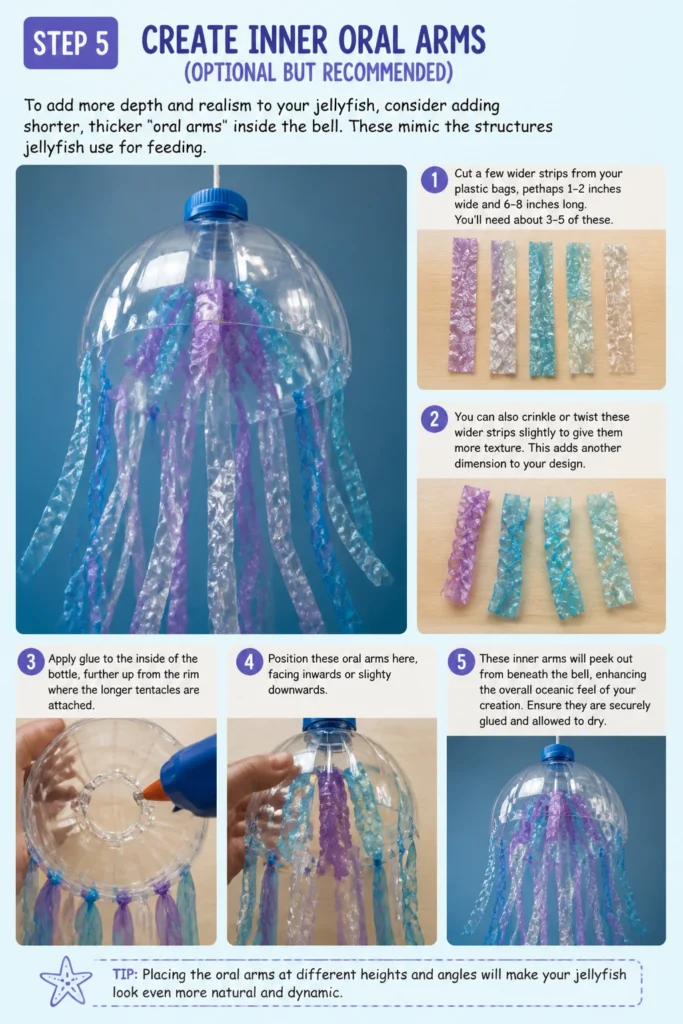
Cut a few wider strips from your plastic bags, perhaps 1-2 inches wide and 6-8 inches long. You’ll need about 3-5 of these.
You can also crinkle or twist these wider strips slightly to give them more texture. This adds another dimension to your design.
Apply glue to the inside of the bottle, further up from the rim where the longer tentacles are attached. Position these oral arms here, facing inwards or slightly downwards.
These inner arms will peek out from beneath the bell, enhancing the overall oceanic feel of your creation. Ensure they are securely glued and allowed to dry.
Step 6: Decorate the Jellyfish Bell
Now for the fun part: personalizing your jellyfish! Use permanent markers to draw patterns, spots, or stripes on the outside of the plastic bottle bell.
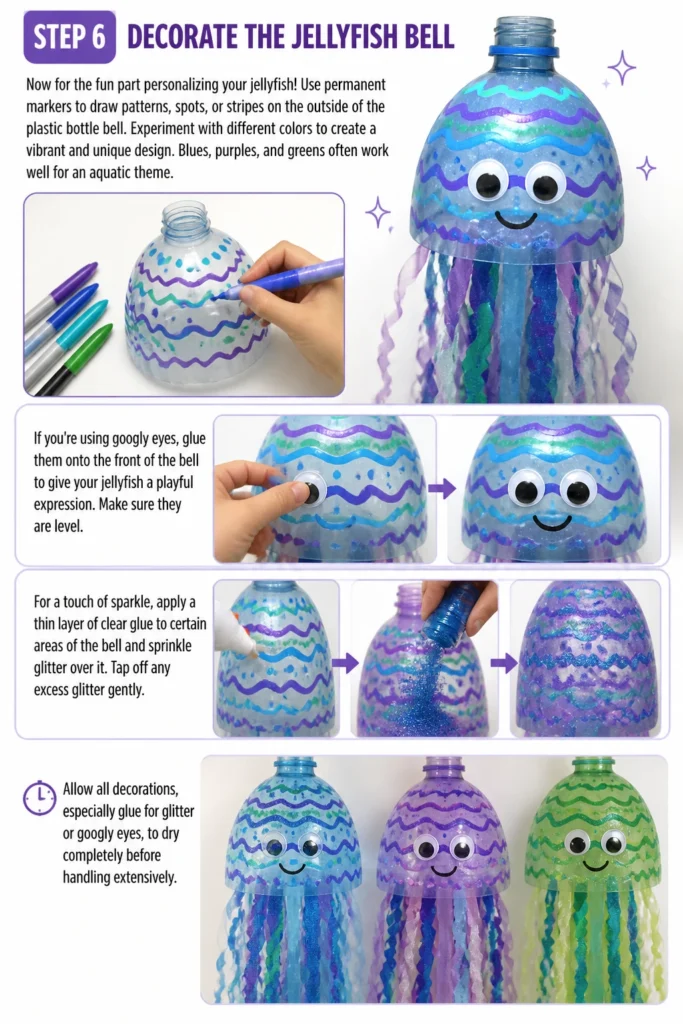
Experiment with different colors to create a vibrant and unique design. Blues, purples, and greens often work well for an aquatic theme.
If you’re using googly eyes, glue them onto the front of the bell to give your jellyfish a playful expression. Make sure they are level.
For a touch of sparkle, apply a thin layer of clear glue to certain areas of the bell and sprinkle glitter over it. Tap off any excess glitter gently.
Allow all decorations, especially glue for glitter or googly eyes, to dry completely before handling extensively.
Step 7: Add Suspension for Display
Your jellyfish is nearly complete; now it needs a way to float! Take a long piece of fishing line or clear thread, about 12-18 inches long.
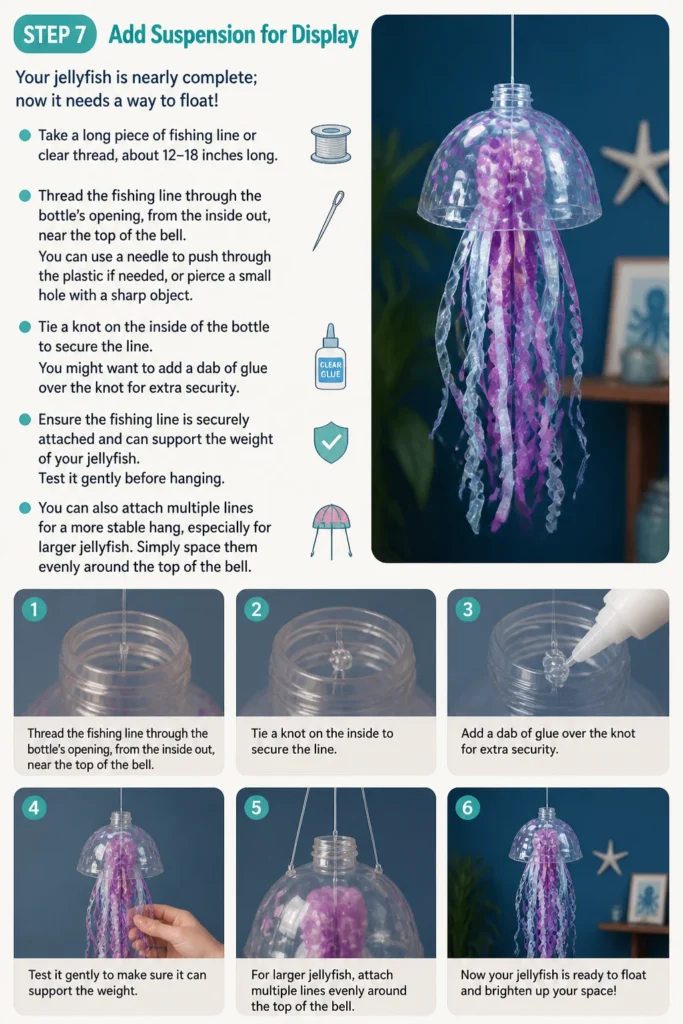
Thread the fishing line through the bottle’s opening, from the inside out, near the top of the bell. You can use a needle to push through the plastic if needed, or pierce a small hole with a sharp object.
Tie a knot on the inside of the bottle to secure the line. You might want to add a dab of glue over the knot for extra security.
Ensure the fishing line is securely attached and can support the weight of your jellyfish. Test it gently before hanging.
You can also attach multiple lines for a more stable hang, especially for larger jellyfish. Simply space them evenly around the top of the bell.
Step 8: Final Drying and Display
Before proudly displaying your new creation, give your jellyfish ample time to dry completely. This ensures all glue has fully cured and decorations are set.
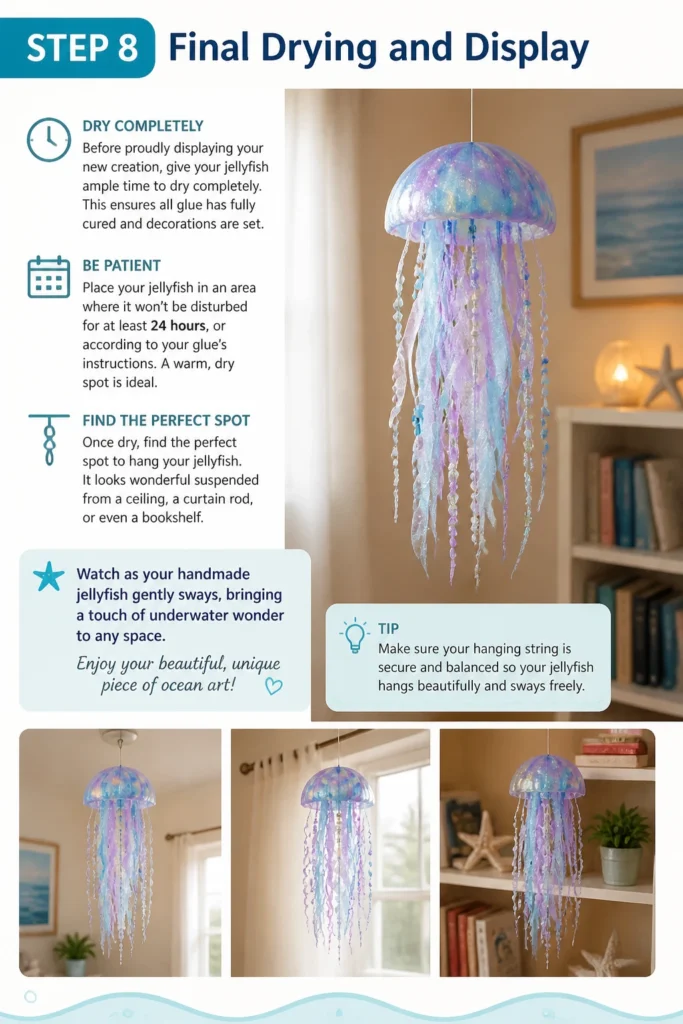
Place your jellyfish in an area where it won’t be disturbed for at least 24 hours, or according to your glue’s instructions. A warm, dry spot is ideal.
Once dry, find the perfect spot to hang your jellyfish. It looks wonderful suspended from a ceiling, a curtain rod, or even a bookshelf.
Watch as your handmade jellyfish gently sways, bringing a touch of underwater wonder to any space. Enjoy your beautiful, unique piece of ocean art!
Common Mistakes to Avoid
Using Weak or Incompatible Glue
A common pitfall is using standard school glue or hot glue for attaching the plastic tentacles. These glues often don’t provide a strong enough bond with the smooth plastic of the bottle and bags.
The tentacles might detach over time, especially if the jellyfish is moved or exposed to slight drafts. Always opt for a strong, clear-drying craft adhesive specifically designed for plastic, such as E6000 or a silicone-based glue, to ensure lasting adhesion.
Uneven Tentacle Placement
Rushing the attachment of tentacles can lead to a lopsided or sparse appearance. If tentacles are not evenly distributed around the bell, one side might look much fuller than the other.
Take your time to space the tentacles consistently, overlapping them slightly where needed, and varying their lengths strategically. This creates a natural, flowing look that mimics real jellyfish.
Over-Decorating the Bell
While decorating is encouraged, applying too much paint, glitter, or too many embellishments can overwhelm the delicate aesthetic of the jellyfish. It can also add unnecessary weight.
Aim for subtle enhancements that complement the translucent nature of the plastic. A few well-placed designs or a sprinkle of glitter can be more effective than an entire layer of decoration.
Rushing the Drying Process
Impatience during drying can compromise the integrity of your jellyfish. If you handle the craft before the glue is fully cured, tentacles can shift or fall off.
Always allow sufficient drying time as recommended by the glue manufacturer. This ensures all components are securely bonded and your jellyfish remains intact for longer.
Troubleshooting
Tentacles Keep Falling Off
If your jellyfish’s tentacles are detaching, the primary issue is likely insufficient adhesion. This can be due to using a weak glue or not allowing enough drying time.
Re-attach the fallen tentacles using a strong, clear-drying craft glue like E6000. Apply a small amount to the tentacle end and firmly press it onto the inside rim of the bell. Hold it in place for a minute and then allow the entire jellyfish to dry undisturbed for at least 24 hours.
Jellyfish Looks Lopsided When Hung
A lopsided jellyfish usually indicates that the suspension line is not centered or the weight distribution is uneven. This can happen if more tentacles are on one side than the other.
Check the placement of your fishing line. If it’s off-center, re-thread it through a new, more central point at the top of the bell. If the issue is weight, try to redistribute or add a few more tentacles to the lighter side to balance it out.
Bell Appears Dull or Uninspired
If your jellyfish bell isn’t as vibrant or interesting as you hoped, it might need a little extra flair. Sometimes the clear plastic can look a bit plain on its own.
Grab your permanent markers and add more intricate patterns, swirls, or dots. You can also carefully apply a thin layer of glitter glue in specific areas for a subtle shimmer. Consider adding a few iridescent stickers or rhinestones for a touch of sparkle that catches the light.
Key Takeaways
- Always use a strong, clear-drying craft glue designed for plastic to ensure tentacles stay secure.
- Take your time when cutting and attaching tentacles to achieve a natural, flowing appearance.
- Decorate the bell thoughtfully, using permanent markers and optional embellishments to personalize your jellyfish.
- Allow ample drying time for all glue and decorations to fully set before hanging.
- Ensure the suspension line is securely attached and centered for a balanced display.
- This craft is a fantastic way to repurpose plastic bottles and bags into beautiful art.
Frequently Asked Questions
Can I use different types of plastic for the tentacles?
Yes, you can experiment with other types of thin, flexible plastic. Clear plastic wrap, thin clear plastic sheeting, or even colorful plastic bags can work. Just ensure the material is light enough to flow freely and can be cut into strips.
How long will my homemade jellyfish last?
With proper care and good quality glue, your plastic bottle jellyfish can last for many years. Keep it out of direct sunlight to prevent the plastic and marker colors from fading over time. Gentle dusting is usually all that’s needed for maintenance.
Is this craft safe for children?
This craft can be suitable for children with adult supervision, especially during the cutting and gluing stages. Use child-safe scissors and non-toxic glue if children are participating. Younger children might enjoy decorating pre-cut bells and tentacles.
Can I make a larger or smaller jellyfish?
Absolutely! You can scale this project up or down by using different sized plastic bottles. A larger soda bottle will create a grander jellyfish, while a small juice bottle can make a delicate mini version. Adjust the length and quantity of tentacles accordingly.
Our Top Recommended Finds
- Precision Craft Scissors: Essential for clean cuts on plastic bottles and bags, making your tentacles look professional.
- Strong Clear Craft Glue (e.g., E6000): Provides a durable, long-lasting bond between different plastics, ensuring your jellyfish stays intact.
- Assorted Permanent Marker Set: Offers a wide range of vibrant colors for decorating your jellyfish bell, allowing for endless creative possibilities.
Unleash Your Inner Ocean Artist
You’ve now mastered the art of creating your very own mesmerizing jellyfish. This project is more than just a craft; it’s an opportunity to bring a piece of the ocean’s tranquility and beauty into your personal space.
Consider making a whole school of jellyfish in varying sizes and colors to create a stunning underwater mobile. Each one will have its own unique personality, reflecting your creative touch.
Why wait? Gather your materials today and start transforming simple items into an enchanting display. Let your imagination flow and dive into the wonderful world of ocean-inspired crafting!