
💡 How To Make A Chandelier
Creating your own chandelier is a truly rewarding project.
It allows you to infuse personal style into your home lighting, transforming a space with a custom piece.
Having crafted several unique light fixtures myself, I know the satisfaction of seeing your design illuminate a room.

Quick Overview
This guide will walk you through the process of designing and building a bespoke chandelier. You’ll learn how to select materials, handle basic wiring, and safely install your dazzling creation.
- Time needed: 8-12 hours (spread over several days for drying times or complex designs)
- Difficulty: Intermediate
- What you’ll need: Frame materials, electrical wire, light sockets, bulbs, decorative elements, basic hand tools, safety gear.
Step-by-Step Instructions
Step 1: Plan Your Vision and Design
Begin by sketching out your chandelier concept. Consider the room size, ceiling height, and desired aesthetic.
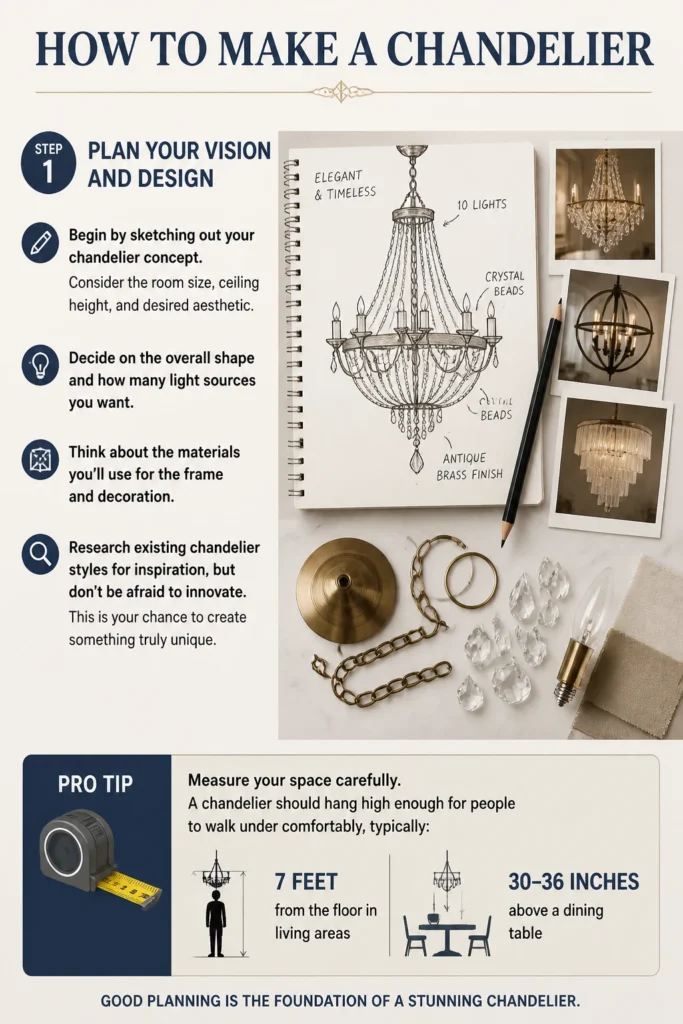
Decide on the overall shape and how many light sources you want. Think about the materials you’ll use for the frame and decoration.
Research existing chandelier styles for inspiration, but don’t be afraid to innovate. This is your chance to create something truly unique.
Pro Tip: Measure your space carefully. A chandelier should hang high enough for people to walk under comfortably, typically 7 feet from the floor in living areas or 30-36 inches above a dining table.
Step 2: Gather Materials and Tools
Compile a comprehensive list based on your design. For the frame, you might choose metal hoops, wood, acrylic, or even repurposed items.
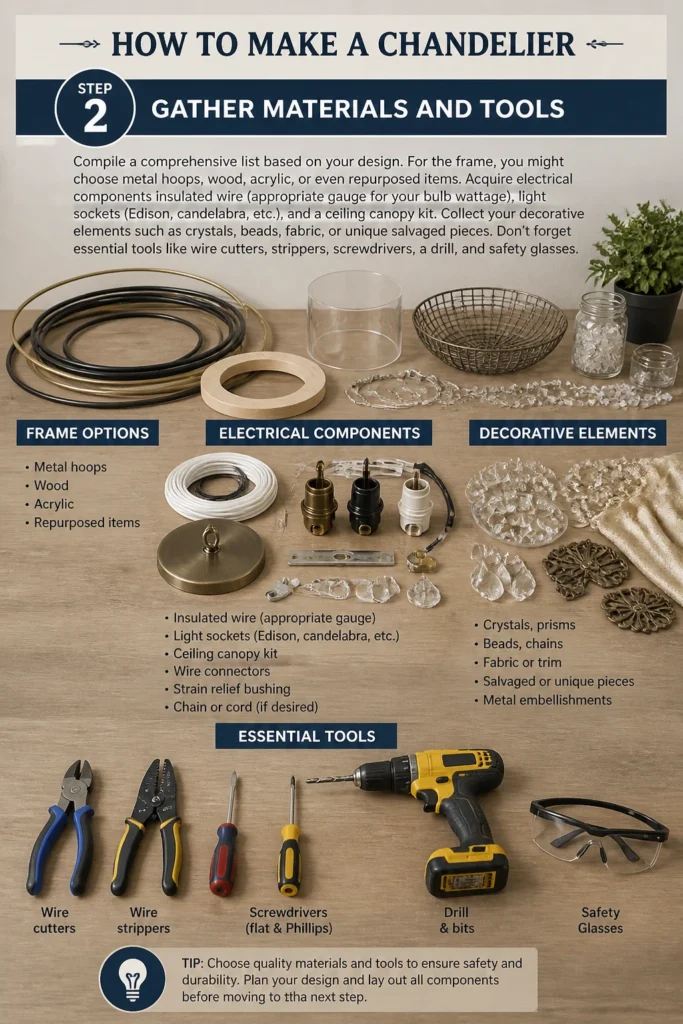
Acquire electrical components: insulated wire (appropriate gauge for your bulb wattage), light sockets (Edison, candelabra, etc.), and a ceiling canopy kit.
Collect your decorative elements such as crystals, beads, fabric, or unique salvaged pieces. Don’t forget essential tools like wire cutters, strippers, screwdrivers, a drill, and safety glasses.
Step 3: Construct the Chandelier Frame
Assemble the main structure of your chandelier. If you’re using metal, you might need to bend or weld pieces together.
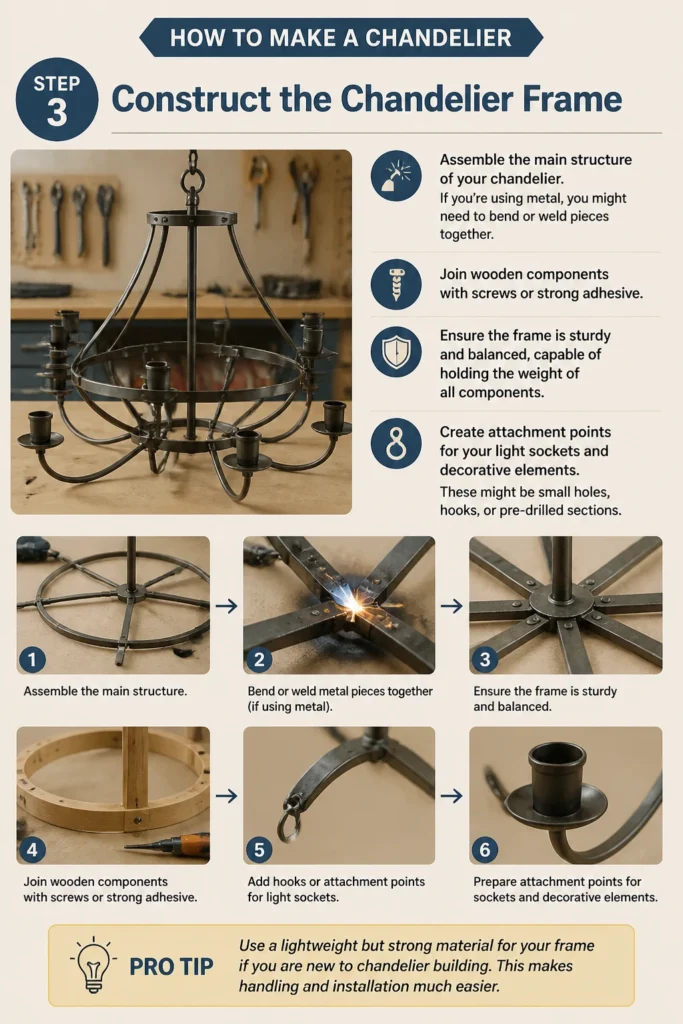
Join wooden components with screws or strong adhesive. Ensure the frame is sturdy and balanced, capable of holding the weight of all components.
Create attachment points for your light sockets and decorative elements. These might be small holes, hooks, or pre-drilled sections.
Pro Tip: Use a lightweight but strong material for your frame if you are new to chandelier building. This makes handling and installation much easier.
Step 4: Wire the Fixture
Cut your electrical wire into appropriate lengths for each light socket, allowing extra for connections.
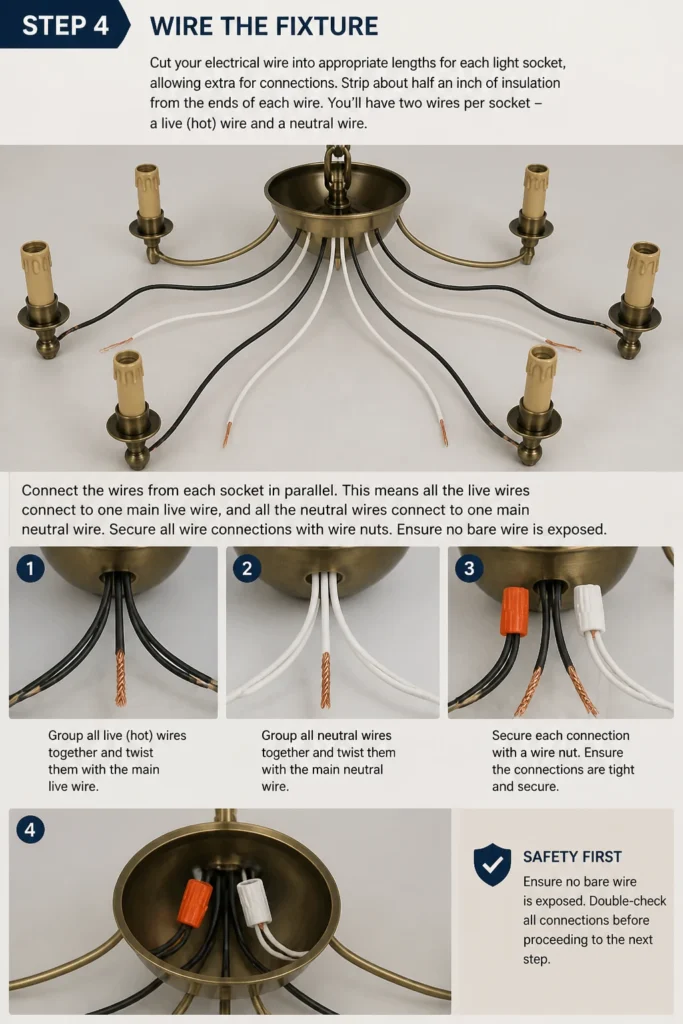
Strip about half an inch of insulation from the ends of each wire. You’ll have two wires per socket: a live (hot) wire and a neutral wire.
Connect the wires from each socket in parallel. This means all the live wires connect to one main live wire, and all the neutral wires connect to one main neutral wire.
Secure all wire connections with wire nuts. Ensure no bare wire is exposed. This step requires careful attention to detail and safety.
Step 5: Install Light Sockets and Bulbs
Mount each light socket securely to your chandelier frame. Make sure they are oriented correctly and firmly attached.
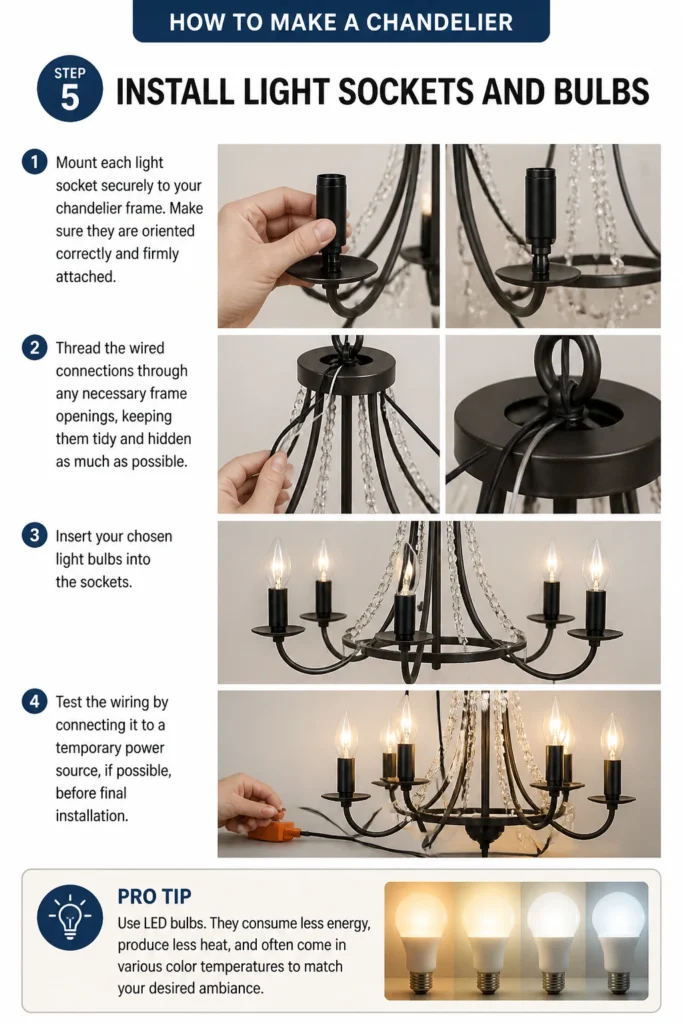
Thread the wired connections through any necessary frame openings, keeping them tidy and hidden as much as possible.
Insert your chosen light bulbs into the sockets. Test the wiring by connecting it to a temporary power source, if possible, before final installation.
Pro Tip: Use LED bulbs. They consume less energy, produce less heat, and often come in various color temperatures to match your desired ambiance.
Step 6: Add Decorative Elements
Attach your chosen decorative elements to the frame. This is where your design truly comes to life.
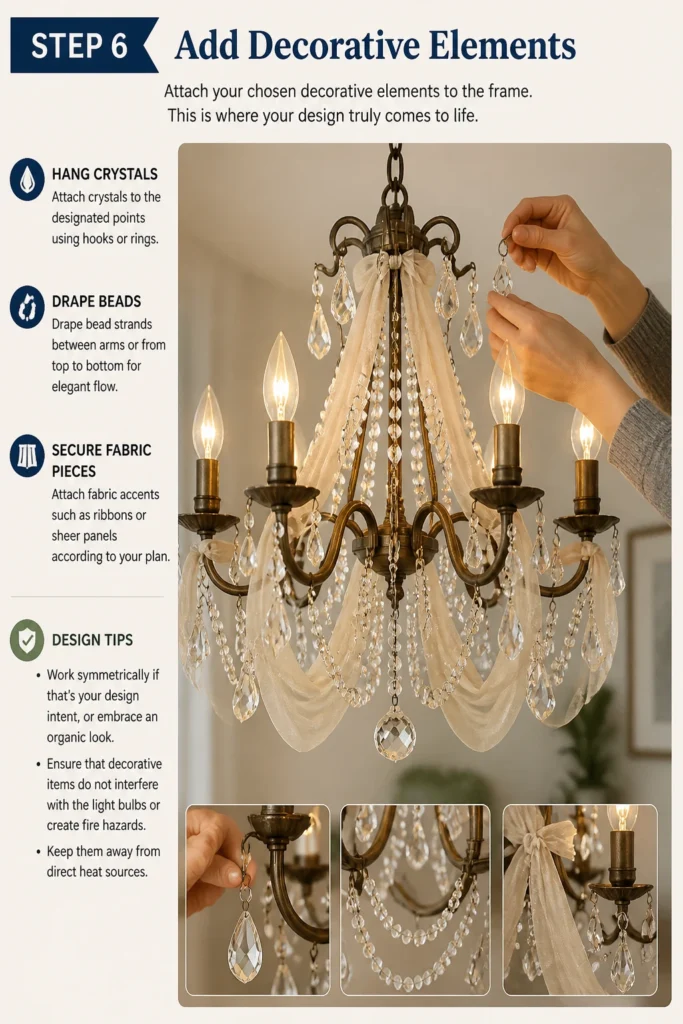
Hang crystals, drape beads, or secure fabric pieces according to your plan. Work symmetrically if that’s your design intent, or embrace an organic look.
Ensure that decorative items do not interfere with the light bulbs or create fire hazards. Keep them away from direct heat sources.
Step 7: Prepare for Installation
Attach the ceiling canopy to the top of your chandelier. This cover hides the wiring connections at the ceiling.
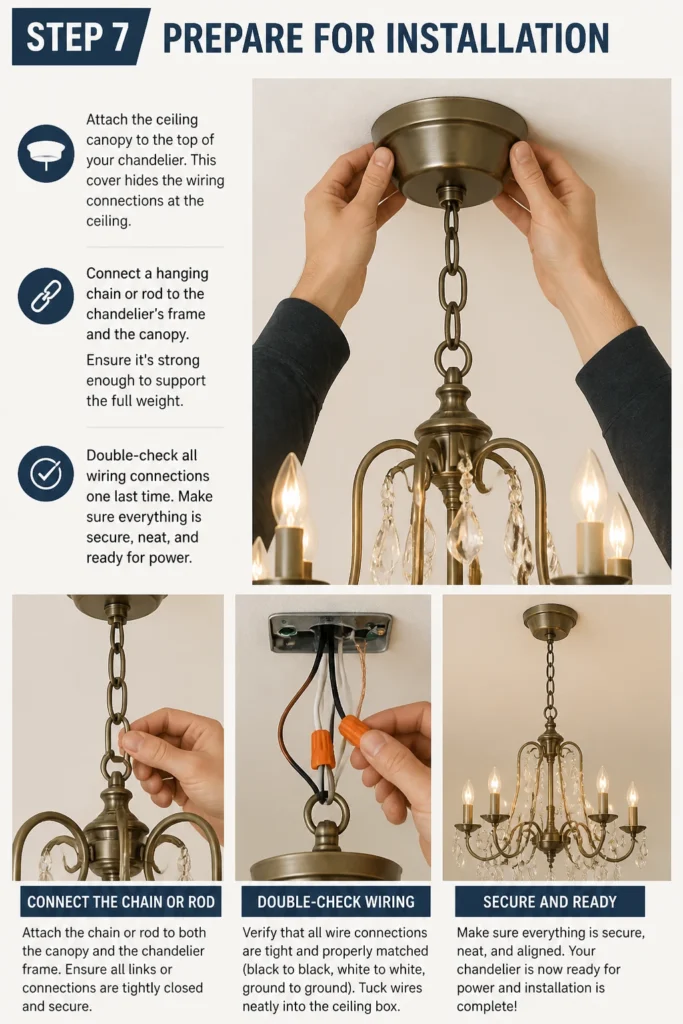
Connect a hanging chain or rod to the chandelier’s frame and the canopy. Ensure it’s strong enough to support the full weight.
Double-check all wiring connections one last time. Make sure everything is secure, neat, and ready for power.
Step 8: Final Installation
Turn off the power to the circuit where you will install the chandelier at your home’s circuit breaker.
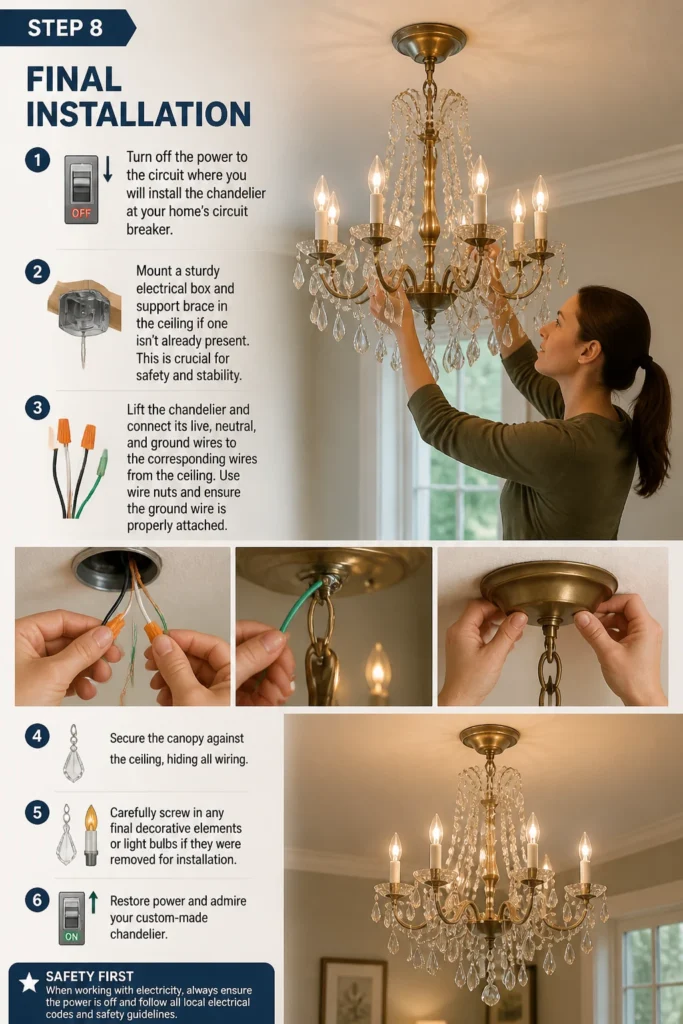
Mount a sturdy electrical box and support brace in the ceiling if one isn’t already present. This is crucial for safety and stability.
Lift the chandelier and connect its live, neutral, and ground wires to the corresponding wires from the ceiling. Use wire nuts and ensure the ground wire is properly attached.
Secure the canopy against the ceiling, hiding all wiring. Carefully screw in any final decorative elements or light bulbs if they were removed for installation.
Restore power and admire your custom-made chandelier.
Common Mistakes to Avoid
Overlooking Electrical Safety
Many DIYers rush the wiring process or neglect to turn off power. This can lead to dangerous shocks or fire hazards. Always double-check connections, use appropriate wire gauges, and ensure the power is off at the breaker before touching any wires.
Poor Planning and Design
Starting without a clear plan often results in a chandelier that doesn’t fit the space or lacks cohesion. Take time in Step 1 to sketch and refine your design, considering all dimensions and aesthetic details. This prevents costly rework and disappointment.
Underestimating Weight and Support
A common error is not accounting for the total weight of the finished chandelier, including all decorative elements and bulbs. Ensure your frame is robust, your hanging mechanism is heavy-duty, and your ceiling electrical box is rated to support the load. A falling chandelier is a serious hazard.
Rushing the Decorative Phase
While exciting, hurrying through the decorative phase can lead to an unfinished or messy look. Take your time to evenly space elements, secure them properly, and ensure they complement the overall design. Patience here yields a more polished result.
Troubleshooting
Lights Not Turning On
First, check your circuit breaker to ensure the power is on. Next, verify that all light bulbs are screwed in tightly and are not burnt out. If issues persist, carefully re-check all wire connections within the chandelier and at the ceiling for any loose or incorrect wiring. A non-contact voltage tester can help pinpoint where power is stopping.
Chandelier Hangs Unevenly
This usually indicates an imbalance in the chandelier’s weight distribution or an improperly installed hanging mechanism. Check if all decorative elements are evenly distributed. Also, ensure the hanging chain or rod is centered and securely attached to both the chandelier frame and the ceiling mount. Adjusting the chain links or re-centering the mounting plate can often resolve this.
Flickering Lights
Flickering lights can be caused by loose bulb connections, incompatible dimmer switches, or faulty wiring. Try tightening all bulbs. If you’re using a dimmer, ensure your bulbs are dimmable and that the dimmer switch is rated for LED or the bulb type you’re using. If neither of these is the cause, a loose wire connection either within the chandelier or at the ceiling box might be the culprit, requiring a careful inspection.
Key Takeaways
- Thorough planning and design are crucial for a successful and aesthetically pleasing chandelier.
- Prioritize electrical safety by turning off power and ensuring all wiring is correct and secure.
- Select appropriate materials for both the frame and decorative elements, considering weight and durability.
- Test your wiring before final installation to catch any issues early.
- Take your time with both the construction and decoration phases for a polished, professional look.
- Always ensure your ceiling support can safely bear the chandelier’s full weight.
Frequently Asked Questions
Can I use any material for the frame?
While you can be creative, the frame material must be strong enough to support the entire fixture and non-combustible or treated to be fire-resistant, especially near light sockets and bulbs. Wood, metal, and certain plastics are common, but always consider safety and weight.
Do I need an electrician?
If you’re comfortable with basic household wiring and follow safety guidelines, you can often wire and install a simple chandelier yourself. However, if you’re unsure about any electrical work, or if your home’s wiring needs updating, it’s always best to consult or hire a qualified electrician for safety and peace of mind.
How heavy can my chandelier be?
The maximum weight depends on your ceiling’s electrical box and joist support. Standard electrical boxes typically support up to 50 pounds, but heavier fixtures require a brace or direct attachment to a ceiling joist. Always check your box’s rating and reinforce if necessary.
What kind of bulbs should I use?
LED bulbs are highly recommended for their energy efficiency, long lifespan, and low heat emission. Choose bulbs with the correct base type for your sockets (e.g., E26, E12) and a wattage appropriate for your fixture and desired brightness. Consider color temperature (warm white, cool white) to match your room’s ambiance.
Our Top Recommended Finds
- Wire Strippers & Crimpers: Essential for safely preparing wires and securing connections.
- Non-Contact Voltage Tester: A vital safety tool to confirm power is off before handling wires.
- Heavy-Duty Ceiling Hook Kit: Ensures secure installation for heavier chandeliers, often including a brace for joist attachment.
Crafting Your Signature Glow
Building a chandelier is more than just an assembly task; it’s an opportunity to create a functional piece of art for your home.
The satisfaction of seeing your design illuminate a space is immense, a testament to your creativity and effort.
Don’t wait to bring your unique vision to light. Gather your materials and begin crafting your custom chandelier today.