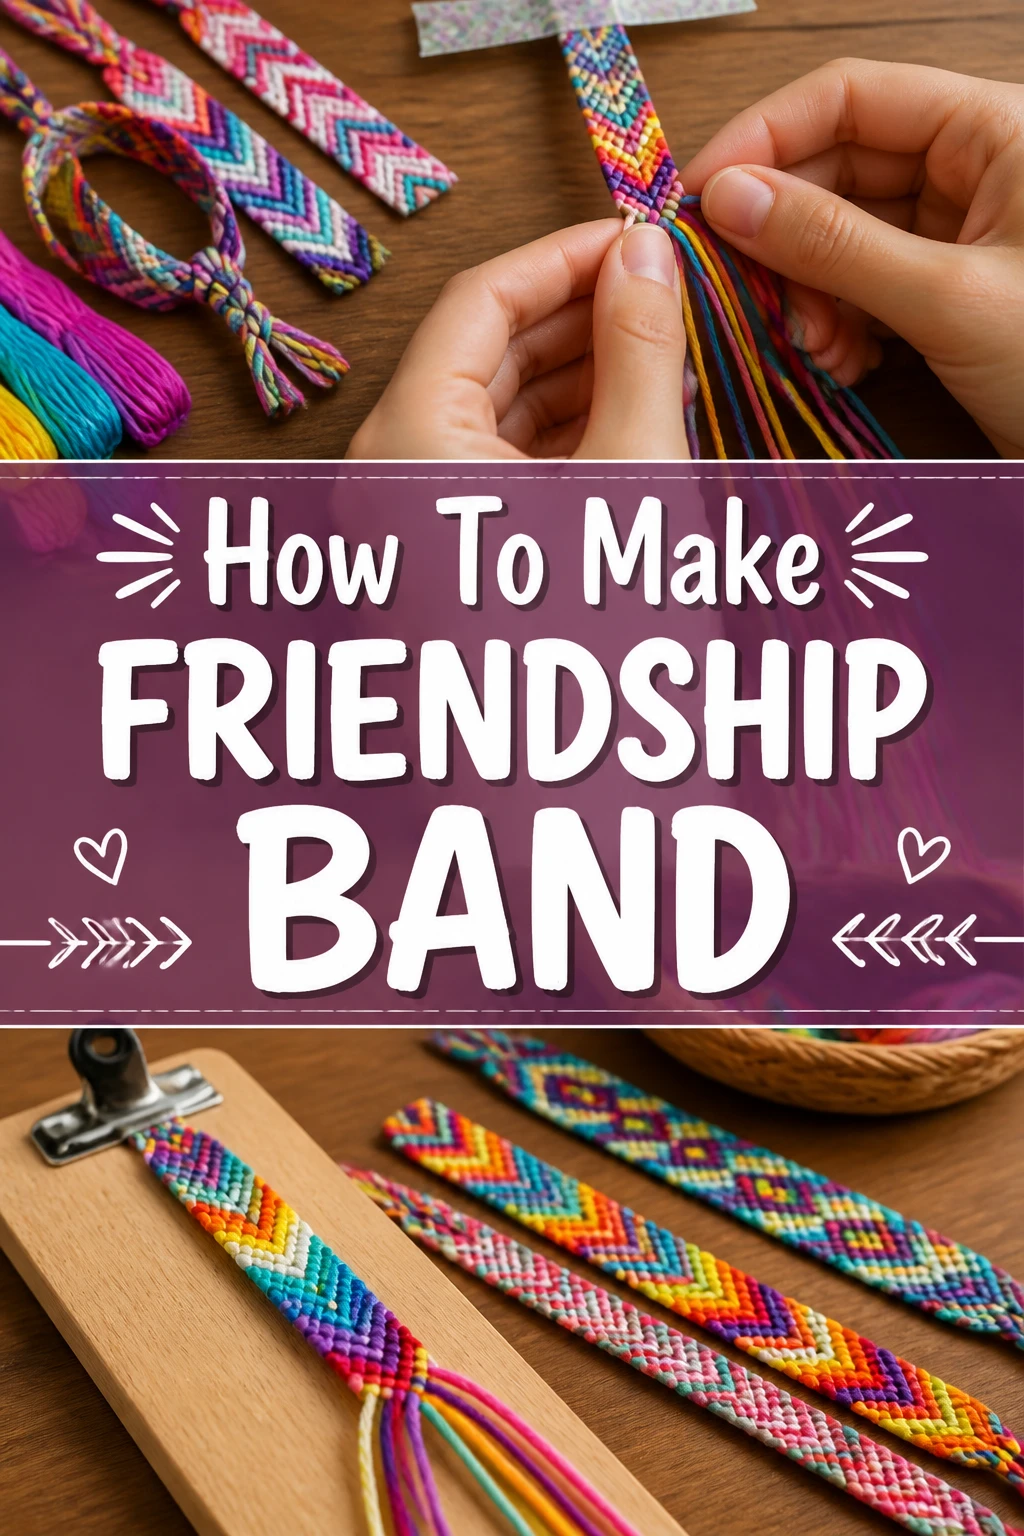
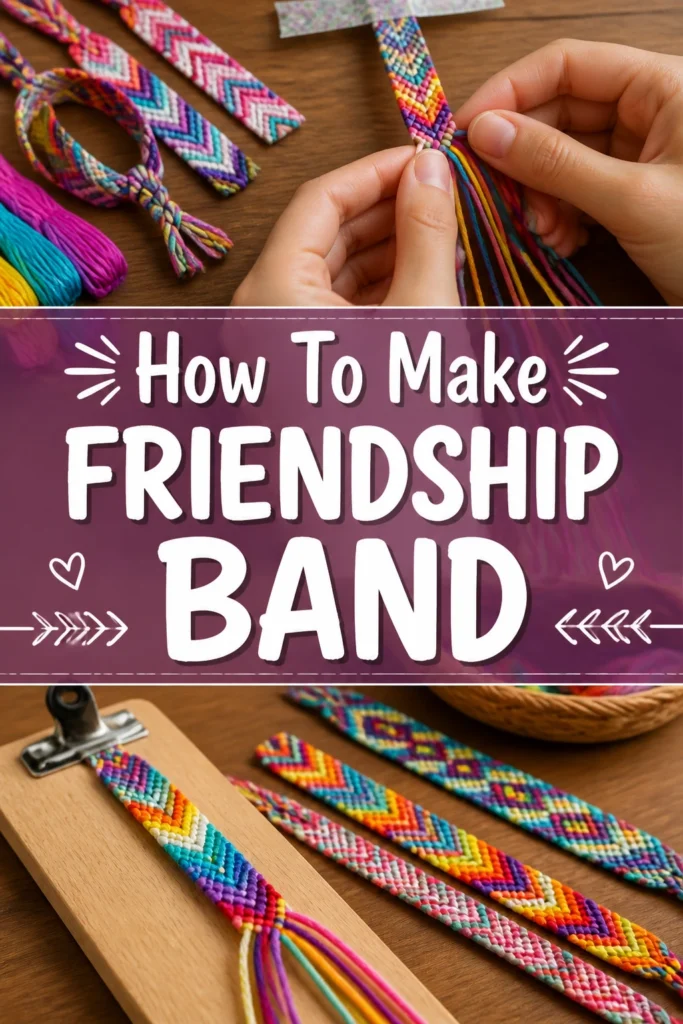
🧵 How To Make Friendship Band
Making friendship bands has always been a cherished memory for me. I spent countless afternoons as a kid, tangled in colorful threads, creating tiny tokens of affection for my friends. This guide will share all the tips and tricks I learned, helping you craft beautiful, meaningful bands with ease. You can trust these steps, refined through years of practice, to lead you to a perfect creation.
Quick Overview
Crafting a friendship band is a wonderful way to express affection and creativity. You’ll learn the fundamental knots to create a classic diagonal stripe pattern. This project is both relaxing and rewarding, perfect for gifting.
- Time needed: 1-3 hours (depending on length and complexity)
- Difficulty: Beginner
- What you’ll need: Embroidery floss, scissors, tape or a clipboard
Step-by-Step Instructions
Step 1: Gather Your Materials
Before you begin knotting, it is important to have all your supplies organized. This prevents interruptions and makes the process smoother. Choose your colors carefully as they will define your band’s look.
Select your embroidery floss. You will need at least four different colors for a basic diagonal stripe pattern, but more can be used.
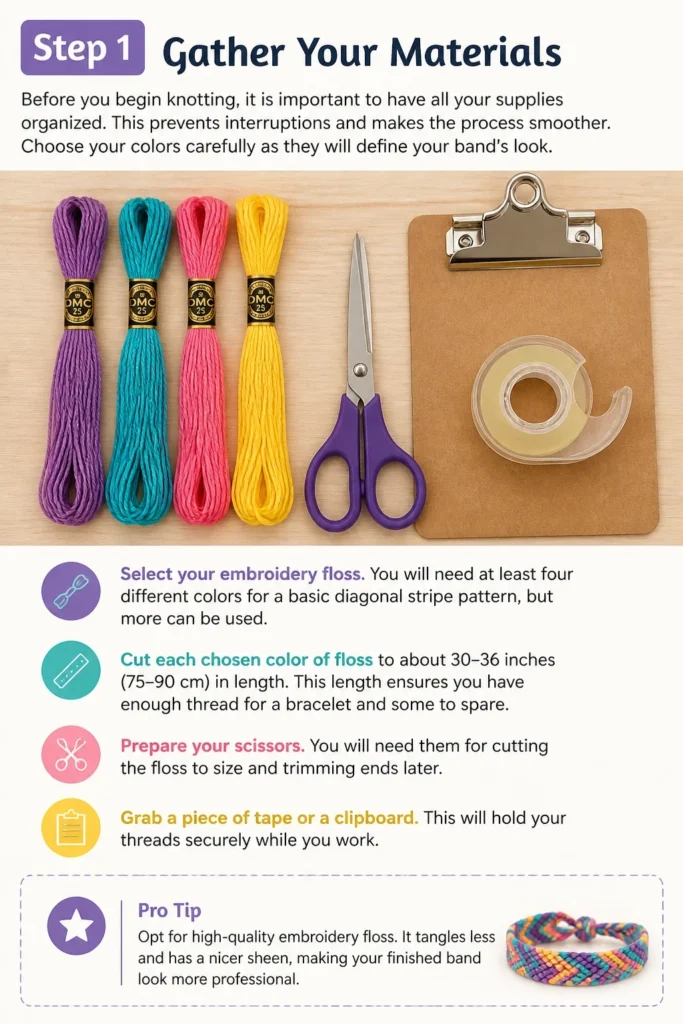
Cut each chosen color of floss to about 30-36 inches (75-90 cm) in length. This length ensures you have enough thread for a bracelet and some to spare.
Prepare your scissors. You will need them for cutting the floss to size and trimming ends later.
Grab a piece of tape or a clipboard. This will hold your threads securely while you work.
Pro Tip: Opt for high-quality embroidery floss. It tangles less and has a nicer sheen, making your finished band look more professional. Avoid cheap, thin threads that fray easily.
Step 2: Set Up Your Threads
Proper setup is crucial for keeping your threads untangled and making the knotting process manageable. A neat starting point leads to a neat finish. Take your time with this initial arrangement.
Align all your cut strands of floss. Make sure they are even at one end.
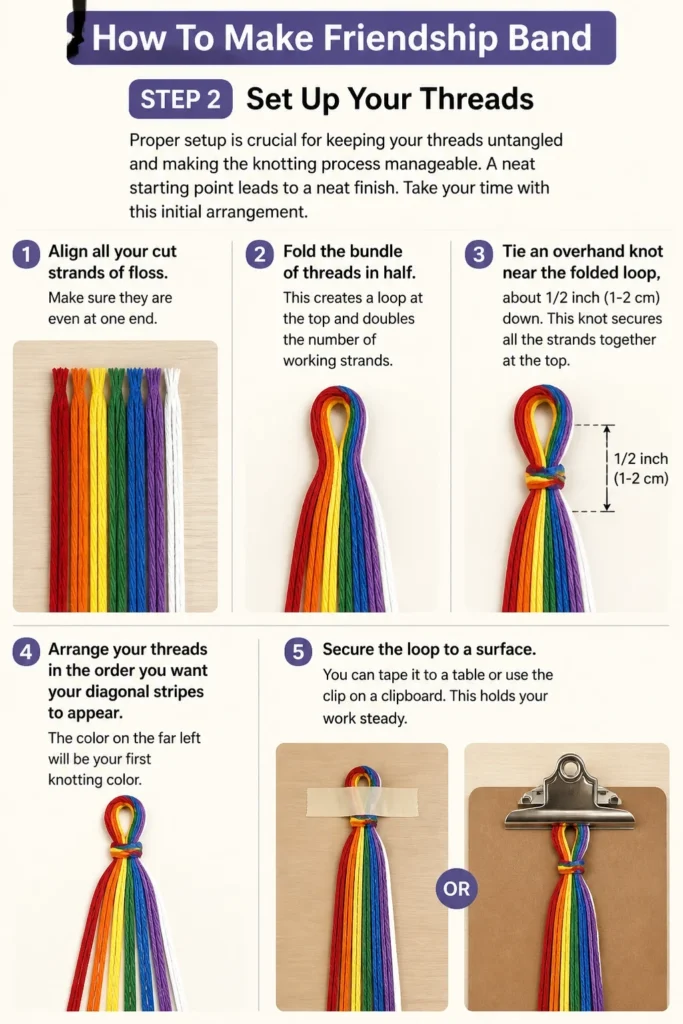
Fold the bundle of threads in half. This creates a loop at the top and doubles the number of working strands.
Tie an overhand knot near the folded loop, about 1/2 inch (1-2 cm) down. This knot secures all the strands together at the top.
Arrange your threads in the order you want your diagonal stripes to appear. The color on the far left will be your first knotting color.
Secure the loop to a surface. You can tape it to a table or use the clip on a clipboard. This holds your work steady.
Step 3: Understand the Forward Knot
The forward knot, also known as the “F” knot, is the fundamental building block for most friendship bands. Mastering this knot is key to creating clean, consistent patterns. Practice it a few times before starting your band.
Choose your first working thread. This is the leftmost thread in your arranged bundle.
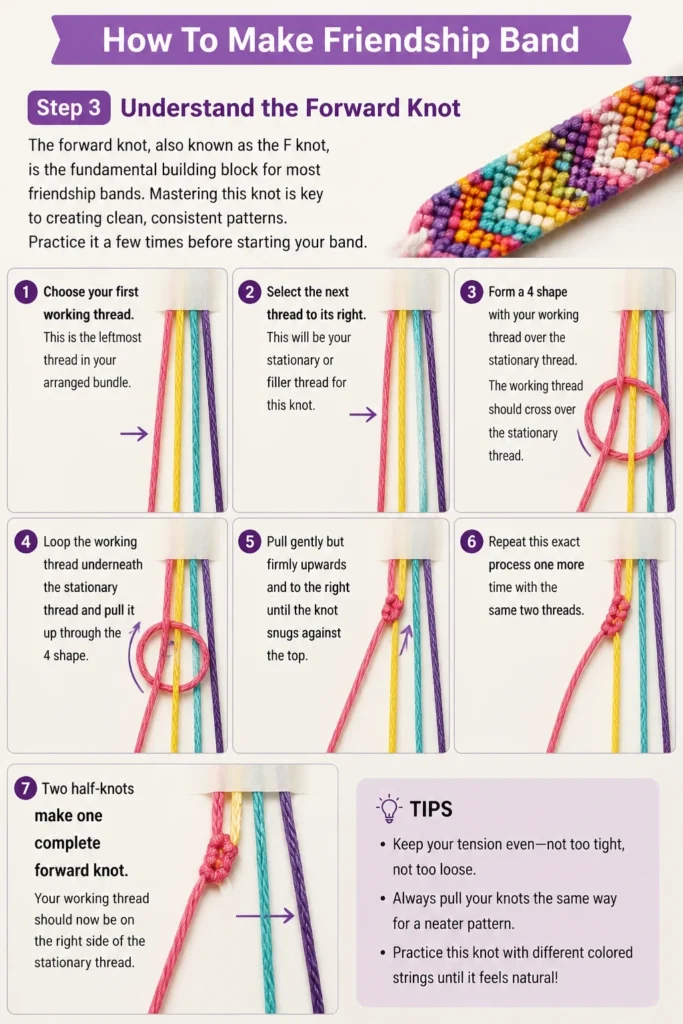
Select the next thread to its right. This will be your stationary or “filler” thread for this knot.
Form a “4” shape with your working thread over the stationary thread. The working thread should cross over the stationary thread.
Loop the working thread underneath the stationary thread and pull it up through the “4” shape. Pull gently but firmly upwards and to the right until the knot snugs against the top.
Repeat this exact process one more time with the same two threads. Two “half-knots” make one full, secure forward knot.
Pro Tip: Always make two half-knots for every full knot. This ensures the knot is secure and prevents unraveling, creating a consistent look. Consistency is key to a beautiful band.
Step 4: Knot Your First Row
Now that you understand the forward knot, you can begin to create your first diagonal row. This step involves moving your working thread across all other threads in sequence. Focus on keeping your tension even.
Take your first working thread (the leftmost one).
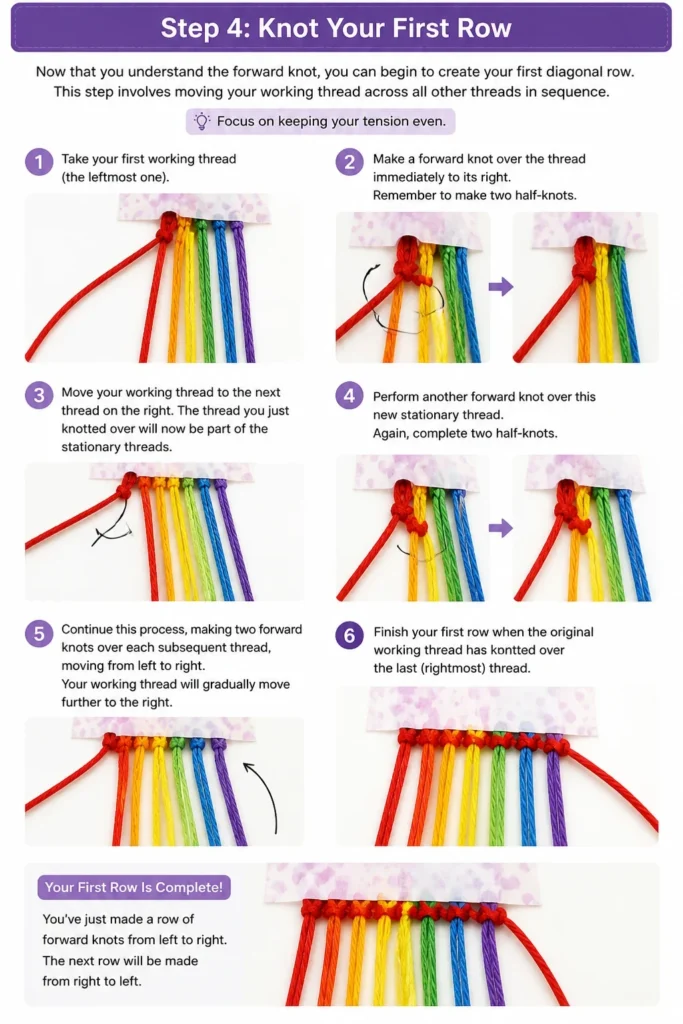
Make a forward knot over the thread immediately to its right. Remember to make two half-knots.
Move your working thread to the next thread on the right. The thread you just knotted over will now be part of the stationary threads.
Perform another forward knot over this new stationary thread. Again, complete two half-knots.
Continue this process, making two forward knots over each subsequent thread, moving from left to right. Your working thread will gradually move further to the right.
Finish your first row when the original working thread has made knots over all other threads. It will now be on the far right side of your bundle.
Step 5: Start Your Second Row
Once your first thread has moved to the far right, it’s time to bring in the next color. The process is identical to the first row, simply starting with the new leftmost thread. This builds the diagonal pattern.
Identify the new leftmost thread. This will be the color that was originally second from the left.
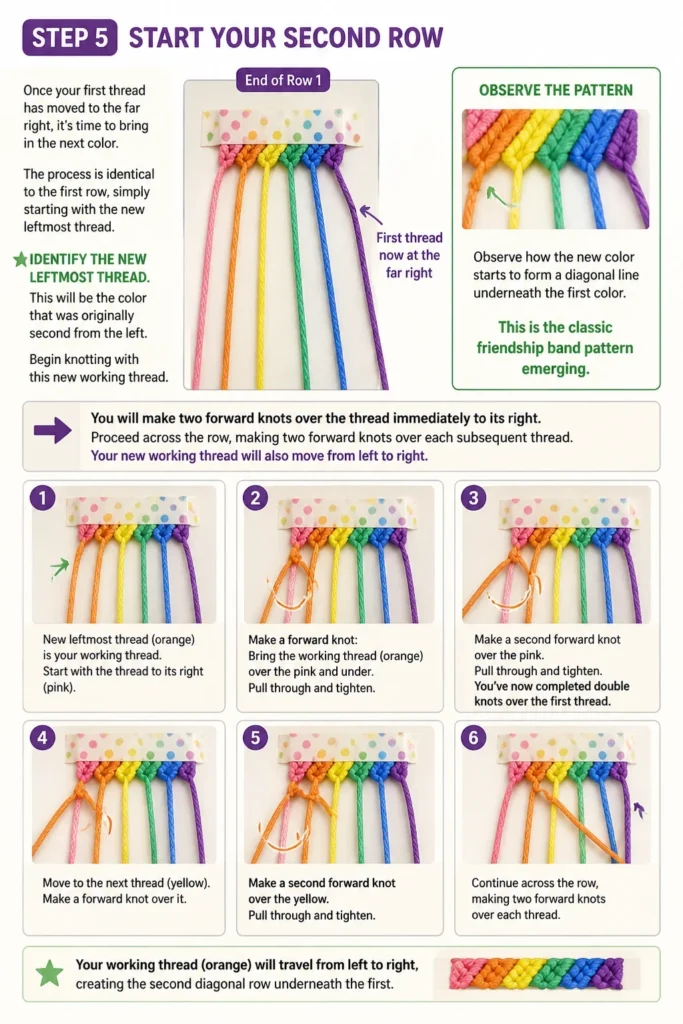
Begin knotting with this new working thread. You will make two forward knots over the thread immediately to its right.
Proceed across the row, making two forward knots over each subsequent thread. Your new working thread will also move from left to right.
Observe how the new color starts to form a diagonal line underneath the first color. This is the classic friendship band pattern emerging.
Step 6: Continue Knotting Rows
The core of making a friendship band is repeating the forward knotting process. Each row will push the previous working thread to the right, and a new color will emerge from the left. This creates a continuous, colorful pattern.
Repeat the process from Step 5. Always take the leftmost thread as your new working thread.
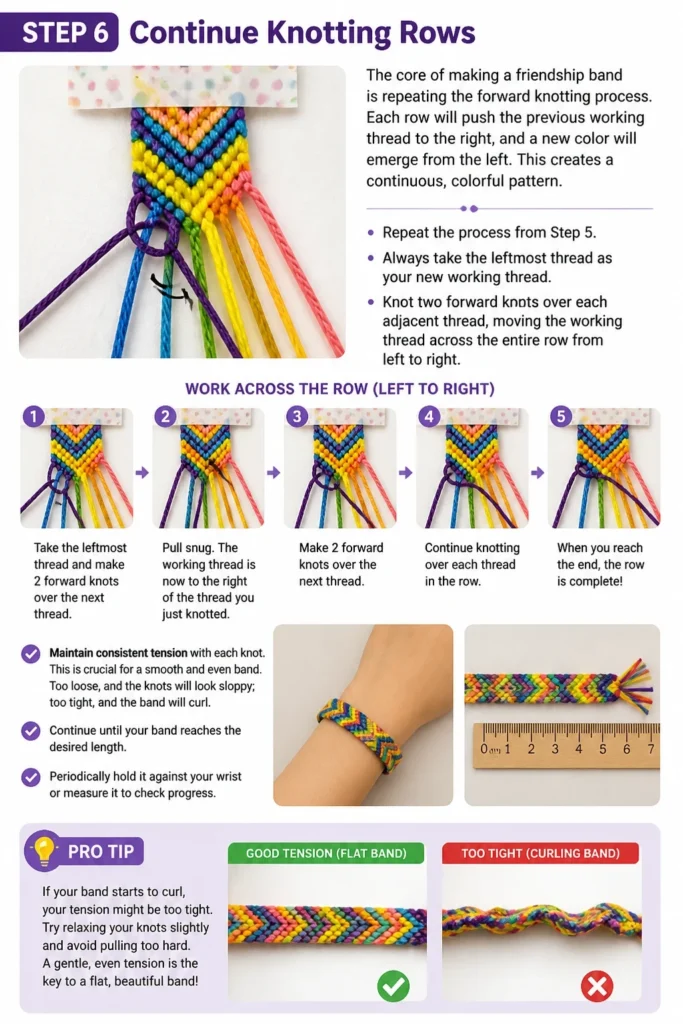
Knot two forward knots over each adjacent thread, moving the working thread across the entire row from left to right.
Maintain consistent tension with each knot. This is crucial for a smooth and even band. Too loose, and the knots will look sloppy; too tight, and the band will curl.
Continue until your band reaches the desired length. Periodically hold it against your wrist or measure it to check progress.
Pro Tip: If your band starts to curl, your tension might be too tight. Try relaxing your grip slightly on the working thread. You can also gently flatten the band occasionally as you work.
Step 7: Finish Your Friendship Band
Once your band is long enough, it’s time to secure the ends and prepare it for wearing. A simple braid and knot will provide a durable and adjustable closure. This step brings your creation to completion.
Stop knotting when the band is about 6-7 inches (15-18 cm) long, or your desired wrist size, leaving enough unknotted thread at the end for tying.
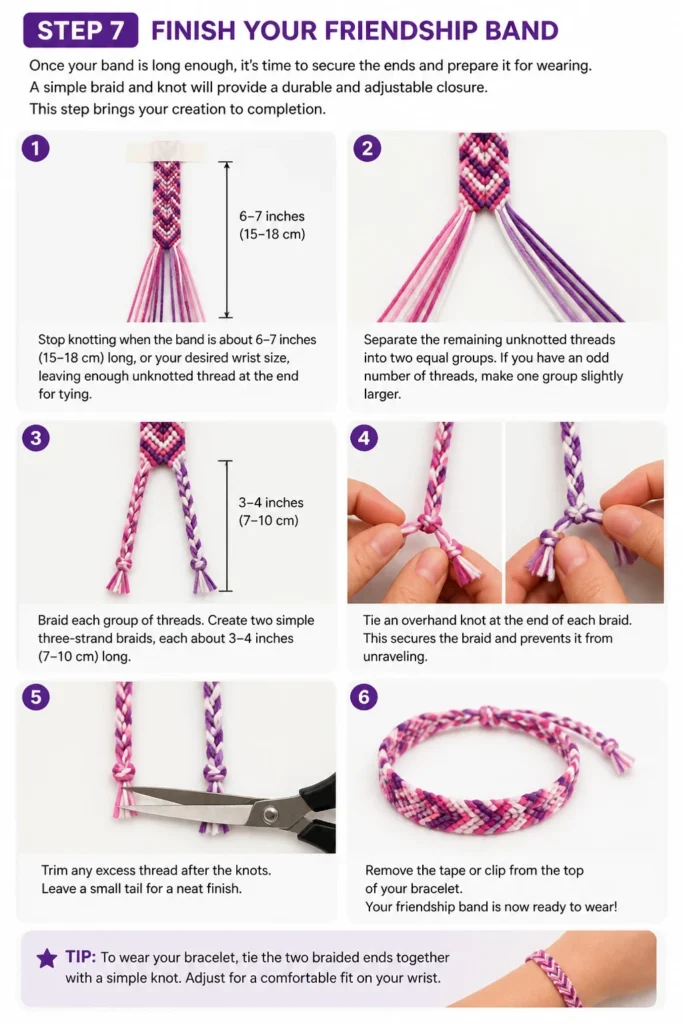
Separate the remaining unknotted threads into two equal groups. If you have an odd number of threads, make one group slightly larger.
Braid each group of threads. Create two simple three-strand braids, each about 3-4 inches (7-10 cm) long.
Tie an overhand knot at the end of each braid. This secures the braid and prevents it from unraveling.
Trim any excess thread after the knots. Leave a small tail for a neat finish.
Remove the tape or clip from the top loop. Your friendship band is now complete and ready to be tied onto a friend’s wrist.
Common Mistakes to Avoid
Crafting friendship bands is forgiving, but some common errors can affect the final look and durability. Being aware of these pitfalls will help you create a much better product. Take a moment to review these before you start.
Inconsistent Tension
This is perhaps the most frequent issue beginners face. If some knots are pulled tighter than others, your band will look uneven, possibly lumpy, or even curl. It might also make the pattern appear distorted. The key is to apply the same amount of gentle but firm pressure to each knot you make. Practice helps build muscle memory for consistent tension.
Not Making Two Half-Knots
Each full knot, whether a forward or backward knot, requires two identical half-knots to be secure. If you only make one half-knot per step, your knots will be loose and prone to unraveling. The pattern will also look gappy and unfinished, as the threads won’t sit snugly together. Always double-knot each step to ensure durability and a polished appearance.
Incorrect Thread Order
When you begin a new row, it’s important to always pick the leftmost thread as your new working thread. If you accidentally pick a thread from the middle or skip a thread, your diagonal pattern will break. This creates a noticeable mistake in the design. Carefully identify the correct starting thread for each row to maintain your pattern’s integrity.
Cutting Threads Too Short
It’s tempting to save floss by cutting threads just long enough, but this often leads to frustration. Running out of thread mid-band means having to awkwardly tie on new pieces, which can create weak points or visible knots. Always err on the side of cutting your initial threads longer than you think you need. It’s better to trim excess than to run short.
Troubleshooting
Even with careful instruction, you might encounter a few hiccups along the way. Don’t worry, most common issues have simple solutions. These tips will help you get back on track and complete your band.
My Band is Curling
A curling band is usually a sign that your knot tension is too tight. When knots are pulled too forcefully, they constrict the band, causing it to roll inward. Try to loosen your grip slightly on the working thread as you pull each knot. You can also gently stretch and flatten the band periodically as you work to counteract the curl.
My Knots Look Uneven or Messy
This often comes down to inconsistent tension or not pulling your knots all the way up. Ensure each knot is pulled firmly and snugly against the previous knot or the top of the band. Also, make sure you are making two full half-knots for each step. Practice on a scrap piece of thread to develop a consistent rhythm and feel for the knot.
The Pattern isn’t Lining Up
If your diagonal stripes aren’t appearing correctly, double-check your thread order. Make sure you are consistently starting each new row with the leftmost thread and knotting it over every subsequent thread to the right. Skipping a thread or starting with the wrong color will disrupt the pattern. Unknot a few steps and re-evaluate your starting position.
Key Takeaways
Crafting a friendship band is a journey of patience and creativity. Remember these essential points to ensure a successful and enjoyable experience. These are the foundations of good band making.
- Always make two half-knots for every full knot to ensure security and consistency.
- Maintain even tension throughout the entire knotting process to prevent curling and unevenness.
- Start each new row with the leftmost working thread to maintain the diagonal stripe pattern.
- Cut your embroidery floss generously to avoid running out of thread mid-project.
- Practice the basic forward knot a few times before starting your actual band to build confidence.
- Embrace imperfections; each hand-knotted band is unique and holds special meaning.
Frequently Asked Questions
Many beginners have similar questions when starting out. Here are some common queries answered to help clarify any lingering doubts. These insights will make your band-making journey smoother.
What if I only have three colors of floss?
You can absolutely make a friendship band with three colors! The principle remains the same. You will simply have fewer threads in your working bundle, resulting in a narrower band. The diagonal stripe pattern will still form beautifully, just with fewer stripes per row.
How long should the band be?
A typical friendship band is usually between 6 to 8 inches (15-20 cm) long for the knotted section, plus additional length for the braided ties. The best way to know is to measure your wrist or the wrist of the person you’re making it for. Always leave extra length for the tying ends.
Can I use different types of knots?
Yes, while this guide focuses on the basic forward knot for diagonal stripes, there are many other knots like the backward knot, forward-backward knot, and backward-forward knot. These allow for different patterns like chevrons, hearts, and more intricate designs. Mastering the forward knot is a great first step before exploring others.
How do I make the band wider?
To make a wider band, simply start with more strands of embroidery floss. Each additional pair of threads (after folding) will add to the width of your band. Remember that more threads also mean more knotting, so it will take longer to complete. Experiment with different numbers to find your preferred width.
Our Top Recommended Finds
Having the right tools can make a big difference in your crafting experience. While not strictly necessary, these items can enhance your comfort and efficiency. Consider these additions to your crafting kit.
- Clipboard with a strong clip: This provides a stable surface and holds your threads securely, preventing them from slipping or tangling while you knot.
- Sharp embroidery scissors: Small, sharp scissors allow for precise cuts, especially when trimming thread ends, giving your finished band a neat and professional look.
- A variety pack of embroidery floss: Investing in a multi-color pack offers endless creative possibilities and ensures you always have the perfect shade on hand for your next project.
Unleash Your Inner Knotting Artist
You now have all the knowledge and practical steps to create your very own friendship bands. This isn’t just about making a piece of jewelry; it’s about creating a tangible symbol of connection and care. The joy of gifting a handmade item is truly special.
Why not gather your materials today and start knotting your first band? Imagine the smiles you’ll bring. Once you master the diagonal stripe, you might explore more complex patterns like chevron or even incorporate beads. The world of knotting is vast and full of creative potential. Get started and share your unique creations with those you cherish!