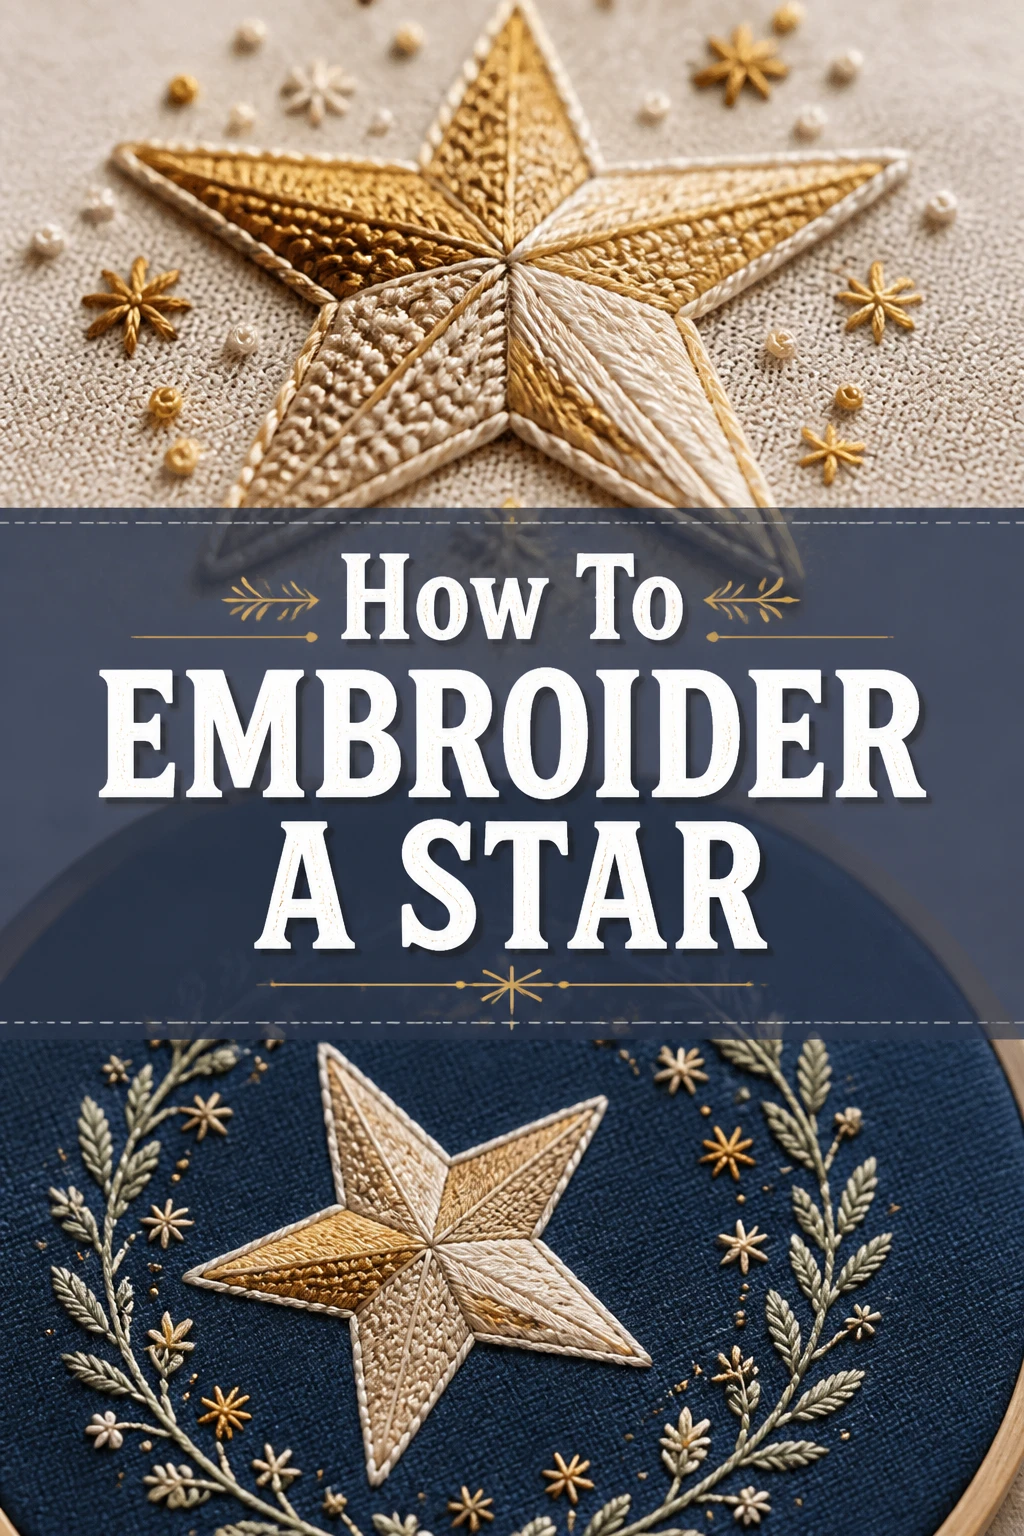
⭐ How To Embroider A Star
Embroidery offers a wonderful way to add personalized charm to any fabric item.
I still remember the satisfaction of stitching my first perfect star, a tiny beacon of handmade beauty.
This guide shares my exact process, making it simple for you to create your own dazzling embroidered stars with confidence.
Quick Overview
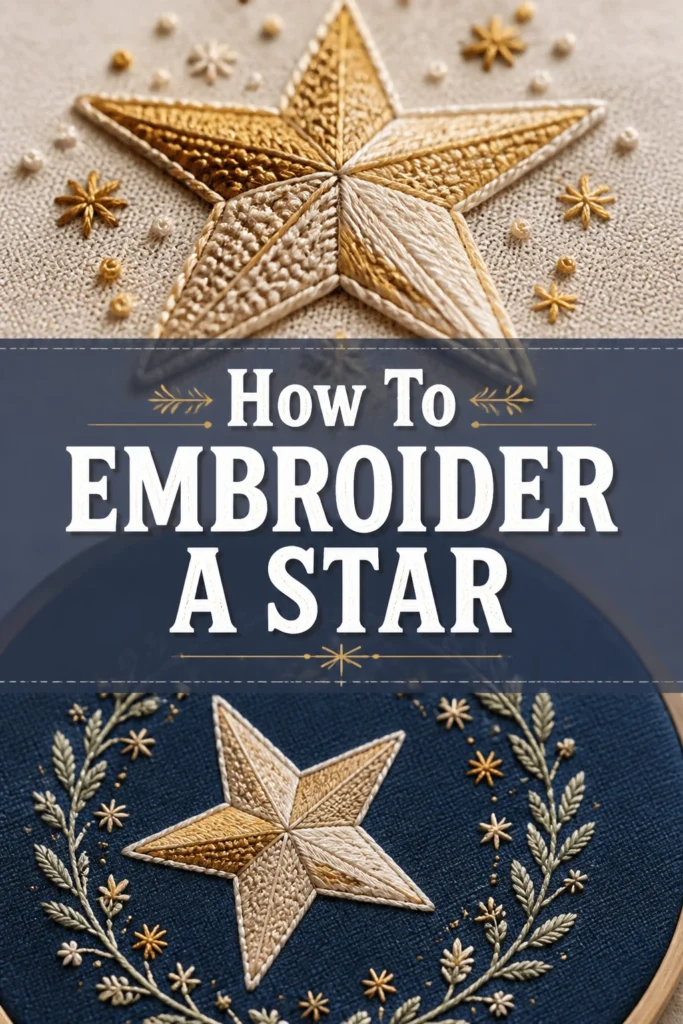
You are about to embark on a delightful journey into the world of embroidery. By following these steps, you will learn how to create a beautiful, five-pointed star using fundamental stitches.
This project is perfect for adding a touch of sparkle to clothing, accessories, or home decor.
- Time needed: 1-2 hours (depending on star size and experience level)
- Difficulty: Beginner
- What you’ll need: Embroidery hoop, fabric, embroidery needle, embroidery floss, fabric pen or pencil, small scissors.
Step-by-Step Instructions
Step 1: Gather Your Tools
Before you begin any creative project, ensuring you have all the necessary supplies is crucial.
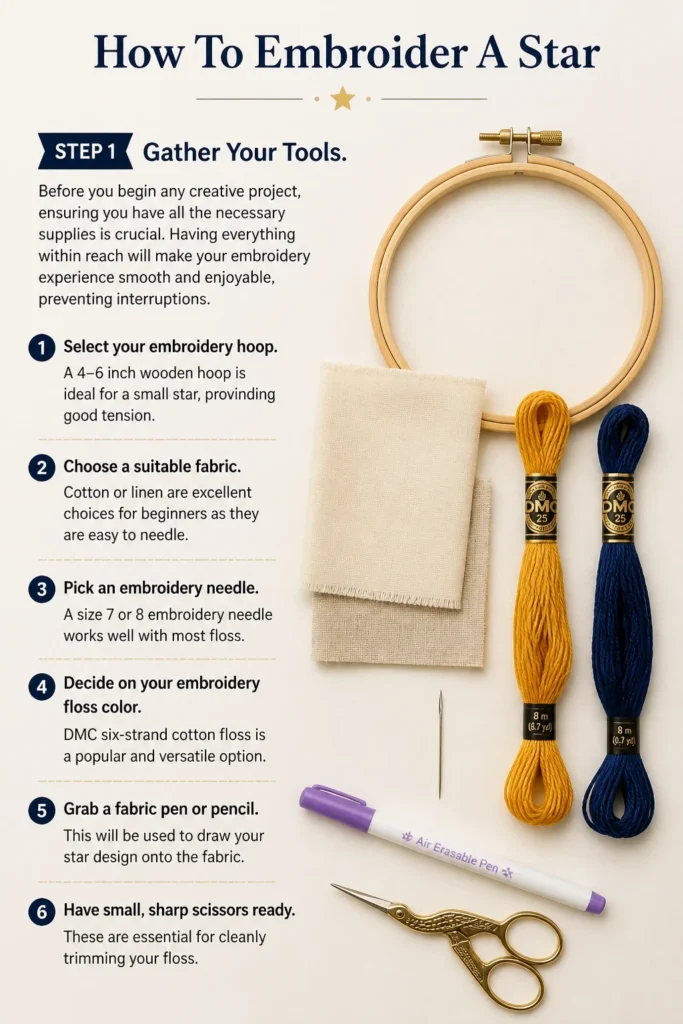
Having everything within reach will make your embroidery experience smooth and enjoyable, preventing interruptions.
- Select your embroidery hoop. A 4-6 inch wooden hoop is ideal for a small star, providing good tension.
- Choose a suitable fabric. Cotton or linen are excellent choices for beginners as they are easy to needle.
- Pick an embroidery needle. A size 7 or 8 embroidery needle works well with most floss.
- Decide on your embroidery floss color. DMC six-strand cotton floss is a popular and versatile option.
- Grab a fabric pen or pencil. This will be used to draw your star design onto the fabric.
- Have small, sharp scissors ready. These are essential for cleanly trimming your floss.
Step 2: Prepare Your Fabric and Hoop
Proper preparation of your fabric and hoop sets the foundation for neat, even stitches.
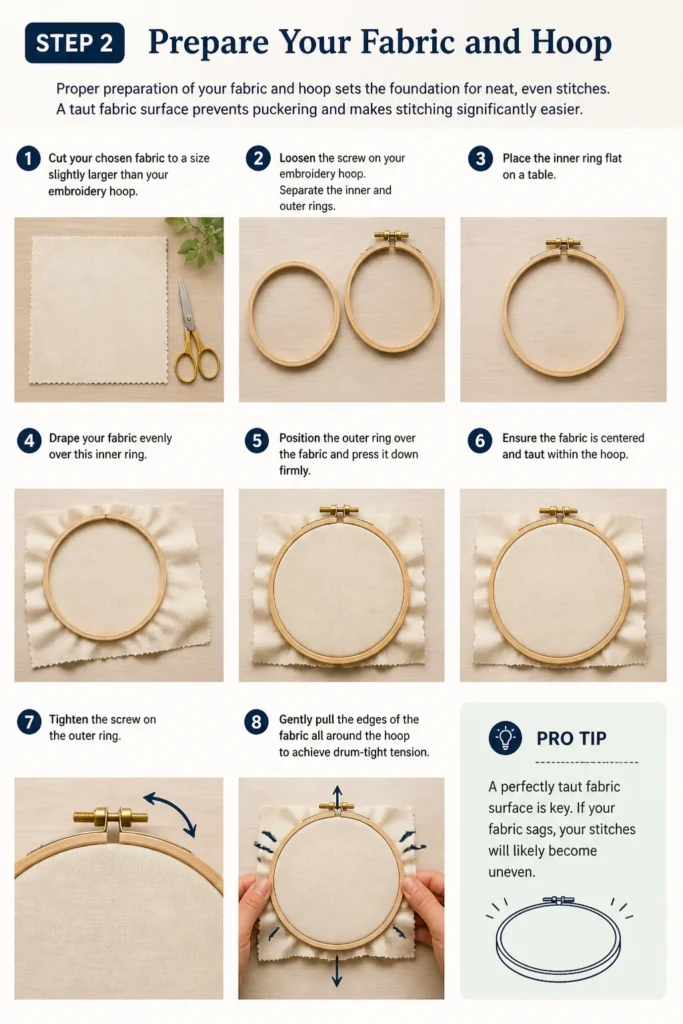
A taut fabric surface prevents puckering and makes stitching significantly easier.
- Cut your chosen fabric to a size slightly larger than your embroidery hoop. This gives you ample room to work.
- Loosen the screw on your embroidery hoop. Separate the inner and outer rings.
- Place the inner ring flat on a table. Drape your fabric evenly over this inner ring.
- Position the outer ring over the fabric and press it down firmly. Ensure the fabric is centered and taut within the hoop.
- Tighten the screw on the outer ring. Gently pull the edges of the fabric all around the hoop to achieve drum-tight tension.
Pro Tip: A perfectly taut fabric surface is key. If your fabric sags, your stitches will likely become uneven, and the final piece may pucker. Always check the tension before you start stitching.
Step 3: Draw Your Star Design
A clear, accurate outline is vital for creating a well-defined embroidered star.
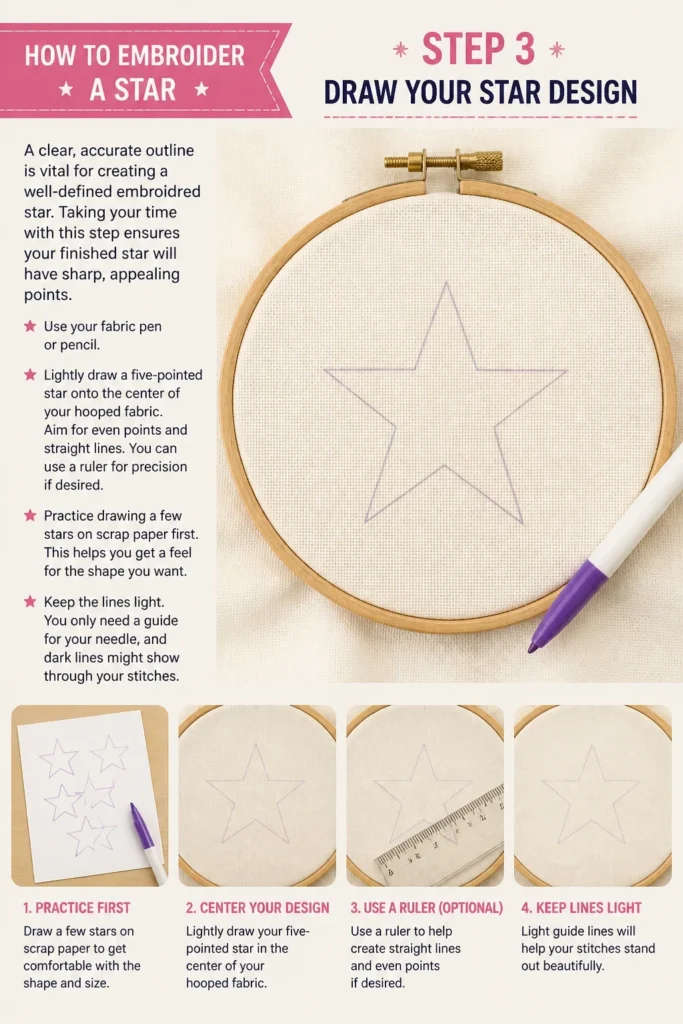
Taking your time with this step ensures your finished star will have sharp, appealing points.
- Use your fabric pen or pencil. Lightly draw a five-pointed star onto the center of your hooped fabric.
- Aim for even points and straight lines. You can use a ruler for precision if desired.
- Practice drawing a few stars on scrap paper first. This helps you get a feel for the shape you want.
- Keep the lines light. You only need a guide for your needle, and dark lines might show through your stitches.
Step 4: Thread Your Needle
Threading your needle correctly and preparing your floss prevents tangles and ensures smooth stitching.
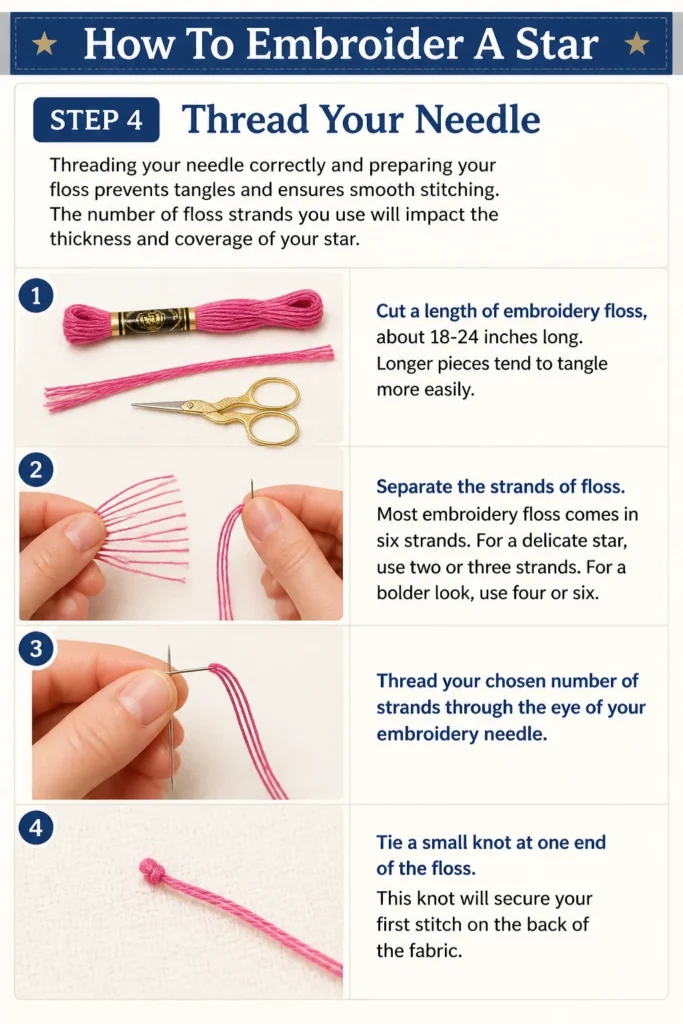
The number of floss strands you use will impact the thickness and coverage of your star.
- Cut a length of embroidery floss, about 18-24 inches long. Longer pieces tend to tangle more easily.
- Separate the strands of floss. Most embroidery floss comes in six strands. For a delicate star, use two or three strands. For a bolder look, use four or six.
- Thread your chosen number of strands through the eye of your embroidery needle.
- Tie a small knot at one end of the floss. This knot will secure your first stitch on the back of the fabric.
Step 5: Outline Your Star (Backstitch)
Outlining your star first provides a crisp edge and a clear boundary for your filling stitches.
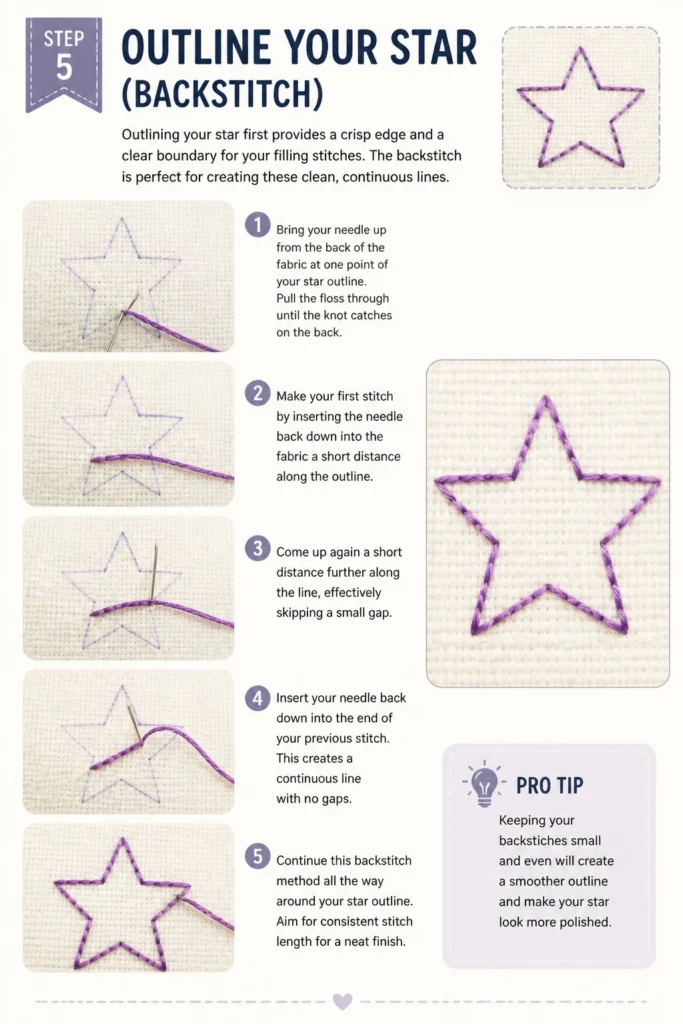
The backstitch is perfect for creating these clean, continuous lines.
- Bring your needle up from the back of the fabric at one point of your star outline. Pull the floss through until the knot catches on the back.
- Make your first stitch by inserting the needle back down into the fabric a short distance along the outline.
- Come up again a short distance further along the line, effectively skipping a small gap.
- Insert your needle back down into the end of your previous stitch. This creates a continuous line with no gaps.
- Continue this backstitch method all the way around your star outline. Aim for consistent stitch length for a neat finish.
Pro Tip: Keeping your backstitches small and even will create a much smoother and more defined outline. This foundation is critical for the overall appearance of your star.
Step 6: Fill the Star (Satin Stitch)
The satin stitch is ideal for creating a smooth, solid, and lustrous fill for your star.
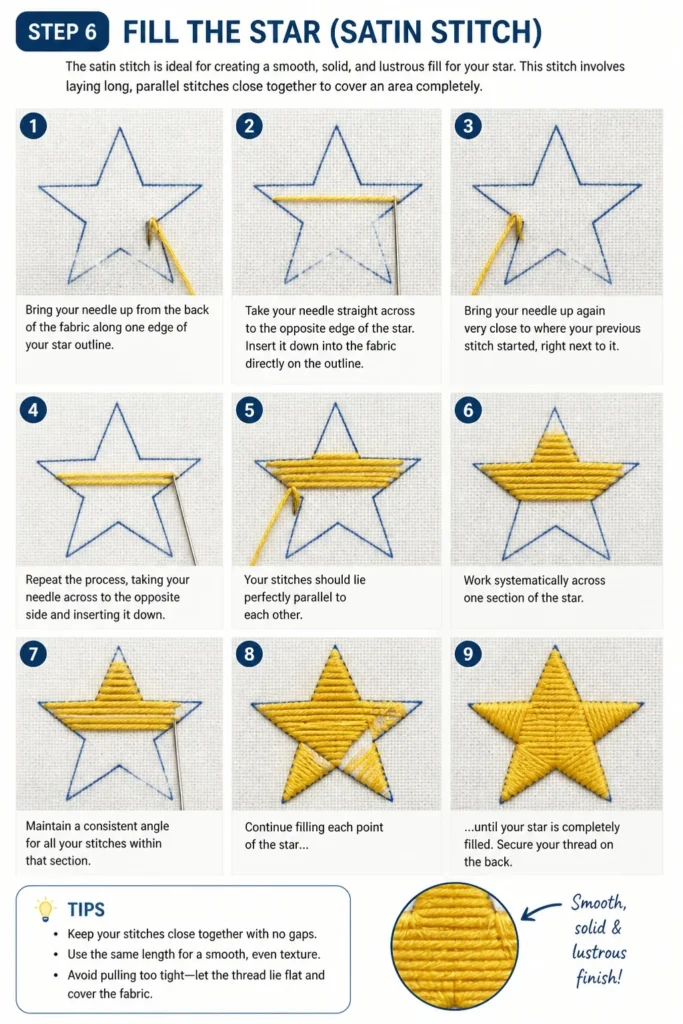
This stitch involves laying long, parallel stitches close together to cover an area completely.
- Bring your needle up from the back of the fabric along one edge of your star outline.
- Take your needle straight across to the opposite edge of the star. Insert it down into the fabric directly on the outline.
- Bring your needle up again very close to where your previous stitch started, right next to it.
- Repeat the process, taking your needle across to the opposite side and inserting it down. Your stitches should lie perfectly parallel to each other.
- Work systematically across one section of the star. Maintain a consistent angle for all your stitches within that section.
- Continue filling each point of the star in this manner. Ensure there are no gaps between your satin stitches for a solid look.
Pro Tip: For the best results, try to keep your stitches at a consistent tension. Pulling too tight can pucker the fabric, while too loose can make the stitches look sloppy. Aim for a smooth, flat surface.
Step 7: Finish Your Star and Secure Threads
Securing your threads properly ensures your beautiful embroidered star will last.
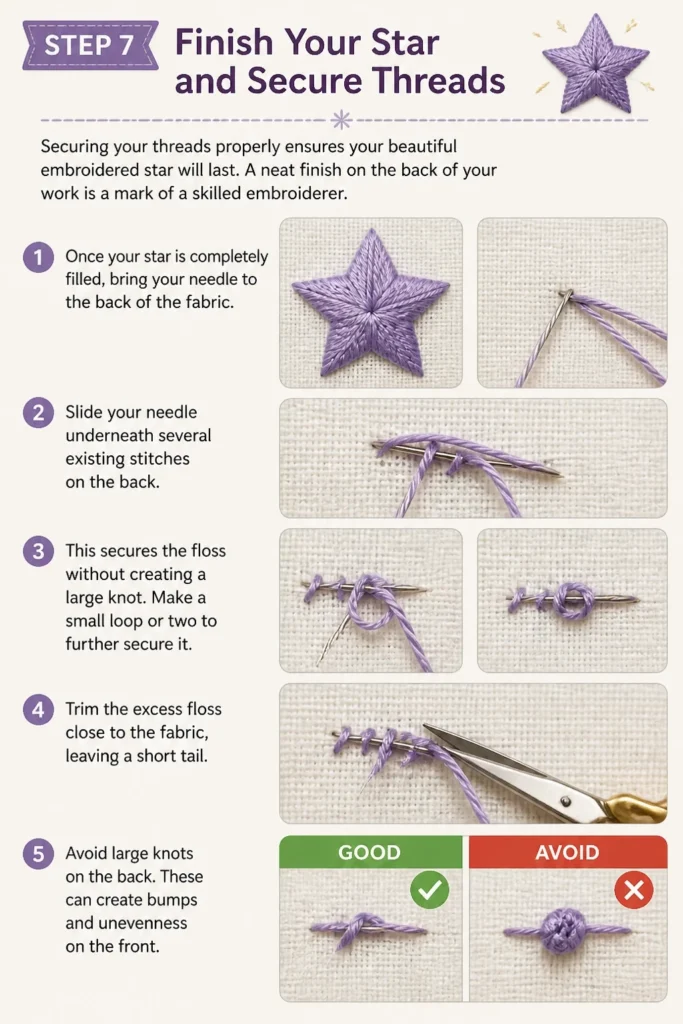
A neat finish on the back of your work is a mark of a skilled embroiderer.
- Once your star is completely filled, bring your needle to the back of the fabric.
- Slide your needle underneath several existing stitches on the back. This secures the floss without creating a large knot.
- Make a small loop or two to further secure it. Trim the excess floss close to the fabric, leaving a short tail.
- Avoid large knots on the back. These can create bumps and unevenness on the front.
Step 8: Remove Hoop and Press
The final steps involve carefully removing your work from the hoop and giving it a gentle press.
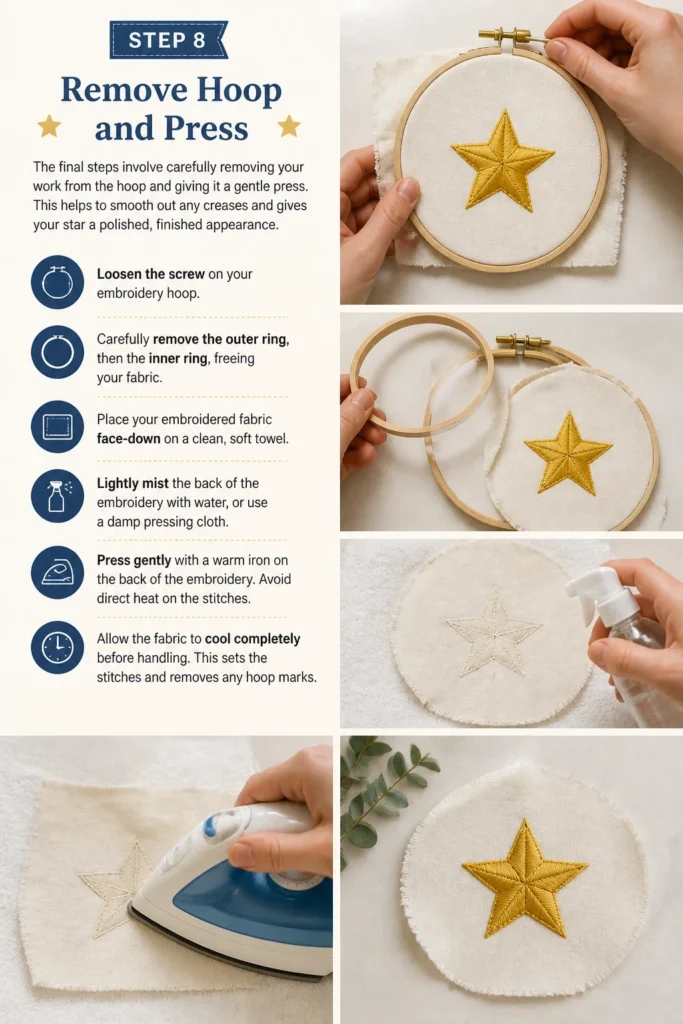
This helps to smooth out any creases and gives your star a polished, finished appearance.
- Loosen the screw on your embroidery hoop. Carefully remove the outer ring, then the inner ring, freeing your fabric.
- Place your embroidered fabric face-down on a clean, soft towel.
- Lightly mist the back of the embroidery with water, or use a damp pressing cloth.
- Press gently with a warm iron on the back of the embroidery. Avoid direct heat on the stitches.
- Allow the fabric to cool completely before handling. This sets the stitches and removes any hoop marks.
Common Mistakes to Avoid
Uneven Hoop Tension
A common pitfall for beginners is not having their fabric drum-tight in the hoop. If the fabric is loose, your stitches will become uneven, and the overall design can appear distorted and messy.
Always ensure your hoop is tightened securely and the fabric is taut before you begin stitching. Regularly check the tension as you work, gently pulling the fabric edges if needed.
Pulling Stitches Too Tight
Over-tightening your embroidery floss is another frequent mistake. This can cause the fabric to pucker and ripple around your design, detracting from the star’s smooth appearance.
Aim for a consistent, gentle tension with each stitch. The floss should lie flat on the fabric surface without pulling it taut. If you notice puckering, try to ease up on your pulling force.
Using Too Many Floss Strands for Detail
While more strands create a bolder look, using too many for a small or intricate star can make the stitches appear bulky and less defined. This can obscure the sharp points of your star.
For a delicate star outline or fine details, typically use two or three strands of floss. Experiment on a scrap piece of fabric to see what strand count achieves your desired effect.
Leaving Long Tails and Loose Ends
Neglecting to secure your floss ends properly or leaving very long tails on the back of your work can lead to tangles, knots, and a messy finish. This can also cause your stitches to unravel over time.
Always secure your floss by weaving it under existing stitches on the back, avoiding large knots. Trim excess floss neatly, leaving just a short tail to prevent unraveling.
Troubleshooting
Fabric is Puckering Around the Star
If your fabric is puckering, it’s often a sign that you’re pulling your stitches too tightly, or your hoop tension might not be even. This can distort the fabric and the embroidered design.
Try to ease the tension on your floss as you stitch, letting the thread lie naturally on the fabric. Also, ensure your fabric is drum-tight in the hoop before you start, and re-tighten it if it loosens.
Stitches Look Messy or Uneven
Uneven stitches can be frustrating, especially when aiming for a smooth satin stitch. This usually comes down to inconsistent stitch length or varying tension.
Focus on making each stitch the same length and angle within a section. Practice maintaining a consistent, gentle tension with every pull. More practice will naturally lead to greater uniformity.
Knots Appearing on the Back of My Work
Random knots on the back of your embroidery are typically caused by your floss tangling as you pull it through the fabric. This can be annoying and make the back of your work look untidy.
Use shorter lengths of floss (around 18-24 inches) to minimize tangling. Let your needle and floss dangle occasionally to unwind any twists. Secure your starting and ending threads neatly to prevent new knots.
Key Takeaways
- Preparation, including proper fabric hooping and design transfer, is essential for a successful embroidery project.
- Outlining your star with a backstitch creates a clear, defined boundary for your filling stitches.
- The satin stitch is perfect for achieving a smooth, solid, and lustrous fill within your star’s outline.
- Consistent tension in your stitches is crucial to prevent fabric puckering and ensure a neat finish.
- Practice is key; the more you embroider, the more refined and even your stitches will become.
- Always secure your floss ends neatly on the back of your work for durability and a professional appearance.
Frequently Asked Questions
What kind of fabric is best for beginners?
For beginners, fabrics like cotton or linen are highly recommended. They have a stable weave that is easy to work with, providing good resistance to the needle without being too stiff or too loose.
How many strands of floss should I use for my star?
The number of strands depends on the desired effect. For a delicate, fine star, use two or three strands. For a bolder, more prominent star, four or six strands will provide greater coverage and a raised texture.
Can I wash embroidered items?
Yes, most embroidered items can be washed, but always check the care instructions for your specific fabric and floss. Generally, hand washing in cool water with a mild detergent and air drying flat is the safest method to preserve your embroidery.
How do I transfer a more complex star design onto my fabric?
For more intricate star designs, you can use water-soluble fabric pens, which disappear with water, or heat-transfer pens that vanish with an iron. Light boxes can also be helpful for tracing designs onto lighter fabrics.
Our Top Recommended Finds
- Embroidery Starter Kit: An all-in-one kit typically includes hoops, various floss colors, needles, and fabric, making it perfect for new embroiderers.
- Water-Soluble Fabric Pen: This tool allows you to draw your designs directly onto the fabric, and the lines easily wash away once your stitching is complete.
- High-Quality Embroidery Floss Set: Investing in a set of reputable floss provides a wide array of vibrant colors that are less prone to tangling and fading.
Your Star-Stitching Journey Begins Now
You now possess the knowledge and steps to embroider a beautiful star.
This foundational project opens up a universe of creative possibilities, allowing you to personalize garments, accessories, and home decor.
Don’t hesitate to experiment with different floss colors, star sizes, or even adding tiny beads for extra sparkle. Grab your needle and floss today, and let your imagination shine!