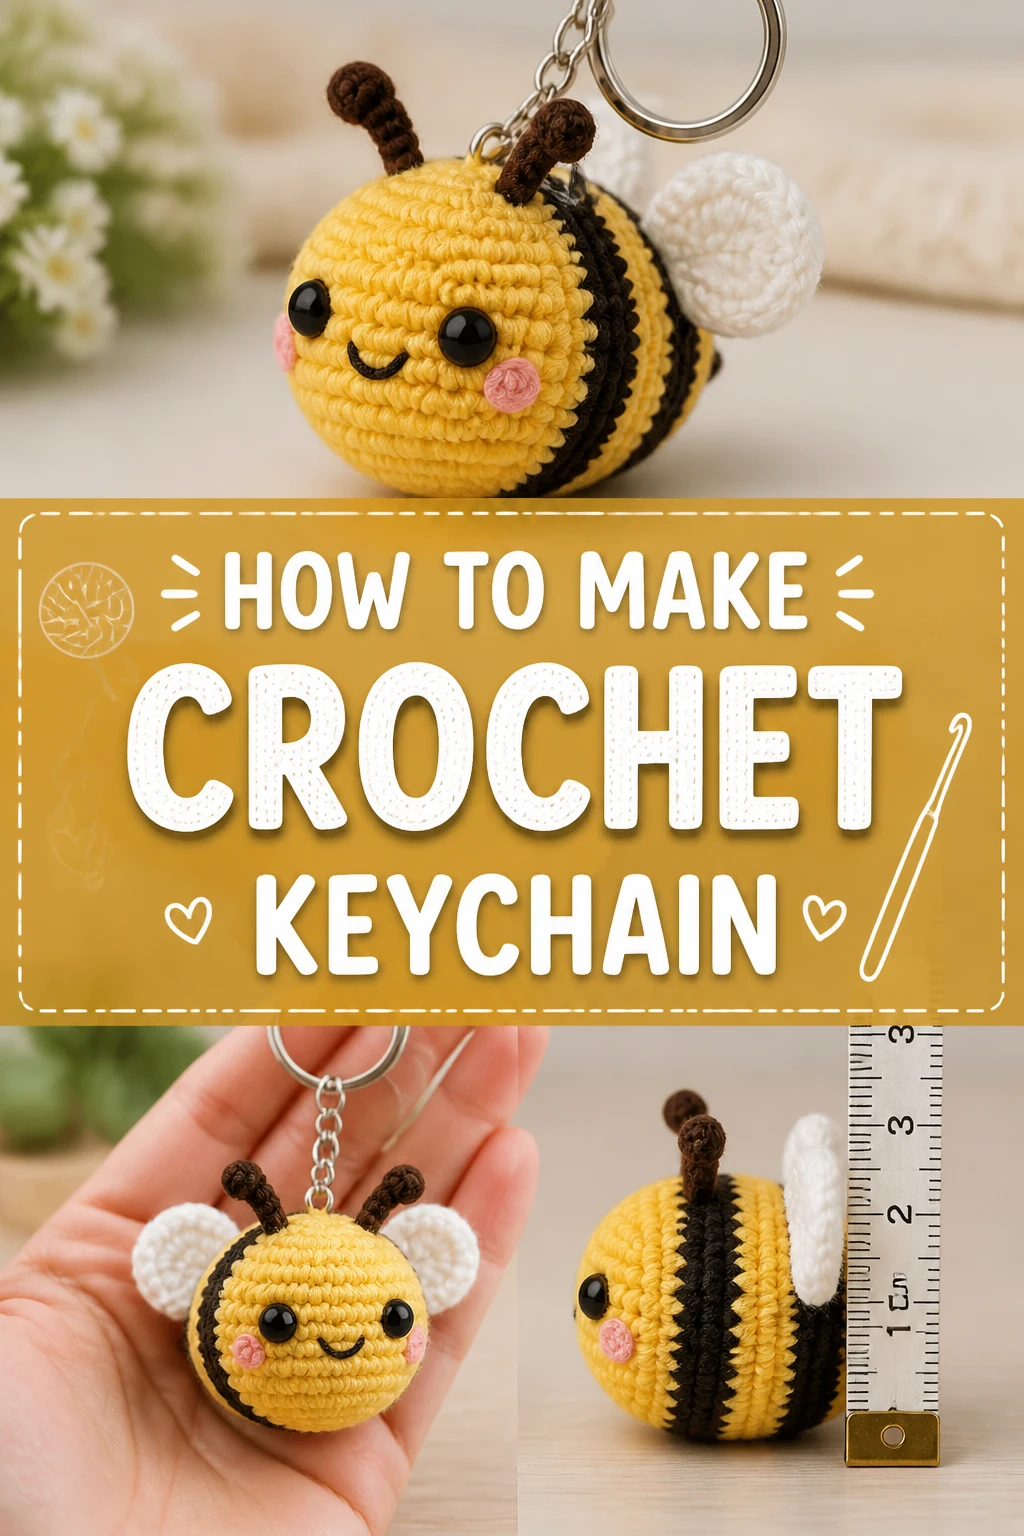
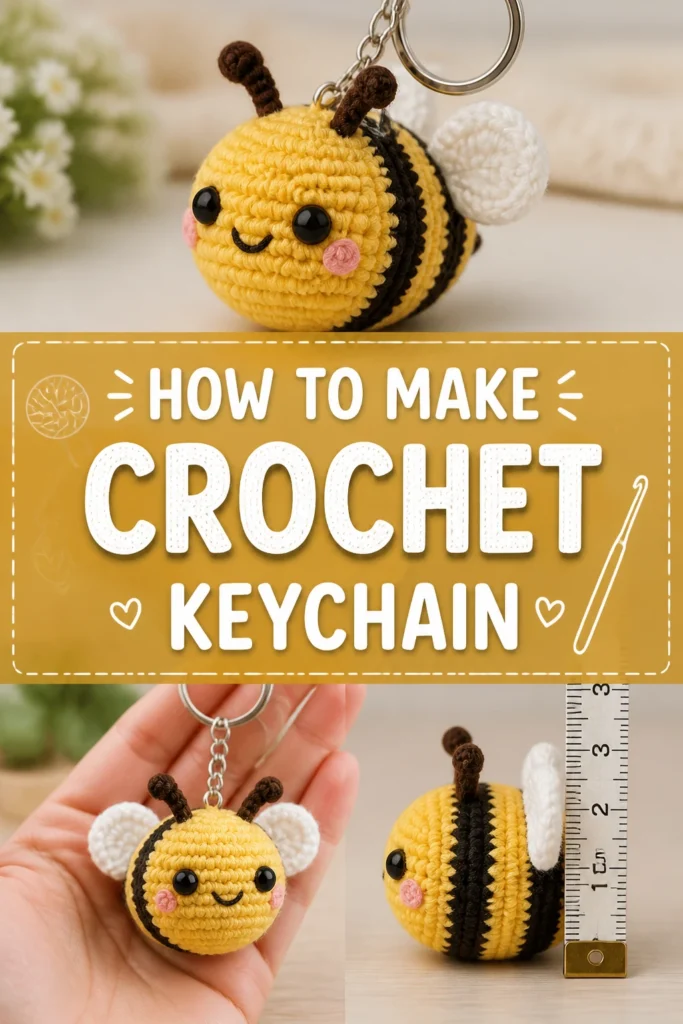
🧶 How To Make Crochet Keychain
There’s something incredibly satisfying about creating a small, handmade item that’s both beautiful and practical.
Making a crochet keychain is a fantastic way to practice your stitches, use up leftover yarn, and create personalized gifts or accessories.
I’ve made countless keychains over the years, from simple spheres to intricate little characters, and I’m excited to share my favorite beginner-friendly method with you.
Quick Overview
This guide will walk you through crafting a charming, durable crochet keychain. You’ll learn essential crochet techniques while creating a functional piece.
- Time needed: 45-90 minutes (depending on experience)
- Difficulty: Beginner
- What you’ll need: Yarn, crochet hook, scissors, yarn needle, keychain hardware, stitch marker (optional but recommended)
Step-by-Step Instructions
Step 1: Gather Your Materials
Before you begin any crochet project, it’s essential to have all your tools within reach. This prevents interruptions and helps maintain your crafting flow.
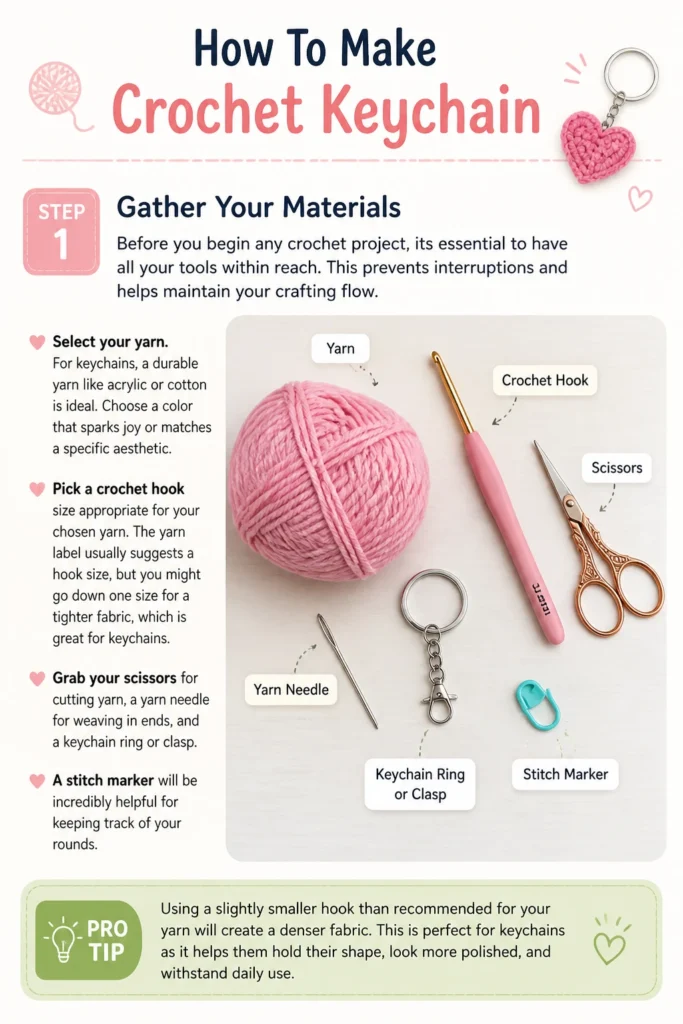
Select your yarn. For keychains, a durable yarn like acrylic or cotton is ideal. Choose a color that sparks joy or matches a specific aesthetic.
Pick a crochet hook size appropriate for your chosen yarn. The yarn label usually suggests a hook size, but you might go down one size for a tighter fabric, which is great for keychains.
Grab your scissors for cutting yarn, a yarn needle for weaving in ends, and a keychain ring or clasp. A stitch marker will be incredibly helpful for keeping track of your rounds.
Pro Tip: Using a slightly smaller hook than recommended for your yarn will create a denser fabric. This is perfect for keychains as it helps prevent stuffing from showing through and makes the item more robust.
Step 2: Start with a Magic Ring (or Magic Circle)
The magic ring creates a tight, closed center for your crochet piece, which is perfect for amigurumi-style keychains like a small ball or sphere.
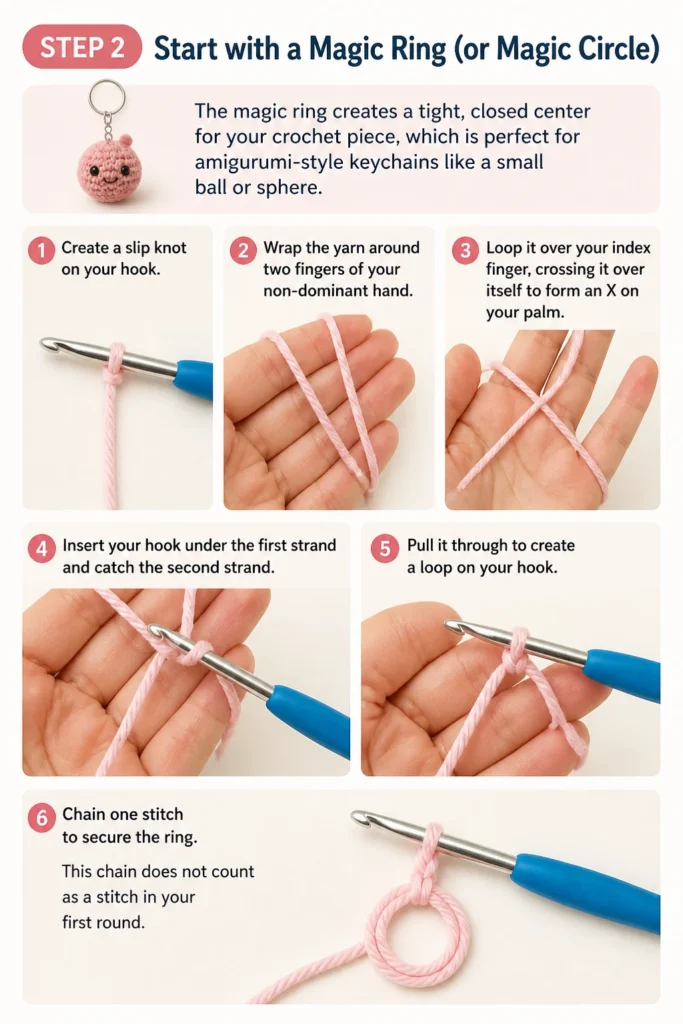
Create a slip knot on your hook. This is your starting point for all crochet work.
Wrap the yarn around two fingers of your non-dominant hand. Loop it over your index finger, crossing it over itself to form an “X” on your palm.
Insert your hook under the first strand and catch the second strand. Pull it through to create a loop on your hook.
Chain one stitch to secure the ring. This chain does not count as a stitch in your first round.
Step 3: Crochet the First Round
Now that your magic ring is established, you’ll begin adding your first stitches into it. This forms the base of your keychain.
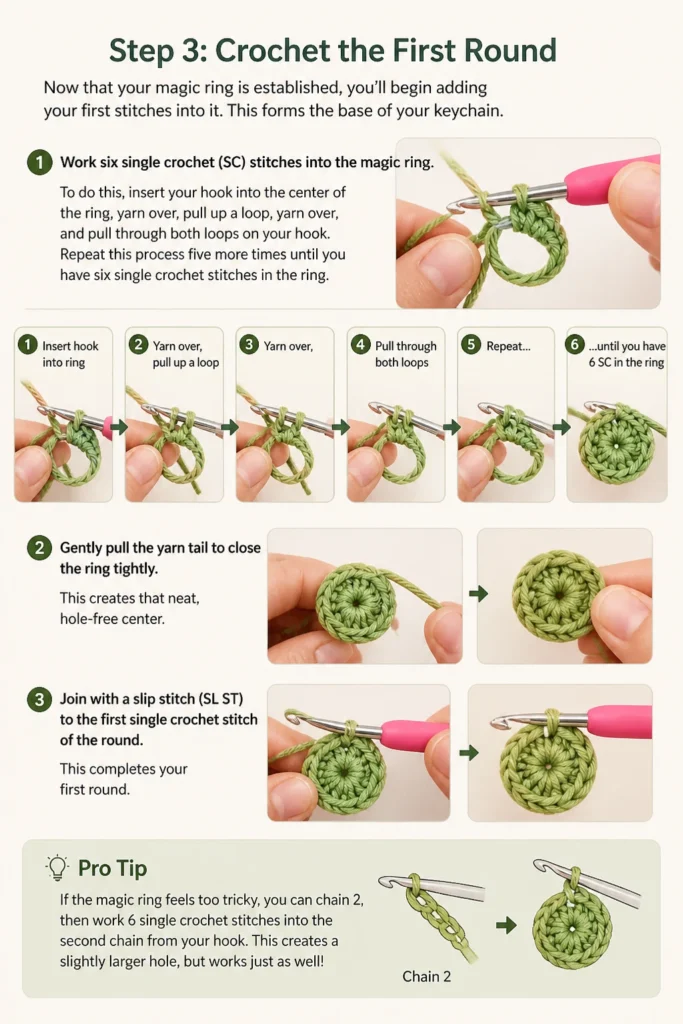
Work six single crochet (SC) stitches into the magic ring. To do this, insert your hook into the center of the ring, yarn over, pull up a loop, yarn over, and pull through both loops on your hook.
Repeat this process five more times until you have six single crochet stitches in the ring.
Gently pull the yarn tail to close the ring tightly. This creates that neat, hole-free center.
Join with a slip stitch (SL ST) to the first single crochet stitch of the round. This completes your first round.
Pro Tip: If the magic ring feels too tricky, you can chain 2, then work 6 single crochet stitches into the second chain from your hook. This creates a slightly larger hole in the center but is an easier alternative for beginners.
Step 4: Increase for Shape
To create a rounded shape, you’ll need to increase the number of stitches in your subsequent rounds. This makes the fabric expand.
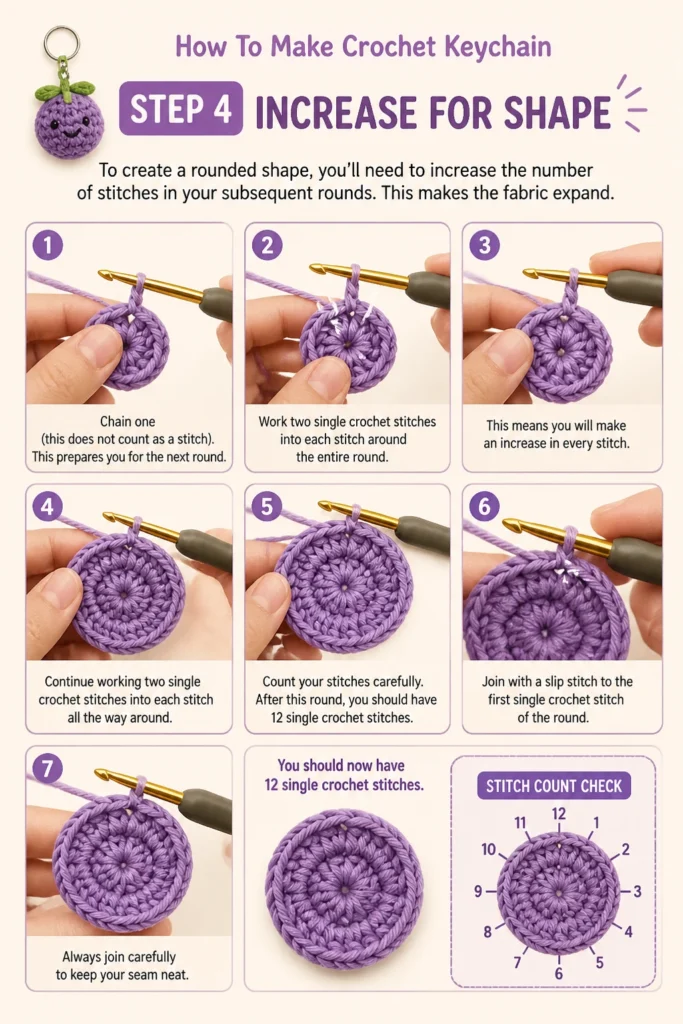
Chain one (this does not count as a stitch). This prepares you for the next round.
Work two single crochet stitches into each stitch around the entire round. This means you will make an increase in every stitch.
Count your stitches carefully. After this round, you should have 12 single crochet stitches.
Join with a slip stitch to the first single crochet stitch of the round. Always join carefully to keep your seam neat.
Step 5: Continue Increasing
You’ll continue to increase stitches, but at a slower rate, to gradually build the rounded shape of your keychain.
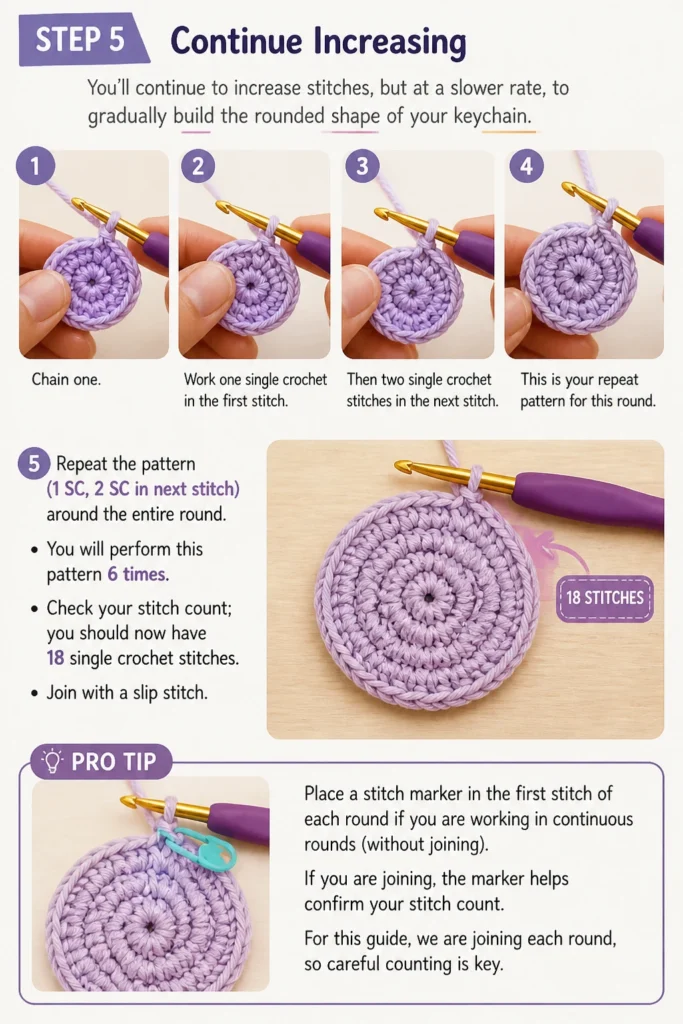
Chain one.
Work one single crochet in the first stitch, then two single crochet stitches in the next stitch. This is your repeat pattern for this round.
Repeat the pattern “(1 SC, 2 SC in next stitch)” around the entire round. You will perform this pattern 6 times.
Check your stitch count; you should now have 18 single crochet stitches.
Join with a slip stitch.
Pro Tip: Place a stitch marker in the first stitch of each round if you are working in continuous rounds (without joining). If you are joining, the marker helps confirm your stitch count. For this guide, we are joining each round, so careful counting is key.
Step 6: Work Even Rounds
Once you’ve reached the desired width for your keychain, you’ll work “even” rounds. This means no increases or decreases, allowing the piece to grow straight up.
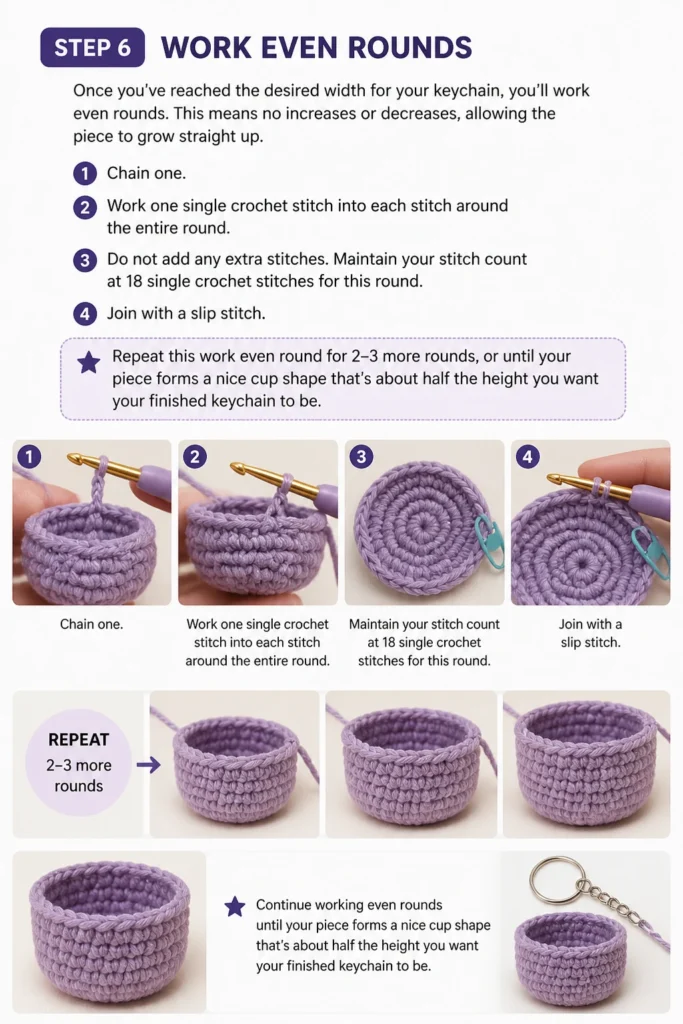
Chain one.
Work one single crochet stitch into each stitch around the entire round. Do not add any extra stitches.
Maintain your stitch count at 18 single crochet stitches for this round.
Join with a slip stitch.
Repeat this “work even” round for 2-3 more rounds, or until your piece forms a nice cup shape that’s about half the height you want your finished keychain to be.
Step 7: Start Decreasing Stitches
To close off the top of your keychain and complete the spherical shape, you’ll begin decreasing your stitches. This makes the fabric narrow again.
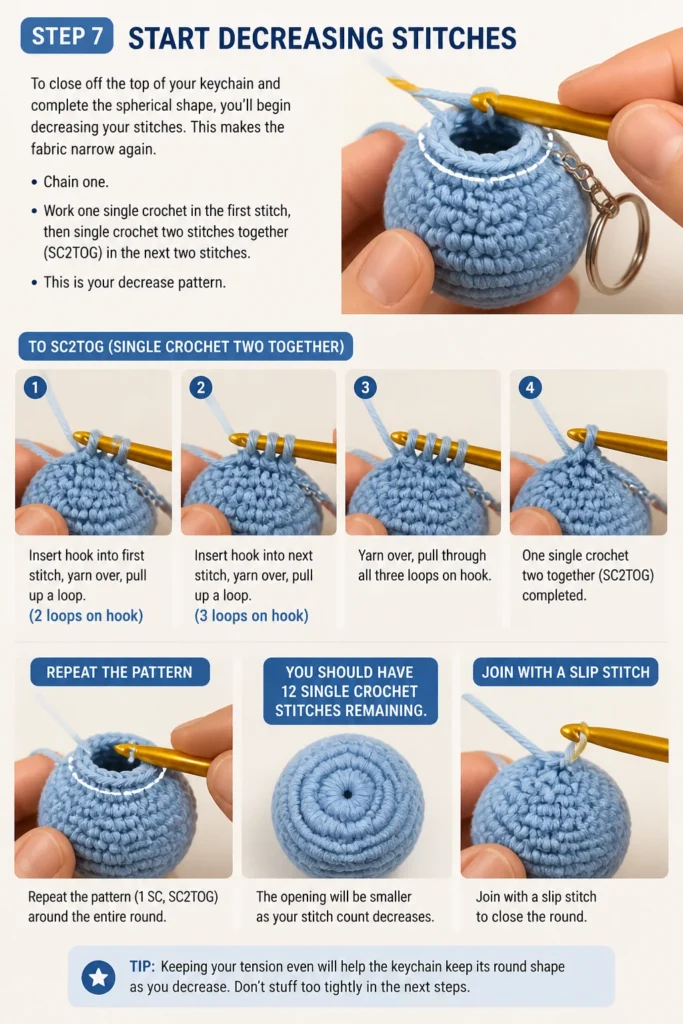
Chain one.
Work one single crochet in the first stitch, then single crochet two stitches together (SC2TOG) in the next two stitches. This is your decrease pattern.
To SC2TOG: Insert hook into first stitch, yarn over, pull up a loop (2 loops on hook). Insert hook into next stitch, yarn over, pull up a loop (3 loops on hook). Yarn over, pull through all three loops on hook.
Repeat the pattern “(1 SC, SC2TOG)” around the entire round. You should have 12 single crochet stitches remaining.
Join with a slip stitch.
Step 8: Stuff and Finish Decreasing
Before you completely close your keychain, you’ll need to stuff it to give it its final plump shape. Don’t overstuff or understuff.
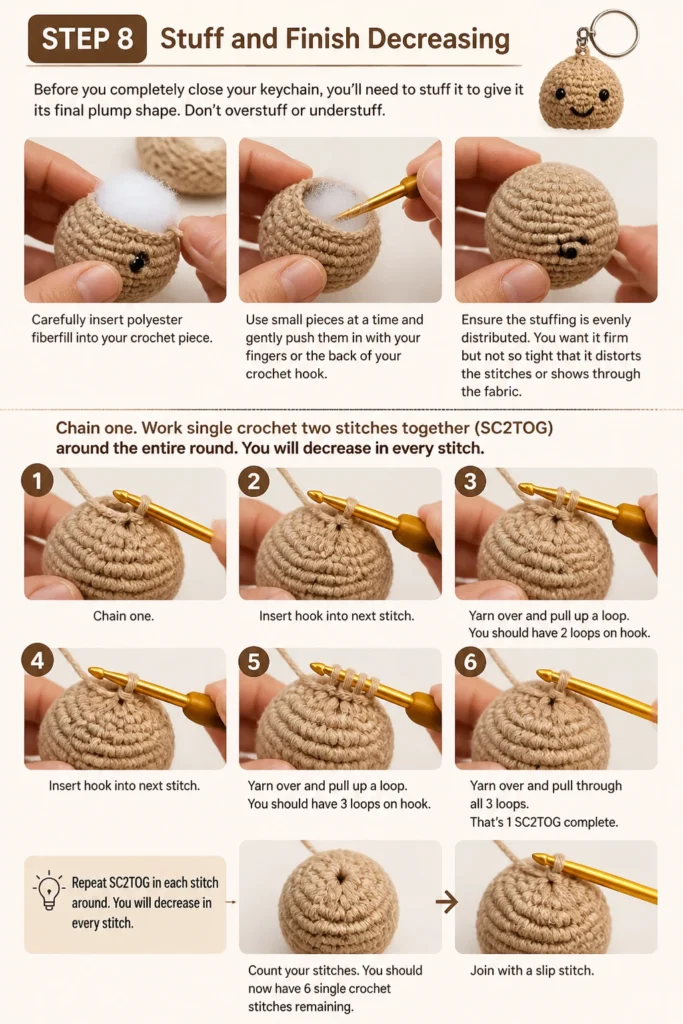
Carefully insert polyester fiberfill into your crochet piece. Use small pieces at a time and gently push them in with your fingers or the back of your crochet hook.
Ensure the stuffing is evenly distributed. You want it firm but not so tight that it distorts the stitches or shows through the fabric.
Chain one.
Work single crochet two stitches together (SC2TOG) around the entire round. You will decrease in every stitch.
Count your stitches. You should now have 6 single crochet stitches remaining.
Join with a slip stitch.
Step 9: Close and Weave in Ends
The final steps involve securely closing the remaining opening and tidying up all those loose yarn tails.
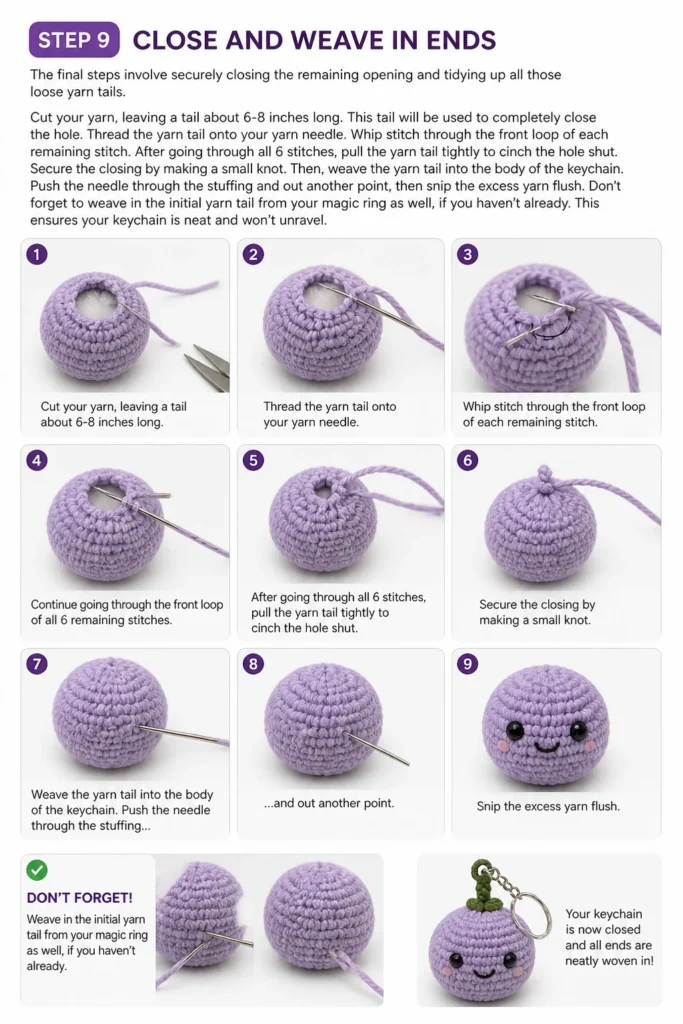
Cut your yarn, leaving a tail about 6-8 inches long. This tail will be used to completely close the hole.
Thread the yarn tail onto your yarn needle.
Whip stitch through the front loop of each remaining stitch. After going through all 6 stitches, pull the yarn tail tightly to cinch the hole shut.
Secure the closing by making a small knot. Then, weave the yarn tail into the body of the keychain. Push the needle through the stuffing and out another point, then snip the excess yarn flush.
Don’t forget to weave in the initial yarn tail from your magic ring as well, if you haven’t already. This ensures your keychain is neat and won’t unravel.
Step 10: Attach Keychain Hardware
Your crochet piece is complete! Now it’s time to turn it into a functional keychain by adding the hardware.
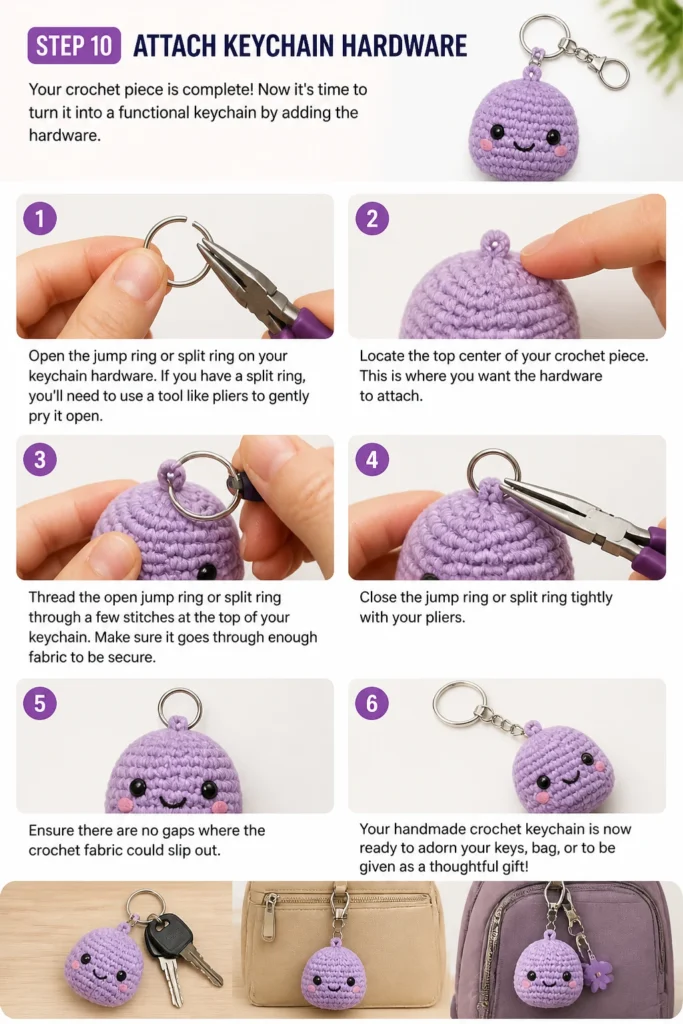
Open the jump ring or split ring on your keychain hardware. If you have a split ring, you’ll need to use a tool like pliers to gently pry it open.
Locate the top center of your crochet piece. This is where you want the hardware to attach.
Thread the open jump ring or split ring through a few stitches at the top of your keychain. Make sure it goes through enough fabric to be secure.
Close the jump ring or split ring tightly with your pliers. Ensure there are no gaps where the crochet fabric could slip out.
Your handmade crochet keychain is now ready to adorn your keys, bag, or to be given as a thoughtful gift!
Common Mistakes to Avoid
Inconsistent Tension
Crochet tension refers to how tightly or loosely you hold your yarn and stitches. If your tension is inconsistent, your keychain can end up looking lumpy or uneven.
Practice maintaining an even grip on your yarn and hook. Try to keep your stitches uniform in size. If your stitches are too tight, they’re hard to work into; too loose, and they create gaps.
Incorrect Stitch Count
Losing track of your stitches is a common pitfall, especially when working in the round. An incorrect stitch count can lead to a wonky, asymmetrical shape.
Always count your stitches at the end of each round. Use a stitch marker to mark the first stitch of every round. This simple tool will save you a lot of frustration and unraveling.
Not Stuffing Enough or Overstuffing
The amount of stuffing you use significantly impacts the final look and feel of your keychain. Too little stuffing makes it look flat and sad, while too much can distort the shape and stretch your stitches.
Stuff your keychain gradually, adding small amounts of fiberfill. Gently shape it with your hands as you go. Aim for a firm but yielding feel, ensuring the stuffing is evenly distributed without bulging.
Forgetting to Secure Ends Properly
Loose ends are not just unsightly; they can also lead to your crochet project unraveling over time. This is especially true for keychains, which experience a lot of wear and tear.
Always weave in your yarn tails thoroughly using a yarn needle. Go back and forth through several stitches in different directions within the fabric. A well-secured end should be virtually invisible and very difficult to pull out.
Troubleshooting
Hole in the Center of the Magic Ring
Sometimes, even after pulling the tail, a small hole remains in the center of your magic ring. This can happen if the initial loop wasn’t tight enough or if the tail wasn’t pulled firmly.
If the hole is small, you can often close it further by using your yarn needle to sew a few small stitches across the gap after weaving in the tail. For a more robust fix next time, ensure your initial yarn loop is snug and pull the tail very tight.
Keychain Looks Lopsided or Uneven
A lopsided keychain usually points to inconsistent tension or an incorrect stitch count in one or more rounds. This can be frustrating, but it’s a common learning curve.
Carefully review your stitch count for each round. If you find a mistake, unravel back to that point and re-crochet. Focus on maintaining even tension throughout your work. Practice really helps to build muscle memory for consistent stitches.
Yarn Splitting While Crocheting
Yarn splitting is when your crochet hook goes through the plies of the yarn instead of cleanly under the entire strand. This results in weak, messy-looking stitches.
This often happens with certain types of yarn or if your hook has a very pointed tip. Try adjusting your hook angle or using a hook with a slightly blunter tip. Slow down and be mindful of where your hook is entering the stitch.
Key Takeaways
- Starting with a magic ring creates a neat, closed center for your keychain.
- Increasing stitches gradually builds the round shape, while decreasing stitches closes it.
- Consistent tension and accurate stitch counting are crucial for a well-formed piece.
- Properly stuffing and securely weaving in ends ensures durability and a professional finish.
- Attaching keychain hardware transforms your crochet piece into a functional accessory.
- Crochet keychains are excellent projects for practicing basic stitches and learning shaping techniques.
Frequently Asked Questions
What’s the best type of yarn for a crochet keychain?
Acrylic or cotton yarn are excellent choices for keychains. They are durable, washable, and come in a wide range of colors. Cotton offers a crisp stitch definition, while acrylic is soft and readily available.
Can I wash my crochet keychain?
Yes, most crochet keychains made from acrylic or cotton yarn can be hand-washed. Use mild soap and cool water, gently squeeze out excess water, and then reshape and air dry. Avoid machine washing and drying unless the yarn label specifically states it’s safe.
How can I make my keychain unique?
You can personalize your keychain by using different yarn colors, adding embroidery for facial features, or attaching small felt cut-outs. Experiment with different stitch patterns or try adding beads before closing up your piece for extra sparkle.
Can I sell the keychains I make using this guide?
Absolutely! Once you’ve mastered the technique, you are welcome to sell the keychains you create. Handmade items make wonderful gifts and marketable products. Remember to price your items fairly, considering your time and material costs.
Embrace Your Creative Journey!
You’ve just created a beautiful, handmade crochet keychain! This project is more than just a functional item; it’s a testament to your growing skills and creativity.
Take pride in your work and consider all the possibilities this small craft opens up. You now have the foundation to explore more complex amigurumi patterns or even design your own unique keychain shapes.
Why not try making a few more in different colors, or experiment with a slightly larger hook for a softer, squishier feel? Your next project could be a tiny animal, a fruit, or even a miniature version of your favorite object.
Grab your hook and some yarn today, and let your imagination lead the way. Happy crocheting!