⚙️ How To Make Automata DIY
Creating automata is a truly captivating experience.
I remember the sheer joy of seeing my first wooden figure spring to life with a turn of a crank.
This guide shares my hands-on knowledge to help you craft your own moving mechanical wonders.
Quick Overview
You’re about to embark on a delightful journey into mechanical art. By following these steps, you’ll design, build, and animate your very own automaton, bringing a static object to dynamic life.
- Time needed: 10-20 hours (depending on complexity and experience)
- Difficulty: Intermediate
- What you’ll need: Wood or thick cardboard, hand tools, glue, dowels, wire, and a dash of patience.
Step-by-Step Instructions
Step 1: Ideate Your Automaton’s Story
Begin by envisioning what your automaton will do. Think about the narrative you want to tell. Will it be a bird flapping its wings, a person waving, or something entirely whimsical?
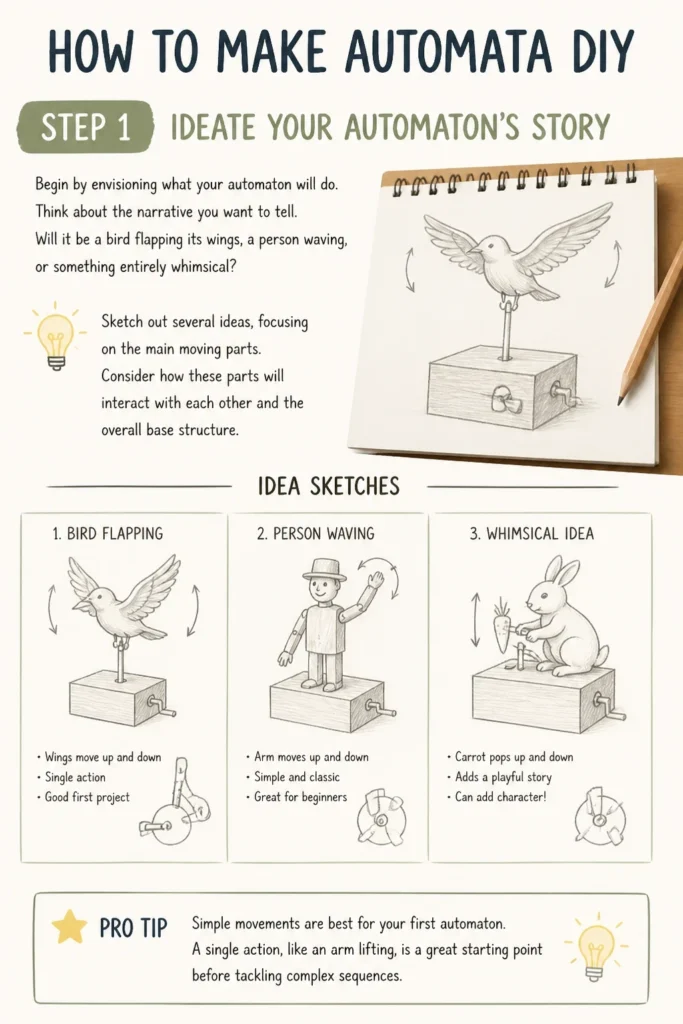
Sketch out several ideas, focusing on the main moving parts. Consider how these parts will interact with each other and the overall base structure.
Pro Tip: Simple movements are best for your first automaton. A single action, like an arm lifting, is a great starting point before tackling complex sequences.
Step 2: Design and Plan Your Mechanism
Translate your initial sketches into a more detailed plan. Decide on the scale of your automaton and the type of movement it will perform.
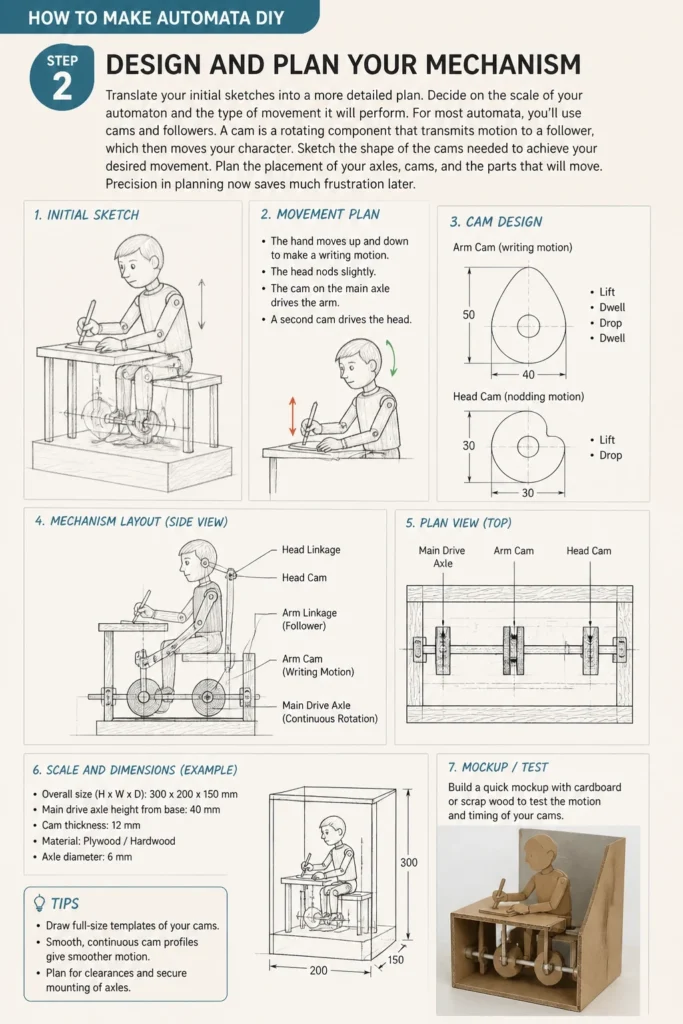
For most automata, you’ll use cams and followers. A cam is a rotating component that transmits motion to a follower, which then moves your character. Sketch the shape of the cams needed to achieve your desired movement.
Plan the placement of your axles, cams, and the parts that will move. Precision in planning now saves much frustration later.
Step 3: Gather Your Materials and Tools
Select your primary construction material. Wood, particularly plywood or basswood, is excellent for durability and ease of cutting. Thick cardboard or foam board can also work for lighter, simpler designs.
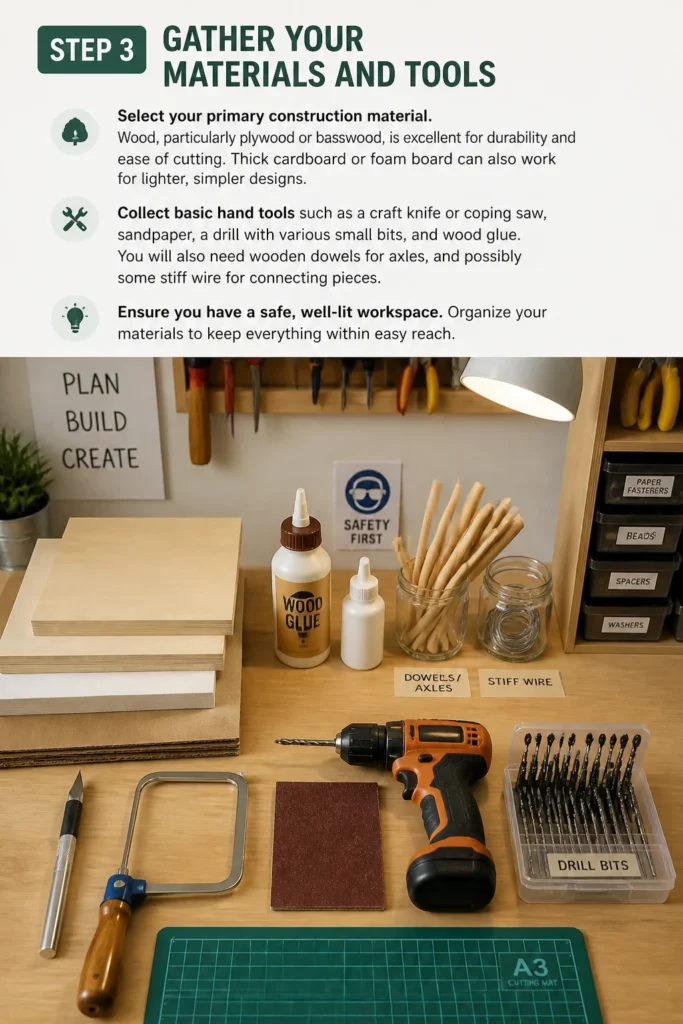
Collect basic hand tools such as a craft knife or coping saw, sandpaper, a drill with various small bits, and wood glue. You will also need wooden dowels for axles, and possibly some stiff wire for connecting pieces.
Ensure you have a safe, well-lit workspace. Organize your materials to keep everything within easy reach.
Step 4: Construct the Base and Frame
Cut the pieces for your automaton’s base and supporting frame. The base provides stability, and the frame holds the internal mechanisms.
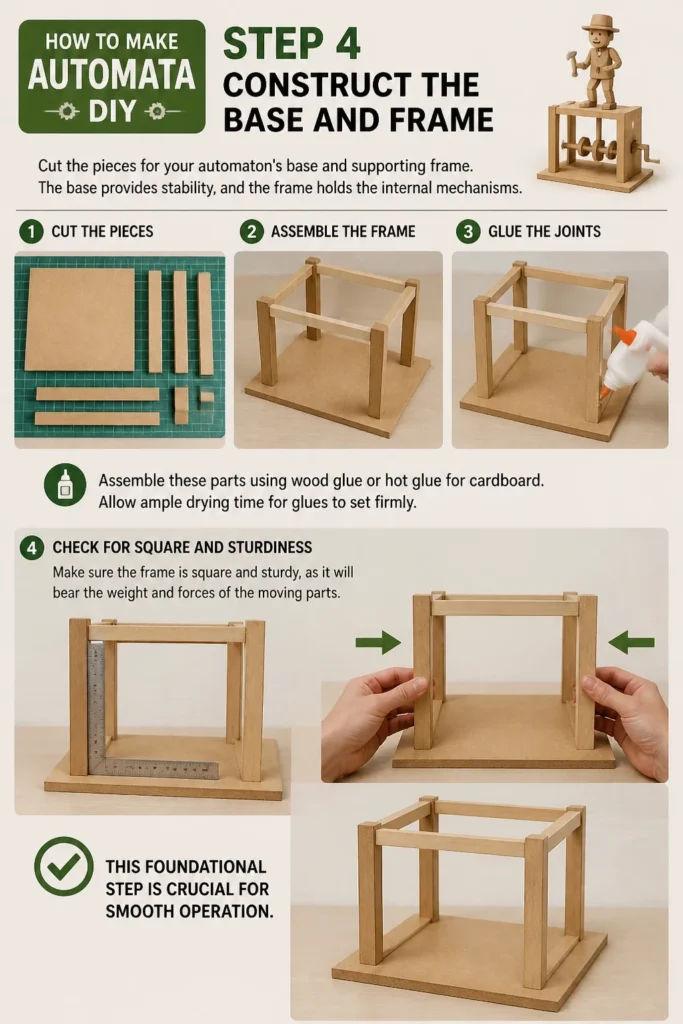
Assemble these parts using wood glue or hot glue for cardboard. Allow ample drying time for glues to set firmly.
Make sure the frame is square and sturdy, as it will bear the weight and forces of the moving parts. This foundational step is crucial for smooth operation.
Step 5: Create the Cams and Axles
Cut out your cam shapes from your chosen material. Common cam shapes include circular (for simple up-and-down motion), snail (for a gradual rise and sudden drop), and eccentric (for irregular motion).
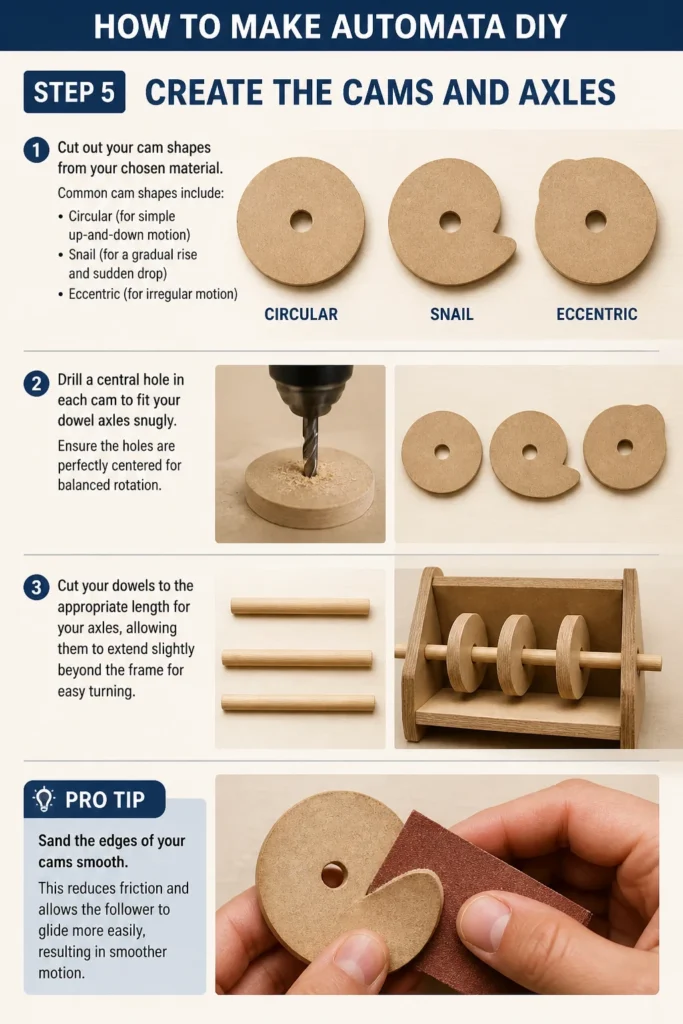
Drill a central hole in each cam to fit your dowel axles snugly. Ensure the holes are perfectly centered for balanced rotation.
Cut your dowels to the appropriate length for your axles, allowing them to extend slightly beyond the frame for easy turning.
Pro Tip: Sand the edges of your cams smooth. This reduces friction and allows the follower to glide more easily, resulting in smoother motion.
Step 6: Assemble the Cam and Follower Mechanism
Insert your axles through pre-drilled holes in your frame. Attach the cams to the axles, ensuring they are positioned correctly to interact with their respective followers.
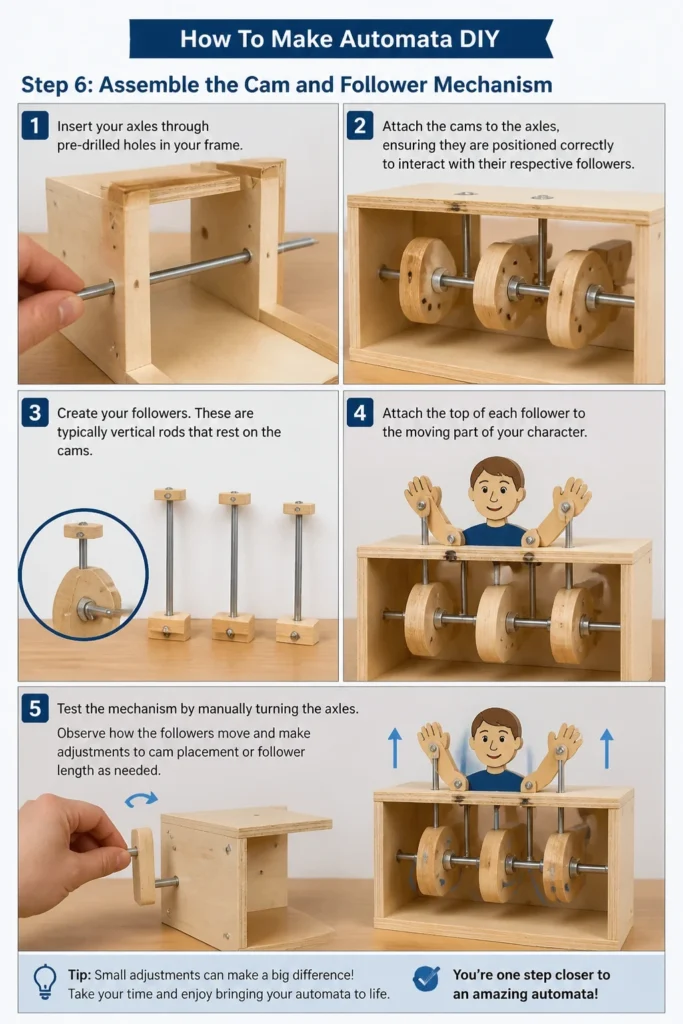
Create your followers. These are typically vertical rods that rest on the cams. Attach the top of each follower to the moving part of your character.
Test the mechanism by manually turning the axles. Observe how the followers move and make adjustments to cam placement or follower length as needed.
Step 7: Build Your Character and Connect Movements
Construct the character or scene that your automaton will animate. This could involve cutting shapes from wood, card, or even modeling clay.
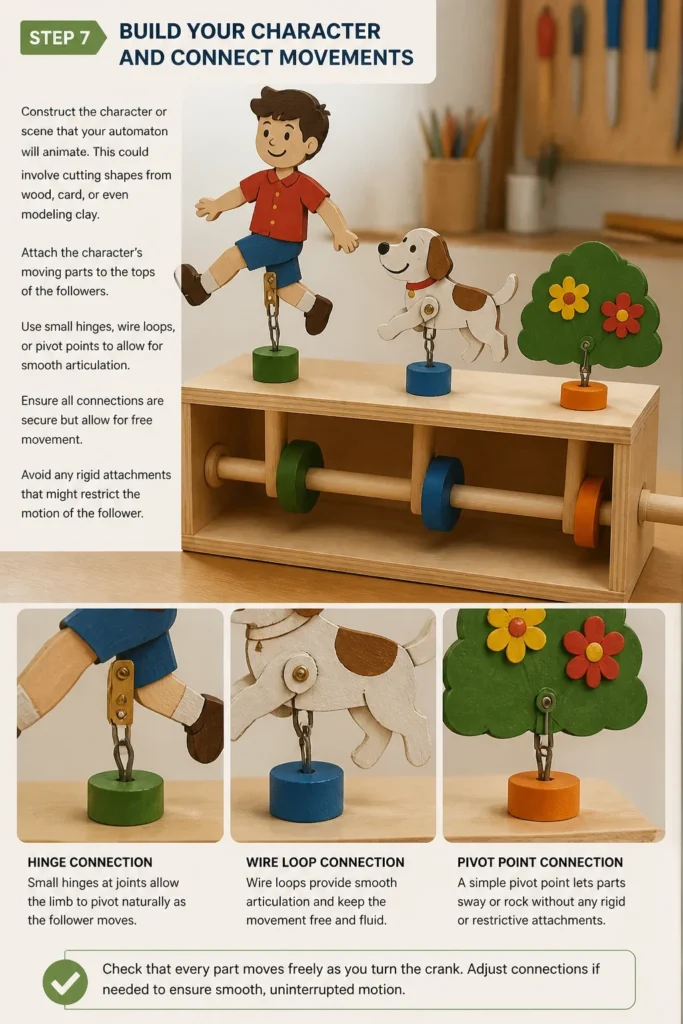
Attach the character’s moving parts to the tops of the followers. Use small hinges, wire loops, or pivot points to allow for smooth articulation.
Ensure all connections are secure but allow for free movement. Avoid any rigid attachments that might restrict the motion of the follower.
Step 8: Add the Crank and Final Touches
Attach a crank handle to one end of your main axle. This will be how you operate your automaton. You can fashion a simple handle from a small piece of wood or a bent wire.
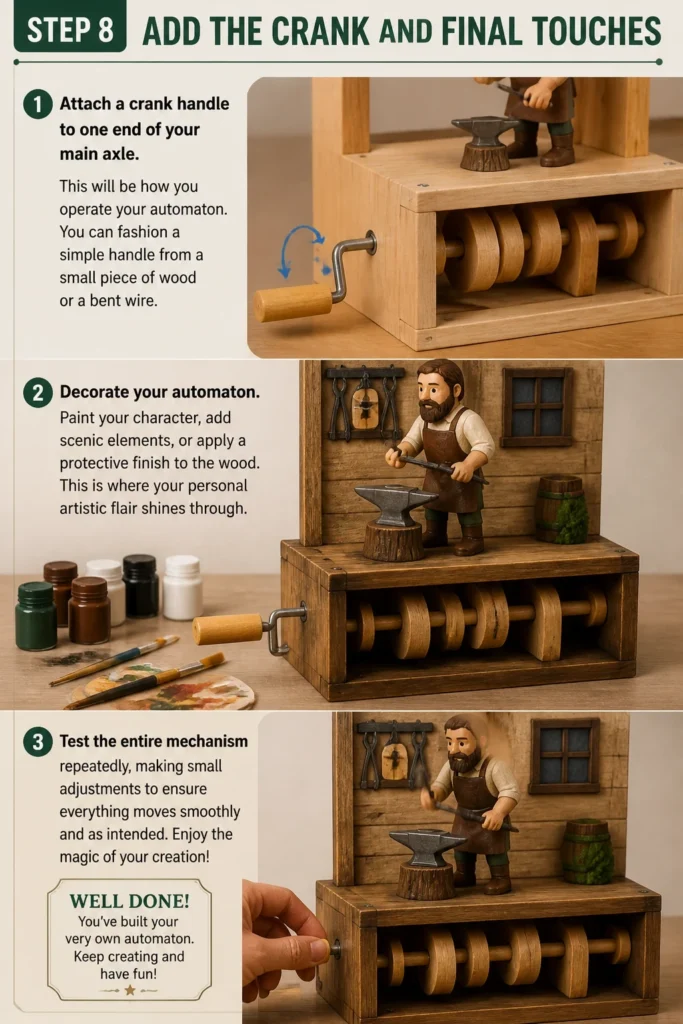
Decorate your automaton. Paint your character, add scenic elements, or apply a protective finish to the wood. This is where your personal artistic flair shines through.
Test the entire mechanism repeatedly, making small adjustments to ensure everything moves smoothly and as intended. Enjoy the magic of your creation!
Common Mistakes to Avoid
Ignoring Friction
One common pitfall is not accounting for friction in the mechanism. Rough edges, tight-fitting parts, and unlubricated joints can make your automaton stiff and difficult to operate.
Always sand all moving surfaces smooth. Use a bit of beeswax or a dry lubricant on axles and cam surfaces to reduce resistance. Ensure holes are drilled slightly larger than the dowels to allow for free rotation.
Over-Complicating the Design
Beginners often try to incorporate too many complex movements or characters into their first project. This can lead to frustration and a higher chance of mechanical failure.
Start with a single, simple movement. Master the basics of cam and follower interaction before attempting multi-axis or intricate character movements. Simplicity often results in the most elegant and satisfying automata.
Poorly Secured Connections
Loose or weak connections between parts can cause erratic movement or complete mechanism failure. If a cam slips on an axle or a character piece detaches, the automaton won’t function.
Use strong wood glue or appropriate fasteners for all permanent connections. For parts that need to rotate or pivot, ensure they are securely attached but still free to move. Double-check all joints before final assembly.
Inaccurate Drilling and Cutting
Precision is key in automata construction. Slightly misaligned holes or unevenly cut cams can throw off the entire mechanism, causing binding or inconsistent movement.
Take your time with all cutting and drilling tasks. Use a ruler and square for accurate measurements and a drill press if available for perfectly perpendicular holes. Measure twice, cut once.
Troubleshooting
Automaton Jams or Binds
If your automaton isn’t turning smoothly or gets stuck, it’s often due to friction or misalignment. Check all moving parts for any rubbing or catching.
Inspect cam surfaces and follower rods for rough spots and sand them smooth. Ensure axles are not too tight in their holes; slightly enlarge holes if necessary. Apply a dry lubricant to contact points.
Movement is Weak or Inconsistent
When the character’s movement is not as strong or consistent as desired, it could be an issue with cam shape, follower weight, or connection rigidity.
Review your cam profiles to ensure they provide sufficient lift and fall. Check if your follower is too heavy for the cam to operate effectively. Ensure all connections to the character allow for full, unhindered motion.
Crank is Hard to Turn
A stiff crank usually indicates excessive friction within the mechanism or a part that is binding. This can also be caused by the character parts catching on the frame.
Carefully turn the crank and observe which parts are creating resistance. Loosen any overly tight screws or glue joints. Ensure axles are free-spinning and not glued into place. Lightly sand any areas where the character might be rubbing against the frame.
Key Takeaways
- Start with a simple design to build confidence and understanding of basic mechanisms.
- Precision in cutting and drilling is fundamental for smooth, reliable operation.
- Reduce friction by sanding all moving surfaces and using appropriate lubricants.
- The cam and follower system is the heart of most automata; understand its principles.
- Test your mechanism frequently during assembly to catch issues early.
- Embrace the iterative process of design, build, test, and refine.
Frequently Asked Questions
What is the best material for a beginner’s automaton?
Plywood, especially thin birch plywood, is highly recommended for beginners. It’s relatively inexpensive, easy to cut with hand tools, and holds glue well. Thick cardboard or foam board also work for very simple, lightweight projects.
How do I make complex movements with cams?
Complex movements are achieved by combining multiple cams on a single axle, or by using cams with more intricate, non-circular profiles. You can also layer mechanisms, where the movement of one cam triggers another part of the automaton.
Can I use a motor instead of a hand crank?
Yes, you can absolutely motorize your automaton. Small DC motors with reduction gearboxes are commonly used. You’ll need to consider the motor’s torque and speed, and how to securely attach it to your main axle.
Where can I find design inspiration?
Look at existing automata artists, watch videos of antique mechanical toys, or draw inspiration from nature and everyday movements. Pinterest, YouTube, and specialized automata websites are excellent resources for ideas.
Our Top Recommended Finds
- Coping Saw with Assorted Blades: Essential for cutting intricate shapes in wood with precision.
- Small Hand Drill Set: Perfect for drilling clean, accurate holes for axles and pivot points.
- Wood Glue (PVA): Provides strong, lasting bonds for wooden components, crucial for a durable automaton.
Unleash Your Mechanical Imagination
You now have the fundamental knowledge to begin your journey into automata making. Each piece you create will teach you more about mechanics and design.
Don’t be afraid to experiment with different materials and movement styles. The world of kinetic sculpture is vast and rewarding.
Start sketching your first design today and bring your unique mechanical vision to life.