🧵 How To Make A Bonnet
Creating your own bonnet is a deeply satisfying project, blending practicality with personal style.
I remember the first one I made; it felt amazing to wear something crafted with my own hands.
This guide draws on years of sewing experience to help you achieve perfect results, even if you’re just starting out.
Quick Overview
You’re about to craft a comfortable and stylish bonnet, perfect for protecting your hair or adding a touch of elegance.
This project is incredibly rewarding and gives you full control over the design.
- Time needed: 2-4 hours (depending on sewing experience)
- Difficulty: Beginner
- What you’ll need: Fabric, elastic, thread, sewing machine, basic sewing tools
Step-by-Step Instructions
Step 1: Gather Your Materials and Tools
Before you begin, ensure you have everything laid out and ready to use.
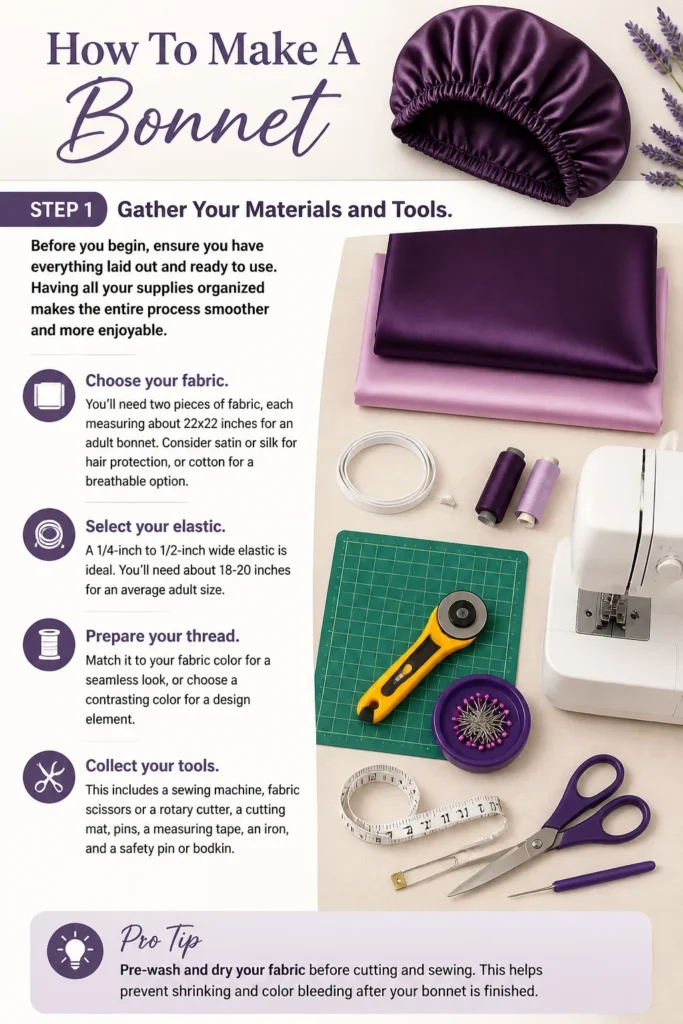
Having all your supplies organized makes the entire process smoother and more enjoyable.
- Choose your fabric. You’ll need two pieces of fabric, each measuring about 22×22 inches for an adult bonnet. Consider satin or silk for hair protection, or cotton for a breathable option.
- Select your elastic. A 1/4-inch to 1/2-inch wide elastic is ideal. You’ll need about 18-20 inches for an average adult size.
- Prepare your thread. Match it to your fabric color for a seamless look, or choose a contrasting color for a design element.
- Collect your tools. This includes a sewing machine, fabric scissors or a rotary cutter, a cutting mat, pins, a measuring tape, an iron, and a safety pin or bodkin.
Pro Tip: Pre-wash and dry your fabric before cutting. This prevents shrinkage later and ensures your bonnet maintains its size and shape after washing.
Step 2: Create Your Bonnet Pattern Pieces
A well-cut pattern is the foundation of a beautiful bonnet.
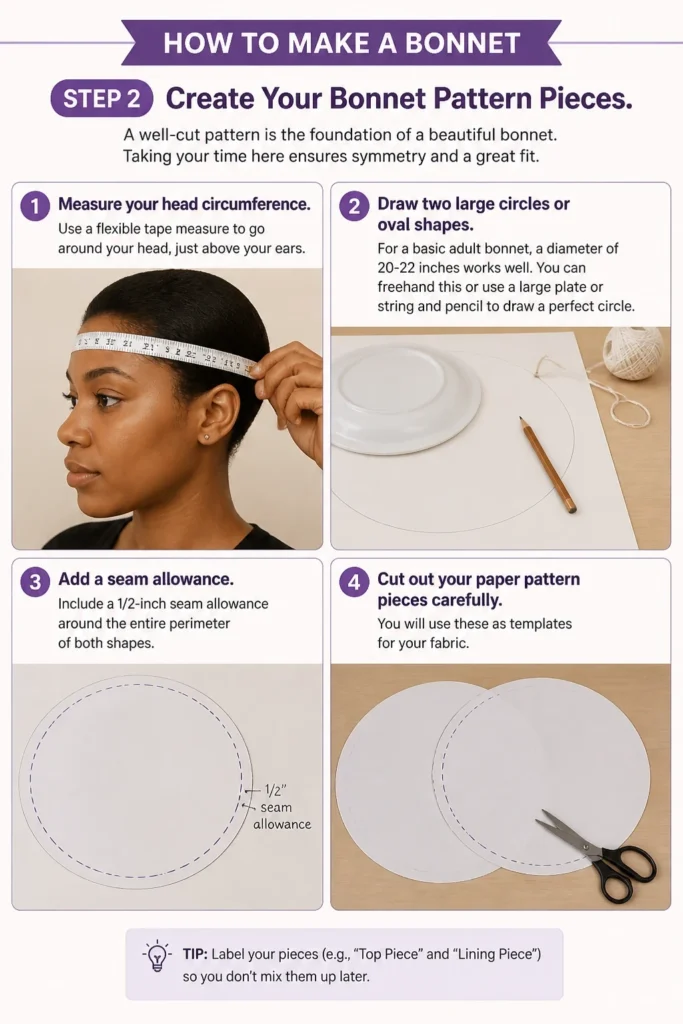
Taking your time here ensures symmetry and a great fit.
- Measure your head circumference. Use a flexible tape measure to go around your head, just above your ears.
- Draw two large circles or oval shapes. For a basic adult bonnet, a diameter of 20-22 inches works well. You can freehand this or use a large plate or string and pencil to draw a perfect circle.
- Add a seam allowance. Include a 1/2-inch seam allowance around the entire perimeter of both shapes.
- Cut out your paper pattern pieces carefully. You will use these as templates for your fabric.
Step 3: Cut Your Fabric
Precision in cutting is key for a neat finish.
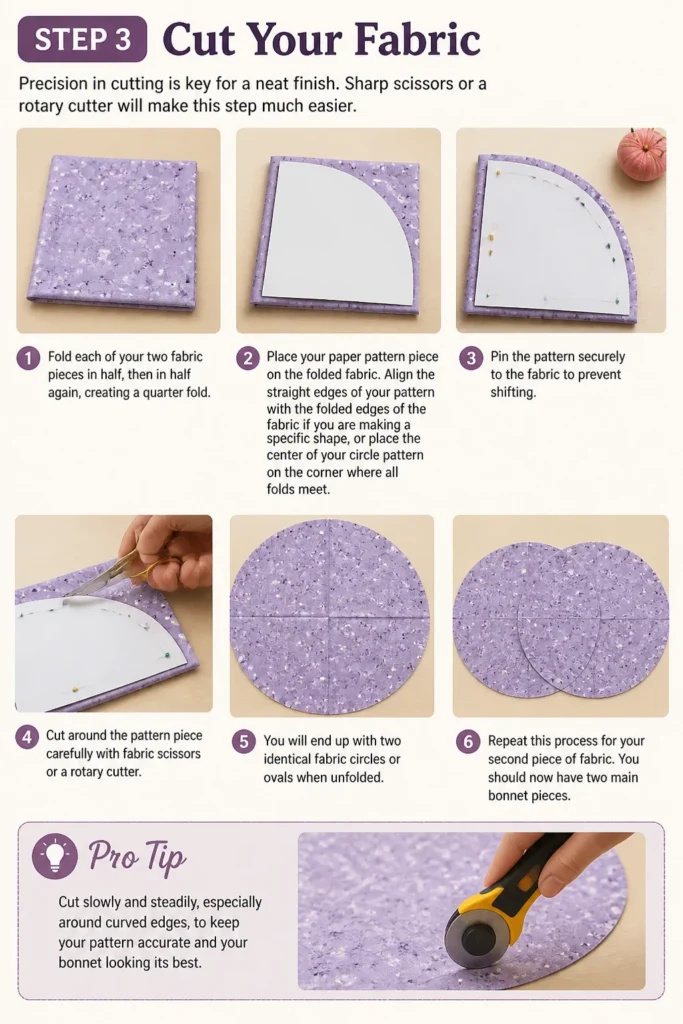
Sharp scissors or a rotary cutter will make this step much easier.
- Fold each of your two fabric pieces in half, then in half again, creating a quarter fold.
- Place your paper pattern piece on the folded fabric. Align the straight edges of your pattern with the folded edges of the fabric if you are making a specific shape, or place the center of your circle pattern on the corner where all folds meet.
- Pin the pattern securely to the fabric to prevent shifting.
- Cut around the pattern piece carefully with fabric scissors or a rotary cutter. You will end up with two identical fabric circles or ovals when unfolded.
- Repeat this process for your second piece of fabric. You should now have two main bonnet pieces.
Pro Tip: Cut slowly and steadily, especially around curves. Any unevenness here will show in your final product. For slippery fabrics like satin, use plenty of pins or pattern weights.
Step 4: Sew the Main Bonnet Pieces Together
This step forms the basic structure of your bonnet.
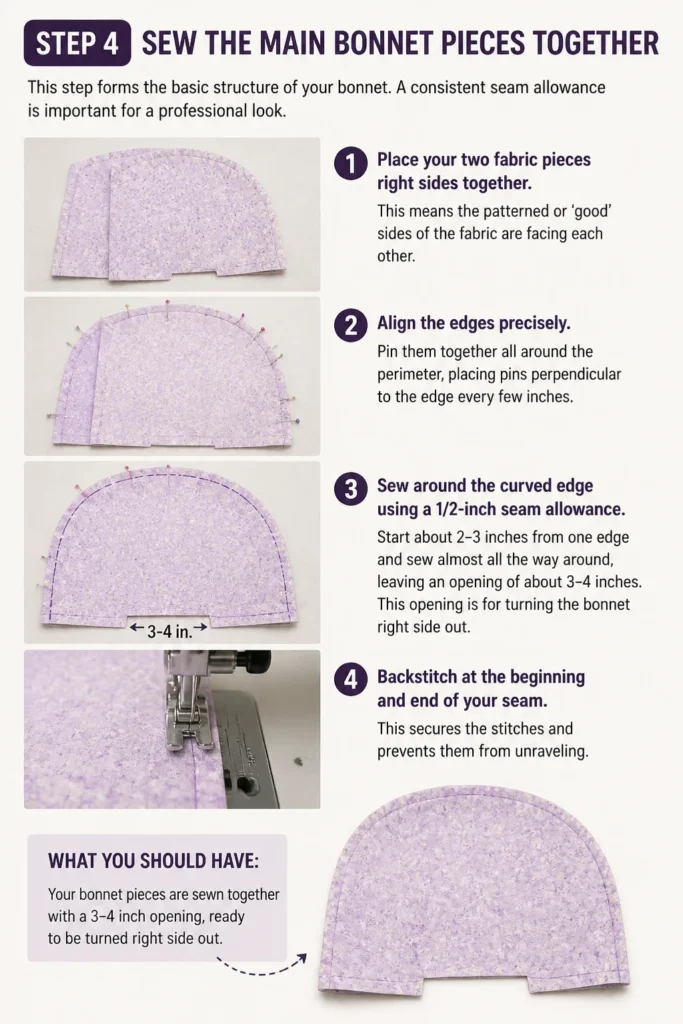
A consistent seam allowance is important for a professional look.
- Place your two fabric pieces right sides together. This means the patterned or ‘good’ sides of the fabric are facing each other.
- Align the edges precisely. Pin them together all around the perimeter, placing pins perpendicular to the edge every few inches.
- Sew around the curved edge using a 1/2-inch seam allowance. Start about 2-3 inches from one edge and sew almost all the way around, leaving an opening of about 3-4 inches. This opening is for turning the bonnet right side out.
- Backstitch at the beginning and end of your seam. This secures the stitches and prevents them from unraveling.
Step 5: Trim Seams and Turn Right Side Out
Trimming and turning help the bonnet lie flat and look smooth.
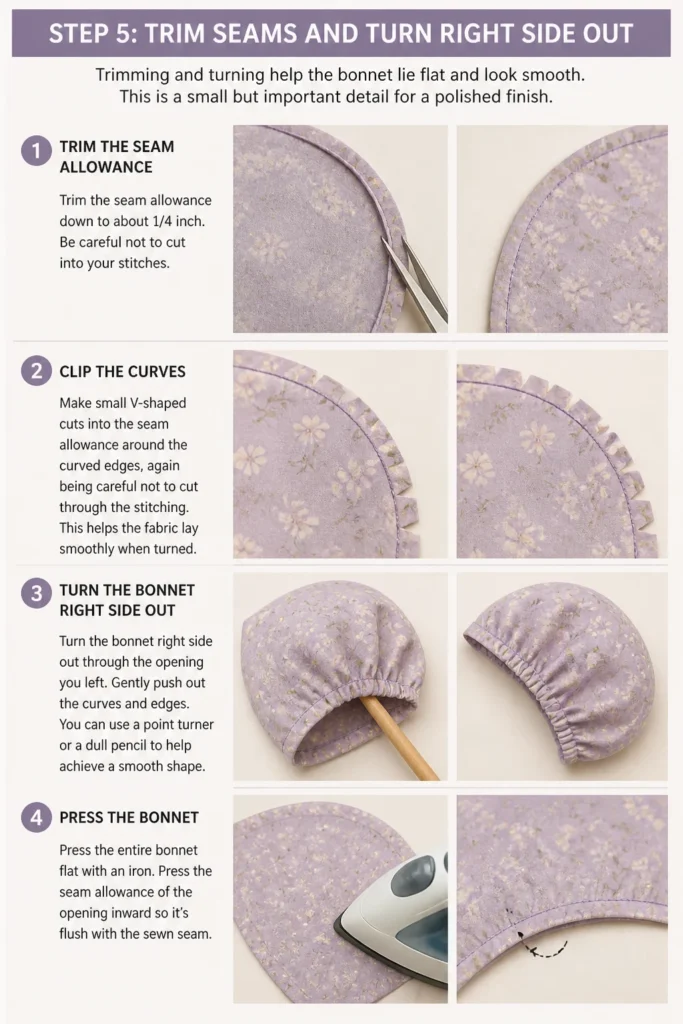
This is a small but important detail for a polished finish.
- Trim the seam allowance down to about 1/4 inch. Be careful not to cut into your stitches.
- Clip the curves. Make small V-shaped cuts into the seam allowance around the curved edges, again being careful not to cut through the stitching. This helps the fabric lay smoothly when turned.
- Turn the bonnet right side out through the opening you left.
- Gently push out the curves and edges. You can use a point turner or a dull pencil to help achieve a smooth shape.
- Press the entire bonnet flat with an iron. Press the seam allowance of the opening inward so it’s flush with the sewn seam.
Step 6: Create the Elastic Casing
The elastic casing will hold your elastic securely, ensuring a snug fit.
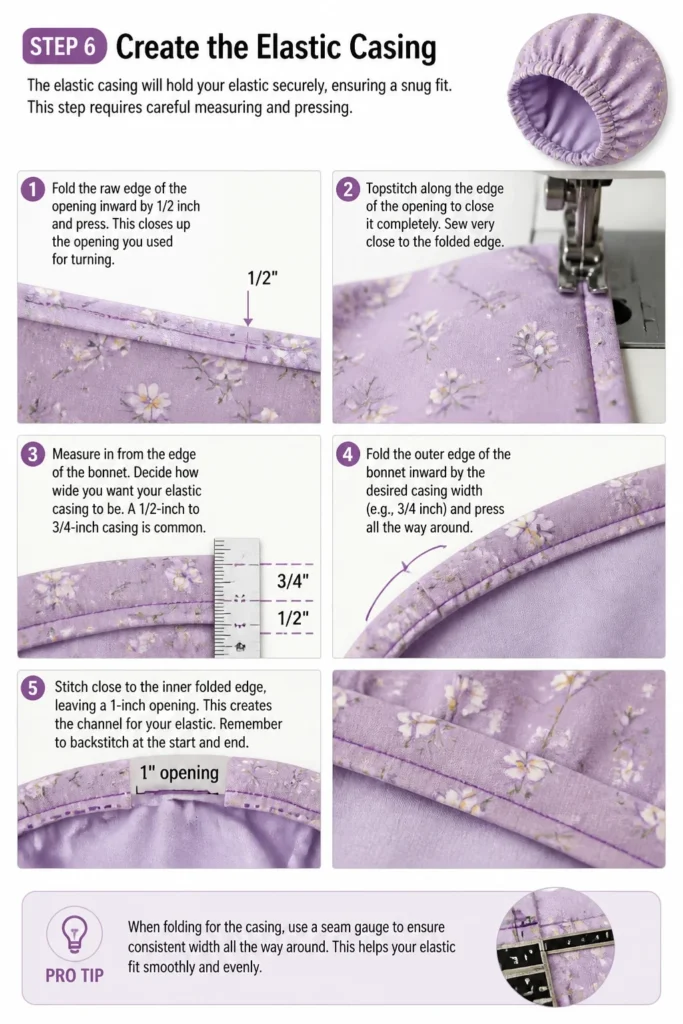
This step requires careful measuring and pressing.
- Fold the raw edge of the opening inward by 1/2 inch and press. This closes up the opening you used for turning.
- Topstitch along the edge of the opening to close it completely. Sew very close to the folded edge.
- Measure in from the edge of the bonnet. Decide how wide you want your elastic casing to be. A 1/2-inch to 3/4-inch casing is common.
- Fold the outer edge of the bonnet inward by the desired casing width (e.g., 3/4 inch) and press all the way around.
- Stitch close to the inner folded edge, leaving a 1-inch opening. This creates the channel for your elastic. Remember to backstitch at the start and end.
Pro Tip: When folding for the casing, use a seam gauge to ensure a consistent width all around. This makes for a much neater elastic channel.
Step 7: Insert the Elastic
This step brings your bonnet to life, giving it its characteristic shape.
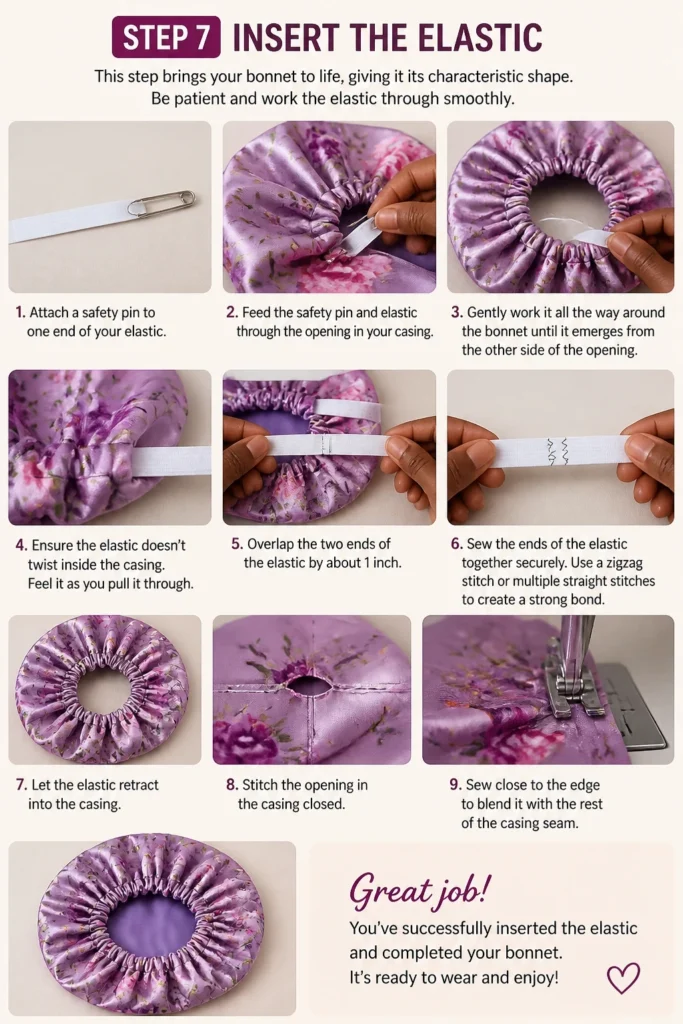
Be patient and work the elastic through smoothly.
- Attach a safety pin to one end of your elastic.
- Feed the safety pin and elastic through the opening in your casing. Gently work it all the way around the bonnet until it emerges from the other side of the opening.
- Ensure the elastic doesn’t twist inside the casing. Feel it as you pull it through.
- Overlap the two ends of the elastic by about 1 inch.
- Sew the ends of the elastic together securely. Use a zigzag stitch or multiple straight stitches to create a strong bond.
- Let the elastic retract into the casing.
- Stitch the opening in the casing closed. Sew close to the edge to blend it with the rest of the casing seam.
Step 8: Final Press and Inspection
A final press gives your handmade bonnet a professional finish.
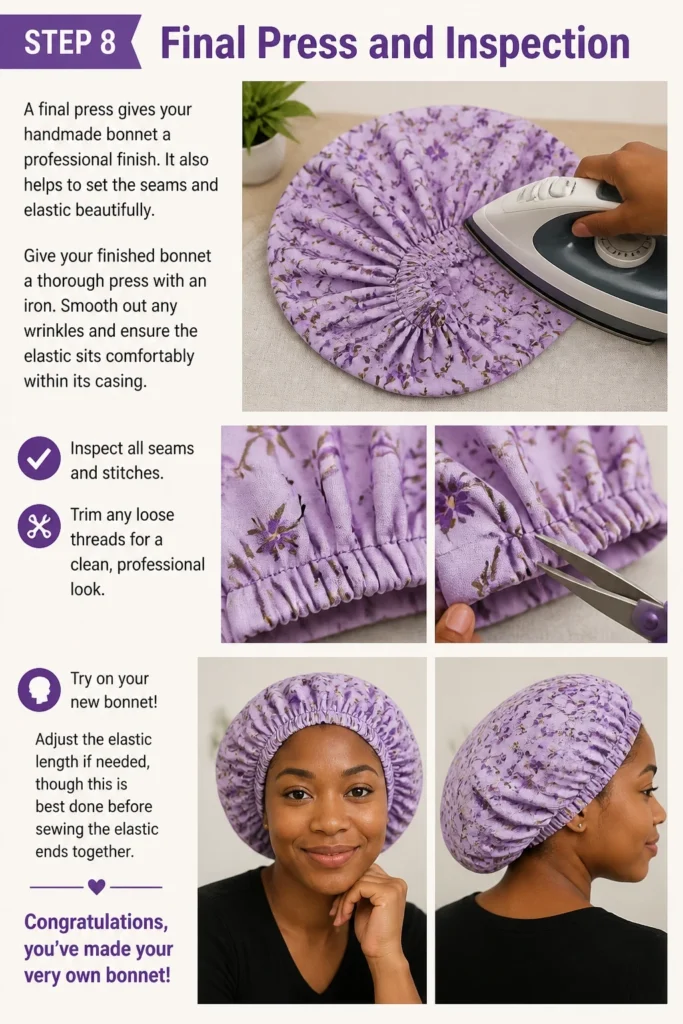
It also helps to set the seams and elastic beautifully.
- Give your finished bonnet a thorough press with an iron.
- Smooth out any wrinkles and ensure the elastic sits comfortably within its casing.
- Inspect all seams and stitches. Trim any loose threads for a clean, professional look.
- Try on your new bonnet! Adjust the elastic length if needed, though this is best done before sewing the elastic ends together.
Congratulations, you’ve made your very own bonnet!
Common Mistakes to Avoid
Choosing the Wrong Fabric
Using fabric that is too stiff or too flimsy can result in a bonnet that doesn’t drape well or isn’t comfortable.
Always consider the bonnet’s purpose; silk or satin for hair protection, cotton for breathability, or a soft knit for extra stretch.
Inconsistent Seam Allowances
Varying your seam allowance can lead to an uneven shape and a lopsided bonnet.
Use the guides on your sewing machine’s needle plate and take your time to maintain a consistent 1/2-inch allowance.
Over-Stretching Elastic
Pulling the elastic too tight when sewing the casing or when joining the ends will make the bonnet uncomfortable and potentially too small.
Aim for a snug but not restrictive fit; you want it to stay on without digging into your head.
Forgetting to Backstitch
Skipping backstitching at the beginning and end of seams means your stitches can easily unravel, especially with repeated wear and washing.
Always backstitch a few stitches to lock your seams in place for durability.
Troubleshooting
Bonnet Feels Too Tight
If your bonnet feels uncomfortably tight, the elastic might be too short or too taut.
Carefully unpick the seam where the elastic was joined, cut a slightly longer piece, and re-sew it, ensuring a more relaxed fit.
Bonnet Looks Puckered
Puckering often occurs when the fabric is stretched while sewing or if the seam allowance isn’t properly clipped on curves.
Pressing the seams thoroughly with an iron can sometimes help, or for severe puckering, you may need to unpick the seam and re-sew it more gently.
Elastic Twists Inside Casing
This is a common issue if the elastic isn’t held flat as it’s fed through the casing.
You’ll need to re-feed the elastic, making sure to keep it flat throughout the entire channel before joining the ends.
Key Takeaways
- Pre-wash your fabric to prevent shrinkage and ensure a consistent fit.
- Precision in cutting and a consistent seam allowance are crucial for a professional finish.
- Take your time with the elastic insertion to prevent twisting and ensure comfort.
- Always backstitch at the start and end of seams for durability.
- Pressing at each stage helps your bonnet look neat and well-constructed.
- Don’t be afraid to unpick and re-sew if something isn’t quite right; practice makes perfect.
Frequently Asked Questions
What is the best fabric for a bonnet?
For hair protection, silk or satin are excellent as they reduce friction and static. For general wear or breathability, soft cottons or bamboo knits are great choices.
Can I make a reversible bonnet?
Absolutely! This guide essentially creates a reversible bonnet. Just ensure both outer fabrics are equally appealing and consider using a slightly wider opening to turn it right side out, making sure to press well.
How do I determine the right elastic length?
A good starting point is to measure your head circumference and subtract 2-3 inches. You can always start longer, pin the elastic, try it on, and then trim and sew for the perfect comfortable fit.
Do I need a sewing machine for this project?
While a sewing machine makes the process much faster and easier, you can certainly hand-sew a bonnet. It will take more time and patience, but the result can be just as lovely and durable.
Our Top Recommended Finds
- Fabric Shears: A good pair of sharp fabric scissors makes cutting precise and effortless, reducing hand strain.
- Rotary Cutter and Mat: Ideal for quickly and accurately cutting curves and large pieces of fabric, especially useful for slippery materials.
- Seam Gauge: This small ruler with a sliding marker is invaluable for measuring consistent seam allowances and folds, making your work much neater.
Embrace Your Inner Creator
You’ve just learned how to craft a beautiful and functional bonnet from scratch.
This skill opens doors to endless customization, allowing you to match bonnets to outfits or specific needs.
Why not try experimenting with different fabrics or adding decorative elements like lace or embroidery?
Dive into your fabric stash today and create another unique piece!