🖼️ How To Make Photo Frame
There’s something truly special about displaying a cherished memory in a frame you crafted yourself.
I remember making my first custom frame for a beloved old photograph, and the sense of accomplishment was immense.
This guide shares that hands-on experience, walking you through each practical step to create your own beautiful photo frame.
Quick Overview
You’re about to embark on a rewarding project, resulting in a unique, custom-made photo frame that perfectly showcases your favorite picture.
This guide will equip you with the knowledge to select materials, cut precise angles, assemble the frame, and add the finishing touches.
- Time needed: 3-5 hours (allowing for drying times)
- Difficulty: Intermediate
- What you’ll need: Wood strips, saw, measuring tape, wood glue, clamps, sandpaper, finishing materials.
Step-by-Step Instructions
Step 1: Gather Your Materials and Tools
Before any cutting begins, ensure you have all necessary items at hand. A well-prepared workspace makes the entire process smoother and safer.
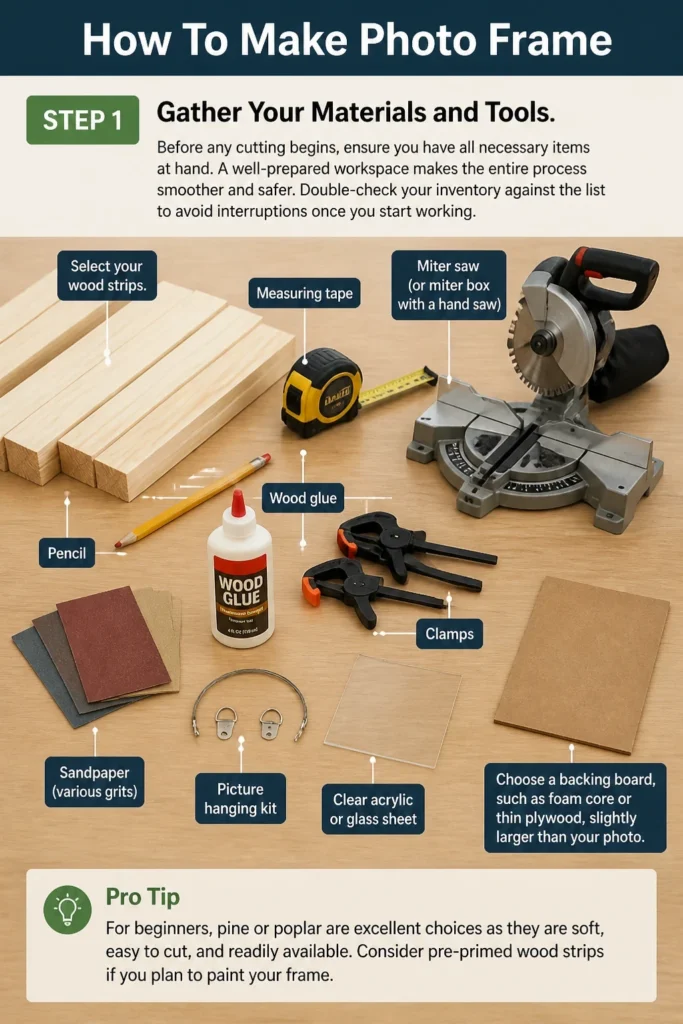
Double-check your inventory against the list to avoid interruptions once you start working.
- Select your wood strips. Opt for a type of wood that complements your photo and home decor.
- Gather your tools: a miter saw (or miter box with a hand saw), measuring tape, pencil, wood glue, clamps, sandpaper (various grits), a picture hanging kit, and a clear acrylic or glass sheet.
- Choose a backing board, such as foam core or thin plywood, slightly larger than your photo.
Pro Tip: For beginners, pine or poplar are excellent choices as they are soft, easy to cut, and readily available. Consider pre-primed wood strips if you plan to paint your frame.
Step 2: Measure and Plan Your Frame Dimensions
Accuracy here is paramount for a professional-looking frame. Take your time with these measurements.
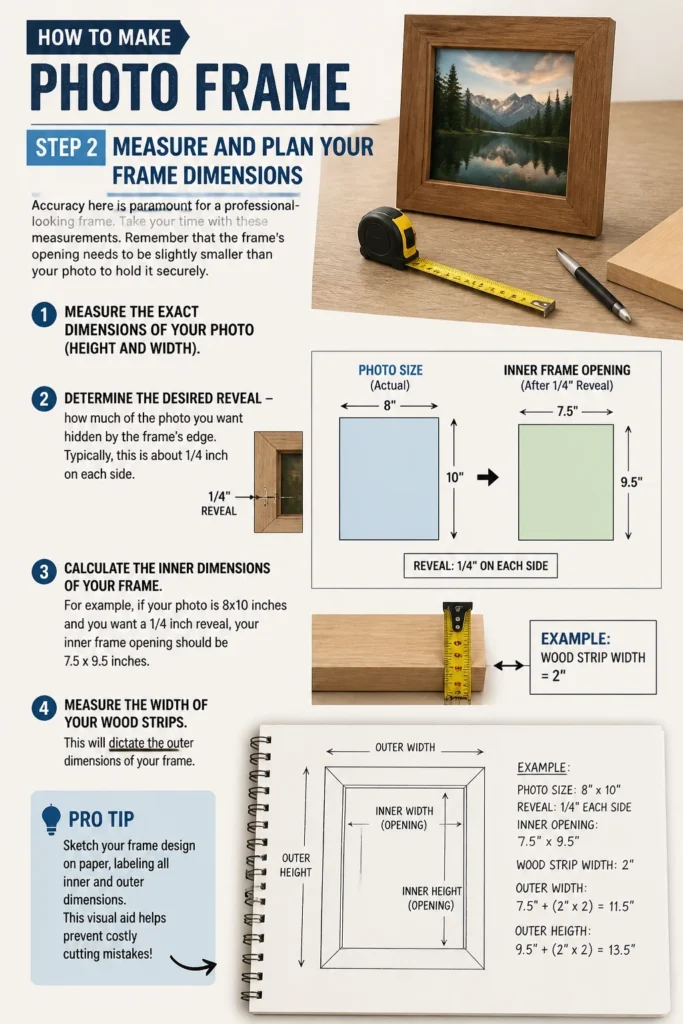
Remember that the frame’s opening needs to be slightly smaller than your photo to hold it securely.
- Measure the exact dimensions of your photo (height and width).
- Determine the desired “reveal” – how much of the photo you want hidden by the frame’s edge. Typically, this is about 1/4 inch on each side.
- Calculate the inner dimensions of your frame. For example, if your photo is 8×10 inches and you want a 1/4 inch reveal, your inner frame opening should be 7.5×9.5 inches.
- Measure the width of your wood strips. This will dictate the outer dimensions of your frame.
Pro Tip: Sketch your frame design on paper, labeling all inner and outer dimensions. This visual aid helps prevent costly cutting mistakes. Always measure twice, cut once.
Step 3: Cut Your Frame Pieces
This step requires precision and careful handling of cutting tools. Safety should always be your top priority.
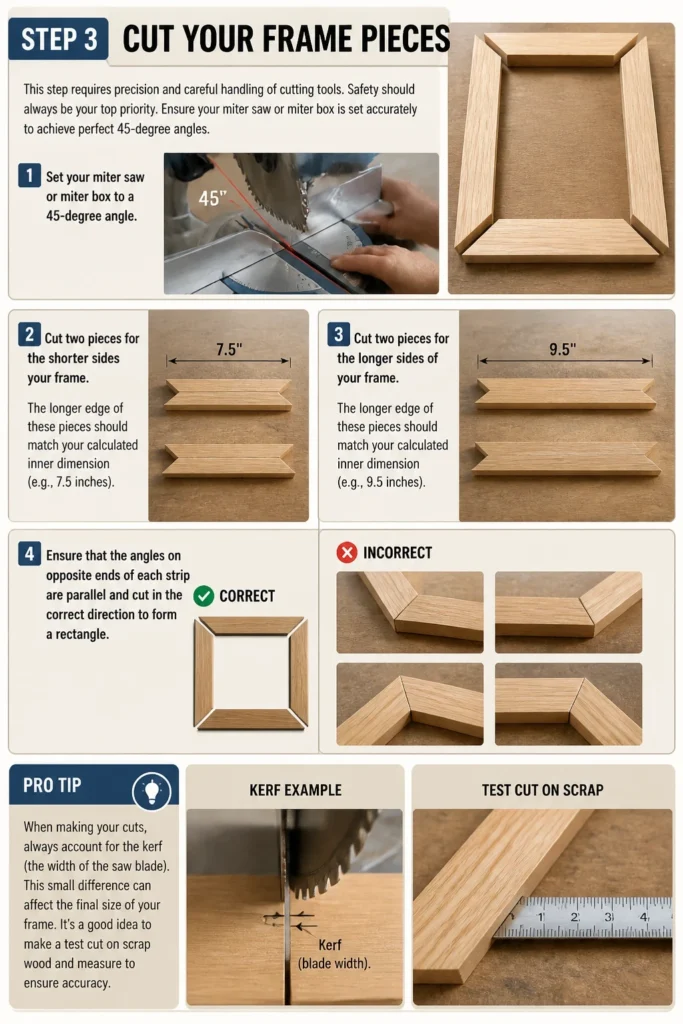
Ensure your miter saw or miter box is set accurately to achieve perfect 45-degree angles.
- Set your miter saw or miter box to a 45-degree angle. You will make four cuts for each side of the frame.
- Cut two pieces for the shorter sides of your frame. The longer edge of these pieces should match your calculated inner dimension (e.g., 7.5 inches).
- Cut two pieces for the longer sides of your frame. The longer edge of these pieces should match your calculated inner dimension (e.g., 9.5 inches).
- Ensure that the angles on opposite ends of each strip are parallel and cut in the correct direction to form a rectangle.
Pro Tip: When making your cuts, always account for the kerf (the width of the saw blade). Make a test cut on a scrap piece of wood to verify your angle and measurement settings before cutting your final frame pieces.
Step 4: Create a Rabbet for Glass and Backing
A rabbet is a recessed groove along the inner edge of the frame, essential for holding the glass, photo, and backing in place.
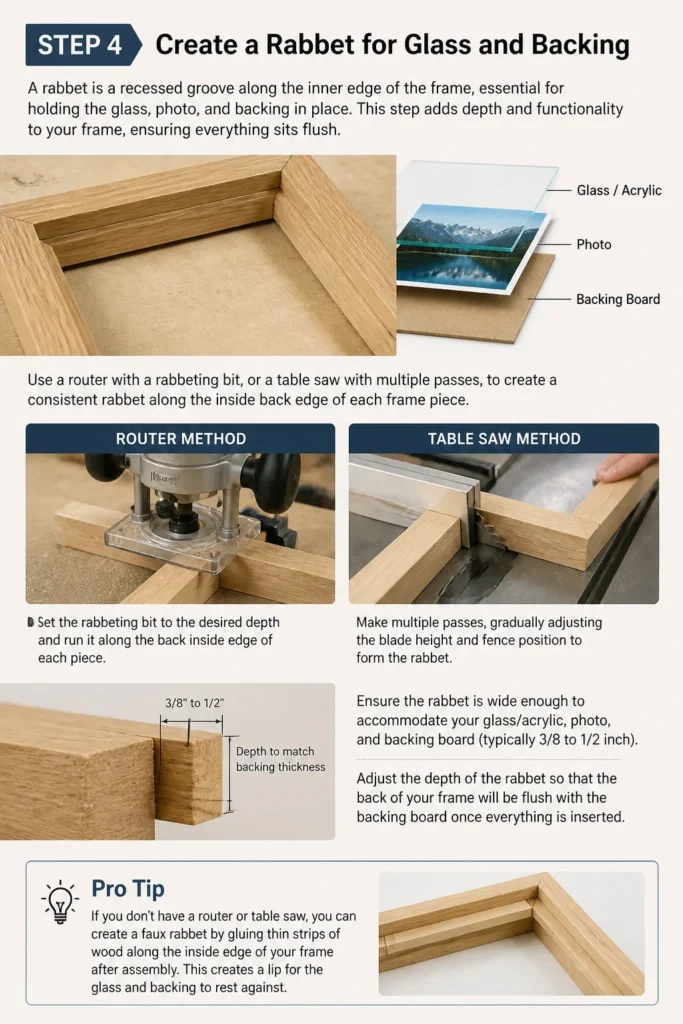
This step adds depth and functionality to your frame, ensuring everything sits flush.
- Use a router with a rabbeting bit, or a table saw with multiple passes, to create a consistent rabbet along the inside back edge of each frame piece.
- Ensure the rabbet is wide enough to accommodate your glass/acrylic, photo, and backing board (typically 3/8 to 1/2 inch).
- Adjust the depth of the rabbet so that the back of your frame will be flush with the backing board once everything is inserted.
Pro Tip: If you don’t have a router or table saw, you can create a faux rabbet by gluing thin strips of wood along the inside edge of your frame after assembly. This creates a lip for the glass and backing.
Step 5: Sand and Prepare for Assembly
Proper sanding is crucial for a smooth, professional finish. It also helps wood glue adhere better.
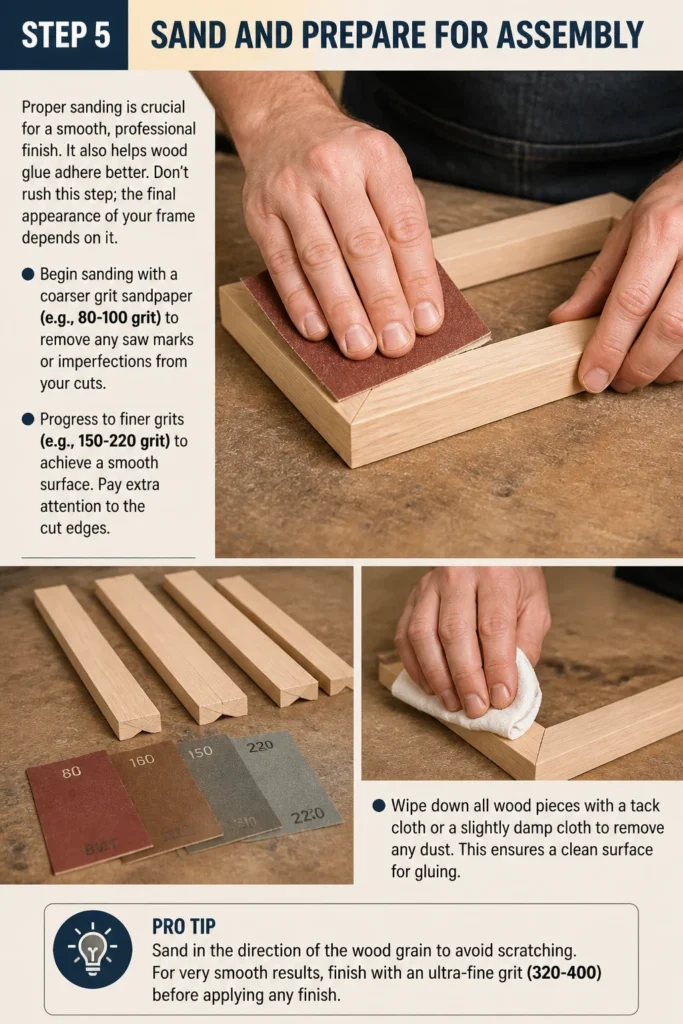
Don’t rush this step; the final appearance of your frame depends on it.
- Begin sanding with a coarser grit sandpaper (e.g., 80-100 grit) to remove any saw marks or imperfections from your cuts.
- Progress to finer grits (e.g., 150-220 grit) to achieve a smooth surface. Pay extra attention to the cut edges.
- Wipe down all wood pieces with a tack cloth or a slightly damp cloth to remove any dust. This ensures a clean surface for gluing.
Pro Tip: Sand in the direction of the wood grain to avoid scratching. For very smooth results, finish with an ultra-fine grit (320-400) before applying any finish.
Step 6: Assemble the Frame
This is where your frame takes shape. Strong, tight joints are key to a durable and attractive frame.
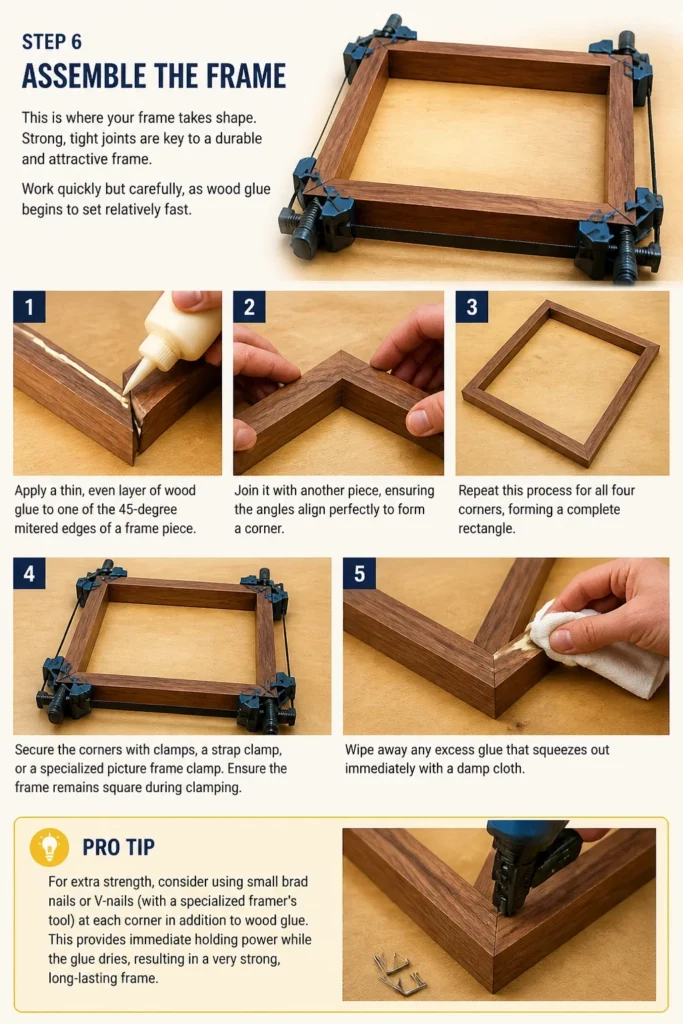
Work quickly but carefully, as wood glue begins to set relatively fast.
- Apply a thin, even layer of wood glue to one of the 45-degree mitered edges of a frame piece.
- Join it with another piece, ensuring the angles align perfectly to form a corner.
- Repeat this process for all four corners, forming a complete rectangle.
- Secure the corners with clamps, a strap clamp, or a specialized picture frame clamp. Ensure the frame remains square during clamping.
- Wipe away any excess glue that squeezes out immediately with a damp cloth.
Pro Tip: For extra strength, consider using small brad nails or V-nails (with a specialized framer’s tool) at each corner in addition to wood glue. This provides immediate holding power while the glue dries.
Step 7: Finish the Frame
The finishing process protects your wood and enhances its natural beauty. Choose a finish that matches your desired aesthetic.
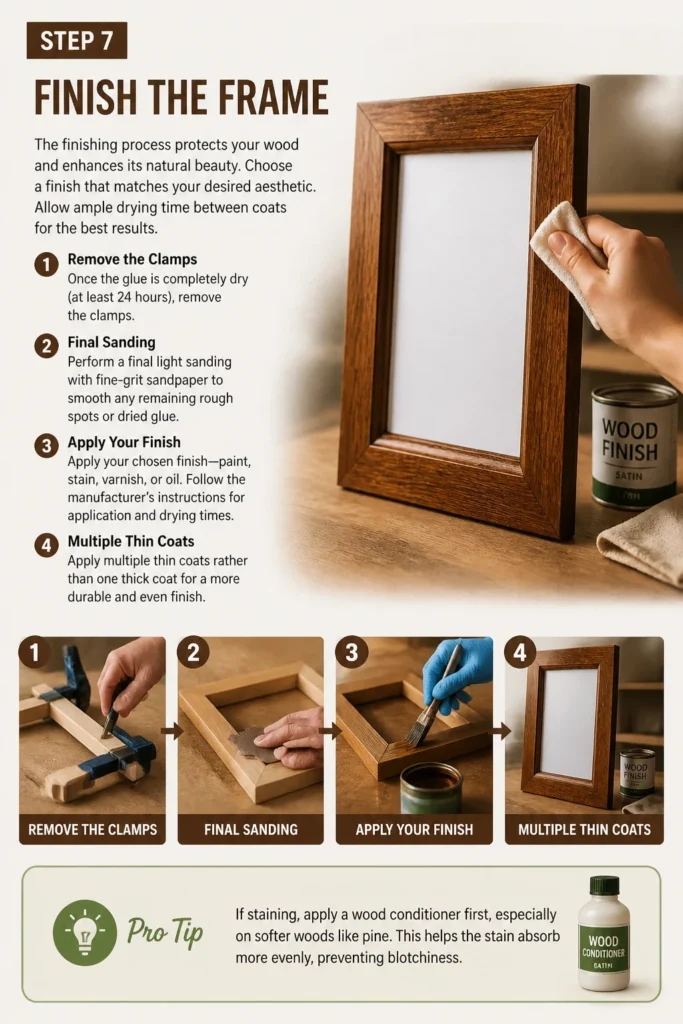
Allow ample drying time between coats for the best results.
- Once the glue is completely dry (at least 24 hours), remove the clamps.
- Perform a final light sanding with fine-grit sandpaper to smooth any remaining rough spots or dried glue.
- Apply your chosen finish: paint, stain, varnish, or oil. Follow the manufacturer’s instructions for application and drying times.
- Apply multiple thin coats rather than one thick coat for a more durable and even finish.
Pro Tip: If staining, apply a wood conditioner first, especially on softer woods like pine. This helps the stain absorb more evenly, preventing blotchiness.
Step 8: Insert Glass, Photo, and Backing
This is the final assembly stage where your frame comes to life with your chosen image.
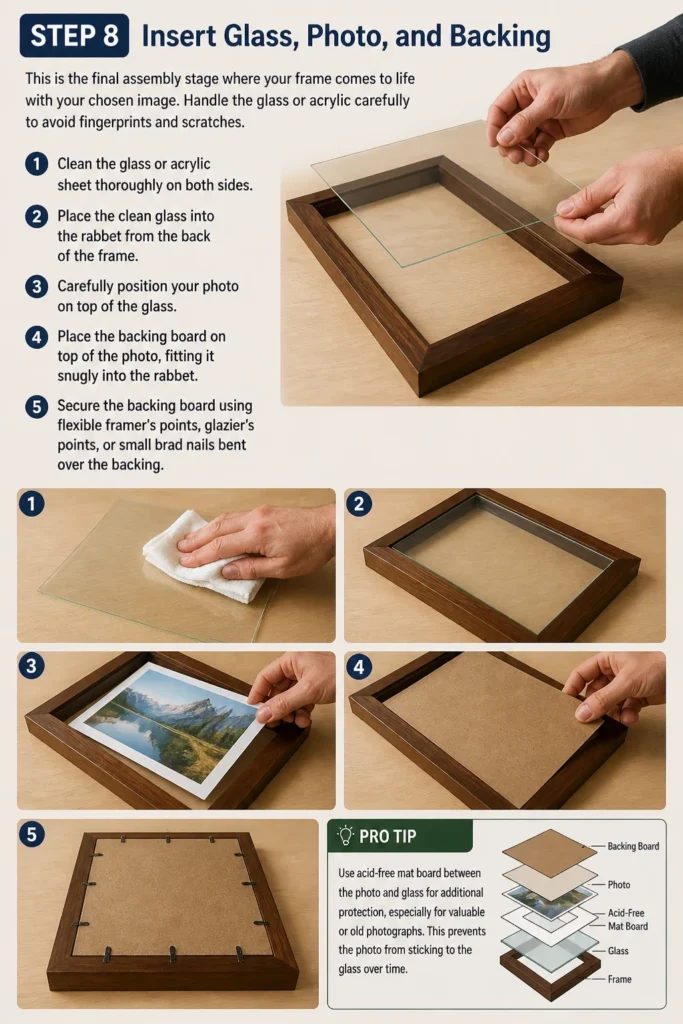
Handle the glass or acrylic carefully to avoid fingerprints and scratches.
- Clean the glass or acrylic sheet thoroughly on both sides.
- Place the clean glass into the rabbet from the back of the frame.
- Carefully position your photo on top of the glass.
- Place the backing board on top of the photo, fitting it snugly into the rabbet.
- Secure the backing board using flexible framer’s points, glazier’s points, or small brad nails bent over the backing.
Pro Tip: Use acid-free mat board between the photo and glass for additional protection, especially for valuable or old photographs. This prevents the photo from sticking to the glass over time.
Step 9: Attach Hanging Hardware
The final touch ensures your beautiful frame can be displayed proudly.
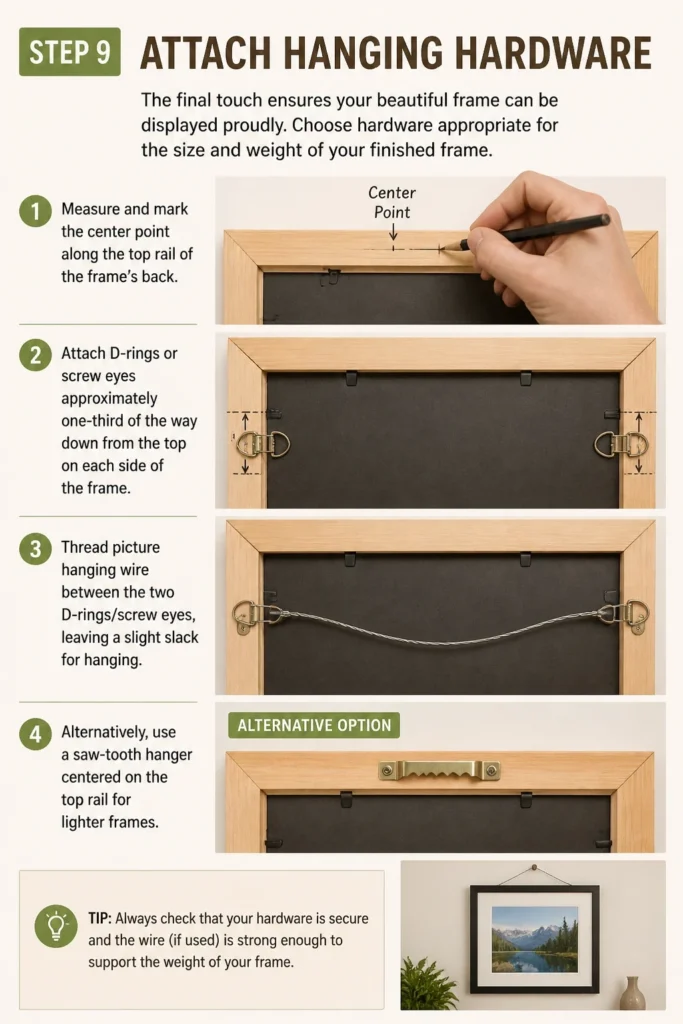
Choose hardware appropriate for the size and weight of your finished frame.
- Measure and mark the center point along the top rail of the frame’s back.
- Attach D-rings or screw eyes approximately one-third of the way down from the top on each side of the frame.
- Thread picture hanging wire between the two D-rings/screw eyes, leaving a slight slack for hanging.
- Alternatively, use a saw-tooth hanger centered on the top rail for lighter frames.
Common Mistakes to Avoid
Inaccurate Measurements
Many framing issues stem from incorrect initial measurements. If your photo dimensions are off, or your reveal calculations are wrong, the frame simply won’t fit well.
Always double-check every measurement and consider making a small template to verify your inner opening before cutting wood.
Poor Miter Cuts
Gaps at the corners are a common giveaway of a homemade frame. This usually happens when 45-degree angles aren’t perfectly cut or when the saw isn’t properly calibrated.
Invest in a good miter saw or miter box, practice on scrap wood, and ensure your cuts are clean and precise for tight joints.
Insufficient Clamping
If your frame feels weak or comes apart easily, it’s often due to inadequate clamping during the glue-drying phase. The glue needs firm, consistent pressure to form a strong bond.
Use enough clamps to apply even pressure to all four corners, and allow the glue to cure fully before removing them.
Rushing the Finishing Process
Applying stain or paint too quickly, or not allowing sufficient drying time between coats, can lead to uneven, blotchy, or sticky finishes. This detracts significantly from the frame’s overall appearance.
Take your time, apply thin coats, sand lightly between coats if recommended, and always follow the product’s drying instructions.
Troubleshooting
Gaps at Frame Corners
If you notice small gaps at the mitered corners after assembly, it’s often due to slightly inaccurate cuts or insufficient clamping pressure. Don’t despair, there are fixes.
You can fill small gaps with wood filler that matches your wood color or is paintable. After drying, sand it smooth and apply your finish. For larger gaps, carefully disassemble, recut, and re-glue if possible.
Wobbly or Weak Frame
A frame that feels flimsy might not have had enough glue, or the glue didn’t cure properly under pressure. This can also happen if the wood itself is too thin for the frame’s size.
Reinforce the corners with additional brad nails or small L-brackets on the back. Ensure future projects use adequate glue and clamping time.
Glass or Backing Doesn’t Fit
If your glass or backing board is too large or too small for the rabbet, your measurements for the rabbet or the material itself were off. This is a common hiccup.
For slightly too-large pieces, you might carefully trim them with a utility knife (for foam core) or have the glass recut. If too small, you can add thin shims within the rabbet to hold them securely.
Key Takeaways
- Precision is paramount: Accurate measurements and cuts are the foundation of a great frame.
- Rabbets are essential: They create the necessary recess for glass, photo, and backing.
- Sanding matters: Proper preparation ensures a smooth, professional finish.
- Clamping is crucial: Strong, even pressure during glue drying creates durable joints.
- Patience with finishing: Allow ample time for drying between coats for the best results.
- Safety first: Always use appropriate protective gear and handle tools with care.
Frequently Asked Questions
What type of wood is best for a beginner?
For those new to woodworking, softwoods like pine, poplar, or even common craft wood are excellent choices. They are easy to cut, sand, and less expensive, making them forgiving for learning.
Can I make a frame without a miter saw?
Yes, absolutely. A miter box and a hand saw designed for fine cuts (like a Japanese pull saw) can achieve excellent results. It requires a bit more effort and practice to maintain straight, precise cuts.
How do I choose the right hanging hardware?
The choice of hanging hardware depends on the frame’s size and weight. For lighter frames, a sawtooth hanger is sufficient. For heavier frames, use D-rings or screw eyes with picture wire, ensuring the wire is rated for the frame’s weight.
What’s the difference between glass and acrylic for framing?
Glass offers superior clarity and scratch resistance but is heavier and can break. Acrylic (Plexiglas) is lighter, shatter-resistant, and offers UV protection, but it can scratch more easily and sometimes has a slight glare. Choose based on your needs and budget.
Our Top Recommended Finds
- Miter Box and Hand Saw Set: Perfect for precise angle cuts without needing a power tool. Great for beginners.
- Wood Glue with Fast Grab: Provides a strong bond and a quicker initial set, reducing clamping time slightly.
- Picture Frame Clamp Kit: Specialized clamps that hold all four corners simultaneously, ensuring squareness and even pressure during assembly.
Craft Your Vision: Display Your Memories
You now have a detailed roadmap to creating beautiful, custom photo frames. The satisfaction of displaying a cherished memory in a frame you built is incredibly rewarding.
Don’t let the thought of starting intimidate you. Pick a favorite photo, gather your materials, and begin your framing journey today.
Your unique creation will not only protect your memories but also add a personal, handcrafted touch to your home decor.