🐻 How To Make Teddy Bear
Making a teddy bear by hand is a truly rewarding experience. It lets you create a unique, cherished companion. I still remember the joy of sewing my first bear, a gift that brought so much warmth.
This guide will walk you through every step. You’ll gain the confidence to craft your own cuddly friend. It’s a journey of creativity and care.
Quick Overview
You’re about to embark on a delightful project. By the end, you’ll have a handmade teddy bear, ready for hugs. This guide covers everything from cutting fabric to adding the final touches.
- Time needed: 8-12 hours (can be spread over several days)
- Difficulty: Intermediate (basic sewing skills are helpful)
- What you’ll need: Fabric, stuffing, thread, needle, pattern, safety eyes/nose
Step-by-Step Instructions
Step 1: Gather Your Materials
Before you begin, ensure you have all necessary items. Having everything ready saves time and prevents interruptions. A well-stocked workspace is key to a smooth crafting process.
Choose your main fabric. Soft, durable options like faux fur, fleece, minky, or wool felt are excellent choices for a cuddly feel. Consider the bear’s intended use when selecting.
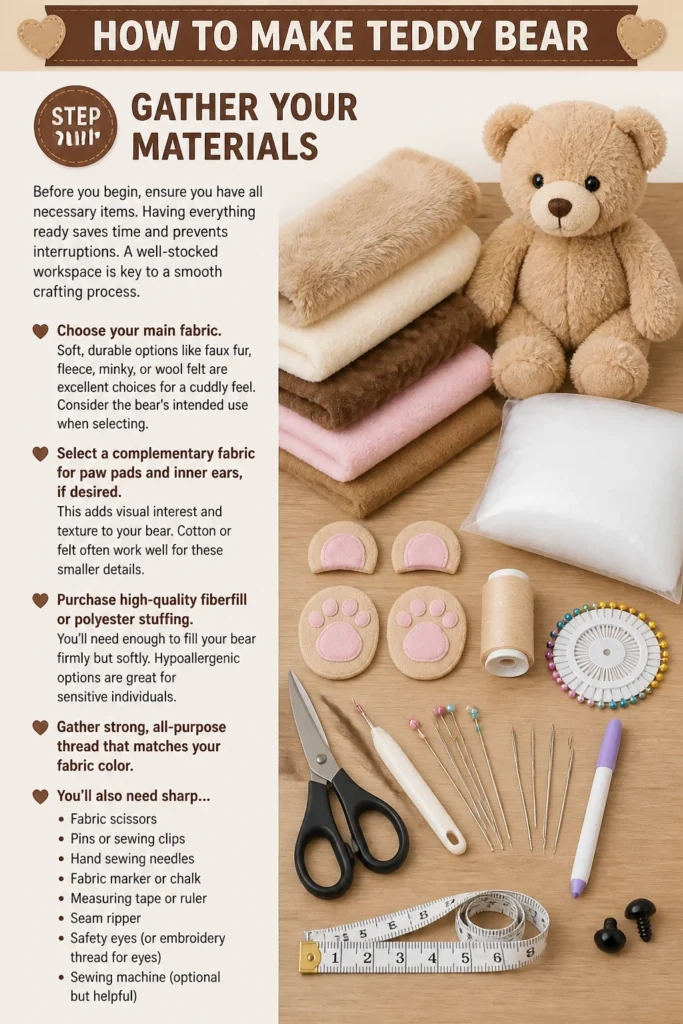
Select a complementary fabric for paw pads and inner ears, if desired. This adds visual interest and texture to your bear. Cotton or felt often work well for these smaller details.
Purchase high-quality fiberfill or polyester stuffing. You’ll need enough to fill your bear firmly but softly. Hypoallergenic options are great for sensitive individuals.
Gather strong, all-purpose thread that matches your fabric color. You’ll also need sharp sewing needles (hand-sewing) or machine needles (if using a machine). A thimble can protect your finger.
Acquire safety eyes and a safety nose, if using. These snap securely into place, making them safe for children. Alternatively, you can embroider facial features.
Don’t forget essential tools like fabric scissors, pins, a fabric marker or chalk, and a turning tool. A seam ripper is always handy for correcting mistakes.
Pro Tip: Pre-wash and dry your fabric before cutting. This prevents potential shrinkage after your bear is complete, ensuring it maintains its shape.
Step 2: Choose and Prepare Your Pattern
A good pattern is the blueprint for your bear. It guides you through the shape and size of each piece. Take your time to select one that matches your skill level and desired bear style.
Find a teddy bear pattern. You can purchase commercial patterns, find free ones online, or even draft your own if you’re experienced. Look for patterns with clear instructions and helpful diagrams.
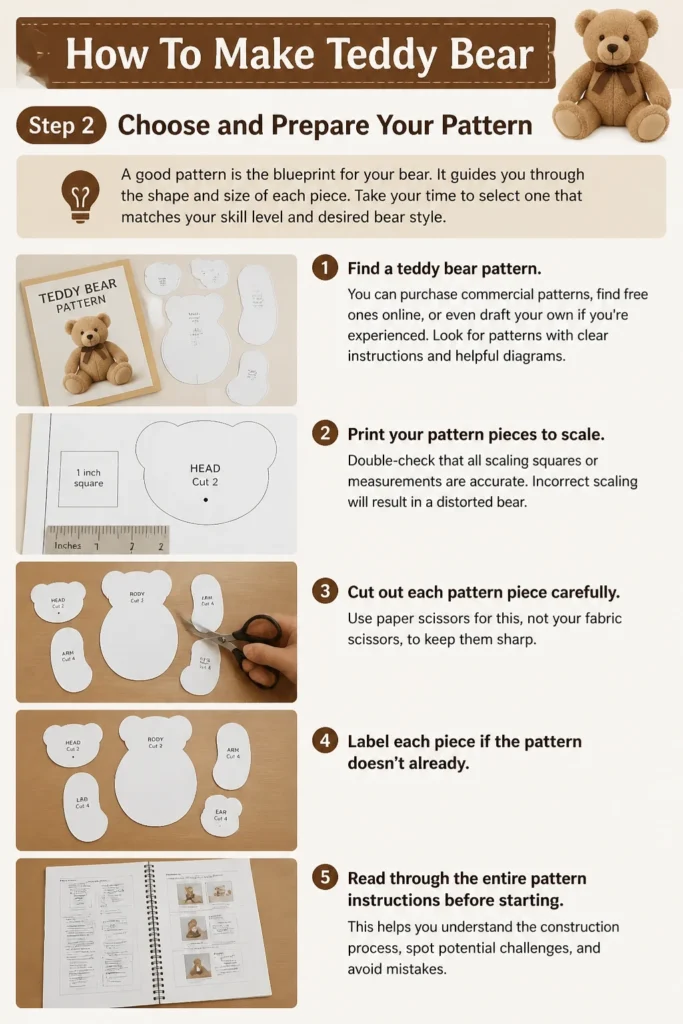
Print your pattern pieces to scale. Double-check that all scaling squares or measurements are accurate. Incorrect scaling will result in a distorted bear.
Cut out each pattern piece carefully. Use paper scissors for this, not your fabric scissors, to keep them sharp. Label each piece if the pattern doesn’t already.
Read through the entire pattern instructions before starting. This helps you understand the construction process. Visualize each step to anticipate any challenges.
Step 3: Cut Out Your Fabric Pieces
Precision in this step is crucial for a well-proportioned bear. Any inaccuracies here will affect the final shape. Take your time and cut slowly.
Lay your chosen fabric flat, right side up or folded as specified by the pattern. Ensure the grainline of the fabric aligns with the pattern markings. This affects how your bear drapes.
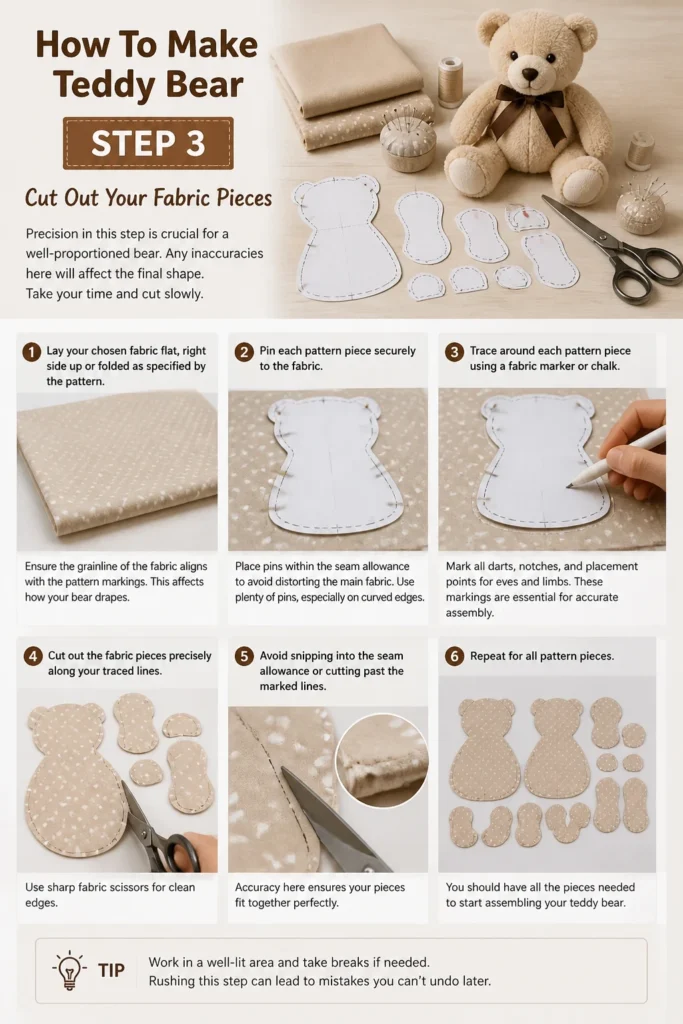
Pin each pattern piece securely to the fabric. Place pins within the seam allowance to avoid distorting the main fabric. Use plenty of pins, especially on curved edges.
Trace around each pattern piece using a fabric marker or chalk. Mark all darts, notches, and placement points for eyes and limbs. These markings are essential for accurate assembly.
Cut out the fabric pieces precisely along your traced lines. Use sharp fabric scissors for clean edges. Avoid snipping into the seam allowance unless directed by the pattern.
Transfer all pattern markings to your fabric pieces. Use tailor’s tacks, a fabric marker, or small snips at notches. These markings will guide your sewing.
Pro Tip: When cutting faux fur, cut only the backing fabric with the tips of your scissors. Avoid cutting the fur fibers themselves to maintain a natural, fluffy edge that hides seams better.
Step 4: Sew the Body Parts
Now it’s time to bring the individual pieces to life. You’ll be sewing the head, ears, arms, legs, and body sections. Remember to sew with the right sides of the fabric together.
Start by sewing the head pieces together. Pin them right sides facing, matching up any darts or notches. Stitch along the seam lines, leaving openings as indicated for turning and stuffing.
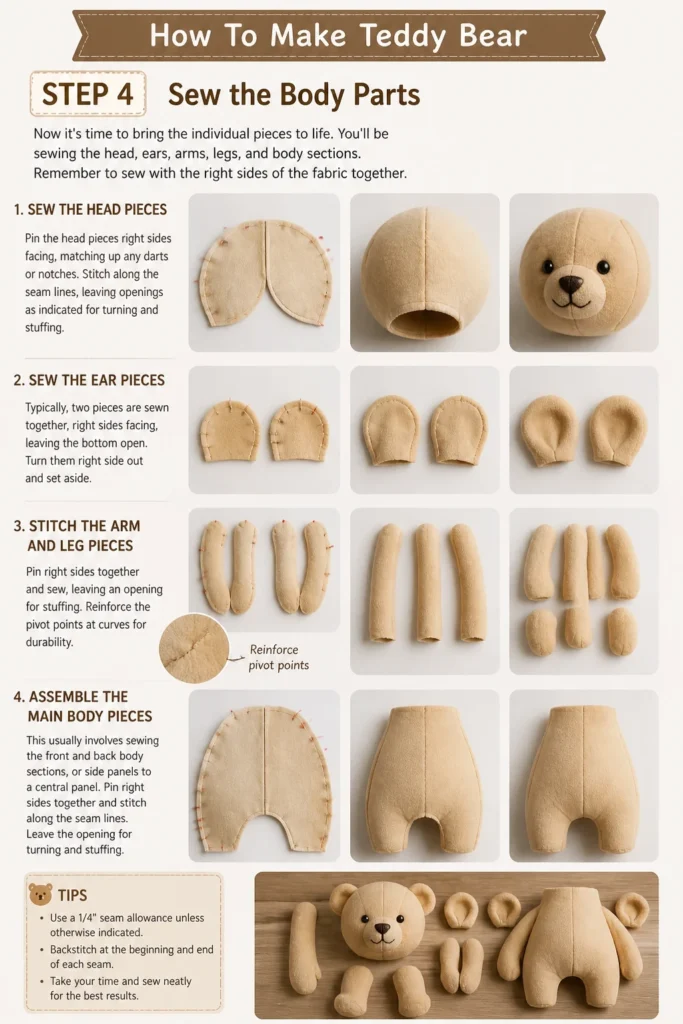
Sew the ear pieces. Typically, two pieces are sewn together, right sides facing, leaving the bottom open. Turn them right side out and set aside.
Stitch the arm and leg pieces. Again, pin right sides together and sew, leaving an opening for stuffing. Reinforce the pivot points at curves for durability.
Assemble the main body pieces. This usually involves sewing the front and back body sections, or side panels to a central panel. Leave the neck opening, arm and leg openings, and a main stuffing opening as specified.
Clip curves and trim seams. For outward curves, snip small V-shapes into the seam allowance. For inward curves, make small cuts perpendicular to the seam line. This helps the fabric lie flat when turned.
Turn all sewn pieces right side out. Use a turning tool or a blunt object to gently push out all seams and corners. Be careful not to poke through the fabric.
Step 5: Attach Features (Eyes, Nose, Mouth)
This step gives your bear its personality. The choice between safety features and embroidery depends on the bear’s recipient and desired aesthetic.
Locate the placement marks for eyes and nose on the head piece. If using safety eyes and nose, carefully cut small slits at these marks. Ensure the slits are just large enough for the post.
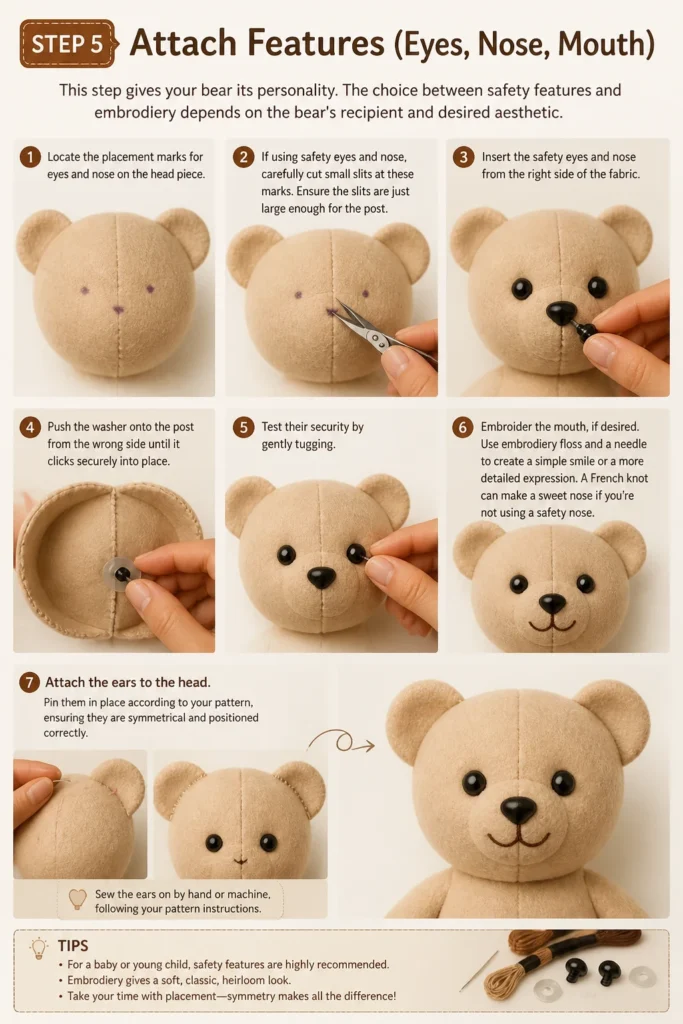
Insert the safety eyes and nose from the right side of the fabric. Push the washer onto the post from the wrong side until it clicks securely into place. Test their security by gently tugging.
Embroider the mouth, if desired. Use embroidery floss and a needle to create a simple smile or a more detailed expression. A French knot can make a sweet nose if you’re not using a safety nose.
Attach the ears to the head. Pin them in place according to your pattern, ensuring they are symmetrical. Hand-stitch them securely or machine-stitch if the pattern allows.
Pro Tip: Before permanently attaching safety eyes and nose, use pins to mark their positions. Step back and look at your bear’s face from different angles to ensure you’re happy with the expression.
Step 6: Stuff Your Bear
Proper stuffing gives your bear its shape and cuddliness. It’s a key step in bringing your creation to life. Take your time to achieve an even, firm fill.
Begin stuffing the head. Push small handfuls of fiberfill into the nose and muzzle area first. This helps define the bear’s snout. Use a turning tool or chopstick to reach tight spots.
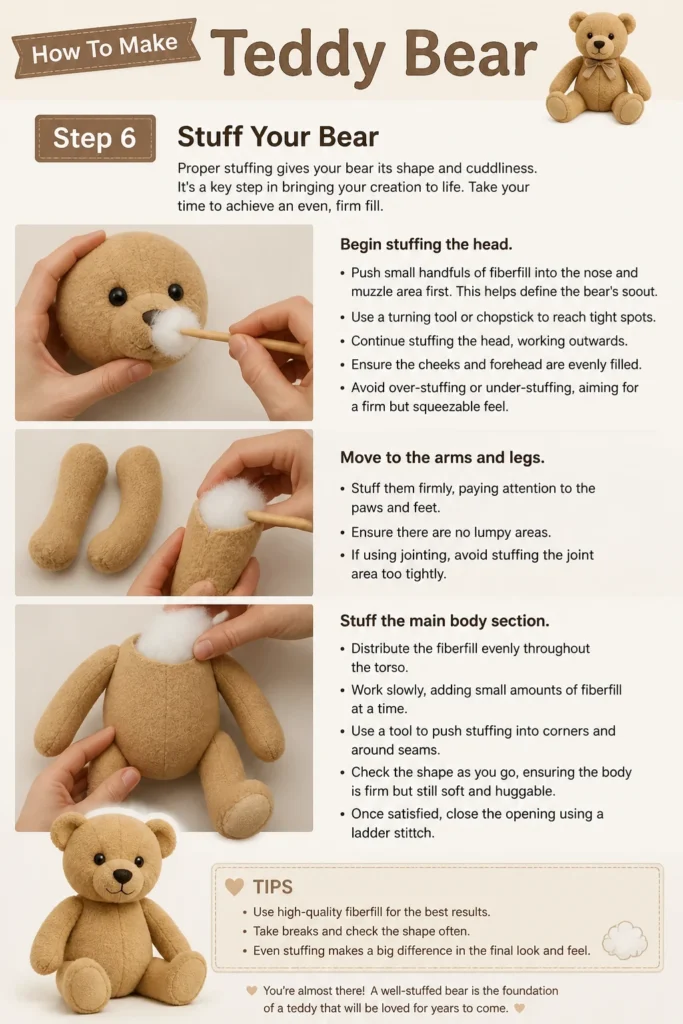
Continue stuffing the head, working outwards. Ensure the cheeks and forehead are evenly filled. Avoid over-stuffing or under-stuffing, aiming for a firm but squeezable feel.
Move to the arms and legs. Stuff them firmly, paying attention to the paws and feet. Ensure there are no lumpy areas. If using jointing, avoid stuffing the joint area too tightly.
Stuff the main body section. Distribute the fiberfill evenly throughout the torso. Work slowly, adding small amounts at a time and gently pushing it into all corners.
Check for firmness and evenness. Gently squeeze the bear all over to feel for soft spots or hard lumps. Add more stuffing where needed to create a smooth, consistent shape.
Step 7: Assemble the Bear
This is where all the individual parts come together to form your teddy bear. Attaching the limbs requires careful positioning and strong stitching.
Pin the arms and legs into place on the body. Refer to your pattern for exact placement. Ensure the limbs are symmetrical and positioned correctly for movement.
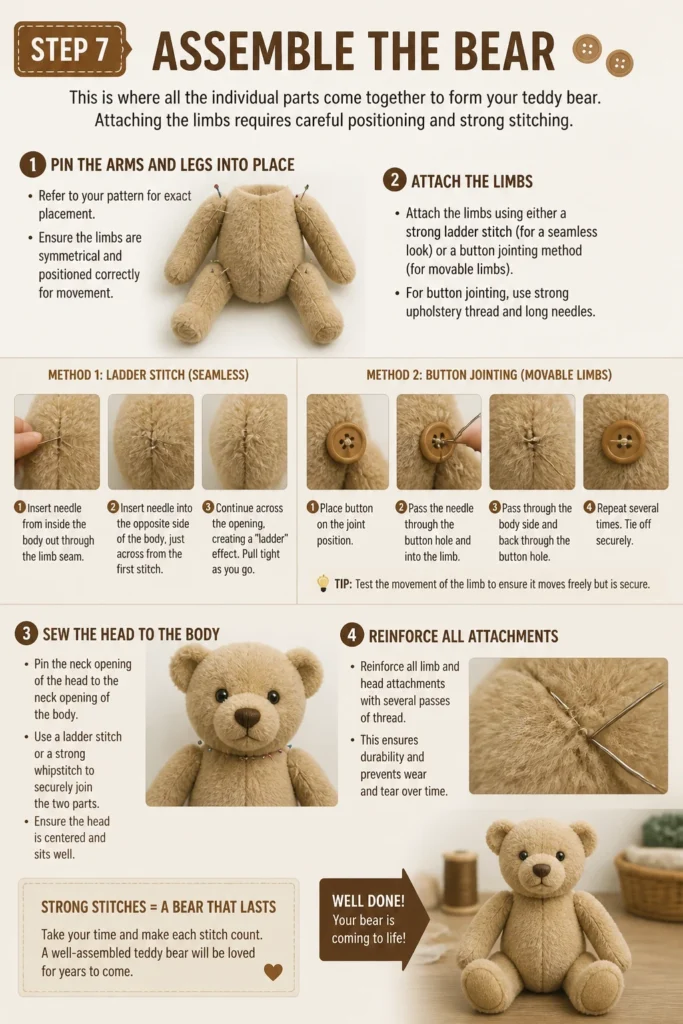
Attach the limbs using either a strong ladder stitch (for a seamless look) or a button jointing method (for movable limbs). For button jointing, use strong upholstery thread and long needles.
Sew the head to the body. Pin the neck opening of the head to the neck opening of the body. Use a ladder stitch or a strong whipstitch to securely join the two parts. Ensure the head is centered and sits well.
Reinforce all limb and head attachments with several passes of thread. This ensures durability, especially if the bear will be played with frequently. Tug gently to test security.
Pro Tip: If you want movable limbs, consider using cotter pin or disc jointing before stuffing. This provides a professional finish and allows the bear to sit and pose.
Step 8: Close the Opening
The final sewing step involves neatly closing the stuffing opening. The ladder stitch is ideal for an invisible finish.
Locate the stuffing opening on your bear. This is typically on the back or bottom of the torso. Ensure all stuffing is tucked neatly inside.
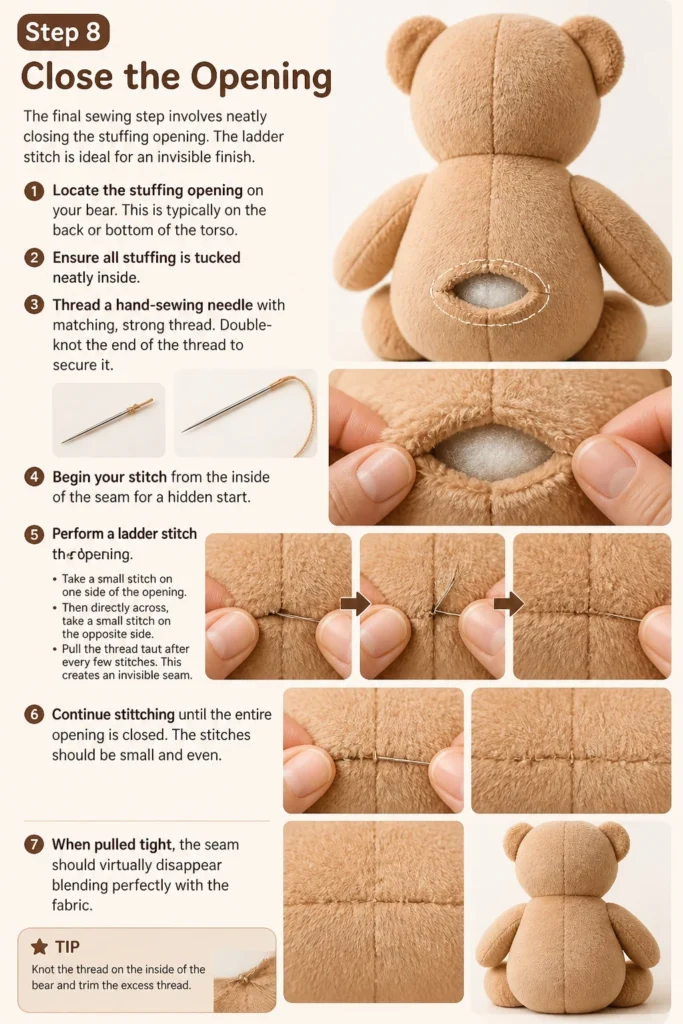
Thread a hand-sewing needle with matching, strong thread. Double-knot the end of the thread to secure it. Begin your stitch from the inside of the seam for a hidden start.
Perform a ladder stitch to close the opening. Take a small stitch on one side of the opening, then directly across, take a small stitch on the opposite side. Pull the thread taut after every few stitches. This creates an invisible seam.
Continue stitching until the entire opening is closed. The stitches should be small and even. When pulled tight, the seam should virtually disappear.
Knot your thread securely at the end of the seam. Hide the knot by pushing the needle through the bear and out at a different spot. Trim the excess thread flush with the fabric.
Step 9: Add Finishing Touches
Personalizing your teddy bear makes it truly unique. These final details add character and charm.
Brush the fur gently if you used faux fur fabric. This helps to fluff up the fibers and hide any stray threads around the seams. A pet brush works well for this.
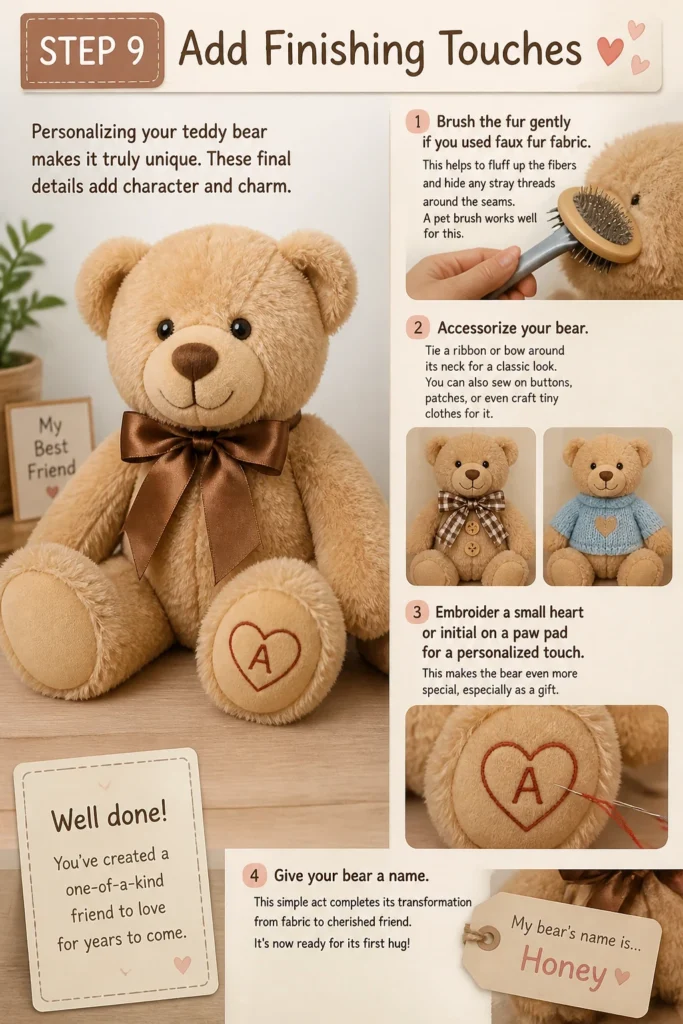
Accessorize your bear. Tie a ribbon or bow around its neck for a classic look. You can also sew on buttons, patches, or even craft tiny clothes for it.
Embroider a small heart or initial on a paw pad for a personalized touch. This makes the bear even more special, especially as a gift.
Give your bear a name. This simple act completes its transformation from fabric to cherished friend. It’s now ready for its first hug!
Common Mistakes to Avoid
Creating a teddy bear is a labor of love, but it’s easy to stumble. Being aware of common pitfalls can save you time and frustration. Focus on precision and patience throughout the process.
Imprecise Cutting
Cutting fabric inaccurately is a frequent mistake. If your pieces aren’t cut precisely along the pattern lines, your bear’s final shape will be distorted. A lopsided head or uneven limbs can result. Always use sharp scissors and take your time to cut carefully, ensuring all notches and markings are transferred accurately.
Uneven Seams
Sewing with inconsistent seam allowances or wobbly lines leads to a less polished bear. Uneven seams can cause parts to not align correctly, creating puckering or a bulky appearance. Strive for consistent stitching, using the seam allowance guide on your sewing machine or drawing your seam lines if hand-sewing. Practice on scrap fabric first.
Under-stuffing or Over-stuffing
The amount of stuffing significantly impacts your bear’s feel and appearance. Under-stuffing makes the bear floppy and shapeless, while over-stuffing makes it rigid and hard, losing its cuddliness. Stuff gradually, using small pieces of fiberfill. Gently compress the bear as you go, aiming for a firm but huggable consistency without visible lumps.
Rushing the Details
Skipping or rushing small details like clipping curves, trimming seams, or securely attaching safety eyes can compromise the bear’s quality and safety. These steps, though seemingly minor, contribute greatly to a professional finish and ensure durability. Take your time on each step, no matter how small, to ensure a high-quality outcome.
Troubleshooting
Even experienced crafters encounter issues. Don’t worry if something doesn’t look quite right. Most problems have simple solutions. Here are a few common challenges and how to fix them.
Bear Looks Lopsided
If your bear appears uneven, the issue might be in your cutting or stuffing. First, check if the stuffing is distributed unevenly. Gently massage the bear to redistribute the fiberfill, adding more to sunken areas if necessary. If the issue persists, it might stem from inaccurate cutting or inconsistent seam allowances on one side. Carefully inspect the seams for any areas where the fabric was not sewn evenly, and consider using a seam ripper to adjust and re-stitch if needed.
Stuffing Shows Through Seams
Seeing stuffing poke through your seams can be frustrating. This usually indicates that your stitches are too loose or the fabric is too thin for the amount of stuffing. To fix this, you can hand-stitch over the problematic seam with a tighter, smaller stitch, like a whipstitch, from the outside. In the future, use a shorter stitch length on your sewing machine or double-stitch seams. Choosing a denser fabric for your bear can also help prevent this issue.
Limbs Don’t Move Freely
If your bear’s arms or legs feel stiff and don’t articulate as expected, the problem often lies in how the jointing was installed or how tightly the area around the joint was stuffed. For jointed bears, ensure the joint components are not overtightened or sewn too close to the body. If using traditional sewing for attachment, ensure the stitches allow for some movement. You may need to carefully remove some stuffing from around the joint area to free up movement, or re-attach the limb with slightly looser stitches.
Key Takeaways
- Patience and precision are your best tools for a beautiful teddy bear.
- Always pre-wash your fabric to prevent future shrinkage and maintain shape.
- Accurate cutting and consistent seam allowances are fundamental for a well-proportioned bear.
- Stuff your bear gradually and evenly to achieve a firm yet cuddly feel.
- Safety eyes and noses offer durability, but embroidery is a safe alternative for very young children.
- Don’t be afraid to personalize your bear with accessories or embroidered details.
Frequently Asked Questions
What type of fabric is best for a beginner?
For beginners, fleece or felt are excellent choices. They are easy to cut, don’t fray, and are forgiving to sew. Faux fur can be challenging due to its bulk and tendency to shed, so it’s often better once you have some experience.
How do I make my teddy bear machine washable?
To make your bear machine washable, ensure all materials used are machine-wash friendly. This includes fabric, thread, and stuffing. Avoid using non-washable embellishments like delicate ribbons or glued-on parts. Use safety eyes and noses securely. Wash on a gentle cycle with cold water and air dry or tumble dry on low.
Can I use a sewing machine for this project?
Absolutely! A sewing machine will make the process much faster and create stronger, more consistent seams. Follow your pattern’s instructions, use a walking foot for thicker fabrics like faux fur, and adjust your stitch length as needed. Hand-sewing is generally reserved for closing openings and attaching small details.
How can I personalize my teddy bear?
There are many ways to personalize your bear! You can embroider a name or birthdate on a paw, sew on small patches, or dress it in handmade clothes. Adding a unique bow, a tiny scarf, or even different colored fabric for the ears and paw pads also creates a distinct look.
Our Top Recommended Finds
- Teddy Bear Pattern Book: A comprehensive book featuring various bear styles and sizes, perfect for expanding your crafting repertoire.
- High-Quality Plush Fabric Pack: A bundle of soft, durable faux fur or minky fabric swatches in different colors, ideal for creating a diverse collection of bears.
- Hypoallergenic Fiberfill Stuffing: A large bag of premium, washable fiberfill that ensures your bear is soft, cuddly, and safe for everyone.
Your Cuddly Companion Awaits!
You’ve just completed a wonderful journey, transforming flat fabric into a beloved friend. Every stitch tells a story of your dedication and creativity. Hold your new teddy bear close and feel the warmth of your accomplishment.
Don’t stop here! Consider making a whole family of bears, or perhaps explore crafting clothes for your new companion. The skills you’ve gained can be applied to countless other soft toy projects. Pick up your needle and thread again today and continue your crafting adventure!