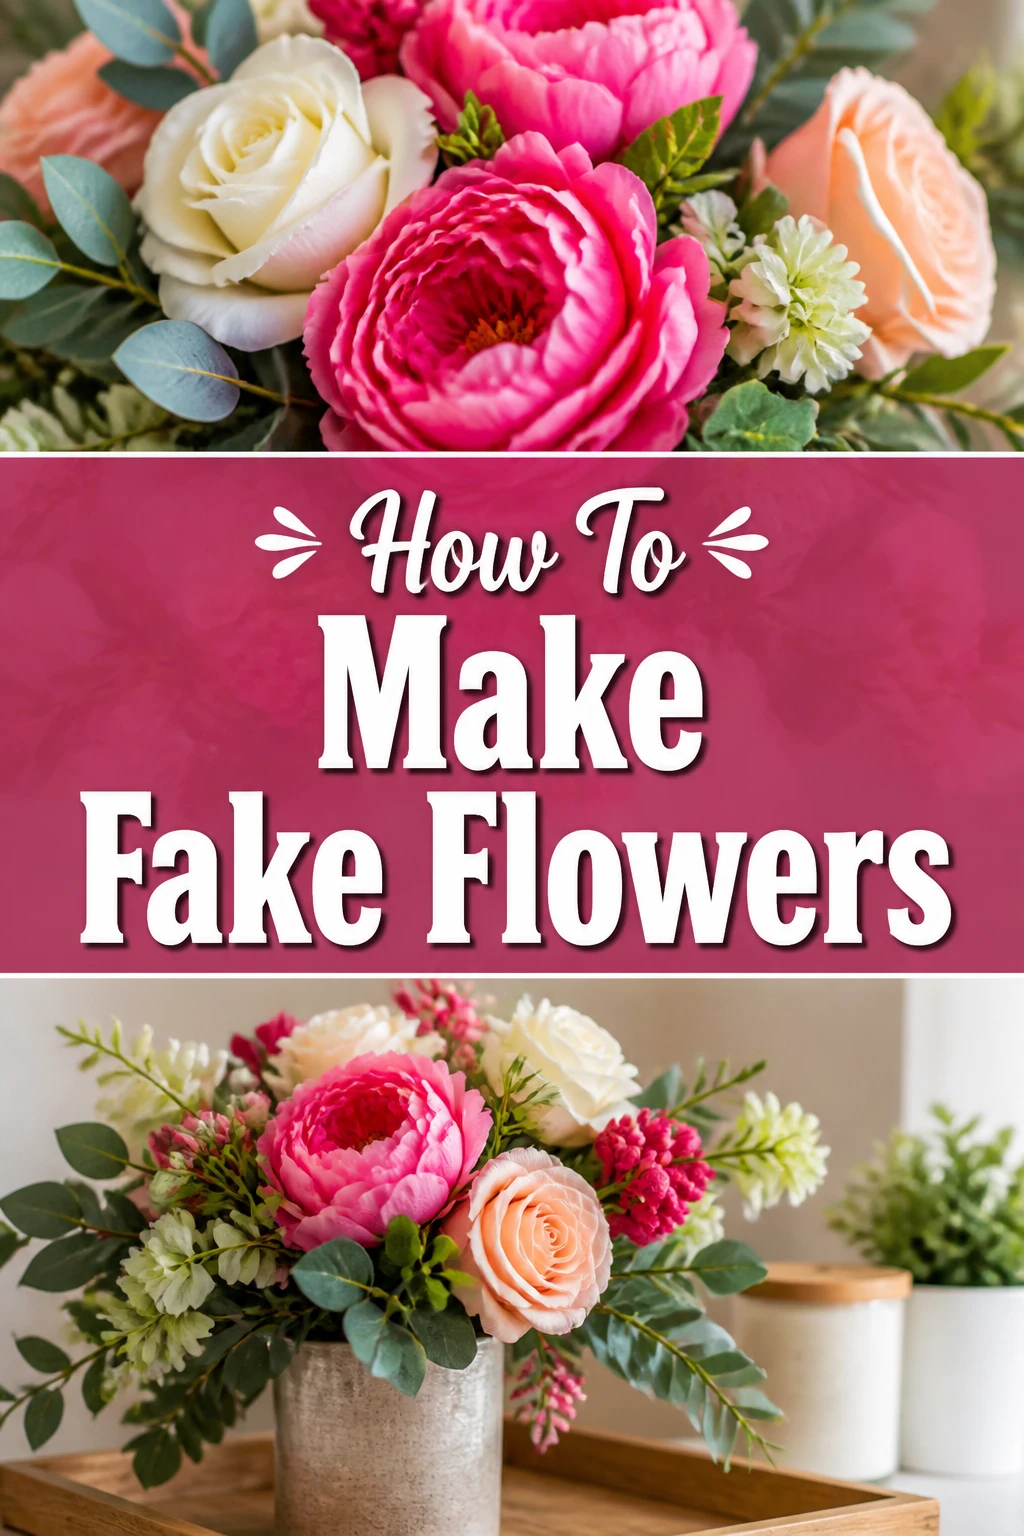
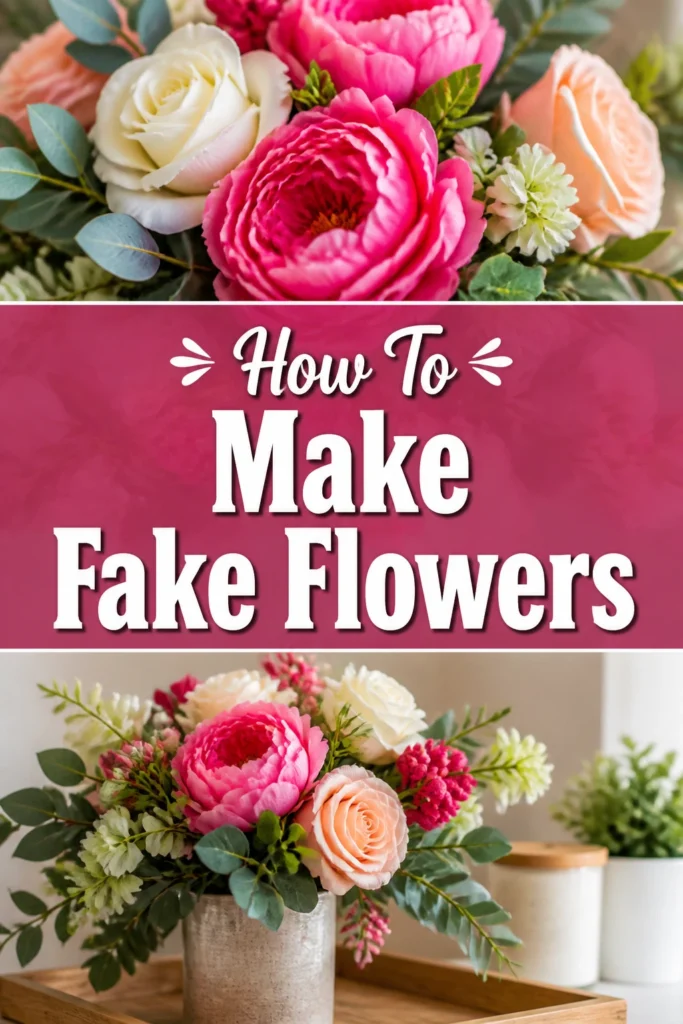
🌸 How To Make Fake Flowers
Do you love the beauty of fresh flowers but wish they lasted longer?
Perhaps allergies keep you from enjoying vibrant bouquets, or you simply want to add a touch of lasting charm to your home decor.
Having crafted countless faux arrangements for events and personal projects, I can guide you through creating stunning, lifelike blossoms that never wilt.
Quick Overview
This guide will walk you through transforming simple materials into beautiful, durable fake flowers. You will learn the techniques to create petals, assemble blooms, and add realistic finishing touches.
- Time needed: 2-4 hours (depending on drying time and complexity)
- Difficulty: Intermediate
- What you’ll need: Fabric, floral wire, glue, scissors, paint or fabric dyes
Step-by-Step Instructions
Step 1: Gather Your Materials
The success of your fake flowers begins with selecting the right supplies. Each component plays a vital role in the final appearance and durability of your creation.
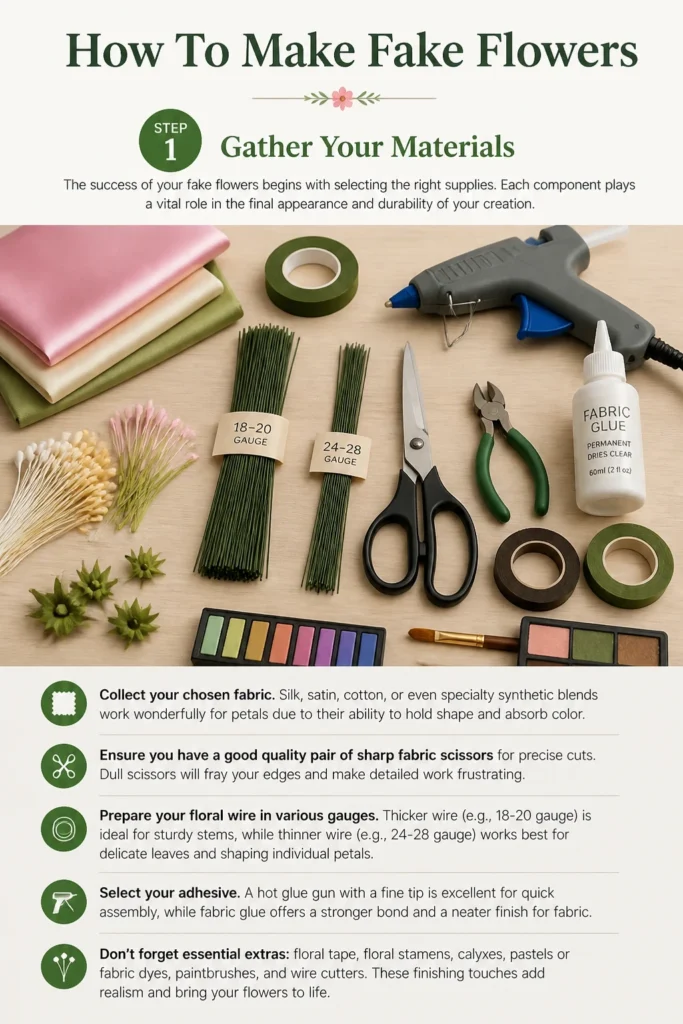
Collect your chosen fabric. Silk, satin, cotton, or even specialty synthetic blends work wonderfully for petals due to their ability to hold shape and absorb color.
Ensure you have a good quality pair of sharp fabric scissors for precise cuts. Dull scissors will fray your edges and make detailed work frustrating.
Prepare your floral wire in various gauges. Thicker wire (e.g., 18-20 gauge) is ideal for sturdy stems, while thinner wire (e.g., 24-28 gauge) works best for delicate leaves and shaping individual petals.
Select your adhesive. A hot glue gun with a fine tip is excellent for quick assembly, while fabric glue offers a stronger, more permanent bond for certain parts.
Gather fabric dyes or acrylic paints. These will allow you to customize your flower colors, adding gradients and realistic shading.
Pro Tip: Consider using a fabric stiffener spray or a mixture of white glue and water for fabrics that need more rigidity. This helps petals maintain their form beautifully.
Step 2: Prepare Your Fabric
Transforming plain fabric into vibrant, realistic petals requires a bit of preparation. This step is crucial for achieving natural colors and textures.
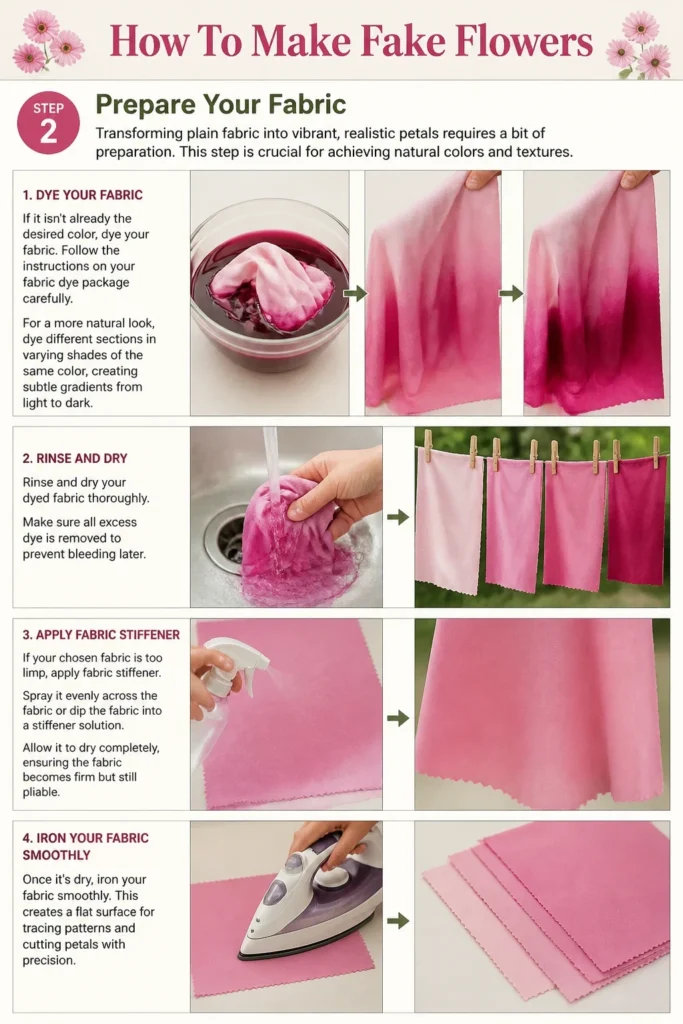
Dye your fabric if it isn’t already the desired color. Follow the instructions on your fabric dye package carefully. For a more natural look, dye different sections in varying shades of the same color, creating subtle gradients from light to dark.
Rinse and dry your dyed fabric thoroughly. Make sure all excess dye is removed to prevent bleeding later.
Apply fabric stiffener if your chosen fabric is too limp. Spray it evenly across the fabric or dip the fabric into a stiffener solution. Allow it to dry completely, ensuring the fabric becomes firm but still pliable.
Iron your fabric smoothly once it’s dry. This creates a flat surface for tracing and cutting, leading to cleaner, more precise petal shapes.
Step 3: Create Your Petal and Leaf Templates
Templates are your secret weapon for consistent and beautiful flower components. They ensure uniformity and make the cutting process much more efficient.
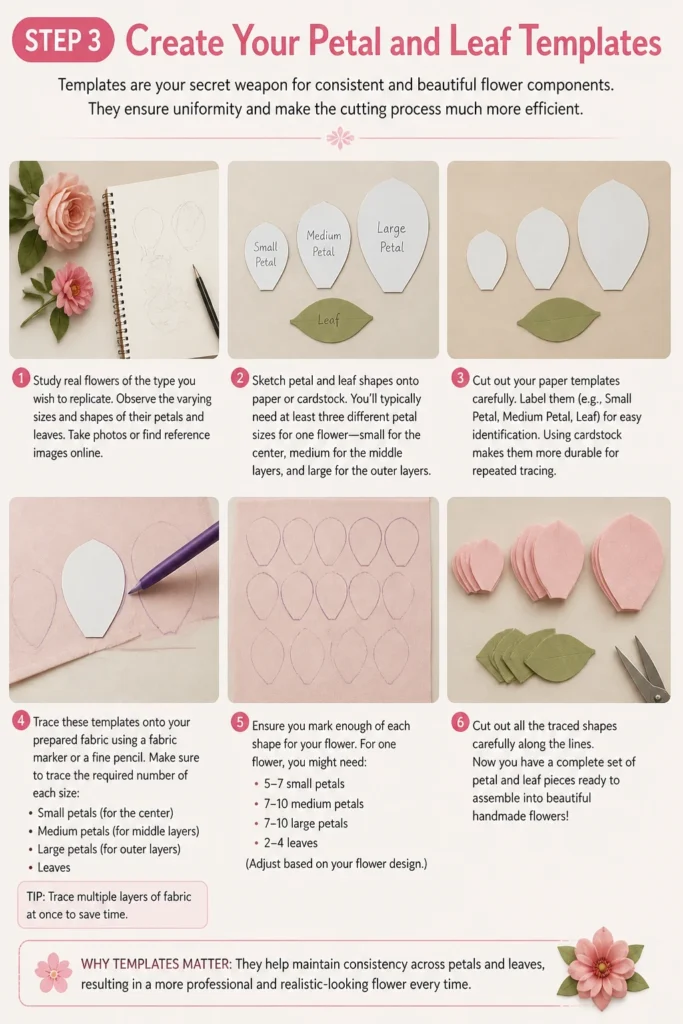
Study real flowers of the type you wish to replicate. Observe the varying sizes and shapes of their petals and leaves. Take photos or find reference images online.
Sketch petal and leaf shapes onto paper or cardstock. You’ll typically need at least three different petal sizes for one flower: small for the center, medium for the middle layers, and large for the outer layers.
Cut out your paper templates carefully. Label them (e.g., “Small Petal,” “Medium Petal,” “Leaf”) for easy identification. Using cardstock makes them more durable for repeated tracing.
Trace these templates onto your prepared fabric using a fabric marker or a fine pencil. Position them closely to minimize fabric waste.
Cut out your fabric petals and leaves precisely. Take your time to follow the lines accurately. The cleaner your cuts, the more professional your finished flower will appear.
Step 4: Shape Your Petals and Leaves
Flat fabric pieces won’t look like real petals. This step is where you introduce dimension and natural curvature, bringing your flower to life.
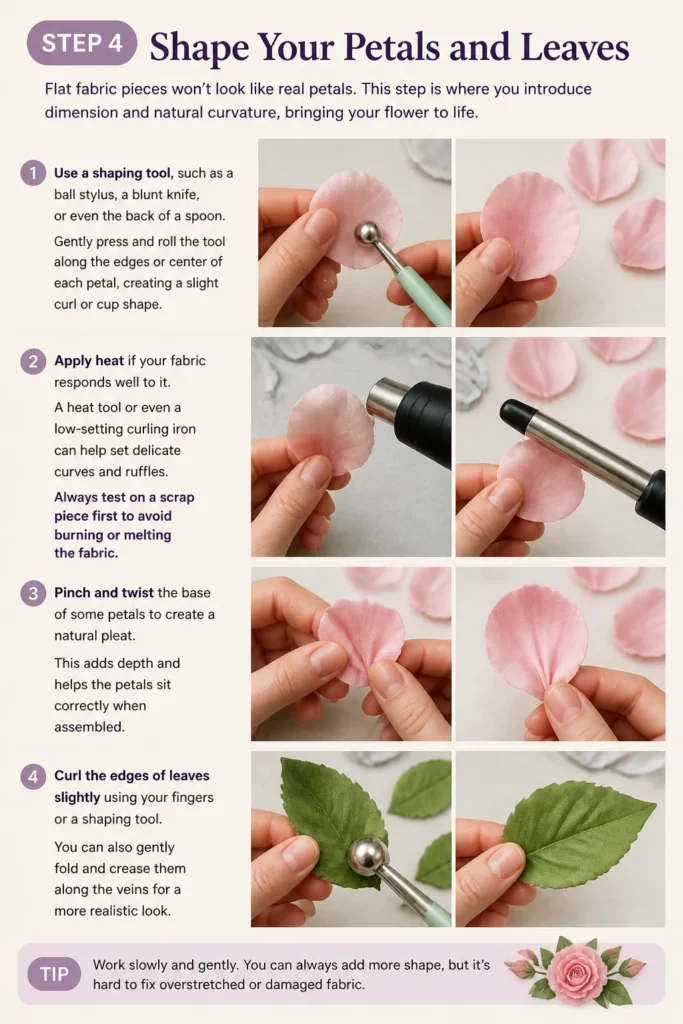
Use a shaping tool, such as a ball stylus, a blunt knife, or even the back of a spoon. Gently press and roll the tool along the edges or center of each petal, creating a slight curl or cup shape.
Apply heat if your fabric responds well to it. A heat tool or even a low-setting curling iron can help set delicate curves and ruffles. Always test on a scrap piece first to avoid burning or melting the fabric.
Pinch and twist the base of some petals to create a natural pleat. This adds depth and helps the petals sit correctly when assembled.
Curl the edges of leaves slightly using your fingers or a shaping tool. You can also gently fold and crease them along the center vein to mimic natural leaf structure.
Pro Tip: Work with a soft foam mat or a thick towel underneath your petals when shaping. This provides a cushioned surface for the tools to press into, allowing for more defined curves without damaging your work surface.
Step 5: Assemble the Flower Head
Now, it’s time to bring all your shaped pieces together to form the heart of your flower. Layering is key to creating a full, realistic bloom.
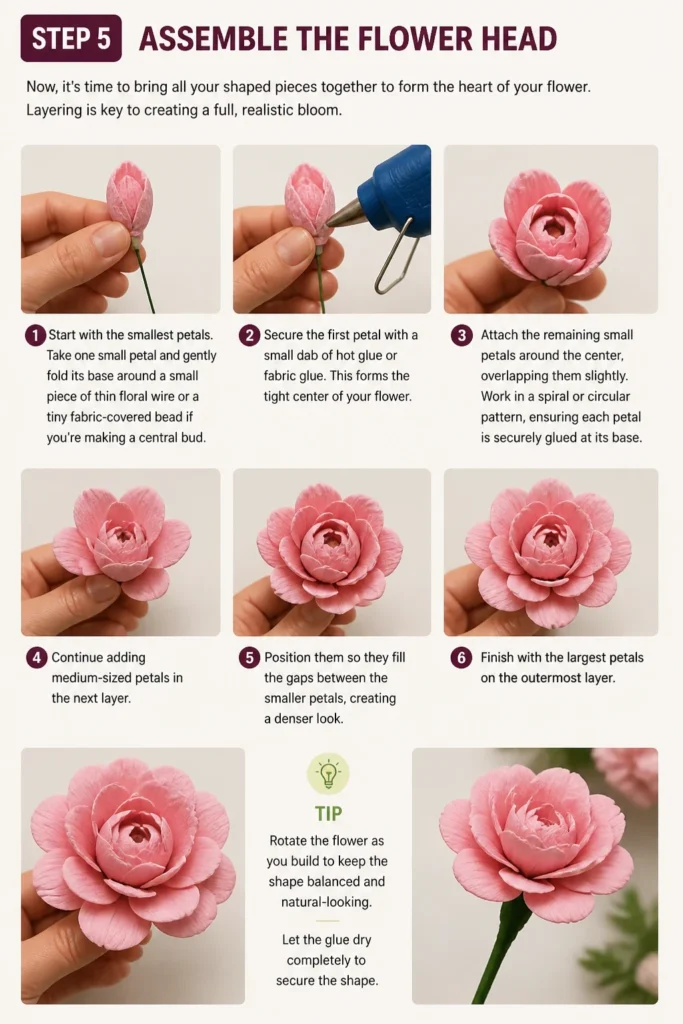
Start with the smallest petals. Take one small petal and gently fold its base around a small piece of thin floral wire or a tiny fabric-covered bead if you’re making a central bud.
Secure the first petal with a small dab of hot glue or fabric glue. This forms the tight center of your flower.
Attach the remaining small petals around the center, overlapping them slightly. Work in a spiral or circular pattern, ensuring each petal is securely glued at its base.
Continue adding medium-sized petals in the next layer. Position them so they fill the gaps between the smaller petals, creating a denser look.
Finish with the largest petals on the outermost layer. Arrange these to give the flower its overall shape and fullness. Pay attention to how real flowers fan out their petals.
Step 6: Add the STEM and Calyx
A sturdy stem and a natural-looking calyx (the green leaf-like structures at the base of the flower head) complete your bloom.
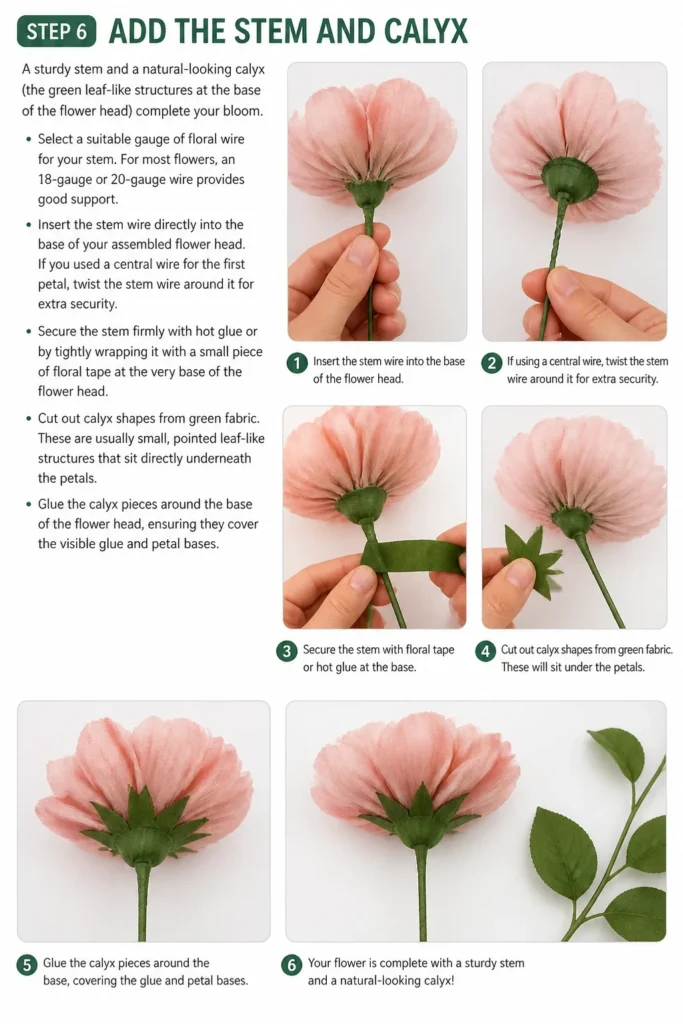
Select a suitable gauge of floral wire for your stem. For most flowers, an 18-gauge or 20-gauge wire provides good support.
Insert the stem wire directly into the base of your assembled flower head. If you used a central wire for the first petal, twist the stem wire around it for extra security.
Secure the stem firmly with hot glue or by tightly wrapping it with a small piece of floral tape at the very base of the flower head.
Cut out calyx shapes from green fabric. These are usually small, pointed leaf-like structures that sit directly underneath the petals.
Glue the calyx pieces around the base of the flower head, ensuring they cover the visible glue and petal bases. Overlap them slightly for a natural appearance.
Wrap the entire stem with floral tape. Start just below the calyx, stretching the tape slightly as you wrap it downwards at an angle. This creates a smooth, green stem and further secures the flower head.
Step 7: Detail and Finishing Touches
The final details are what truly elevate your fake flowers from simple crafts to lifelike botanical art. These small additions make a big difference.
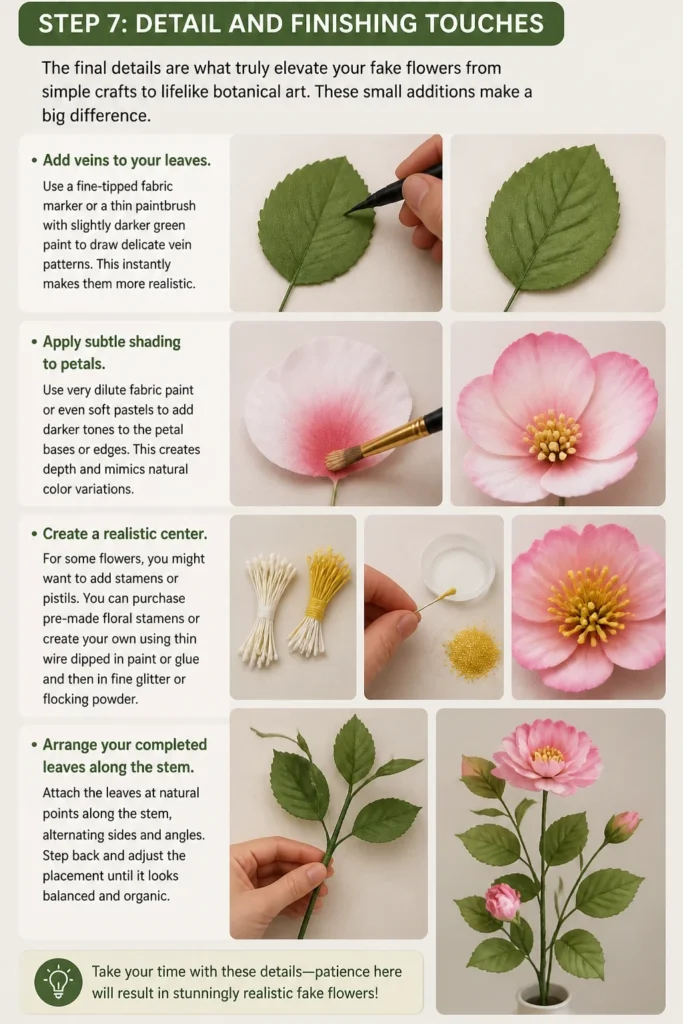
Add veins to your leaves. Use a fine-tipped fabric marker or a thin paintbrush with slightly darker green paint to draw delicate vein patterns. This instantly makes them more realistic.
Apply subtle shading to petals. Use very dilute fabric paint or even soft pastels to add darker tones to the petal bases or edges. This creates depth and mimics natural color variations.
Create a realistic center. For some flowers, you might want to add stamens or pistils. You can purchase pre-made floral stamens or create your own using thin wire dipped in paint or glue and then in fine glitter or flocking powder.
Arrange your completed leaves along the stem. Wrap their individual wires around the main stem and secure them with floral tape, positioning them as they would naturally grow.
Gently bend and adjust the petals and leaves. Step back and observe your flower, making minor adjustments to achieve the most natural and pleasing shape.
Mist with a clear, matte sealant spray if desired. This can protect the fabric and colors, making your flowers even more durable.
Common Mistakes to Avoid
Choosing the Wrong Fabric
Using fabric that is too thin or too stiff can severely impact the outcome. Very thin fabrics often lack the body to hold a shaped form, resulting in limp, unrealistic petals. Conversely, overly stiff fabrics can be difficult to shape naturally and may look rigid and unnatural.
Always test a small piece of your chosen fabric first. Look for materials that offer a balance of pliability and structure, allowing for delicate shaping while retaining their form. Silk, satin, and certain cotton blends are generally excellent choices.
Skipping Petal Shaping
One of the most common pitfalls is simply cutting out flat petals and gluing them together. This results in a flower that looks flat and two-dimensional, immediately giving away its artificial nature. Real flowers have natural curves, cups, and undulations.
Invest time in shaping each individual petal. Use tools to curl, cup, and pleat the fabric. This adds the crucial dimension and realism that makes your fake flowers truly shine. Every curve contributes to the overall lifelike appearance.
Using Too Much Glue
Excessive glue can make your flowers look messy, stiff, and unnatural. Large blobs of glue can seep through fabric, leave shiny residues, and prevent petals from moving or draping naturally. It can also make the flower feel rigid and heavy.
Apply glue sparingly. Use small, precise dots or thin lines, especially with hot glue. For fabric glue, use just enough to create a secure bond. Less is always more when it comes to adhesives in delicate crafting.
Poor Color Choices and Shading
Using a single, flat color for an entire flower can make it look artificial. Real flowers exhibit subtle variations, gradients, and natural imperfections in their coloring. Overly bright or unnatural hues can also detract from realism.
Observe the color nuances in real flowers. Incorporate subtle shading with dyes or paints, adding darker tones to the bases of petals and lighter touches to the tips. Mix colors to achieve more natural, muted tones, and consider gentle color blending for gradients.
Troubleshooting
Petals Falling Apart After Assembly
If your carefully arranged petals are detaching, the adhesive might not be strong enough or was applied incorrectly. This often happens with delicate fabrics or if the glue didn’t fully cure.
Re-glue the loose petals using a fresh application of glue. For a stronger bond, consider using a fabric-specific adhesive rather than just hot glue, especially for stress points. Ensure the glue is fully dry before handling or moving the flower extensively.
Flower Looks Flat or Unrealistic
A flower lacking depth and realism often stems from insufficient shaping or improper layering. Flat petals or too few layers can make the bloom appear sparse and artificial.
Gently re-shape individual petals using your shaping tools, focusing on creating more pronounced curves and cups. Add more layers of petals, especially medium and large sizes, to build fullness. Ensure petals are overlapped and offset to mimic natural growth patterns.
Stem Not Holding Shape or Bending Easily
If your flower stem is flimsy or struggles to support the weight of the flower head, you’ve likely used a wire that is too thin for the job. This can lead to drooping or instability.
Replace the thin wire with a thicker gauge floral wire (e.g., 18 or 16 gauge). If replacing isn’t feasible, you can reinforce the existing stem by wrapping another piece of wire tightly around it with floral tape. Ensure the wire extends well into the flower head for better support.
Key Takeaways
- Material selection is fundamental for a realistic and durable fake flower.
- Dedicated time to shaping each petal is crucial for achieving natural dimension and realism.
- Layering petals correctly, from smallest to largest, builds a full and lifelike bloom.
- Subtle details like shading, veining, and a proper calyx elevate the overall appearance.
- Patience and precision with cutting and gluing prevent common crafting frustrations.
- Don’t be afraid to experiment with different fabrics and coloring techniques to find your unique style.
Frequently Asked Questions
What is the best fabric for making fake flowers?
Silk and satin are widely considered excellent choices due to their luxurious feel, ability to hold shape, and capacity to absorb dyes beautifully. However, cotton blends, organza, and even certain synthetic fabrics can also yield beautiful results depending on the specific flower you are trying to create.
Can I use household items for shaping tools?
Absolutely! You don’t need specialized tools to start. The back of a spoon, a blunt butter knife, a knitting needle, or even your fingers can be effectively used to curl and cup petals. Experiment with what you have on hand to discover what works best for different shapes.
How can I make my fake flowers last longer?
To ensure longevity, protect your flowers from direct sunlight, which can fade colors over time. A light misting of a clear, matte sealant spray can also help protect fabric and paint from wear and tear. Store them carefully to prevent crushing or dust buildup.
Can I make different types of flowers using these steps?
Yes, the fundamental principles of cutting, shaping, and assembling apply to a wide variety of flower types. The key is to adapt your petal and leaf templates to match the specific flower you want to replicate. Researching the unique characteristics of each bloom will guide your design choices.
Our Top Recommended Finds
- Fabric Stiffener Spray: Essential for giving delicate fabrics the necessary body to hold intricate shapes.
- Assorted Floral Wire Pack: A variety of gauges ensures you have the right strength for stems, petals, and leaves.
- Fine-Tip Hot Glue Gun: Allows for precise application, minimizing visible glue and preventing messy results.
Crafting Beauty That Lasts Forever
You now possess the knowledge and practical steps to create your own stunning fake flowers. Imagine the joy of crafting a bouquet that stays vibrant year-round, or a centerpiece that never wilts.
The satisfaction of transforming simple materials into something so beautiful is truly rewarding. Don’t let hesitation hold you back.
Grab your materials, pick your favorite bloom, and start your journey into the delightful world of everlasting floral artistry today!