🏮 How To Make Paper Lanterns
Creating your own paper lanterns brings a unique charm to any space or celebration. I remember crafting dozens for a garden party, and the soft glow transformed the entire evening. This guide shares proven techniques, making the process straightforward and enjoyable for anyone.
You will learn how to build beautiful, glowing decorations from simple sheets of paper. Get ready to add a personal, illuminated touch to your home or next event.
Quick Overview
This guide will walk you through crafting a charming paper lantern, perfect for decorating any occasion. You will learn essential cutting, folding, and assembly techniques to create a sturdy and attractive piece. We will cover everything from basic construction to adding your personal decorative flair.
- Time needed: 1-2 hours (depending on complexity and drying time)
- Difficulty: Beginner
- What you’ll need: Paper, scissors, ruler, glue, pencil, string/wire, optional decorations, and a light source.
Step-by-Step Instructions
Step 1: Gather Your Materials
Before you begin, lay out all your necessary tools and supplies. Having everything within reach makes the crafting process much smoother. This prevents interruptions and helps maintain your creative flow.
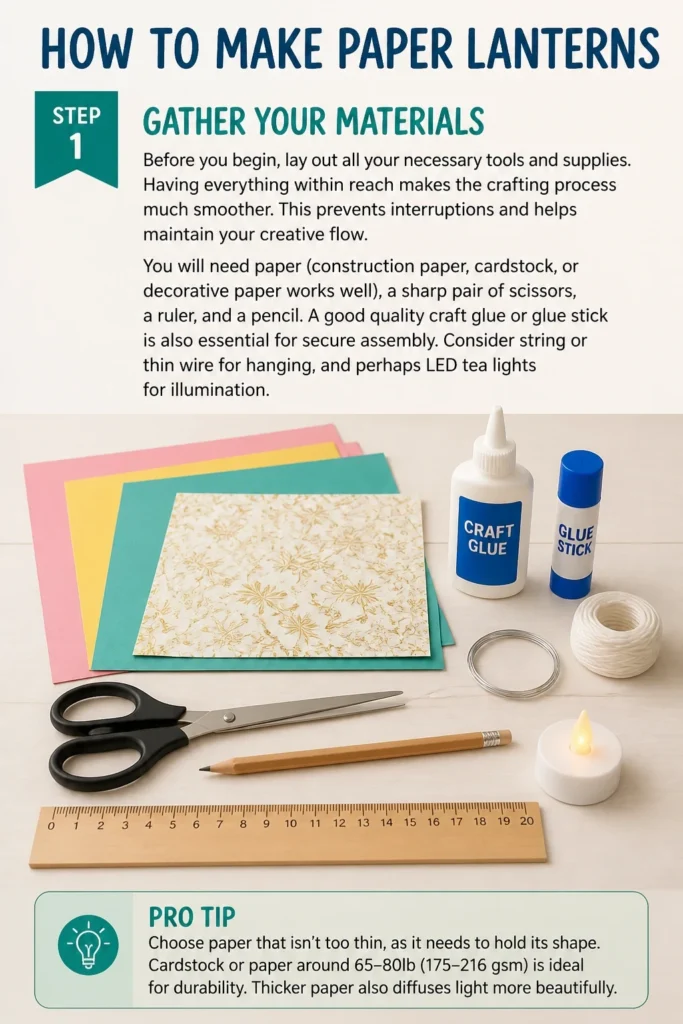
You will need paper (construction paper, cardstock, or decorative paper works well), a sharp pair of scissors, a ruler, and a pencil. A good quality craft glue or glue stick is also essential for secure assembly. Consider string or thin wire for hanging, and perhaps LED tea lights for illumination.
Pro Tip: Choose paper that isn’t too thin, as it needs to hold its shape. Cardstock or paper around 65-80lb (175-216 gsm) is ideal for durability. Thicker paper also diffuses light more beautifully.
Step 2: Prepare Your Paper
Start by deciding the size of your lantern. For a standard lantern, you might begin with a rectangular sheet of paper, such as 8.5 x 11 inches or larger. You can also use square paper for a different shape.
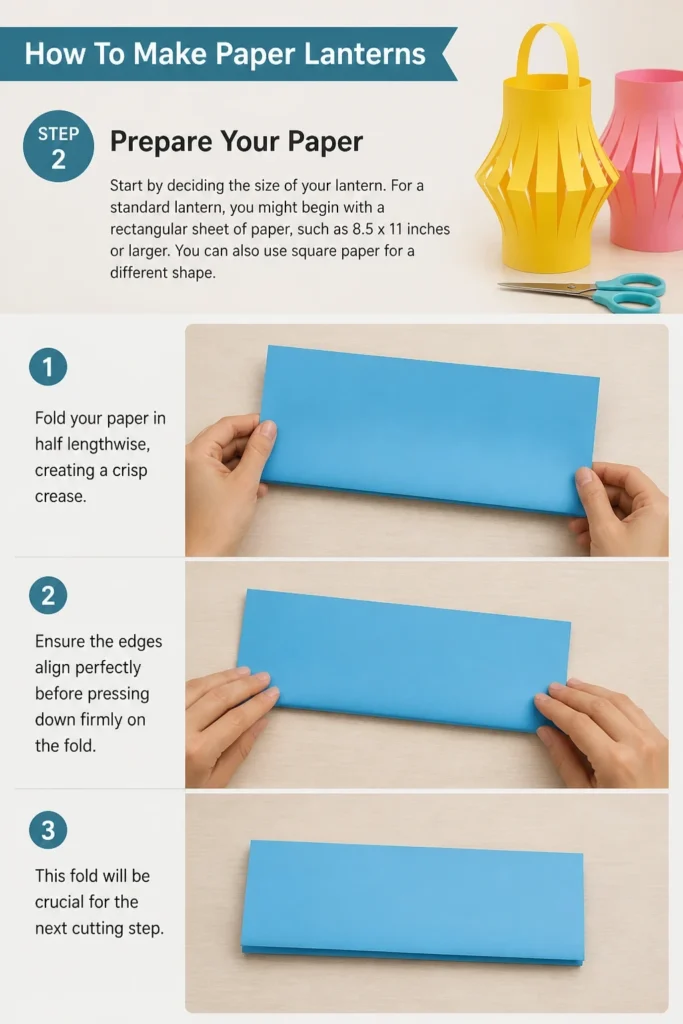
Fold your paper in half lengthwise, creating a crisp crease. Ensure the edges align perfectly before pressing down firmly on the fold. This fold will be crucial for the next cutting step.
Step 3: Mark and Cut the Fringe
With the paper still folded, use your ruler and pencil to mark a line about 1 inch (2.5 cm) from the unfolded edge. This line will act as your stopping point for the cuts. Do not cut past this line.
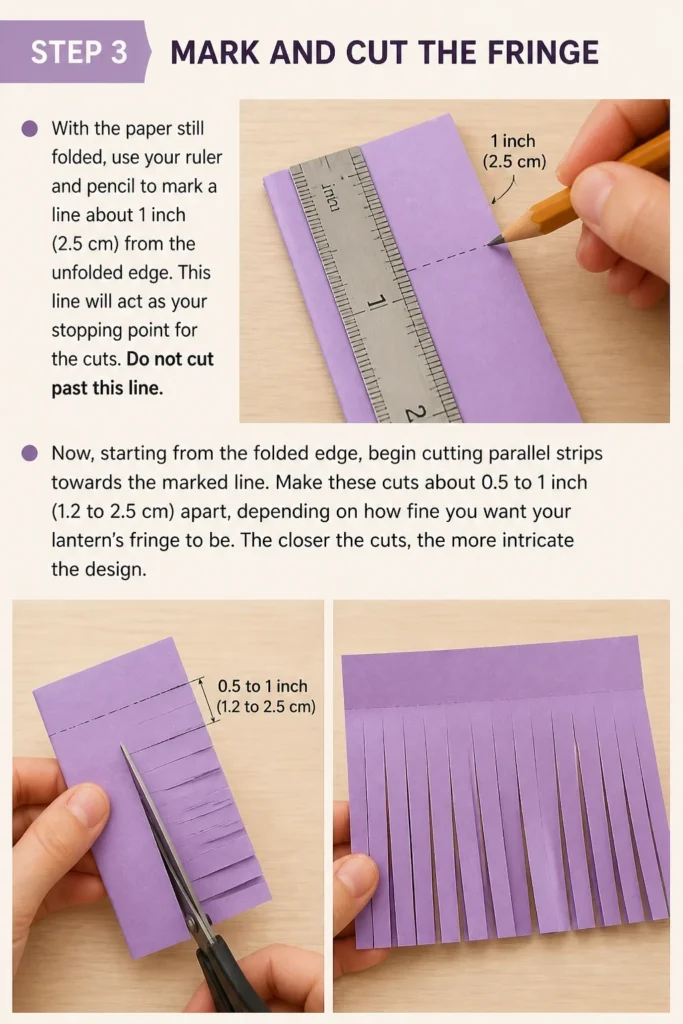
Now, starting from the folded edge, begin cutting parallel strips towards the marked line. Make these cuts about 0.5 to 1 inch (1.2 to 2.5 cm) apart, depending on how fine you want your lantern’s “fringe” to be. The closer the cuts, the more intricate the design.
Step 4: Unfold and Shape
Once all your cuts are made, carefully unfold the paper. You will see a series of evenly spaced slits running along the center of your paper. The two uncut edges will become the top and bottom of your lantern.
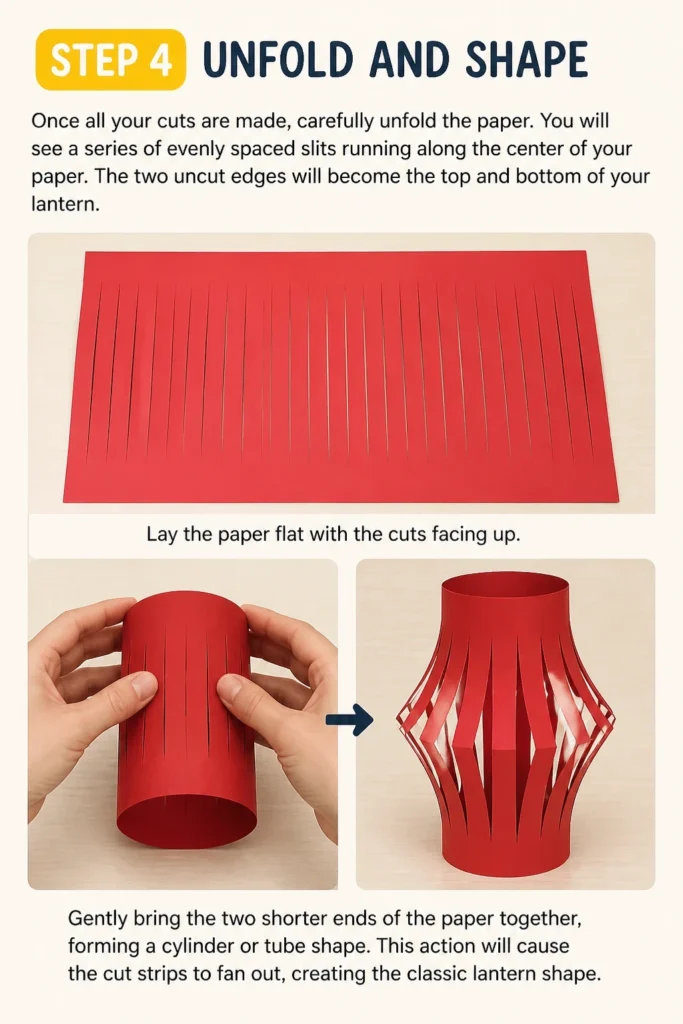
Lay the paper flat with the cuts facing up. Gently bring the two shorter ends of the paper together, forming a cylinder or tube shape. This action will cause the cut strips to fan out, creating the classic lantern shape.
Step 5: Secure the Seam
Apply a thin, even line of glue along one of the shorter edges of your paper. Make sure to cover the entire edge from top to bottom. Avoid using too much glue, as it can cause the paper to warp or wrinkle.
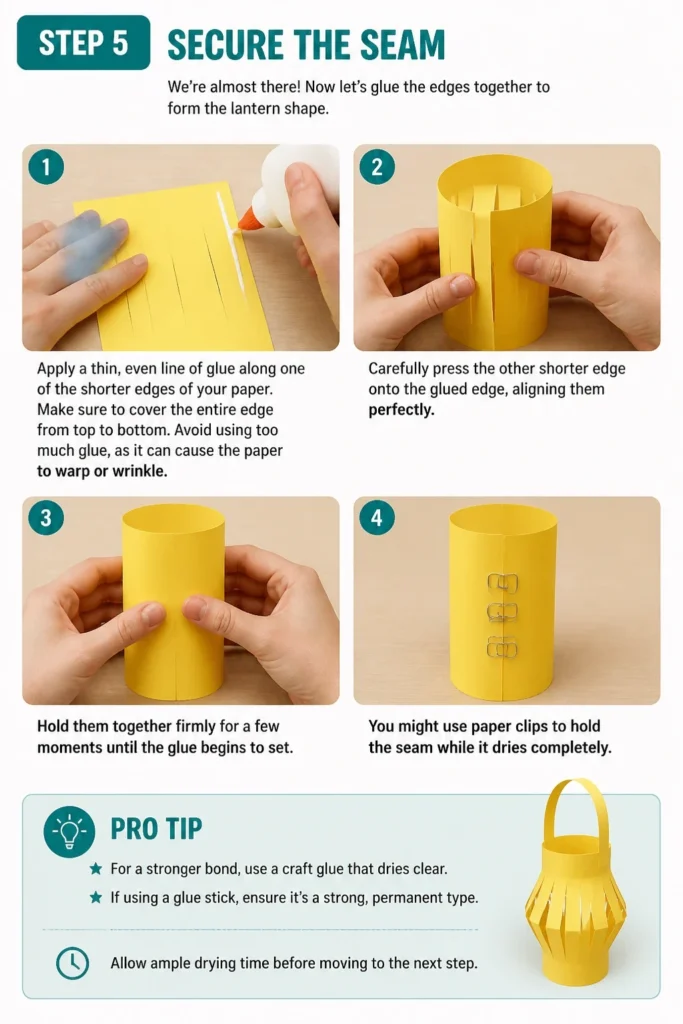
Carefully press the other shorter edge onto the glued edge, aligning them perfectly. Hold them together firmly for a few moments until the glue begins to set. You might use paper clips to hold the seam while it dries completely.
Pro Tip: For a stronger bond, use a craft glue that dries clear. If using a glue stick, ensure it’s a strong, permanent type. Allow ample drying time before moving to the next step.
Step 6: Create the Handle
To hang your lantern, you will need a handle. Cut a thin strip of paper, about 0.5 to 1 inch (1.2 to 2.5 cm) wide and 6-8 inches (15-20 cm) long, from a matching or contrasting sheet. This will form the loop.
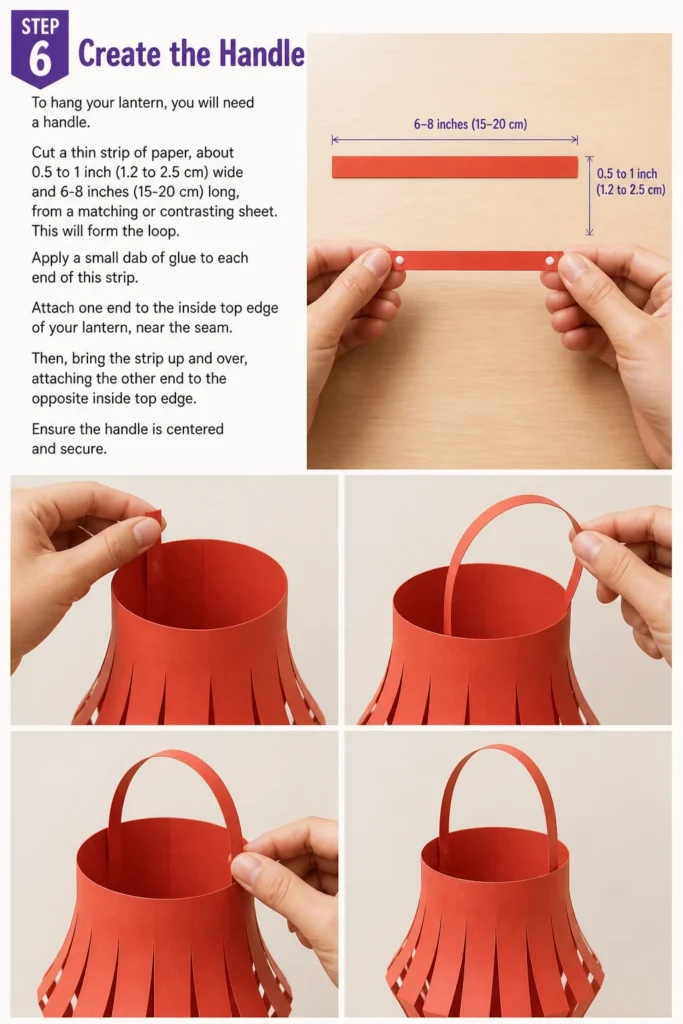
Apply a small dab of glue to each end of this strip. Attach one end to the inside top edge of your lantern, near the seam. Then, bring the strip up and over, attaching the other end to the opposite inside top edge. Ensure the handle is centered and secure.
Step 7: Add a Base (Optional but Recommended)
While not strictly necessary for all designs, adding a base can provide stability and a cleaner look. Cut a circle or square of paper slightly larger than the bottom opening of your lantern. This base will sit inside or beneath the lantern.
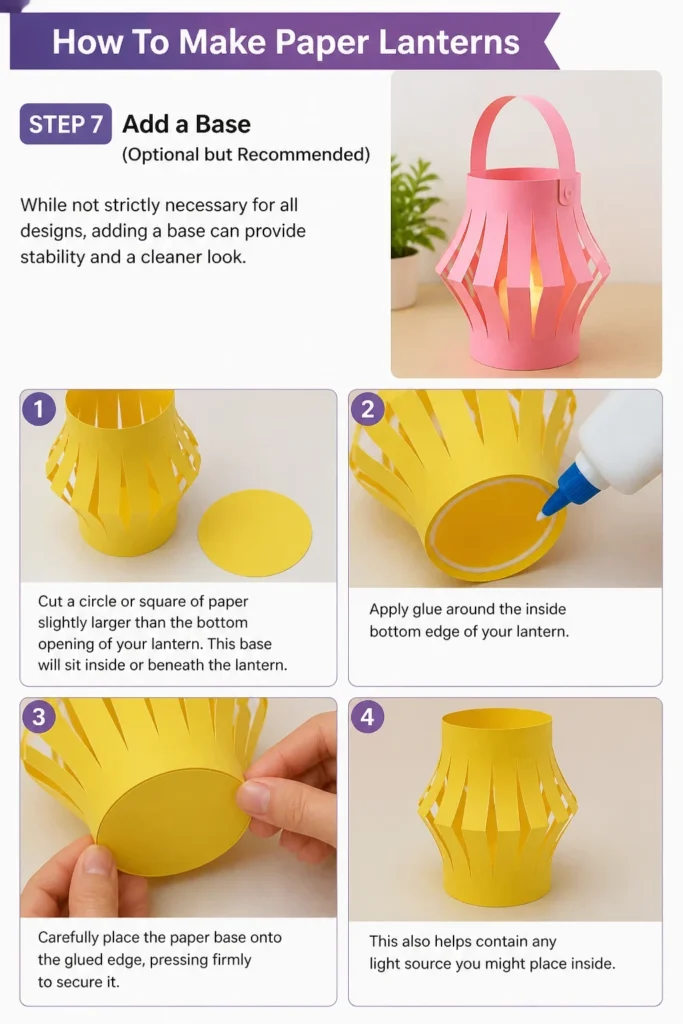
Apply glue around the inside bottom edge of your lantern. Carefully place the paper base onto the glued edge, pressing firmly to secure it. This also helps contain any light source you might place inside.
Step 8: Decorate Your Lantern
Now comes the fun part: personalizing your creation. You can use markers, glitter, stickers, or cut-out shapes to adorn your lantern. Consider themes like stars, hearts, or simple geometric patterns.
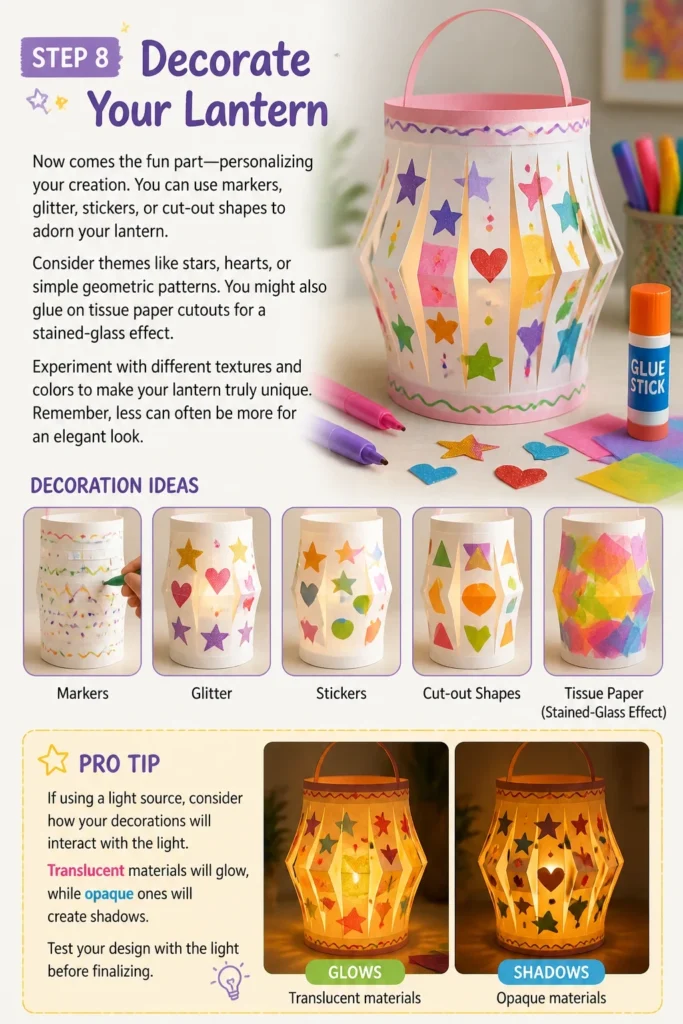
You might also glue on tissue paper cutouts for a stained-glass effect. Experiment with different textures and colors to make your lantern truly unique. Remember, less can often be more for an elegant look.
Pro Tip: If using a light source, consider how your decorations will interact with the light. Translucent materials will glow, while opaque ones will create shadows. Test your design with the light before finalizing.
Step 9: Insert Your Light Source
For safety and convenience, use battery-operated LED tea lights or small LED string lights. Never use real candles or incandescent bulbs, as they can be a fire hazard with paper. LED lights are cool to the touch and perfectly safe.
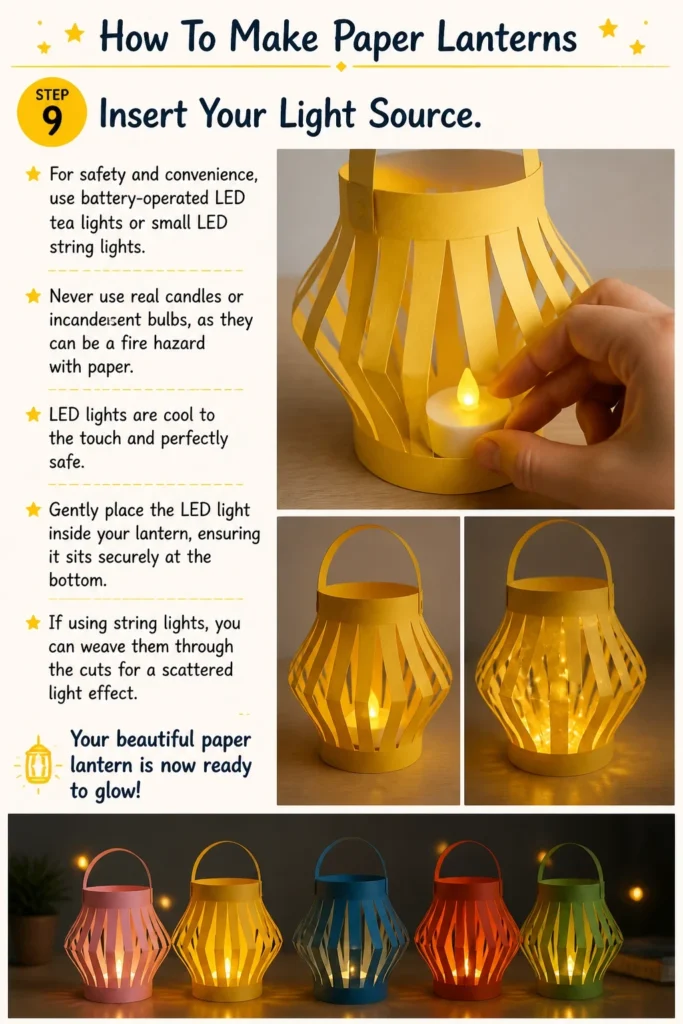
Gently place the LED light inside your lantern, ensuring it sits securely at the bottom. If using string lights, you can weave them through the cuts for a scattered light effect. Your beautiful paper lantern is now ready to glow!
Common Mistakes to Avoid
Cutting Past the Guide Line
Many beginners accidentally cut all the way through the paper when creating the fringe. This mistake separates the paper into two pieces, making it impossible to form a complete lantern. Always mark a clear stopping line and be mindful of your cuts.
The correct approach is to stop your cuts at least an inch from the unfolded edge. This uncut strip is what holds the top and bottom of your lantern together, allowing it to maintain its cylindrical shape. Precision here saves you from restarting your project.
Using Too Much Glue
Applying a thick layer of glue can cause the paper to wrinkle, buckle, or even tear. It also significantly increases drying time, leading to impatient handling and potential structural failure. Excess glue can also seep out and create unsightly marks.
Instead, apply a thin, even bead or layer of glue along the seam. A small amount is often sufficient to create a strong bond, especially with craft glues. Patience during the drying process is also key to a clean finish.
Not Letting Glue Dry Completely
Attempting to handle or decorate the lantern before the glue has fully set can cause the seams to come apart. This leads to frustration and the need to re-glue, which can weaken the paper. The entire structure relies on those secure bonds.
Always allow ample time for the glue to dry, usually 15-30 minutes, or as recommended by your specific glue product. If you’re unsure, give it more time; a fully dried seam is a strong seam. This ensures your lantern holds its shape.
Using Unsafe Light Sources
A common and dangerous mistake is using real candles, incandescent bulbs, or other heat-generating light sources inside paper lanterns. Paper is flammable, and heat can quickly ignite it, posing a serious fire risk. Safety should always be your top priority.
Stick to battery-operated LED tea lights or small LED string lights. These options produce no heat, making them perfectly safe for paper crafts. They also come in various colors and flicker effects, enhancing the ambiance without any danger.
Troubleshooting
Lantern Won’t Hold Its Shape
If your lantern collapses or doesn’t maintain its cylindrical form, the glue along the seam might not be holding. This often happens if the glue wasn’t allowed to dry completely or if there wasn’t enough applied initially. Check the seam for any gaps.
Reapply a thin line of glue along the loose seam and press firmly. Use paper clips or clothespins to hold the edges together while it dries thoroughly. For future projects, consider using slightly thicker paper or cardstock for added rigidity.
Cuts Are Uneven or Jagged
Uneven or jagged cuts can detract from the lantern’s aesthetic appeal, making it look less polished. This usually results from using dull scissors or rushing the cutting process. Precision is important for a clean, professional look.
Use a sharp pair of craft scissors and take your time with each cut. If your existing scissors feel dull, consider sharpening them or replacing them. Practicing on scrap paper can also help improve your cutting technique before working on your final piece.
Handle Tears Off Easily
A handle that rips away suggests either insufficient glue, a weak bond, or the paper itself is too thin to support the weight. The stress of hanging the lantern can quickly expose these weak points. The handle needs to be robust.
Ensure you’re attaching the handle to a strong part of the lantern, ideally with a generous amount of glue spread over a larger surface area. If using thin paper, reinforce the attachment points with a small square of cardstock on the inside. You could also use a stronger material like thin wire for the handle, attaching it through small punched holes.
Key Takeaways
- Always gather all materials before starting to ensure a smooth crafting process.
- Precision in folding and cutting is crucial for a symmetrical and well-structured lantern.
- Use a thin, even application of glue and allow it to dry completely for strong, invisible seams.
- Prioritize safety by exclusively using battery-operated LED lights for illumination.
- Personalize your lantern with various decorations to reflect your style and occasion.
- Thicker paper or cardstock provides better durability and a more professional finish.
Frequently Asked Questions
Can I make different shapes of paper lanterns?
Absolutely! While this guide focuses on a basic cylinder, you can adapt the technique for various shapes. Instead of bringing the short ends together, you might connect the long ends to create a wider, shorter lantern. Experiment with different initial paper shapes or by cutting patterns into the top and bottom edges before assembly.
What kind of paper is best for paper lanterns?
Cardstock (65-80lb or 175-216 gsm) is generally best as it offers good durability and holds its shape well. Decorative paper, scrapbook paper, or even watercolor paper can also work, provided it has some weight. Avoid very thin paper like printer paper, as it can tear easily and won’t hold its form.
How can I make my paper lantern more durable?
To increase durability, use heavier cardstock for the main body and reinforce seams with strong craft glue. You can also add a thin layer of clear sealant or Mod Podge to the finished lantern, which adds a protective coating and can make it more resistant to moisture. This also helps with handling over time.
Can these paper lanterns be used outdoors?
These paper lanterns are primarily designed for indoor use. Paper is susceptible to moisture and wind, which can quickly damage them. If you plan to use them outdoors for a brief event, ensure it’s a dry, calm day and bring them inside immediately afterward. Never leave them out overnight or in wet conditions.
Our Top Recommended Finds
- Heavy Cardstock Assortment: A pack of varied colored cardstock provides sturdy material and allows for creative color combinations. It’s essential for a durable lantern.
- Craft Glue with Precision Tip: A high-quality craft glue that dries clear and comes with a fine tip ensures clean application and strong, lasting bonds. This prevents messy seams.
- Battery-Operated LED Tea Lights: These small, safe lights are perfect for illuminating your lanterns without any heat risk. They often come in multi-packs, offering great value and convenience.
Illuminate Your World with Creativity
You now possess the knowledge and steps to craft beautiful paper lanterns. This is more than just a craft; it’s an opportunity to infuse your space with personal warmth and light. Imagine the soft glow enhancing your next dinner party, a cozy reading nook, or even a child’s bedroom.
Don’t let these ideas just flicker in your mind. Gather your supplies, choose your favorite paper, and start creating today. Perhaps you’ll move on to explore different cutting patterns, layered designs, or even incorporate elements like dried flowers or fabric. The possibilities are endless when you embrace your inner maker!