🧵 How To Make A Cuff
There’s a unique satisfaction in crafting a garment that fits perfectly, especially when you’ve tackled a detail like a cuff.
I still remember the triumph of sewing my first neat shirt cuff; it felt like a small, personal victory.
Through countless projects, I’ve honed the techniques for creating crisp, professional cuffs, and I’m here to share that experience with you.
Quick Overview
This guide will walk you through creating a well-structured, professional-looking cuff, suitable for shirts, blouses, or other garments. You’ll learn the essential techniques to achieve clean lines and a strong finish.
- Time needed: 1-2 hours (depending on experience)
- Difficulty: Beginner to Intermediate
- What you’ll need: Fabric, fusible interfacing, matching thread, sewing machine, fabric scissors, iron, ironing board, pins, ruler/measuring tape, tailor’s chalk or fabric marker.
Step-by-Step Instructions
Step 1: Prepare Your Materials and Measurements
Before you begin, gather all your tools and materials. Ensure your fabric is pre-washed and pressed to prevent future shrinking or distortion.
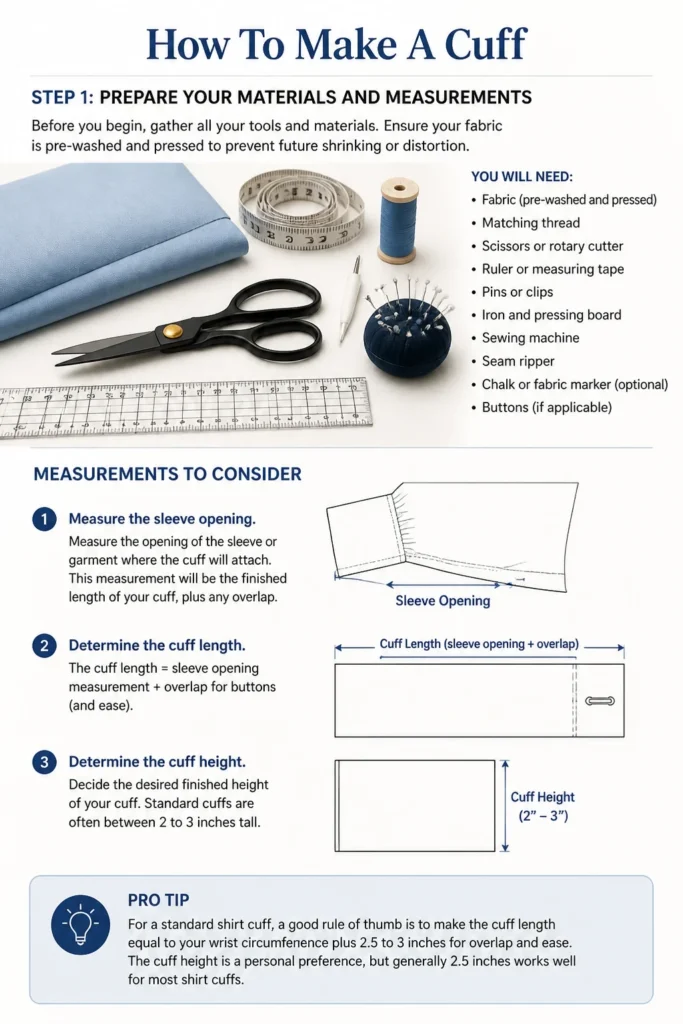
You’ll need to decide on the desired finished size of your cuff. A typical shirt cuff might be 2.5 inches tall and wrap comfortably around the wrist, plus an overlap for buttons.
- Measure the opening of the sleeve or garment where the cuff will attach. This measurement will be the finished length of your cuff, plus any overlap.
- Determine the desired finished height of your cuff. Standard cuffs are often between 2 to 3 inches tall.
Pro Tip: For a standard shirt cuff, a good rule of thumb is to make the cuff length equal to your wrist circumference plus 2.5 to 3 inches for overlap and ease. The cuff height is a personal preference, but generally 2.5 inches is a classic choice.
Step 2: Cut Your Fabric and Interfacing
Accuracy in cutting is crucial for a crisp cuff. Take your time to measure twice and cut once.
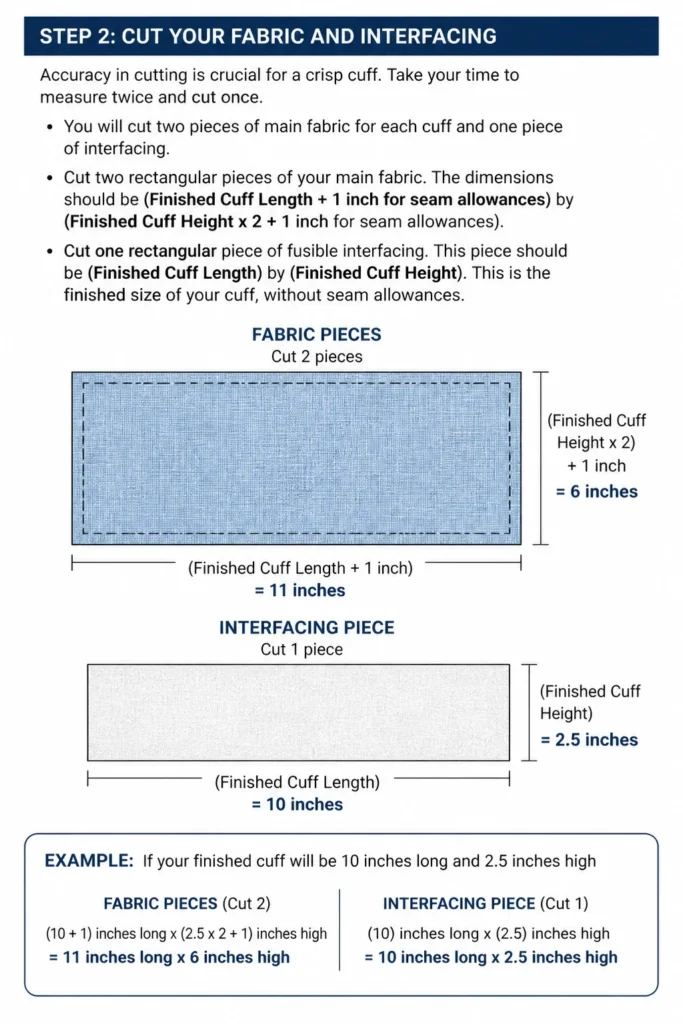
You will cut two pieces of main fabric for each cuff and one piece of interfacing.
- Cut two rectangular pieces of your main fabric. The dimensions should be: (Finished Cuff Length + 1 inch for seam allowances) by (Finished Cuff Height x 2 + 1 inch for seam allowances).
- Cut one rectangular piece of fusible interfacing. This piece should be: (Finished Cuff Length) by (Finished Cuff Height). This is the finished size of your cuff, without seam allowances.
For example, if your finished cuff will be 10 inches long and 2.5 inches high:
- Fabric pieces: (10 + 1) inches long x (2.5 x 2 + 1) inches high = 11 inches long x 6 inches high.
- Interfacing piece: 10 inches long x 2.5 inches high.
Step 3: Attach the Fusible Interfacing
Interfacing provides structure and stability to your cuff, preventing it from looking flimsy or wrinkling easily. Fusible interfacing is ironed directly onto the fabric.
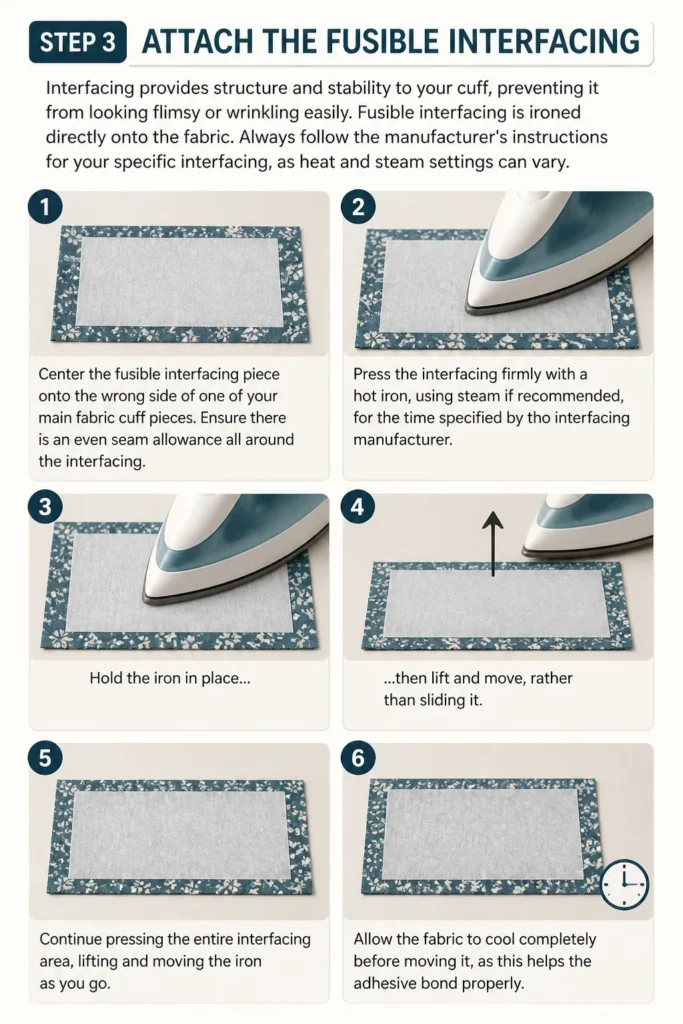
Always follow the manufacturer’s instructions for your specific interfacing, as heat and steam settings can vary.
- Center the fusible interfacing piece onto the wrong side of one of your main fabric cuff pieces. Ensure there is an even seam allowance all around the interfacing.
- Press the interfacing firmly with a hot iron, using steam if recommended, for the time specified by the interfacing manufacturer. Hold the iron in place, then lift and move, rather than sliding it.
- Allow the fabric to cool completely before moving it, as this helps the adhesive bond properly.
Step 4: Fold and Press the Cuff
Pressing is a vital step in creating sharp, professional edges. It sets the fabric and guides your stitching.
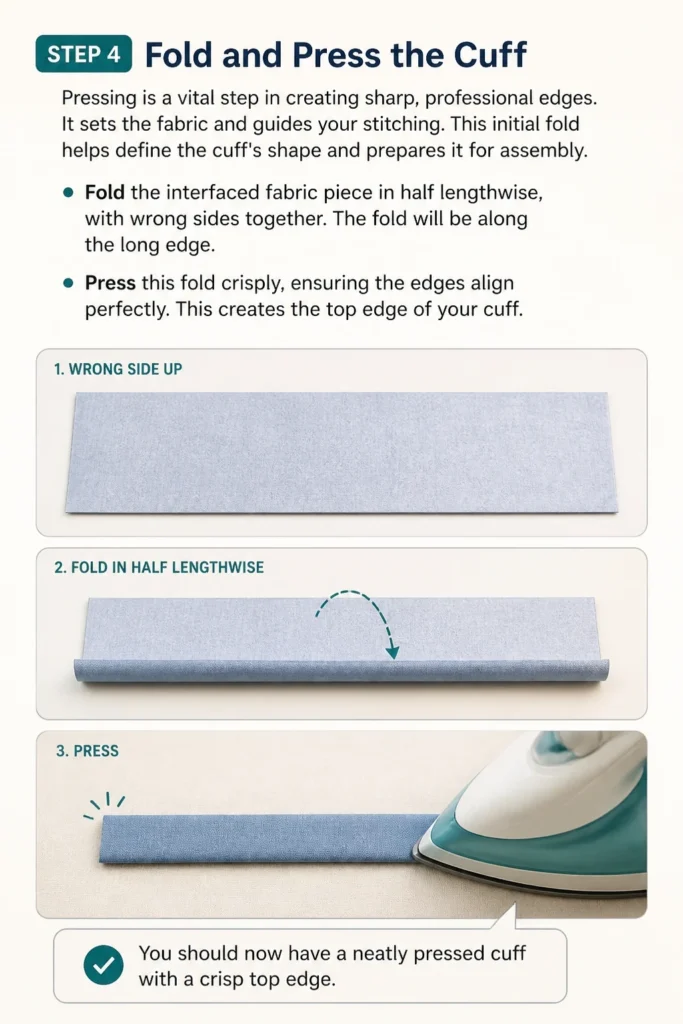
This initial fold helps define the cuff’s shape and prepares it for assembly.
- Fold the interfaced fabric piece in half lengthwise, with wrong sides together. The fold will be along the long edge.
- Press this fold crisply, ensuring the edges align perfectly. This creates the top edge of your cuff.
Step 5: Stitch the Cuff Sides
Now you’ll begin to sew the cuff, creating the side seams and preparing it to be turned right side out.
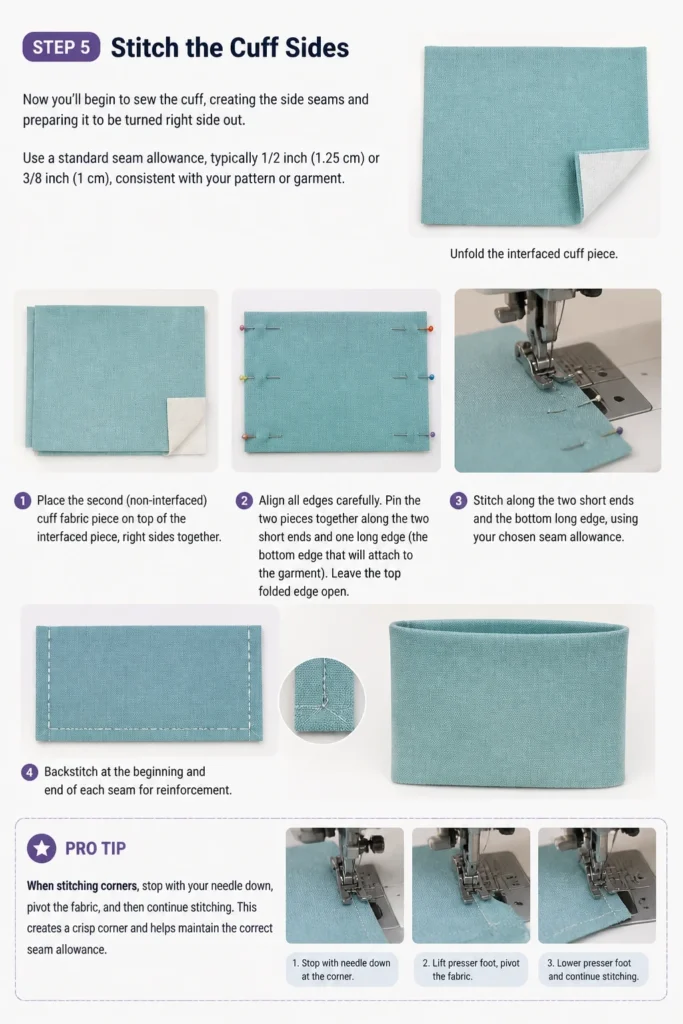
Use a standard seam allowance, typically 1/2 inch (1.25 cm) or 3/8 inch (1 cm), consistent with your pattern or garment.
- Unfold the interfaced cuff piece.
- Place the second (non-interfaced) cuff fabric piece on top of the interfaced piece, right sides together. Align all edges carefully.
- Pin the two pieces together along the two short ends and one long edge (the bottom edge that will attach to the garment). Leave the top folded edge open.
- Stitch along the two short ends and the bottom long edge, using your chosen seam allowance. Backstitch at the beginning and end of each seam for reinforcement.
Pro Tip: When stitching corners, stop with your needle down, pivot the fabric, and then continue stitching. This creates a sharper, cleaner corner.
Step 6: Trim and Turn Out
Trimming seam allowances reduces bulk, especially in corners, allowing the cuff to lie flat and sharp.
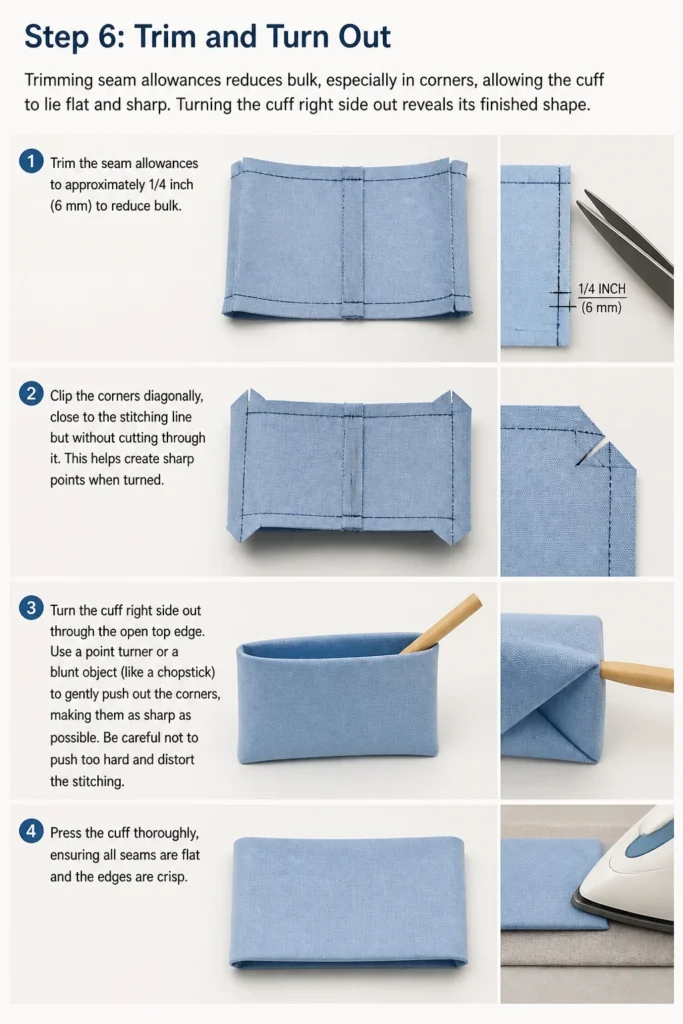
Turning the cuff right side out reveals its finished shape.
- Trim the seam allowances to approximately 1/4 inch (6 mm) to reduce bulk.
- Clip the corners diagonally, close to the stitching line but without cutting through it. This helps create sharp points when turned.
- Turn the cuff right side out through the open top edge.
- Use a point turner or a blunt object (like a chopstick) to gently push out the corners, making them as sharp as possible. Be careful not to push too hard and distort the stitching.
- Press the cuff thoroughly, ensuring all seams are flat and the edges are crisp.
Step 7: Attach the Cuff to the Garment
This step integrates your beautifully made cuff into your garment. Precision here ensures a smooth, even attachment.
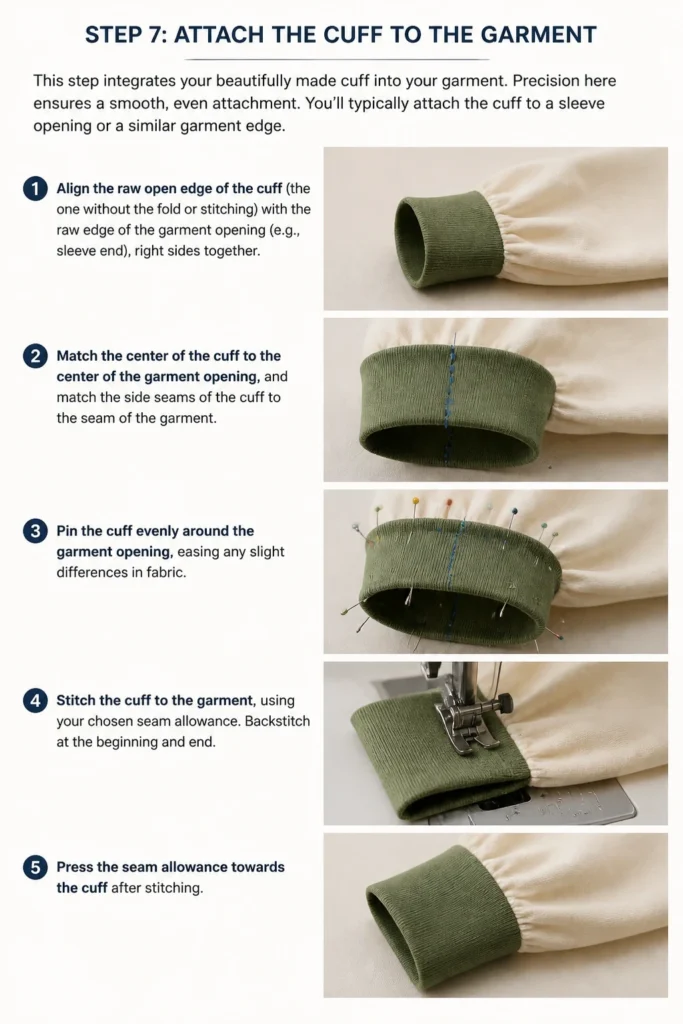
You’ll typically attach the cuff to a sleeve opening or a similar garment edge.
- Align the raw open edge of the cuff (the one without the fold or stitching) with the raw edge of the garment opening (e.g., sleeve end), right sides together.
- Match the center of the cuff to the center of the garment opening, and match the side seams of the cuff to the seam of the garment.
- Pin the cuff evenly around the garment opening, easing any slight differences in fabric.
- Stitch the cuff to the garment, using your chosen seam allowance. Backstitch at the beginning and end.
- Press the seam allowance towards the cuff after stitching.
Step 8: Topstitch for a Professional Finish
Topstitching adds a polished, professional look to your cuff and helps to secure the layers of fabric.
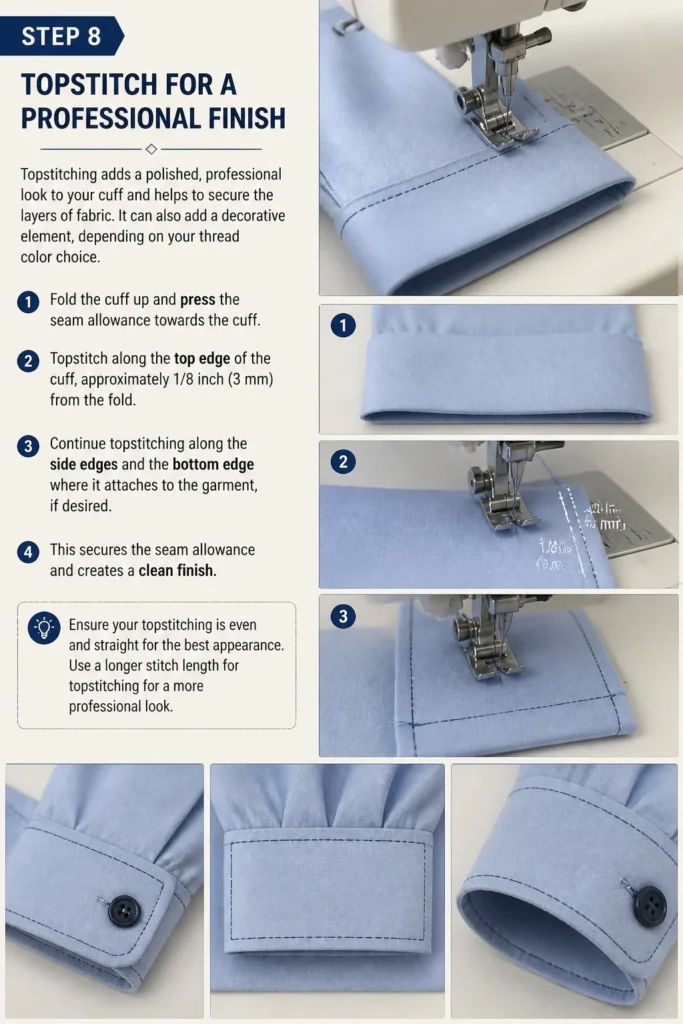
It can also add a decorative element, depending on your thread color choice.
- Fold the cuff up and press the seam allowance towards the cuff.
- Topstitch along the top edge of the cuff, approximately 1/8 inch (3 mm) from the fold.
- Continue topstitching along the side edges and the bottom edge where it attaches to the garment, if desired. This secures the seam allowance and creates a clean finish.
- Ensure your topstitching is even and straight for the best appearance. Use a longer stitch length for topstitching for a more professional look.
Step 9: Add Fasteners
The final touch for your cuff is adding the necessary fasteners, such as buttons, buttonholes, snaps, or hook and loop tape.
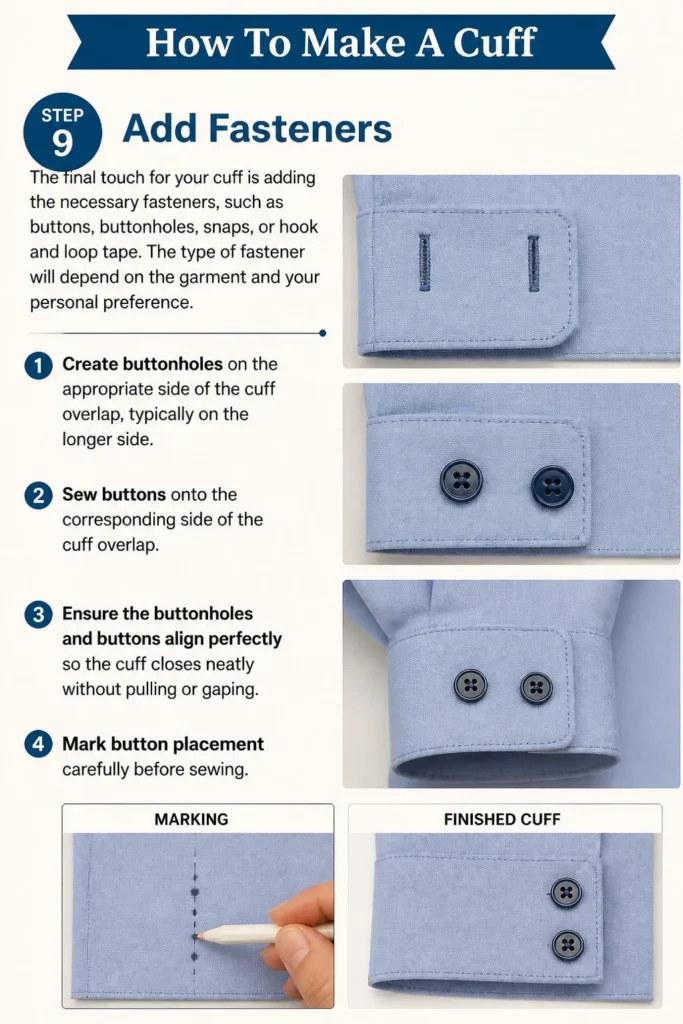
The type of fastener will depend on the garment and your personal preference.
- Create buttonholes on the appropriate side of the cuff overlap, typically on the longer side.
- Sew buttons onto the corresponding side of the cuff overlap.
- Ensure the buttonholes and buttons align perfectly so the cuff closes neatly without pulling or gaping.
- Mark button placement carefully before sewing.
Common Mistakes to Avoid
Not Using Interfacing
Skipping interfacing is a common error, especially for beginners. Without it, your cuff will lack structure, appearing limp, wrinkled, and unprofessional.
Always use a suitable weight of fusible interfacing to give your cuff stability and a crisp finish. It’s the secret to a professional-looking cuff that holds its shape.
Inaccurate Seam Allowances
Inconsistent seam allowances can lead to a cuff that is too big, too small, or uneven. This impacts how the cuff fits the garment and how it looks overall.
Always measure and mark your seam allowances carefully, and stitch them precisely. Use a seam guide on your sewing machine to maintain an even stitch line.
Skipping Pressing Steps
Many sewers underestimate the power of pressing. Not pressing seams open or folds flat between steps results in bulky, uneven seams and a less defined cuff shape.
Pressing is as important as stitching. Take the time to press each seam and fold, using an iron and steam as appropriate, to achieve flat, crisp edges and a professional finish.
Uneven Topstitching
Topstitching is often the most visible stitching on a cuff, so uneven lines can detract significantly from the garment’s overall appearance. Wobbly or inconsistent topstitching looks amateurish.
Practice topstitching on scrap fabric first. Use a longer stitch length, a walking foot if available, and guide your fabric carefully along a fixed seam allowance or a chalk line for perfectly straight lines.
Troubleshooting
Cuff Looks Flimsy or Wrinkled
If your cuff lacks body and appears easily creased, the interfacing might be too lightweight or incorrectly applied. A flimsy cuff won’t hold its shape well.
Ensure you’re using a medium-weight fusible interfacing appropriate for your fabric. Re-check the application instructions for your interfacing, ensuring sufficient heat, steam, and pressing time for a strong bond.
Cuff Doesn’t Fit the Sleeve Opening
If your finished cuff is either too long or too short for the garment opening, it’s usually due to inaccurate initial measurements or inconsistent seam allowances during attachment. This creates puckering or gaps.
Double-check your measurements before cutting. If the cuff is slightly too long, you might be able to ease the sleeve into the cuff. If it’s too short, carefully unpick and re-stitch with a slightly smaller seam allowance on the cuff attachment, or consider adding a small extension if possible.
Corners are Bulky or Rounded
Bulky or rounded corners indicate that the seam allowances weren’t trimmed enough, or the corners weren’t clipped properly before turning. This prevents the fabric from lying flat.
Before turning the cuff right side out, trim seam allowances to 1/4 inch (6mm) and clip the corners diagonally very close to the stitching line. Use a point turner gently to push out the corners as much as possible after turning.
Key Takeaways
- Accurate measuring and cutting are the foundation for a well-made cuff.
- Interfacing is essential for providing structure, stability, and a crisp finish.
- Pressing at every stage is crucial for flat seams and sharp edges.
- Consistent seam allowances ensure the cuff fits correctly and looks professional.
- Take your time with topstitching to achieve a polished and even appearance.
- Don’t rush; precision and patience lead to the best results.
Frequently Asked Questions
Can I make a cuff without a sewing machine?
Yes, you can hand-sew a cuff, though it will take considerably more time and precision. Use a strong backstitch for durability and a neat slip stitch for attaching the final edge. Ensure your stitches are small and even for the best appearance.
What type of fabric is best for cuffs?
The best fabric for a cuff typically matches the main garment fabric. However, for durability and crispness, choose a fabric that holds a press well, such as cotton, linen, or blends. Avoid overly stretchy or slippery fabrics unless you have significant experience.
How do I make a cuff for a different garment type (e.g., pants)?
While the basic principles of cutting, interfacing, and pressing remain, the specific attachment method will vary. Pants cuffs often involve folding up the hem and securing it, sometimes with a hidden stitch or a facing, rather than attaching a separate piece. Refer to a pattern specific to your garment type for precise instructions.
How do I choose the right interfacing?
Choose an interfacing that is compatible with your fabric weight and care requirements. For medium-weight fabrics, a medium-weight fusible interfacing is usually appropriate. For lighter fabrics, use a lighter interfacing. Test a small piece on scrap fabric first to ensure it adheres well and provides the desired stiffness without changing the fabric’s drape too much.
Our Top Recommended Finds
- Quality Sewing Machine: A reliable machine with various stitch options makes cuff creation smoother and more enjoyable. Look for models known for even stitching.
- Sharp Fabric Scissors: Precision cutting starts with sharp scissors. Invest in a pair dedicated solely to fabric to ensure clean, fray-free edges.
- Tailor’s Ham and Seam Roll: These pressing tools help shape curved seams and press open straight seams without leaving imprints, crucial for a professional finish.
Your Next Sewing Adventure Awaits
Mastering the cuff is a significant step in your sewing journey, opening doors to more complex and rewarding projects. You now have the skills to add a polished, professional touch to your handmade garments.
Don’t stop here. Consider exploring variations like French cuffs, plackets, or different sleeve finishes to further expand your repertoire.
Gather your materials, review these steps, and start creating your perfectly tailored cuff today. Each stitch is a step towards becoming a more confident and skilled sewer.