🧤 How To Make Fingerless Gloves
There’s a special satisfaction in crafting something with your own hands, especially when it’s both practical and stylish.
I remember knitting my first pair of fingerless gloves years ago, struggling with the thumbhole, but ultimately cherishing the warmth and personalized fit.
This guide draws on that hands-on experience, breaking down the process into simple, manageable steps, so you can create your very own pair with confidence.
Quick Overview
This guide will walk you through creating a cozy pair of knitted fingerless gloves, perfect for keeping your hands warm while leaving your fingers free.
You’ll learn essential knitting techniques and finish with a practical, handmade accessory.
- Time needed: 3-6 hours (depending on knitting speed and experience)
- Difficulty: Beginner
- What you’ll need: Yarn, knitting needles, scissors, tapestry needle, stitch markers, measuring tape.
Step-by-Step Instructions
Step 1: Gather Your Materials
Before you begin, ensure you have all the necessary supplies ready.
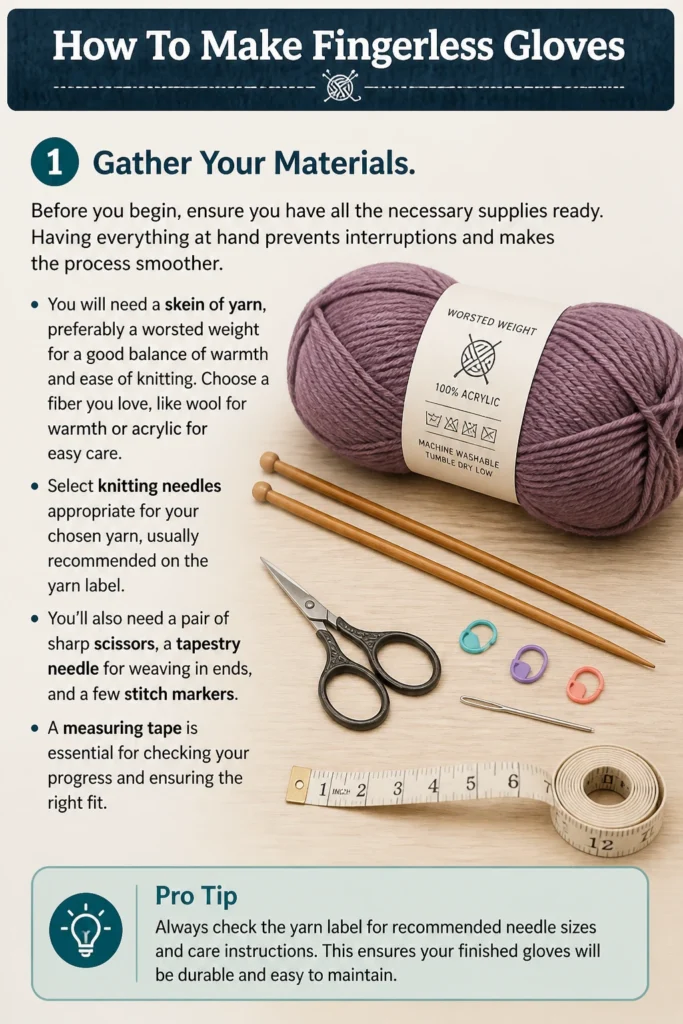
Having everything at hand prevents interruptions and makes the process smoother.
You will need a skein of yarn, preferably a worsted weight for a good balance of warmth and ease of knitting.
Choose a fiber you love, like wool for warmth or acrylic for easy care.
Select knitting needles appropriate for your chosen yarn, usually recommended on the yarn label.
You’ll also need a pair of sharp scissors, a tapestry needle for weaving in ends, and a few stitch markers.
A measuring tape is essential for checking your progress and ensuring the right fit.
Pro Tip: Always check the yarn label for recommended needle sizes and care instructions. This ensures your finished gloves will be durable and easy to maintain.
Step 2: Choose Your Yarn and Needles
The type of yarn you select significantly impacts the look and feel of your gloves.
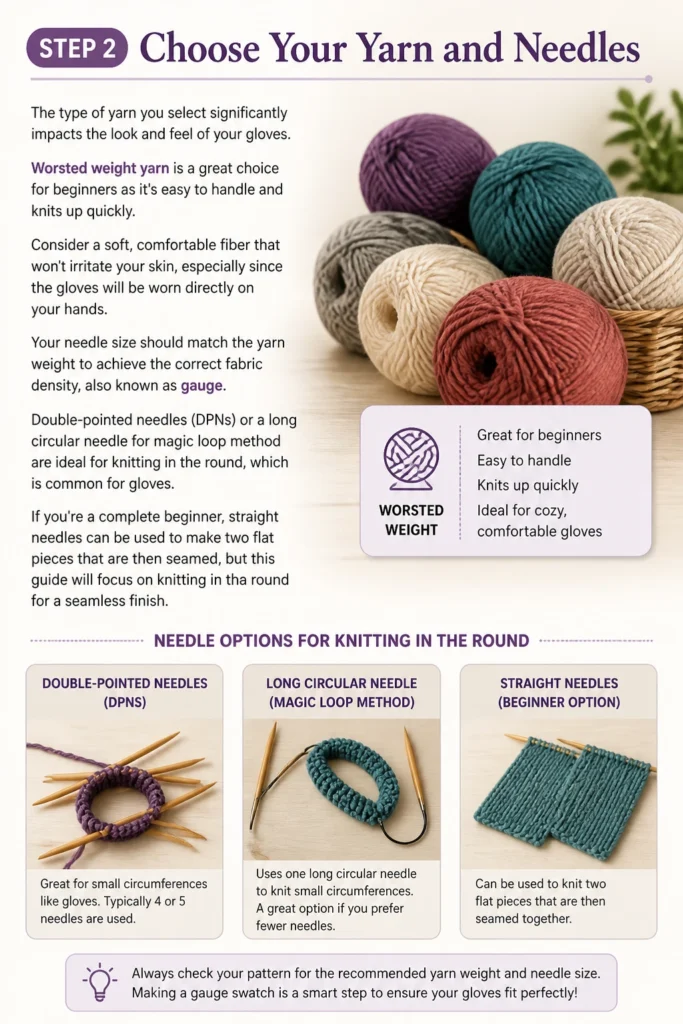
Worsted weight yarn is a great choice for beginners as it’s easy to handle and knits up quickly.
Consider a soft, comfortable fiber that won’t irritate your skin, especially since the gloves will be worn directly on your hands.
Your needle size should match the yarn weight to achieve the correct fabric density, also known as gauge.
Double-pointed needles (DPNs) or a long circular needle for magic loop method are ideal for knitting in the round, which is common for gloves.
If you’re a complete beginner, straight needles can be used to make two flat pieces that are then seamed, but this guide will focus on knitting in the round for a seamless finish.
Step 3: Create a Swatch and Check Your Gauge
Making a gauge swatch is perhaps the most crucial step for a well-fitting garment.
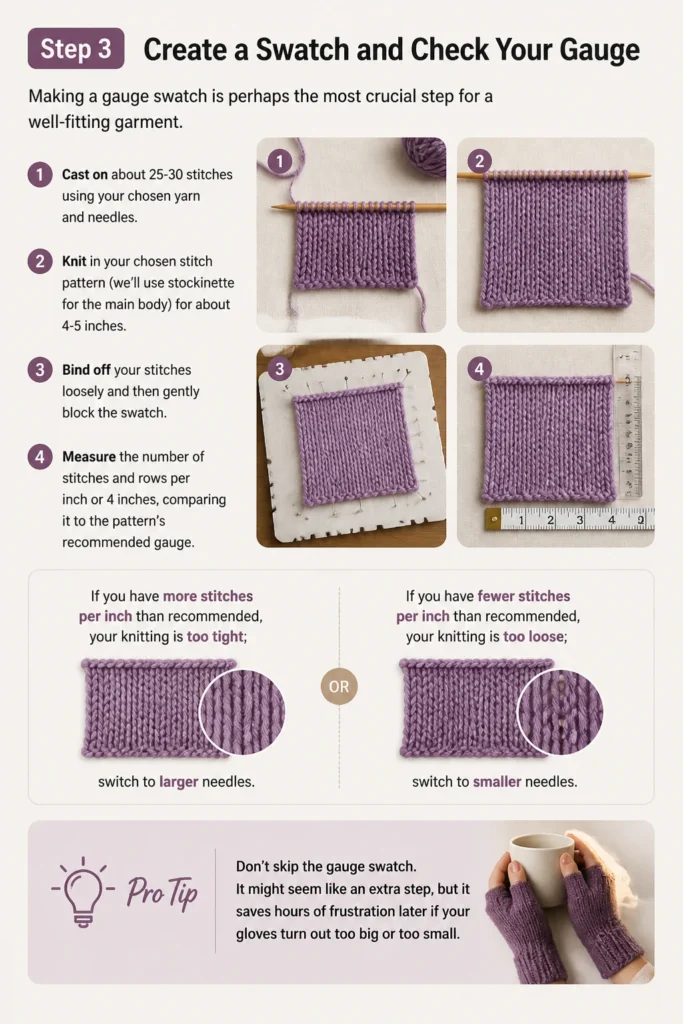
Cast on about 25-30 stitches using your chosen yarn and needles.
Knit in your chosen stitch pattern (we’ll use stockinette for the main body) for about 4-5 inches.
Bind off your stitches loosely and then gently block the swatch.
Measure the number of stitches and rows per inch or 4 inches, comparing it to the pattern’s recommended gauge.
If you have more stitches per inch than recommended, your knitting is too tight; switch to larger needles.
If you have fewer stitches per inch, your knitting is too loose; switch to smaller needles.
Pro Tip: Don’t skip the gauge swatch. It might seem like an extra step, but it saves hours of frustration later if your gloves turn out too big or too small.
Step 4: Cast On Your Stitches
Once your gauge is correct, you can begin casting on for the actual glove.
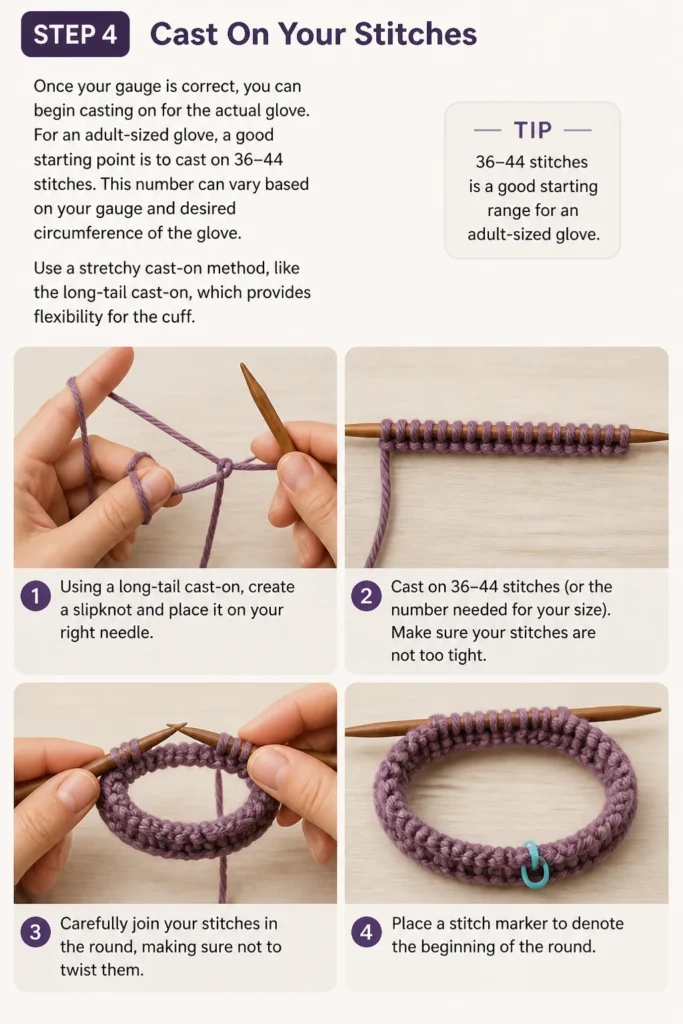
For an adult-sized glove, a good starting point is to cast on 36-44 stitches.
This number can vary based on your gauge and desired circumference of the glove.
Use a stretchy cast-on method, like the long-tail cast-on, which provides flexibility for the cuff.
Carefully join your stitches in the round, making sure not to twist them.
Place a stitch marker to denote the beginning of the round.
Step 5: Knit the Cuff Ribbing
The cuff ribbing provides elasticity and helps the glove stay securely on your wrist.
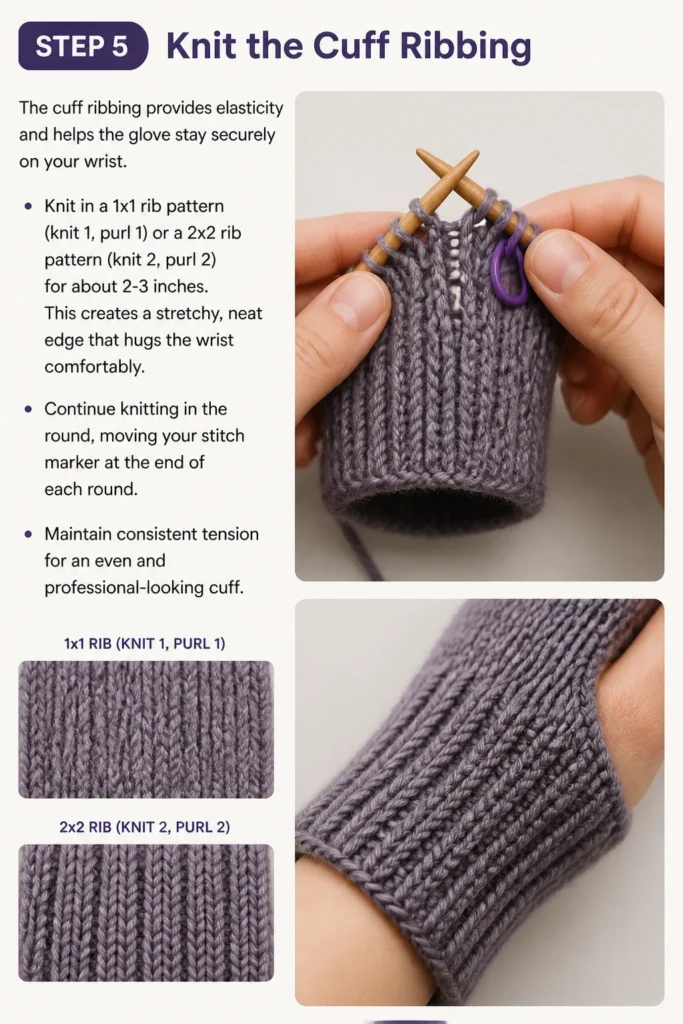
Knit in a 1×1 rib pattern (knit 1, purl 1) or a 2×2 rib pattern (knit 2, purl 2) for about 2-3 inches.
This creates a stretchy, neat edge that hugs the wrist comfortably.
Continue knitting in the round, moving your stitch marker at the end of each round.
Maintain consistent tension for an even and professional-looking cuff.
Step 6: Work the Main Body of the Glove
After completing the cuff, you’ll transition to the main body of the glove.
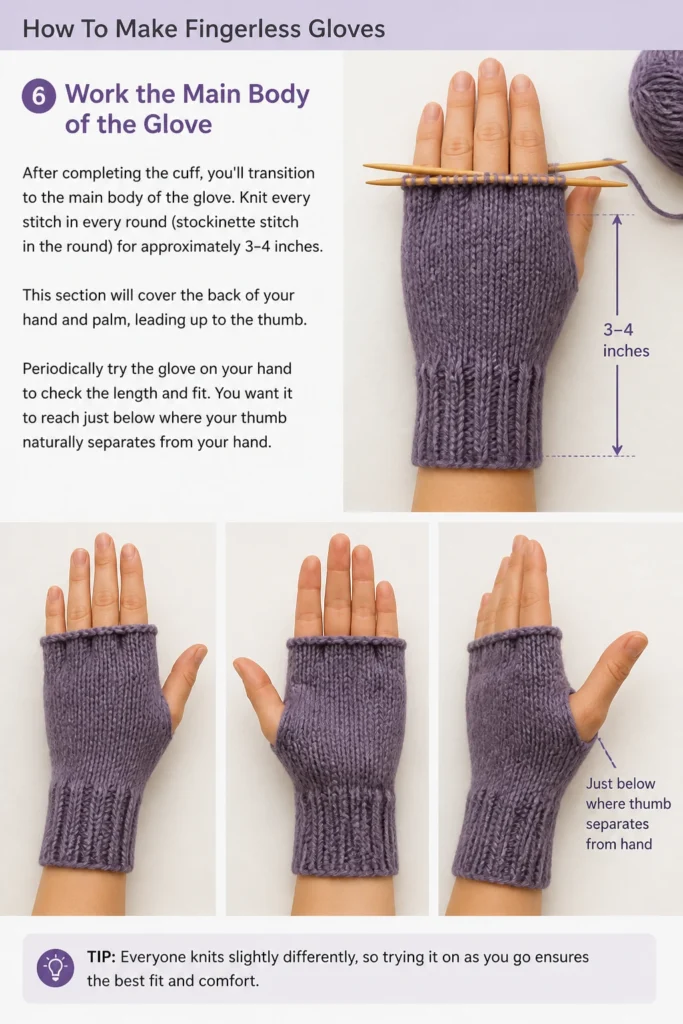
Knit every stitch in every round (stockinette stitch in the round) for approximately 3-4 inches.
This section will cover the back of your hand and palm, leading up to the thumb.
Periodically try the glove on your hand to check the length and fit.
You want it to reach just below where your thumb naturally separates from your hand.
Step 7: Create the Thumb Gusset
The thumb gusset is a small section of increases that creates space for your thumb.
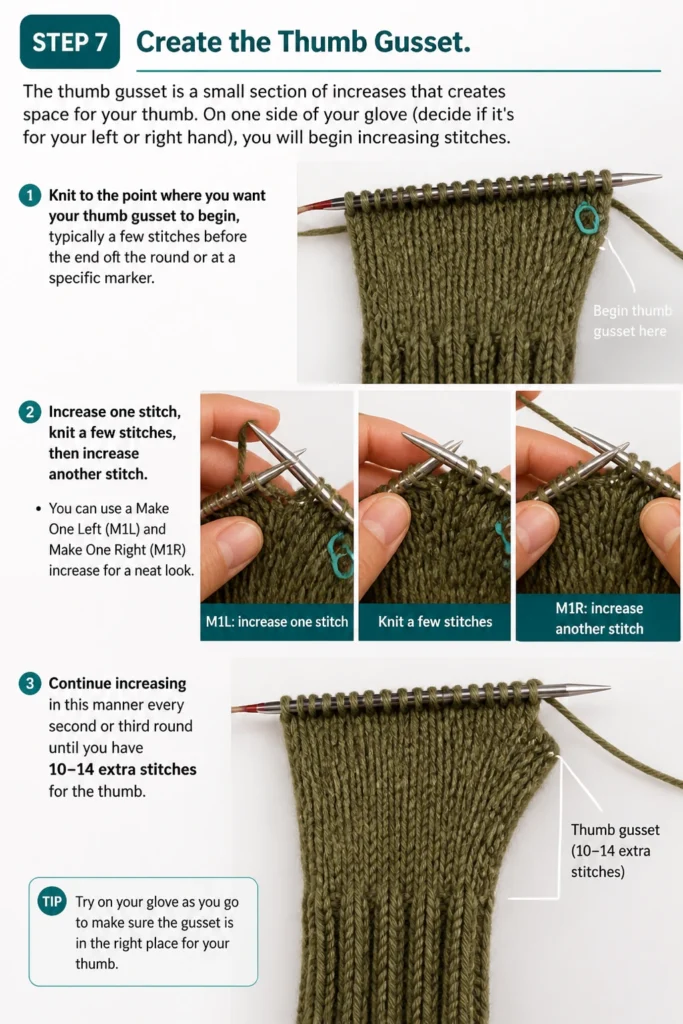
On one side of your glove (decide if it’s for your left or right hand), you will begin increasing stitches.
Knit to the point where you want your thumb gusset to begin, typically a few stitches before the end of the round or at a specific marker.
Increase one stitch, knit a few stitches, then increase another stitch.
You can use a “Make One Left” (M1L) and “Make One Right” (M1R) increase for a neat look.
Continue increasing in this manner every second or third round until you have 10-14 extra stitches for the thumb.
Step 8: Separate the Thumb Stitches
Once your thumb gusset has enough stitches, you will separate them from the main hand stitches.
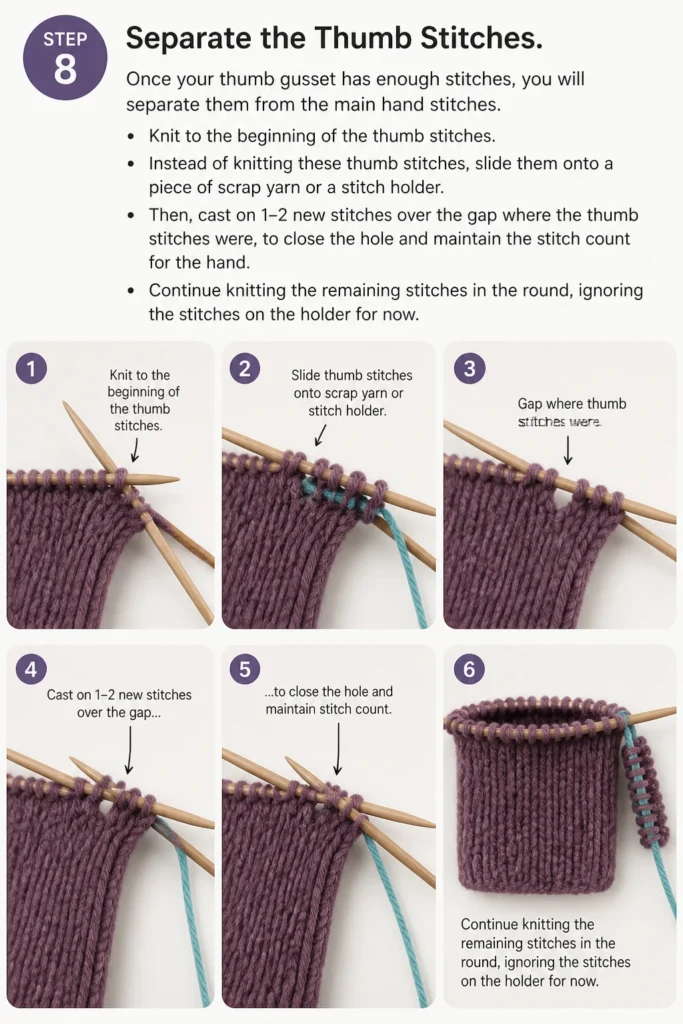
Knit to the beginning of the thumb stitches.
Instead of knitting these thumb stitches, slide them onto a piece of scrap yarn or a stitch holder.
Then, cast on 1-2 new stitches over the gap where the thumb stitches were, to close the hole and maintain the stitch count for the hand.
Continue knitting the remaining stitches in the round, ignoring the stitches on the holder for now.
Step 9: Finish the Hand Section
With the thumb stitches set aside, continue knitting the main hand section.
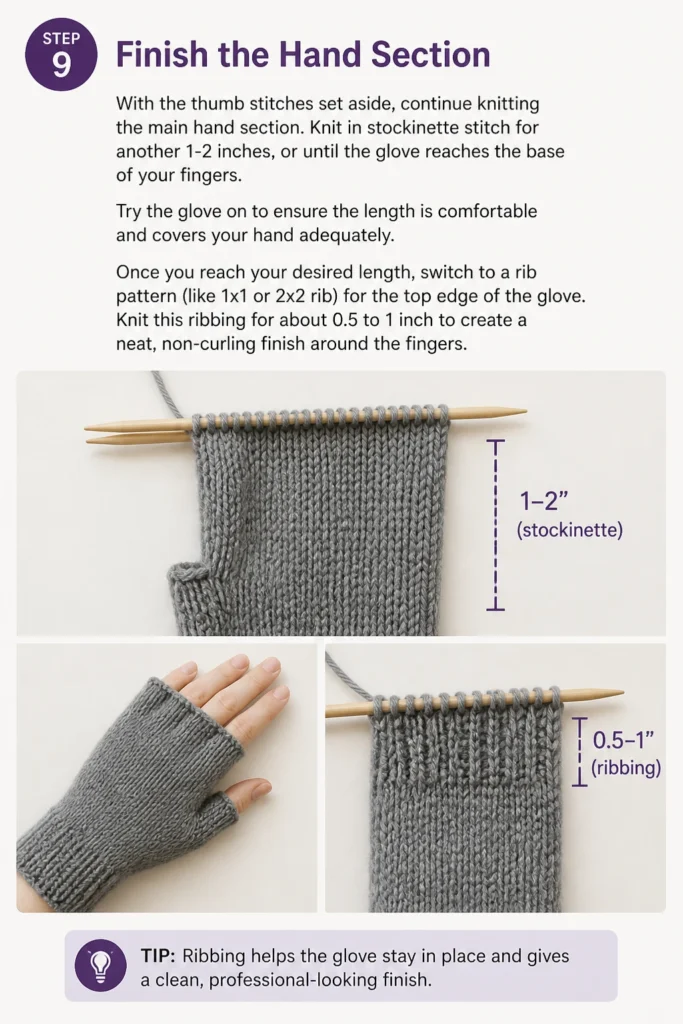
Knit in stockinette stitch for another 1-2 inches, or until the glove reaches the base of your fingers.
Try the glove on to ensure the length is comfortable and covers your hand adequately.
Once you reach your desired length, switch to a rib pattern (like 1×1 or 2×2 rib) for the top edge of the glove.
Knit this ribbing for about 0.5 to 1 inch to create a neat, non-curling finish around the fingers.
Step 10: Bind Off and Finish the Thumb
After completing the finger ribbing, bind off your stitches loosely in pattern.
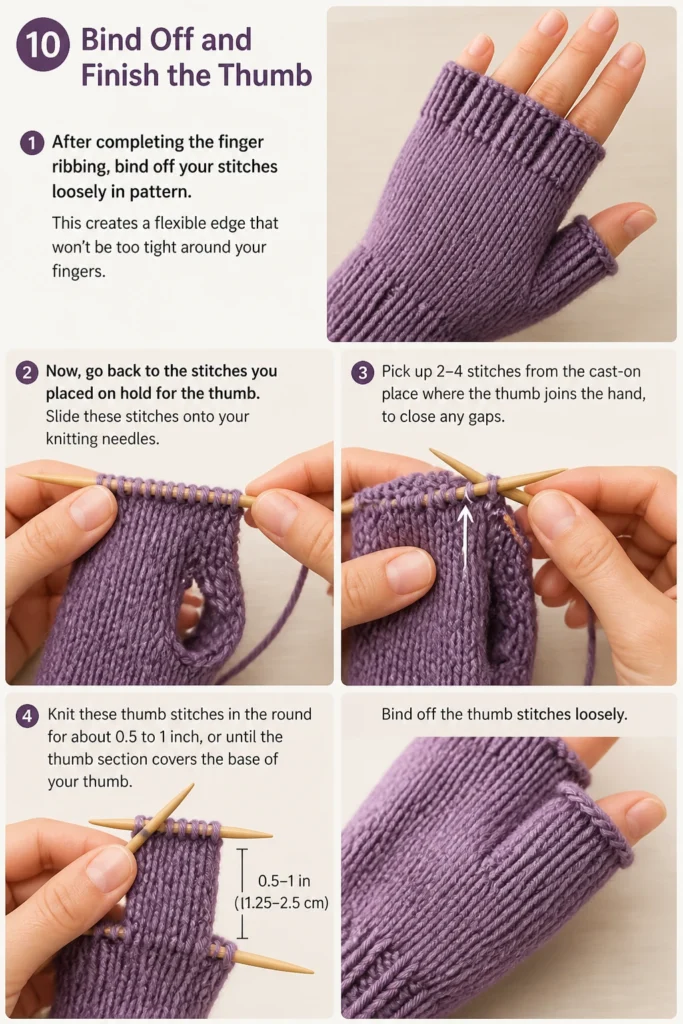
This creates a flexible edge that won’t be too tight around your fingers.
Now, go back to the stitches you placed on hold for the thumb.
Slide these stitches onto your knitting needles.
Pick up 2-4 stitches from the cast-on edge where the thumb joins the hand, to close any gaps.
Knit these thumb stitches in the round for about 0.5 to 1 inch, or until the thumb section covers the base of your thumb.
Bind off the thumb stitches loosely.
Step 11: Weave In Ends and Make the Second Glove
Once both the main glove and thumb are bound off, you will have several loose yarn tails.
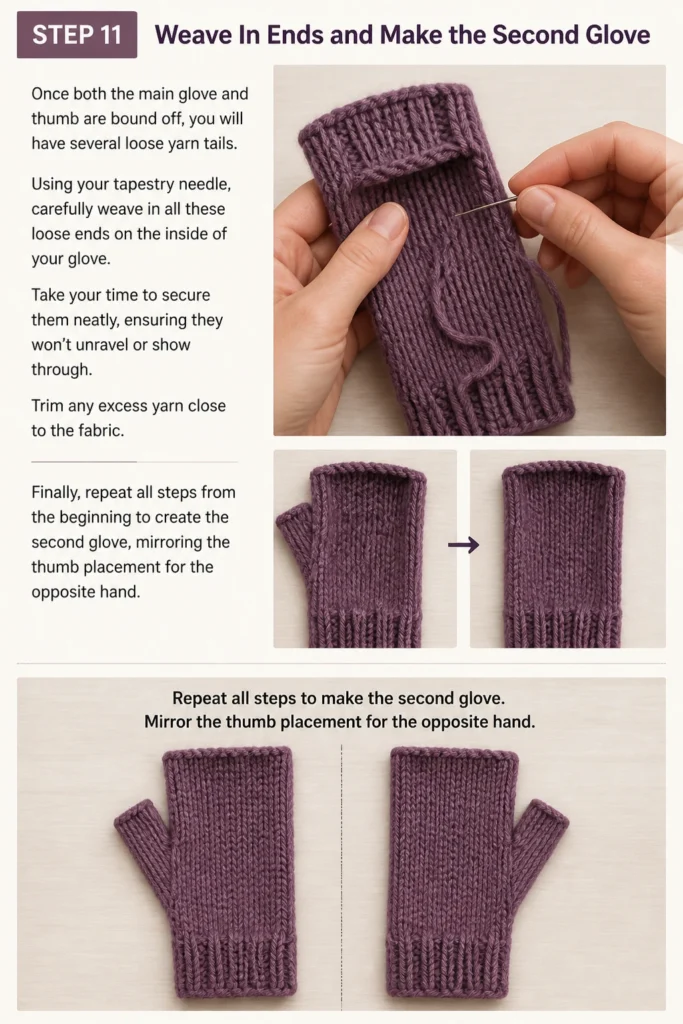
Using your tapestry needle, carefully weave in all these loose ends on the inside of your glove.
Take your time to secure them neatly, ensuring they won’t unravel or show through.
Trim any excess yarn close to the fabric.
Finally, repeat all steps from the beginning to create the second glove, mirroring the thumb placement for the opposite hand.
Common Mistakes to Avoid
Ignoring Gauge
Many beginners skip making a gauge swatch because they are eager to start knitting. However, ignoring gauge is the most common reason for projects turning out the wrong size.
Your finished gloves might be too large or too small, wasting your time and yarn. Always knit a swatch and adjust your needle size until your gauge matches the pattern.
Uneven Tension
Inconsistent tension leads to an uneven fabric with tight and loose spots. This can make your gloves look messy and feel uncomfortable.
Practice maintaining a steady tension throughout your knitting. If you notice your tension varying, take a break or try to consciously relax your grip on the needles.
Twisting Stitches When Joining in the Round
When joining your cast-on stitches to knit in the round, it’s easy for them to become twisted. If this happens, your entire project will have a twisted seam running through it.
Before joining, carefully lay out your stitches on the needle, ensuring the bottom edge of the cast-on is consistently facing inwards. Double-check before you knit your first few rounds.
Forgetting the Thumb Hole
It sounds obvious, but in the rhythm of knitting, it’s possible to forget to create the thumb gusset or separate the thumb stitches at the correct point. This means you’ll have to unravel significant progress.
Pay close attention to your pattern instructions regarding the thumb. Use stitch markers to clearly delineate where the thumb gusset begins and ends, and when to put stitches on hold.
Troubleshooting
Gloves Are Too Big or Too Small
If your finished gloves don’t fit well, the most likely culprit is incorrect gauge. You might have used the wrong needle size for your yarn, or your personal knitting tension differs from the pattern’s.
To fix this, unravel your work and restart with a different needle size after re-checking your gauge. If it’s only slightly off, you might consider blocking your finished gloves to gently stretch or shrink them, though this is less effective for significant size changes.
Edges Are Uneven or Curling
Uneven edges, especially at the cuff or finger opening, can happen if your tension is inconsistent when binding off or if you didn’t knit enough ribbing. Stockinette stitch naturally curls at the edges.
Ensure you bind off loosely and consistently. For curling, ensure you have sufficient ribbing (at least 0.5-1 inch) at the top and bottom of the glove, as ribbing prevents curling. Blocking can also help to flatten minor curling.
Dropped Stitches
A dropped stitch creates a ladder-like hole in your fabric. It’s a common issue for beginners and can be frustrating to fix.
If you catch it immediately, you can often pick it up with your knitting needle or a crochet hook. If it’s several rows down, use a crochet hook to carefully pull the dropped stitch up through the horizontal bars of yarn until it’s back on the needle. There are many helpful video tutorials available for this repair.
Key Takeaways
- Gauge is paramount: Always swatch to ensure your gloves fit perfectly.
- Practice makes perfect: Don’t be discouraged by initial mistakes; knitting improves with experience.
- Read the pattern carefully: Pay close attention to instructions, especially for thumb placement.
- Consistent tension matters: Strive for even stitches for a polished look and comfortable feel.
- Enjoy the process: Knitting should be a relaxing and rewarding hobby.
Frequently Asked Questions
What type of yarn is best for fingerless gloves?
Worsted weight wool or acrylic yarn is generally recommended for beginners. Wool offers excellent warmth and elasticity, while acrylic is durable, affordable, and easy to care for. Choose a yarn that feels soft against your skin.
Can I use a different stitch pattern for the main body?
Absolutely! While stockinette stitch is straightforward and common, you can experiment with other patterns like garter stitch, seed stitch, or even simple cable patterns once you’re comfortable. Just remember to check your gauge with the new stitch pattern.
How do I make the gloves longer or shorter?
To adjust the length, simply knit more or fewer rounds in the main body section before starting the thumb gusset, and again after separating the thumb stitches. Try the glove on periodically to determine your preferred length for both the hand and finger sections.
Can I machine wash my finished gloves?
It depends entirely on your yarn choice. Always refer to the yarn label’s care instructions. Superwash wools and most acrylics are machine washable, but non-superwash wools often require hand washing to prevent felting.
Our Top Recommended Finds
- Ergonomic Knitting Needles: Reduce hand fatigue and make long knitting sessions more comfortable.
- Locking Stitch Markers: Essential for marking the beginning of rounds or specific pattern repeats, and they won’t fall out.
- Yarn Winder and Swift: Transform hanks of yarn into neat cakes, preventing tangles and making knitting much easier.
Embrace Your Crafting Journey
You’ve now learned the foundational steps to create your very own pair of fingerless gloves.
This project is a fantastic way to build your knitting skills and produce a practical, stylish accessory.
Don’t hesitate to experiment with different yarn colors, fiber types, or even add simple embellishments once you’re confident.
Consider tackling other small projects like hats or scarves next, using the techniques you’ve mastered here.
Pick up your needles today and start knitting a pair of gloves that truly reflect your personal style and creativity.