🎁 How To Gift Wrap Clothes
There’s a special joy in giving a beautifully wrapped gift. It builds anticipation and shows an extra layer of care. I learned this firsthand after many attempts to tame a bulky sweater with flimsy paper.
A thoughtful presentation truly elevates any present. This guide will help you master the art of wrapping clothes, making every gift feel luxurious.
Quick Overview
This guide will walk you through transforming ordinary clothing items into stunning, professionally wrapped gifts. You’ll learn the techniques for neat folds and elegant finishes.
- Time needed: 15-30 minutes, depending on the item and embellishments
- Difficulty: Beginner to Intermediate
- What you’ll need: Wrapping paper, scissors, tape (preferably double-sided), ribbon, gift tag, and possibly tissue paper or a gift box
Step-by-Step Instructions
Step 1: Gather Your Essentials
Before you begin, lay out all your supplies. Having everything within reach saves time and reduces frustration. This ensures a smooth wrapping process from start to finish.
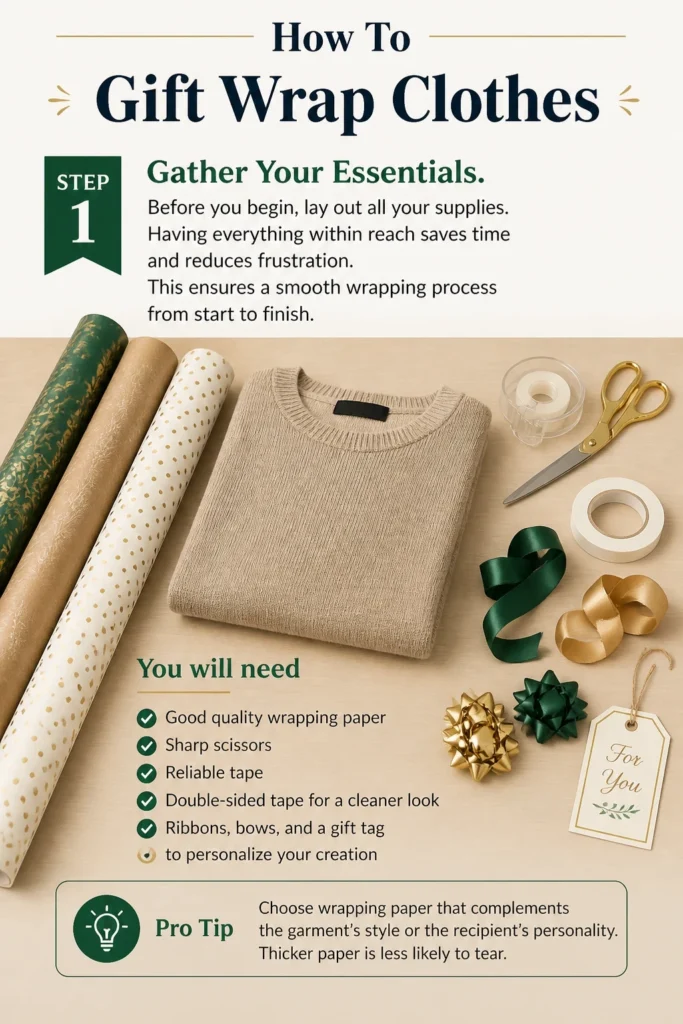
You will need good quality wrapping paper, sharp scissors, and reliable tape. Double-sided tape creates a cleaner look, hiding seams beautifully. Don’t forget ribbons, bows, and a gift tag to personalize your creation.
Pro Tip: Choose wrapping paper that complements the garment’s style or the recipient’s personality. Thicker paper is less likely to tear.
Step 2: Prepare the Garment
The key to a well-wrapped gift is starting with a neatly presented item. Fold the clothing as flat and rectangular as possible. This creates a stable base for wrapping.
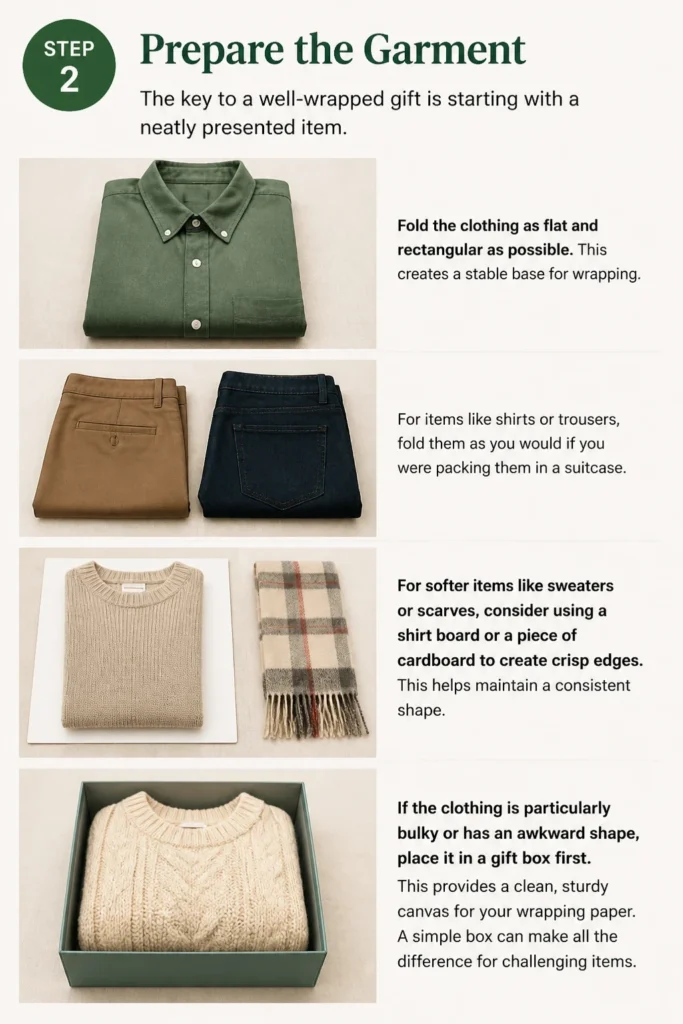
For items like shirts or trousers, fold them as you would if you were packing them in a suitcase. For softer items like sweaters or scarves, consider using a shirt board or a piece of cardboard to create crisp edges. This helps maintain a consistent shape.
If the clothing is particularly bulky or has an awkward shape, place it in a gift box first. This provides a clean, sturdy canvas for your wrapping paper. A simple box can make all the difference for challenging items.
Step 3: Measure and Cut Paper
Unroll your wrapping paper and place your prepared garment or box on top. You need enough paper to cover the item completely, with a slight overlap. Give yourself a little extra room to work with.
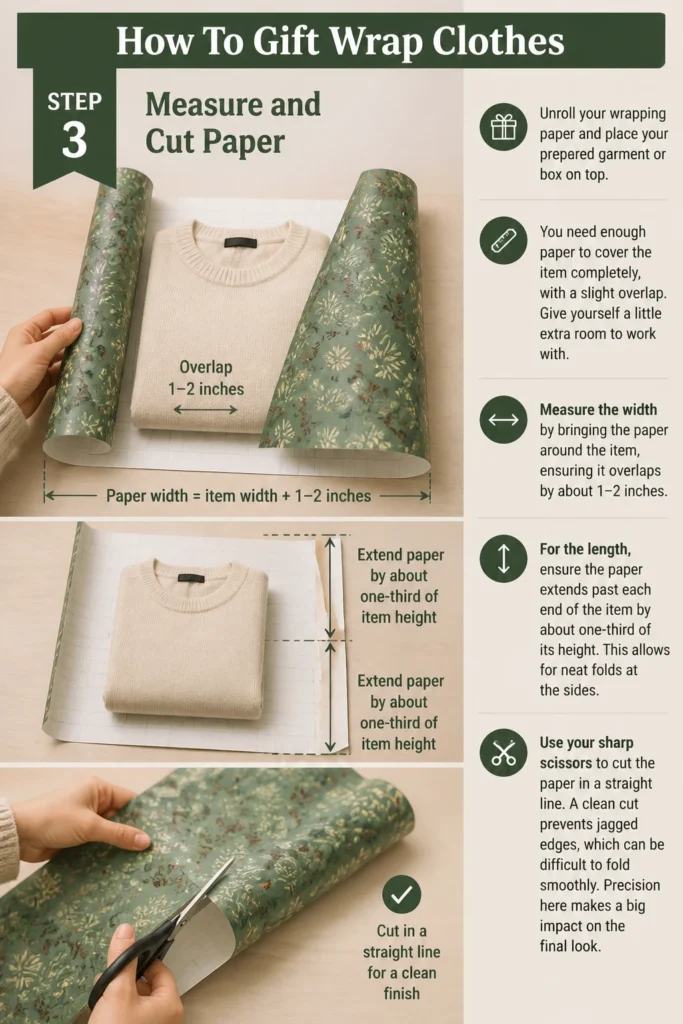
Measure the width by bringing the paper around the item, ensuring it overlaps by about 1-2 inches. For the length, ensure the paper extends past each end of the item by about one-third of its height. This allows for neat folds at the sides.
Use your sharp scissors to cut the paper in a straight line. A clean cut prevents jagged edges, which can be difficult to fold smoothly. Precision here makes a big impact on the final look.
Step 4: Wrap the Body of the Gift
Position your garment or box in the center of the cut wrapping paper. Bring one long edge of the paper over the item and secure it with a piece of tape. Start near the middle and work your way out.
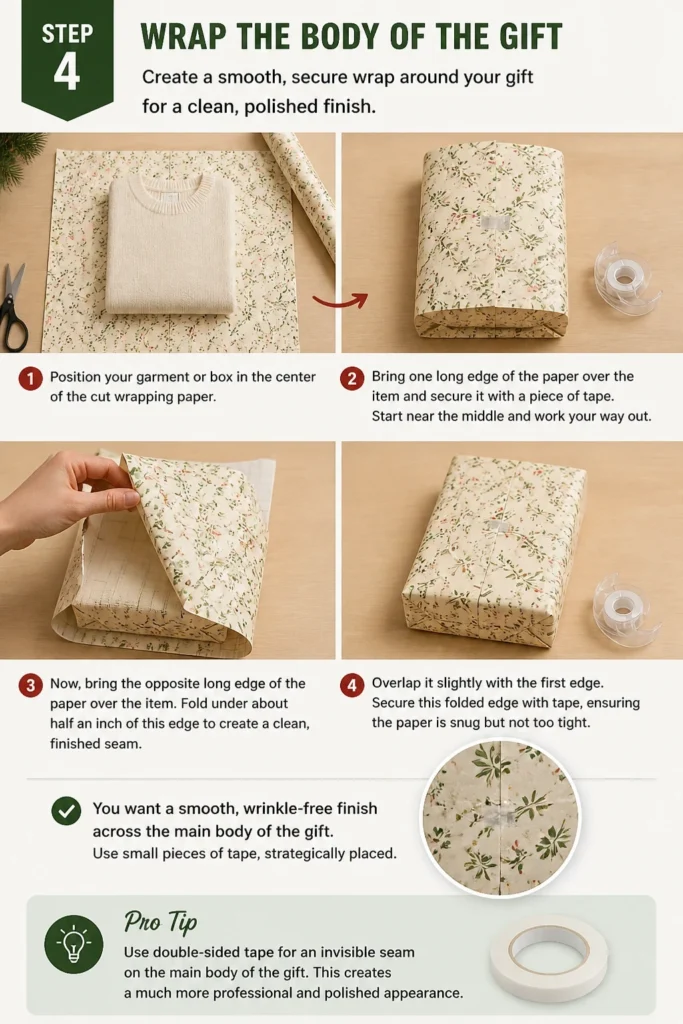
Now, bring the opposite long edge of the paper over the item. Fold under about half an inch of this edge to create a clean, finished seam. Overlap it slightly with the first edge.
Secure this folded edge with tape, ensuring the paper is snug but not too tight. You want a smooth, wrinkle-free finish across the main body of the gift. Use small pieces of tape, strategically placed.
Pro Tip: Use double-sided tape for an invisible seam on the main body of the gift. This creates a much more professional and polished appearance.
Step 5: Master the Ends
This is where many people struggle, but neat ends are crucial for a professional look. Start with one end of the gift. Fold the two side edges of the paper inward, creating triangular flaps.
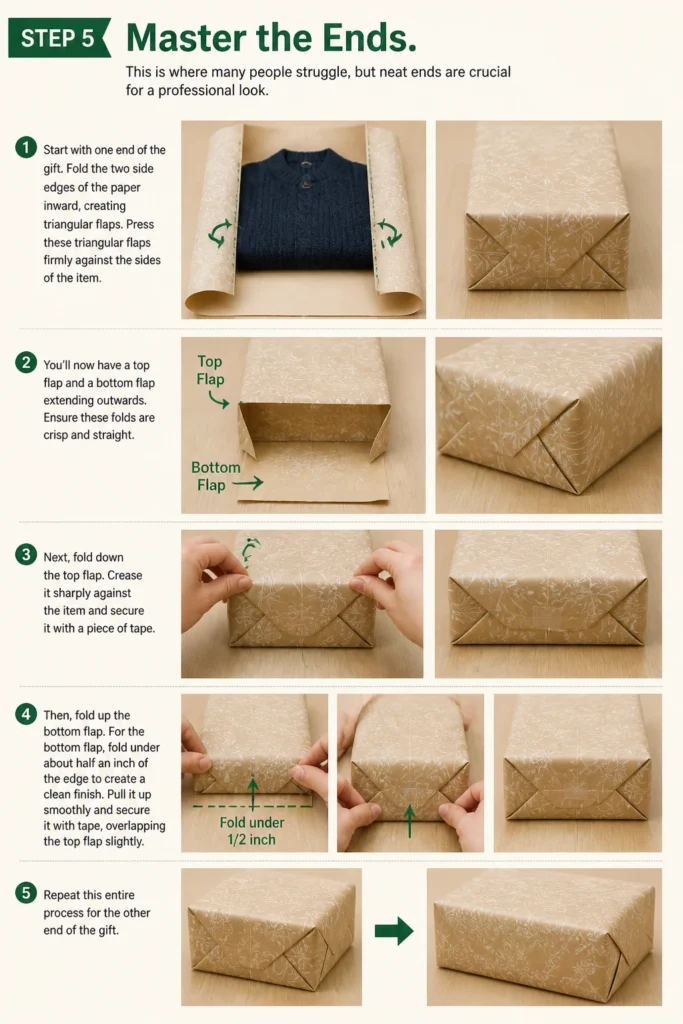
Press these triangular flaps firmly against the sides of the item. You’ll now have a top flap and a bottom flap extending outwards. Ensure these folds are crisp and straight.
Next, fold down the top flap. Crease it sharply against the item and secure it with a piece of tape. Then, fold up the bottom flap.
For the bottom flap, fold under about half an inch of the edge to create a clean finish. Pull it up smoothly and secure it with tape, overlapping the top flap slightly. Repeat this entire process for the other end of the gift.
Step 6: Elevate with Embellishments
Now that your gift is neatly wrapped, it’s time to add the decorative touches. Ribbons, bows, and other embellishments can transform a simple package into something truly special. Choose colors and textures that complement your wrapping paper.
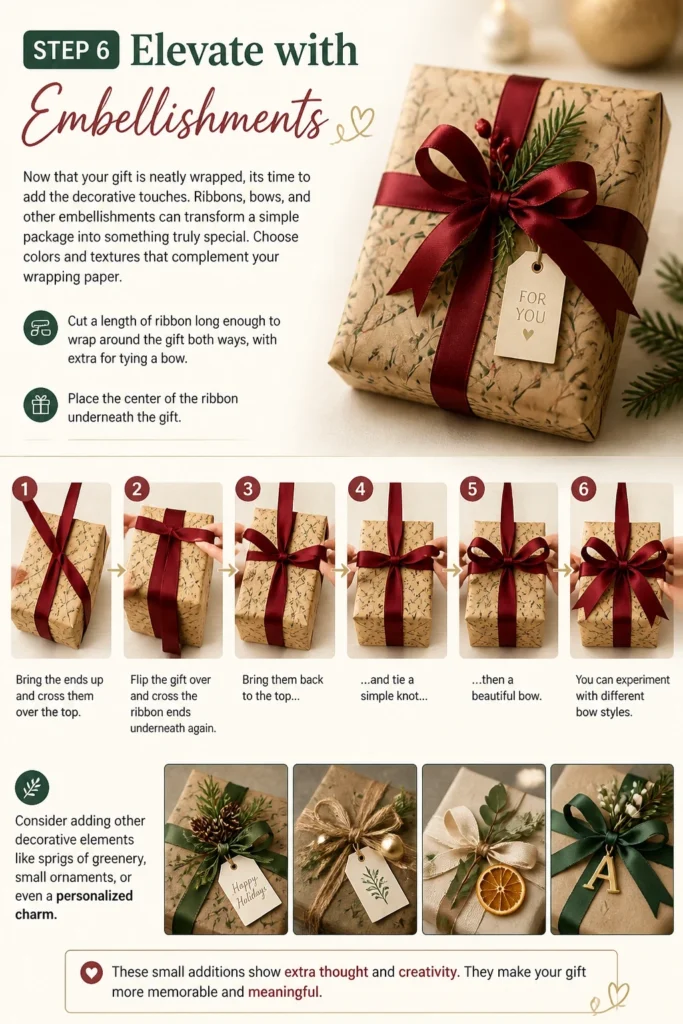
Cut a length of ribbon long enough to wrap around the gift both ways, with extra for tying a bow. Place the center of the ribbon underneath the gift. Bring the ends up and cross them over the top.
Flip the gift over and cross the ribbon ends underneath again. Bring them back to the top and tie a simple knot, then a beautiful bow. You can experiment with different bow styles.
Consider adding other decorative elements like sprigs of greenery, small ornaments, or even a personalized charm. These small additions show extra thought and creativity. They make the gift feel unique.
Step 7: Personalize with a Tag
A gift tag is the final touch that completes your presentation. It allows you to convey a personal message and clearly identify the recipient. Choose a tag that matches your wrapping style.
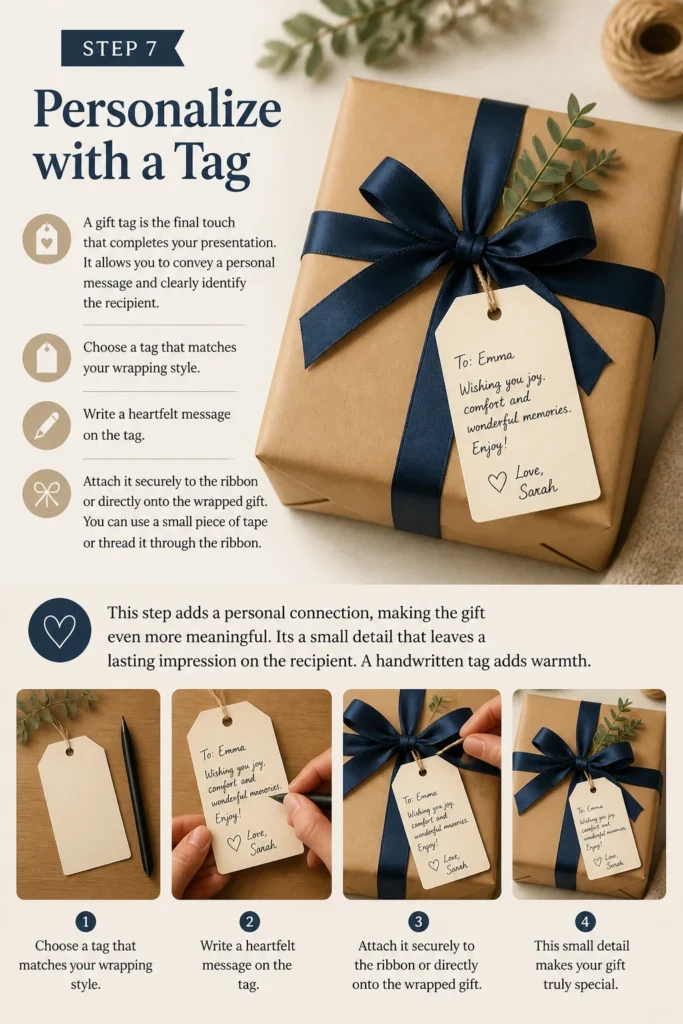
Write a heartfelt message on the tag. Attach it securely to the ribbon or directly onto the wrapped gift. You can use a small piece of tape or thread it through the ribbon.
This step adds a personal connection, making the gift even more meaningful. It’s a small detail that leaves a lasting impression on the recipient. A handwritten tag adds warmth.
Common Mistakes to Avoid
Using Too Much or Too Little Paper
Cutting the wrong amount of paper is a common pitfall. Too much paper leads to bulky, messy folds and unnecessary waste. Too little paper means your item won’t be fully covered, or you’ll struggle to make neat seams. Always measure carefully, aiming for a slight overlap on the sides and enough for neat folds at the ends.
Ignoring the Item’s Shape
Trying to wrap a soft, irregular item directly can result in a lumpy, uneven package. This makes it difficult to achieve crisp lines. For items that lack structure, always use a gift box or a piece of cardboard to create a firm, rectangular base. This simple step makes wrapping significantly easier and more effective.
Messy Folds and Creases
Sloppy folds instantly diminish the look of a wrapped gift. Unkempt corners and loose paper suggest a rushed job. Take your time to make sharp, precise creases, especially at the ends of the gift. Use your fingers or a ruler to press down firmly on all folds for a clean, tailored appearance.
Using Visible Tape Excessively
While tape is essential, too much visible tape can detract from the elegance of your wrapping. Overlapping tape or using large, shiny pieces stands out. Opt for double-sided tape whenever possible for invisible seams. When using regular tape, choose clear, matte options and apply small, discreet pieces where necessary.
Troubleshooting
Paper Keeps Tearing
If your wrapping paper frequently tears, it might be too thin or you might be pulling it too tightly. Try using a higher-quality, thicker wrapping paper for delicate items. When wrapping, apply gentle tension rather than extreme pulling. You can also reinforce corners or edges with a small strip of clear tape on the inside before wrapping.
Awkwardly Shaped Items
Wrapping items that aren’t perfectly rectangular can be a challenge. The best solution is to place the item inside a gift box first. If a box isn’t an option, consider using tissue paper to create a more uniform shape around the item before wrapping. You can also try a “bag” wrap by gathering the paper at the top and tying it with a ribbon, much like a goodie bag.
Ribbon Won’t Stay in Place
If your ribbon slips or unravels, it might not be tied securely enough, or the material might be too slick. Ensure you tie a tight initial knot before forming your bow. For very smooth paper or ribbon, a tiny dot of hot glue (applied carefully and sparingly) beneath the ribbon’s knot can help anchor it. You can also use a small piece of double-sided tape where the ribbon crosses on the underside of the gift.
Key Takeaways
- Preparation is paramount: Gather all your supplies and prepare the garment for wrapping before you start.
- Structure matters: Use a gift box or cardboard for oddly shaped or soft items to create a firm base.
- Measure twice, cut once: Ensure you have the right amount of paper to avoid waste and frustration.
- Master the ends: Neat, crisp folds at the sides are crucial for a professional, polished look.
- Embellish thoughtfully: Ribbons, bows, and tags add personality and elevate the gift’s presentation.
- Invisible tape is best: Double-sided tape creates clean seams and a more refined finish.
Frequently Asked Questions
How can I wrap a shirt without using a box?
To wrap a shirt without a box, first fold it as neatly and flat as possible, mimicking the shape of a rectangle. You can use a shirt folding board or even a magazine as a guide to achieve crisp edges. Once folded, proceed with the standard wrapping paper technique, ensuring your folds are tight and precise.
What kind of tape works best for gift wrapping?
For the cleanest finish, double-sided tape is highly recommended as it creates invisible seams. If you’re using single-sided tape, opt for a clear, matte finish tape rather than glossy options. Apply small, discreet pieces only where necessary to secure the paper without being overly conspicuous.
Can I make my own bows instead of buying them?
Absolutely! Making your own bows is a wonderful way to add a personal touch. You can use various types of ribbon, from satin to grosgrain, to create different styles. There are many online tutorials for crafting simple loops, classic bows, or even elaborate pom-pom bows, often requiring just ribbon and scissors.
Are there eco-friendly alternatives to traditional wrapping paper?
Yes, there are many sustainable options! Consider using reusable fabric wraps (like the Japanese Furoshiki method), brown kraft paper decorated with natural elements, or even old maps or newspaper for a unique look. You can also opt for recycled wrapping paper or skip paper altogether and use a reusable gift bag.
Our Top Recommended Finds
- High-Quality Double-Sided Tape: Essential for seamless, professional-looking wraps.
- Sharp Craft Scissors: A good pair makes clean cuts, preventing jagged edges and frustration.
- Assorted Fabric Ribbon Pack: Offers versatility in color and texture for beautiful embellishments.
Your Gift, Beautifully Presented
Gift wrapping is more than just covering an item; it’s an expression of care and thoughtfulness. By following these steps, you’re not just wrapping clothes; you’re crafting an experience. Each neat fold and elegant ribbon adds to the joy of giving.
Don’t let the thought of wrapping overwhelm you. Start today, practice these techniques, and watch your gifts transform. The delight on the recipient’s face when they see a beautifully presented package is truly rewarding.