👕 How To Distress A Tshirt
There is a specific kind of magic in a shirt that looks like it has survived a decade of rock concerts and road trips.
I spent years ruining perfectly good clothes before I finally mastered the balance between “vintage cool” and “actually falling apart.”
This guide comes from a place of trial, error, and many accidental holes that were way too big to be fashionable.

Quick Overview
Distressing a shirt is an art form that turns a stiff, new garment into a soft, lived-in staple of your wardrobe.
- Time needed: 45 to 90 minutes
- Difficulty: Intermediate
- What you’ll need: Sharp scissors, sandpaper, a disposable razor, a cheese grater, and bleach or tea for staining.
Step 1: Choose Your Canvas Wisely
Look for 100% cotton shirts if you want the best results for fraying and fading.
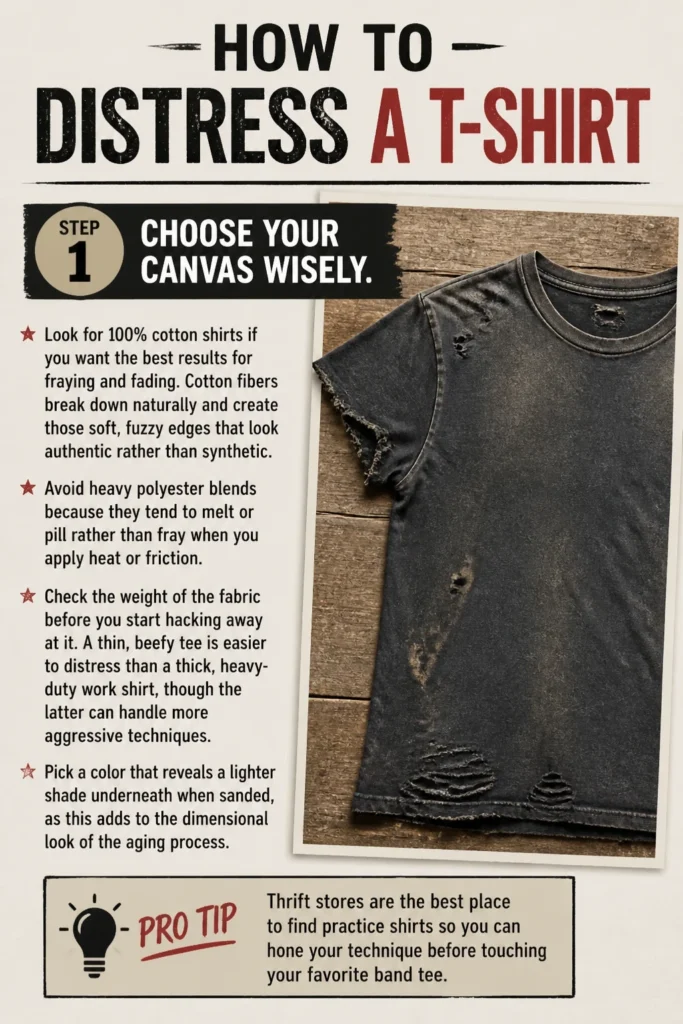
Cotton fibers break down naturally and create those soft, fuzzy edges that look authentic rather than synthetic.
Avoid heavy polyester blends because they tend to melt or pill rather than fray when you apply heat or friction.
Check the weight of the fabric before you start hacking away at it.
A thin, “beefy” tee is easier to distress than a thick, heavy-duty work shirt, though the latter can handle more aggressive techniques.
Pick a color that reveals a lighter shade underneath when sanded, as this adds to the dimensional look of the aging process.
Pro Tip: Thrift stores are the best place to find “practice” shirts so you can hone your technique before touching your favorite band tee.
Step 2: Map Out Your Masterpiece
Lay the shirt flat on a hard surface like a wooden table or a cutting mat.
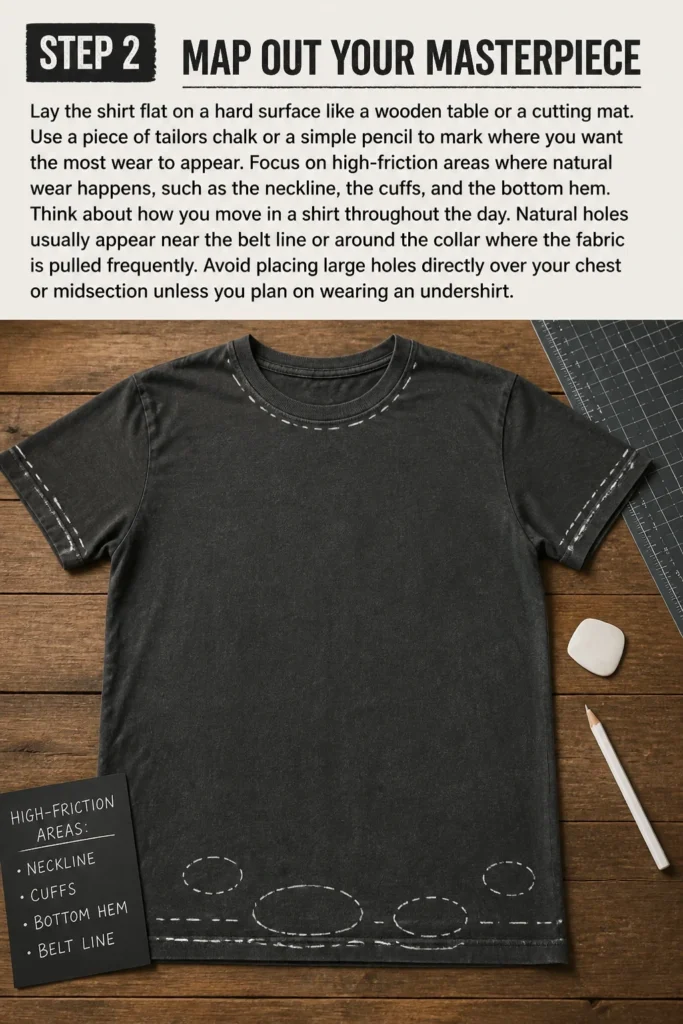
Use a piece of tailor’s chalk or a simple pencil to mark where you want the most wear to appear.
Focus on high-friction areas where natural wear happens, such as the neckline, the cuffs, and the bottom hem.
Think about how you move in a shirt throughout the day.
Natural holes usually appear near the belt line or around the collar where the fabric is pulled frequently.
Avoid placing large holes directly over your chest or midsection unless you plan on wearing an undershirt.
Step 3: Weather the Neckline and Hems
Grab a disposable razor or a piece of coarse sandpaper to start on the edges.
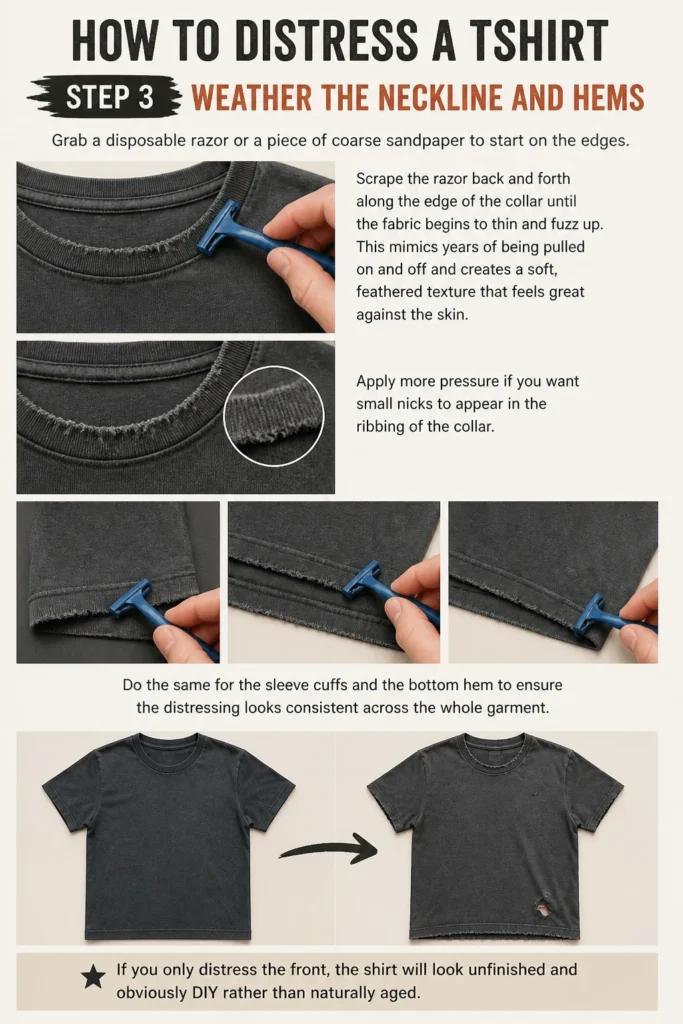
Scrape the razor back and forth along the edge of the collar until the fabric begins to thin and “fuzz” up.
This mimics years of being pulled on and off and creates a soft, feathered texture that feels great against the skin.
Apply more pressure if you want small nicks to appear in the ribbing of the collar.
Do the same for the sleeve cuffs and the bottom hem to ensure the distressing looks consistent across the whole garment.
If you only distress the front, the shirt will look unfinished and obviously DIY rather than naturally aged.
Step 4: Create Strategic Slices
Insert a piece of cardboard inside the shirt to prevent your cuts from bleeding through to the back layer.
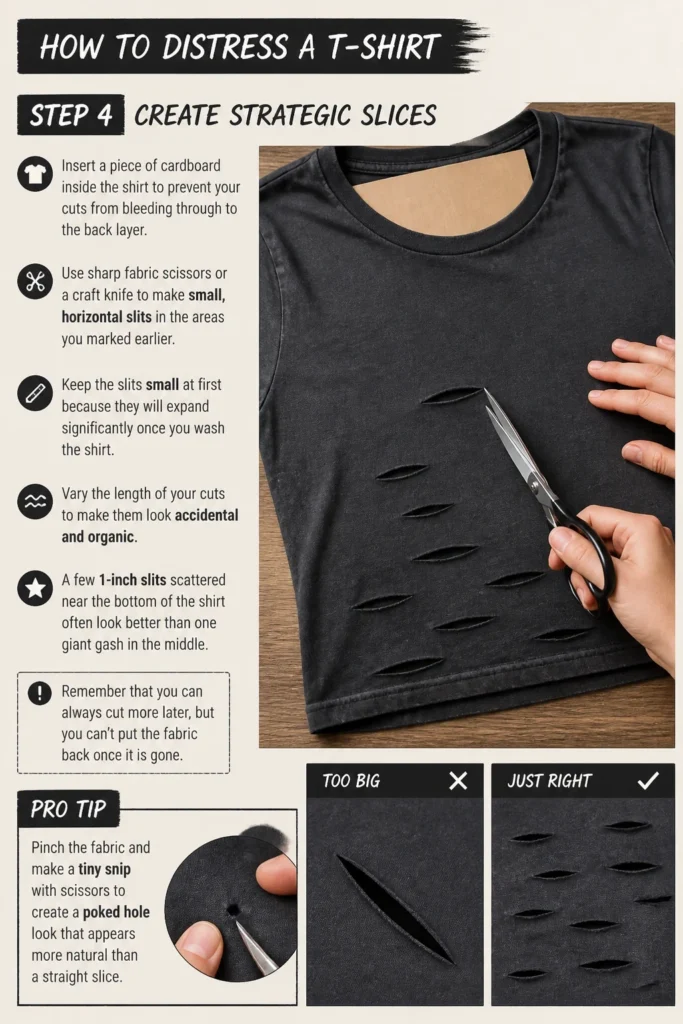
Use sharp fabric scissors or a craft knife to make small, horizontal slits in the areas you marked earlier.
Keep the slits small at first because they will expand significantly once you wash the shirt.
Vary the length of your cuts to make them look accidental and organic.
A few 1-inch slits scattered near the bottom of the shirt often look better than one giant gash in the middle.
Remember that you can always cut more later, but you can’t put the fabric back once it is gone.
Pro Tip: Pinch the fabric and make a tiny snip with scissors to create a “poked” hole look that appears more natural than a straight slice.
Step 5: Use Abrasives for Realistic Fading
Select a medium-grit sandpaper, around 80 to 100 grit, for the main body of the shirt.
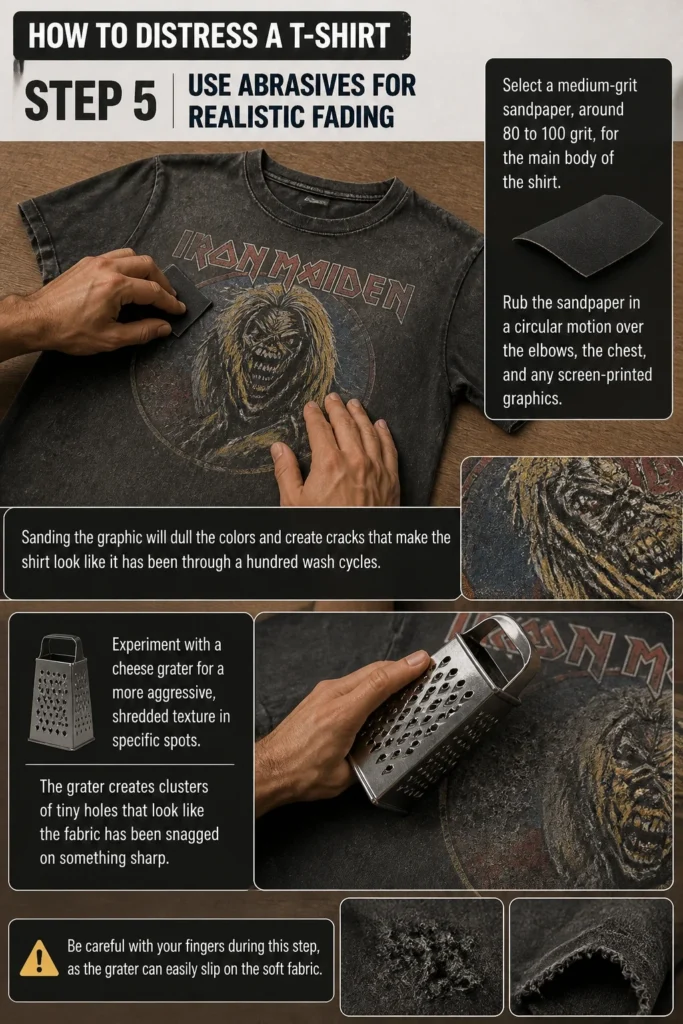
Rub the sandpaper in a circular motion over the elbows, the chest, and any screen-printed graphics.
Sanding the graphic will dull the colors and create cracks that make the shirt look like it has been through a hundred wash cycles.
Experiment with a cheese grater for a more aggressive, “shredded” texture in specific spots.
The grater creates clusters of tiny holes that look like the fabric has been snagged on something sharp.
Be careful with your fingers during this step, as the grater can easily slip on the soft fabric.
Step 6: Soften the Fibers with Chemicals
Mix a solution of one part bleach to four parts water in a spray bottle if you are working with a dark shirt.
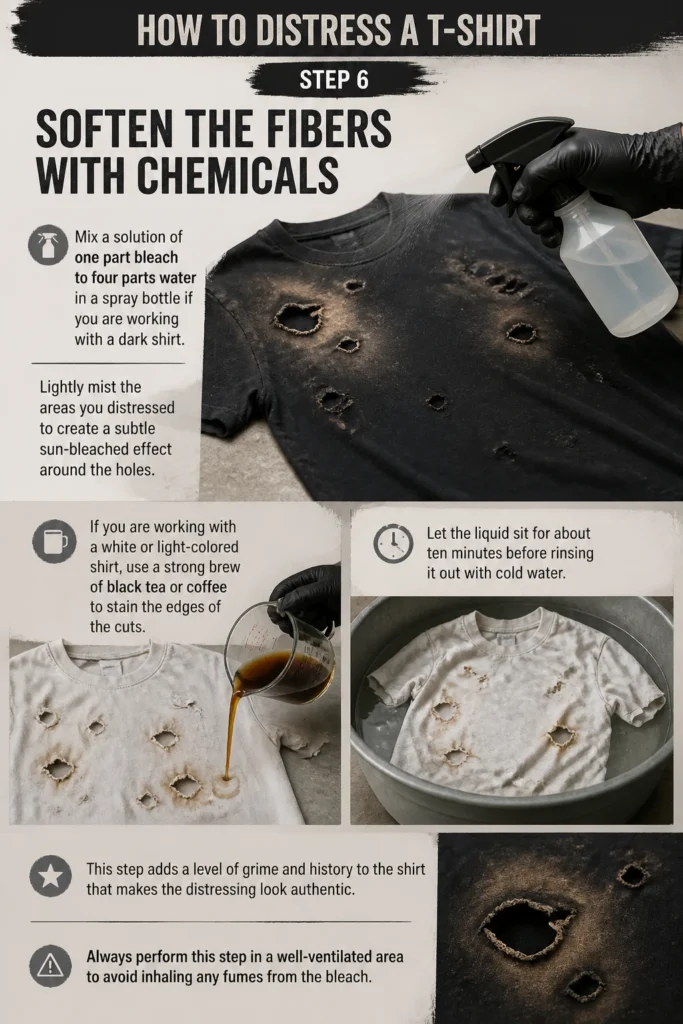
Lightly mist the areas you distressed to create a subtle “sun-bleached” effect around the holes.
If you are working with a white or light-colored shirt, use a strong brew of black tea or coffee to “stain” the edges of the cuts.
Let the liquid sit for about ten minutes before rinsing it out with cold water.
This step adds a level of grime and history to the shirt that makes the distressing look authentic.
Always perform this step in a well-ventilated area to avoid inhaling any fumes from the bleach.
Step 7: The Agitation Cycle
Toss your newly distressed shirt into the washing machine on a heavy-duty cycle.
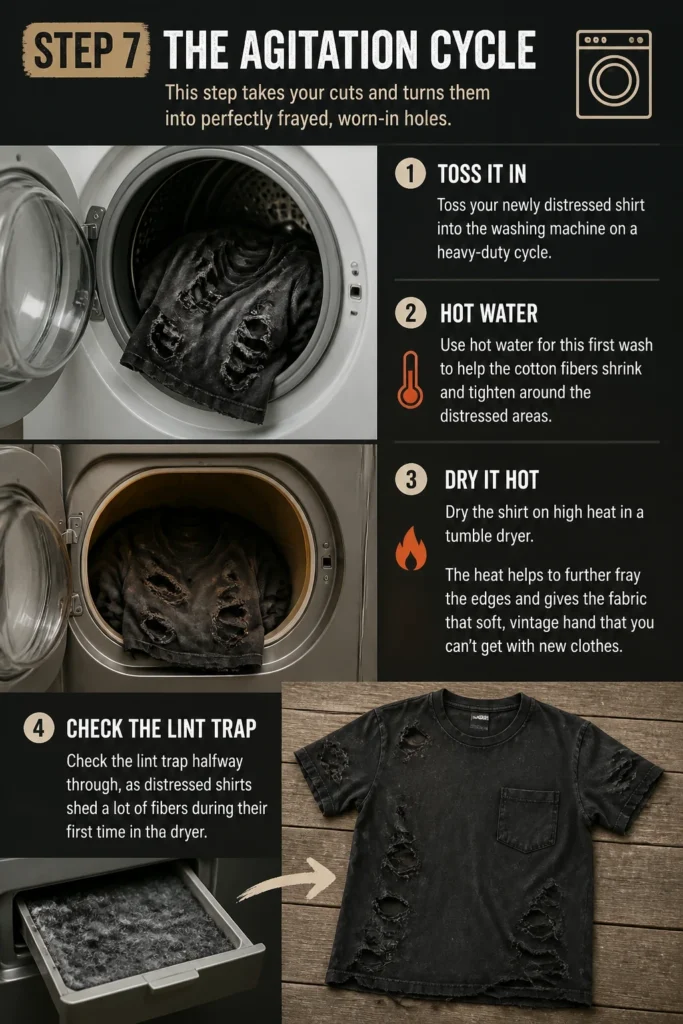
The agitation of the machine is what turns those clean cuts into frayed, fuzzy holes.
Use hot water for this first wash to help the cotton fibers shrink and tighten around the distressed areas.
Dry the shirt on high heat in a tumble dryer.
The heat helps to further fray the edges and gives the fabric that soft, vintage “hand” that you can’t get with new clothes.
Check the lint trap halfway through, as distressed shirts shed a lot of fibers during their first time in the dryer.
Common Mistakes to Avoid
Overworking the Fabric
It is very easy to get carried away once you start cutting and sanding. If you put too many holes in one area, the structural integrity of the shirt fails, and it will eventually tear into two pieces. Start with half as much distressing as you think you need, then add more after the first wash.
Ignoring the Back of the Shirt
Many people only focus on the front because that is what they see in the mirror. A shirt with a shredded front and a pristine back looks fake and unbalanced. Make sure to add at least a little bit of wear to the back of the collar and the shoulder blades.
Using Dull Tools
Dull scissors or a blunt razor will pull and snag the fabric in unattractive ways. You want clean cuts that you then fray manually or through washing. Using sharp tools gives you much more control over the final aesthetic of the garment.
Troubleshooting
The Holes Are Too Large After Washing
If your small slits turned into giant gaping maws, you can use a needle and thread to do some “visible mending.” Use a contrasting thread color to sew small crosses or messy lines across the hole. This actually adds to the distressed aesthetic while keeping the shirt wearable.
The Bleach Spots Are Too Orange
Darker fabrics often turn a brassy orange color when bleached rather than white or grey. You can tone this down by soaking the shirt in a very weak purple dye or using a fabric marker to blend the edges. Next time, try a more diluted bleach solution and apply it in multiple thin layers.
The Fabric Is Not Fraying
This usually happens when the shirt has a high synthetic content like polyester or spandex. If the edges are just sitting there looking flat, use a wire brush to manually pull at the fibers. You might need to be much more aggressive with the sandpaper to break the synthetic bonds.
Key Takeaways
- Always use 100% cotton for the most realistic and comfortable distressing results.
- Focus your efforts on natural wear points like the collar, hems, and elbows for an authentic look.
- Protect the back of the shirt with cardboard when cutting the front to avoid unwanted holes.
- Wash and dry the shirt on high heat immediately after distressing to set the frayed edges.
- Start small and add more wear gradually, as you can’t undo a cut once it is made.
Frequently Asked Questions
Can I distress a shirt that has a large screen print?
Yes, and it often looks better when you do. Use a fine-grit sandpaper to lightly scuff the surface of the print until it starts to crack. This prevents the print from looking like a giant, stiff plastic sticker on your chest.
How do I make the shirt feel softer as well as look older?
You can soak the shirt in a mixture of salt and water for three days before you start the distressing process. Use about one cup of salt for every gallon of water. This breaks down the factory finish on the fabric and makes it feel incredibly soft.
Will the holes keep growing every time I wash it?
They will grow slightly for the first two or three washes until the edges are fully frayed and the fibers have “locked” into place. To slow down the process, wash the shirt in a mesh laundry bag or on a delicate cycle after the initial distressing wash. Avoid using a dryer if you want to preserve the exact size of the holes.
What is the best tool for making tiny “moth” holes?
A seam ripper or a small screwdriver works perfectly for this. Simply poke the tool through the fabric and wiggle it around to expand the hole slightly. This creates those tiny, circular holes that look like natural age rather than scissor cuts.
Our Top Recommended Finds
- Fabric Shears: A pair of heavy-duty, sharp fabric scissors will make your initial cuts much cleaner and easier to manage.
- Abrasive Sanding Blocks: These are easier to grip than loose sheets of sandpaper and allow you to apply more consistent pressure to the fabric.
- Pumice Stones: These are great for creating a very subtle, overall “pilled” texture on the fabric without making actual holes.
Level Up Your Style Game Today
Now that you have the techniques down, it is time to grab that old shirt from the back of your closet and give it a new life.
Distressing is a skill that improves with every garment you finish, so don’t be afraid to experiment with different tools and textures.
Once you’ve mastered the t-shirt, you can apply these same methods to denim jackets or even hoodies.
The goal is to create something that feels like it belongs to you and tells a story, even if you just finished making it twenty minutes ago.