🐸 How To Crochet A Frog
Remember that first time you picked up a hook, dreaming of creating something truly adorable?
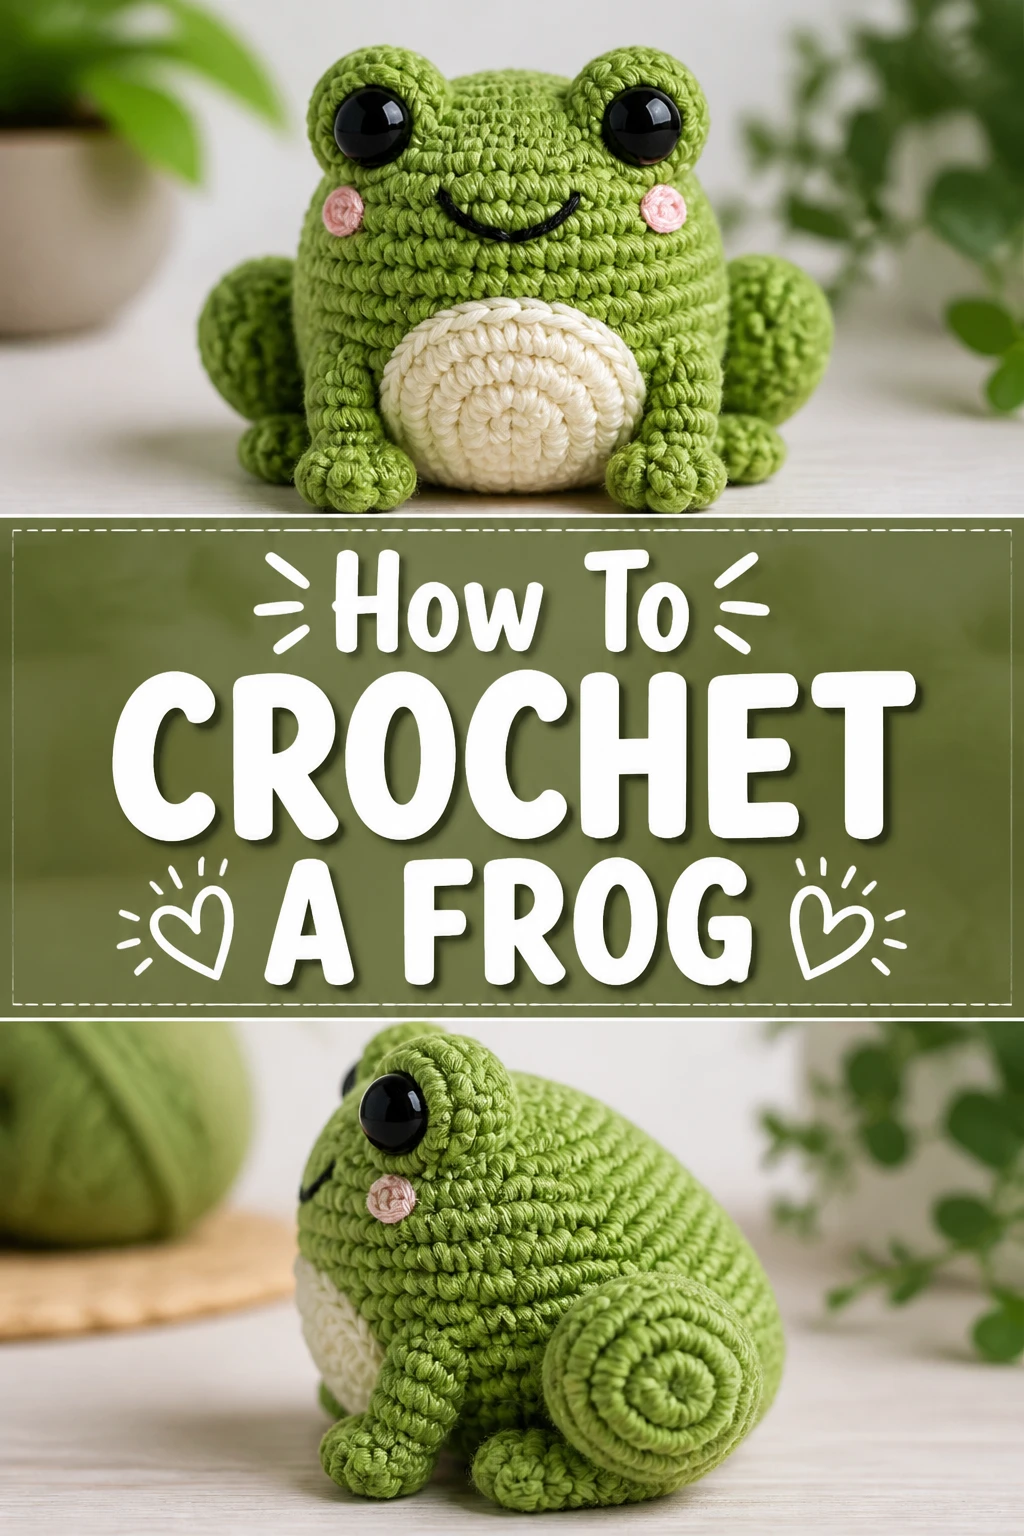
Crocheting a cute little frog is a truly rewarding project, perfect for crafters ready to bring a charming character to life.
I’ve made countless amigurumi creatures, and these little frogs always bring a smile, so I’m here to share my tried-and-true method with you.
Quick Overview
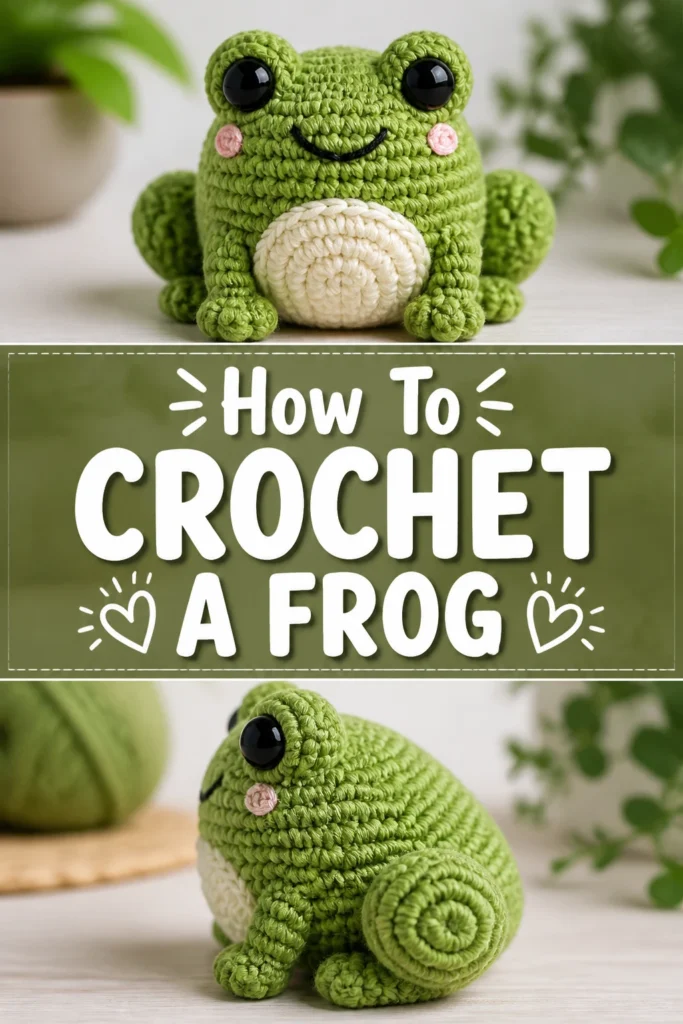
This guide will walk you through creating your very own charming amigurumi frog, from the first stitch to the final details.
You’ll learn essential shaping and assembly techniques to craft a lovable, huggable companion.
- Time needed: 3-5 hours (depending on experience and speed)
- Difficulty: Beginner-Friendly (assumes basic crochet stitches)
- What you’ll need: Yarn, crochet hook, stuffing, safety eyes, yarn needle, scissors, stitch markers.
Step-by-Step Instructions
Step 1: Gather Your Supplies
Before you begin, ensure you have all your materials neatly organized and within reach.
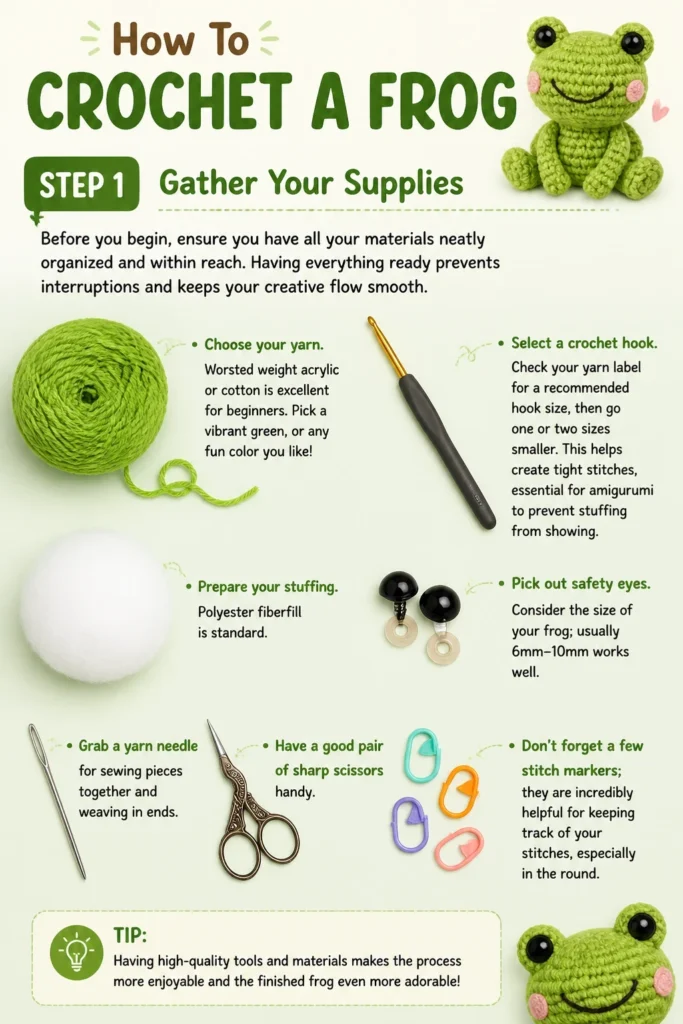
Having everything ready prevents interruptions and keeps your creative flow smooth.
- Choose your yarn. Worsted weight acrylic or cotton is excellent for beginners. Pick a vibrant green, or any fun color you like!
- Select a crochet hook. Check your yarn label for a recommended hook size, then go one or two sizes smaller. This helps create tight stitches, essential for amigurumi to prevent stuffing from showing.
- Prepare your stuffing. Polyester fiberfill is standard.
- Pick out safety eyes. Consider the size of your frog; usually 6mm-10mm works well.
- Grab a yarn needle for sewing pieces together and weaving in ends.
- Have a good pair of sharp scissors handy.
- Don’t forget a few stitch markers; they are incredibly helpful for tracking rounds.
Pro Tip: Using a slightly smaller hook than recommended for your yarn creates a denser fabric. This prevents your stuffing from peeking through and gives your amigurumi a smoother finish.
Step 2: Start the Head and Body
Most amigurumi frogs begin with the head, often worked seamlessly into the body for a clean look.
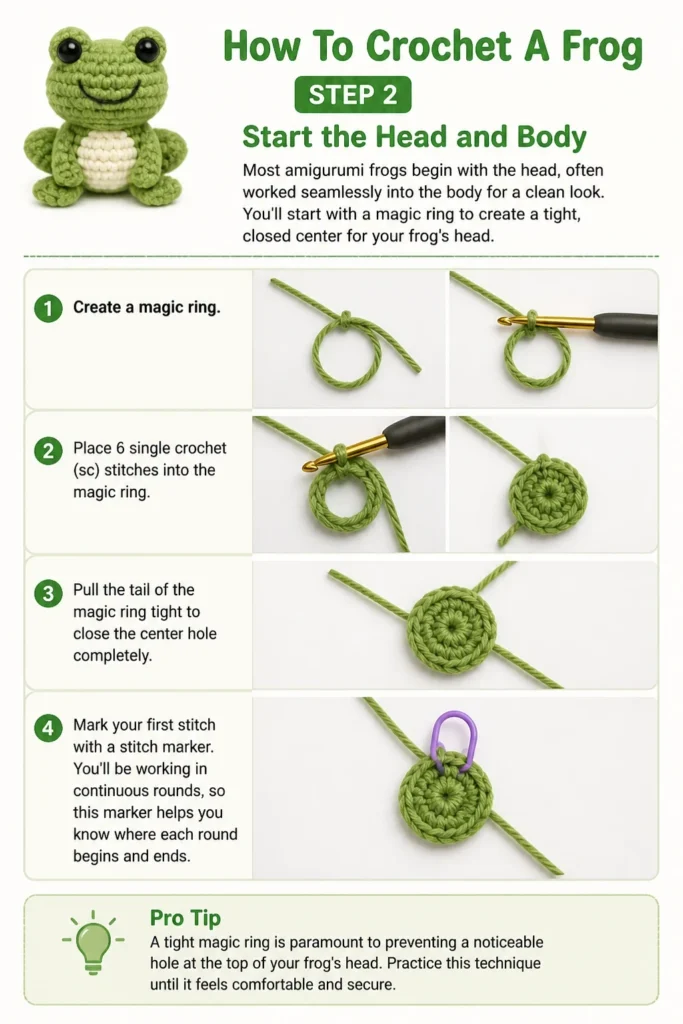
You’ll start with a magic ring to create a tight, closed center for your frog’s head.
- Create a magic ring. This is a foundational technique that ensures there’s no hole at the top of your piece.
- Place 6 single crochet (sc) stitches into the magic ring.
- Pull the tail of the magic ring tight to close the center hole completely.
- Mark your first stitch with a stitch marker. You’ll be working in continuous rounds, so this marker helps you know where each round begins and ends.
Pro Tip: A tight magic ring is paramount to preventing a noticeable hole at the top of your frog’s head. Practice this technique until it feels comfortable and secure.
Step 3: Shape the Head
Now, you will begin to increase your stitches to form the rounded shape of your frog’s head.
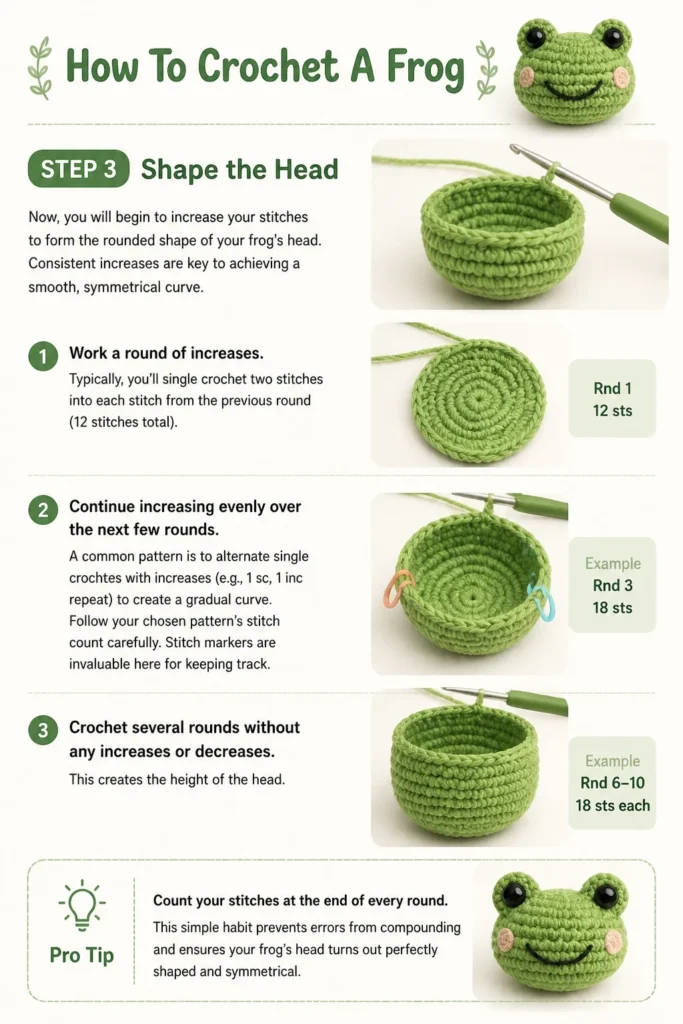
Consistent increases are key to achieving a smooth, symmetrical curve.
- Work a round of increases. Typically, you’ll single crochet two stitches into each stitch from the previous round (12 stitches total).
- Continue increasing evenly over the next few rounds. A common pattern is to alternate single crochets with increases (e.g., 1 sc, 1 inc repeat) to create a gradual curve.
- Follow your chosen pattern’s stitch count carefully. Stitch markers are invaluable here for keeping track.
- Crochet several rounds without any increases or decreases. This creates the height of the head.
Pro Tip: Count your stitches at the end of every round. This simple habit prevents errors from compounding and ensures your frog’s head is perfectly shaped.
Step 4: Attach Safety Eyes and Stuff the Head
Placing the safety eyes and adding initial stuffing are crucial steps before the head opening becomes too small.
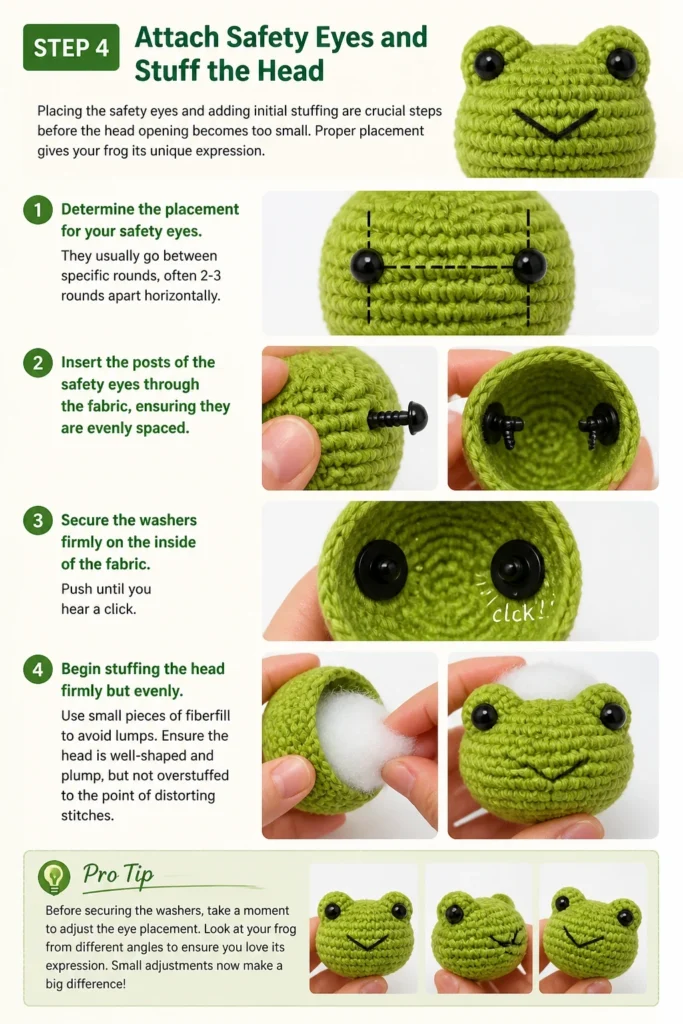
Proper placement gives your frog its unique expression.
- Determine the placement for your safety eyes. They usually go between specific rounds, often 2-3 rounds apart horizontally.
- Insert the posts of the safety eyes through the fabric, ensuring they are evenly spaced.
- Secure the washers firmly on the inside of the fabric. Push until you hear a click.
- Begin stuffing the head firmly but evenly. Use small pieces of fiberfill to avoid lumps.
- Ensure the head is well-shaped and plump, but not overstuffed to the point of distorting stitches.
Pro Tip: Before securing the washers, take a moment to adjust the eye placement. Look at your frog from different angles to ensure you love its expression. Once locked, safety eyes are permanent.
Step 5: Shape the Body and Close
After the head is formed, you will gradually decrease stitches to create the neck and then increase again for the body, or simply continue decreasing to finish the head if it’s a one-piece body.
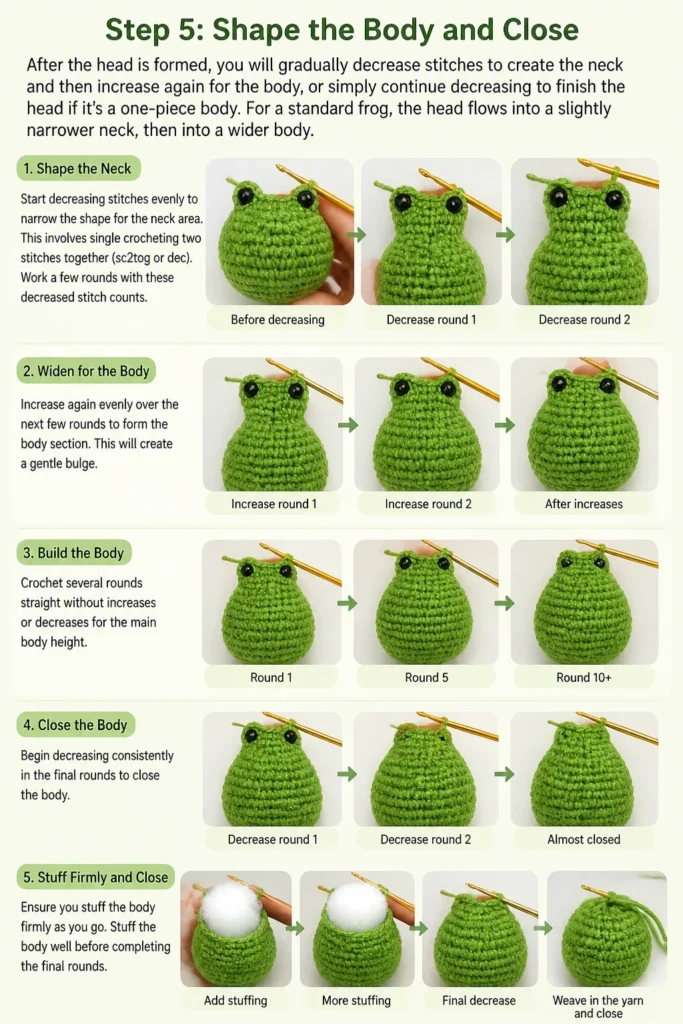
For a standard frog, the head flows into a slightly narrower neck, then into a wider body.
- Start decreasing stitches evenly to narrow the shape for the neck area. This involves single crocheting two stitches together (sc2tog or dec).
- Work a few rounds with these decreased stitch counts.
- Increase again evenly over the next few rounds to form the body section. This will create a gentle bulge.
- Crochet several rounds straight without increases or decreases for the main body height.
- Begin decreasing consistently in the final rounds to close the body. Ensure you stuff the body firmly as you go.
- Stuff the body firmly until it’s plump and holds its shape.
- Fasten off once only 6-8 stitches remain. Leave a long tail for sewing.
- Thread the tail onto your yarn needle and weave it through the front loop of each remaining stitch. Pull tight to close the hole.
Pro Tip: Stuff your frog evenly and incrementally. Add a little stuffing, push it into place, then add more. This prevents lumps and ensures a smooth, pleasing shape.
Step 6: Crochet the Legs (Four of Them)
Your frog needs its signature limbs! The legs are typically simple tubes of single crochet stitches.
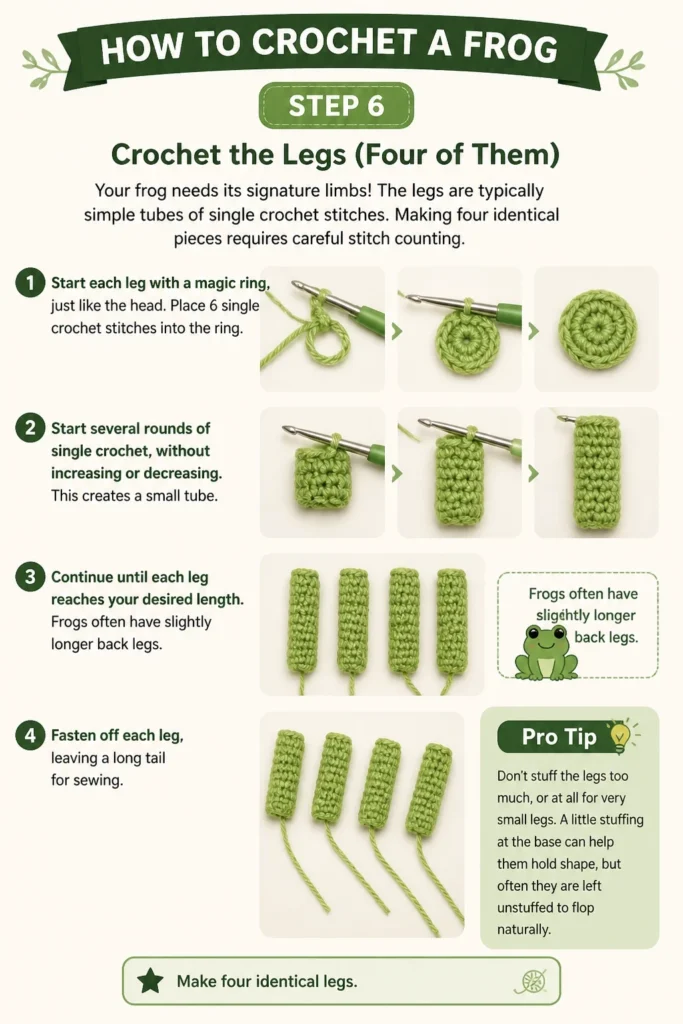
Making four identical pieces requires careful stitch counting.
- Start each leg with a magic ring, just like the head. Place 6 single crochet stitches into the ring.
- Work several rounds of single crochet, without increasing or decreasing. This creates a small tube.
- Continue until each leg reaches your desired length. Frogs often have slightly longer back legs.
- Fasten off each leg, leaving a long tail for sewing.
- Make four identical legs.
Pro Tip: Don’t stuff the legs too much, or at all for very small legs. A little stuffing at the base can help them hold shape, but often they are left unstuffed to flop naturally.
Step 7: Crochet the Eye Bumps (Two of Them)
To give your frog those characteristic protruding eyes, you’ll crochet small bumps that sit behind the safety eyes.
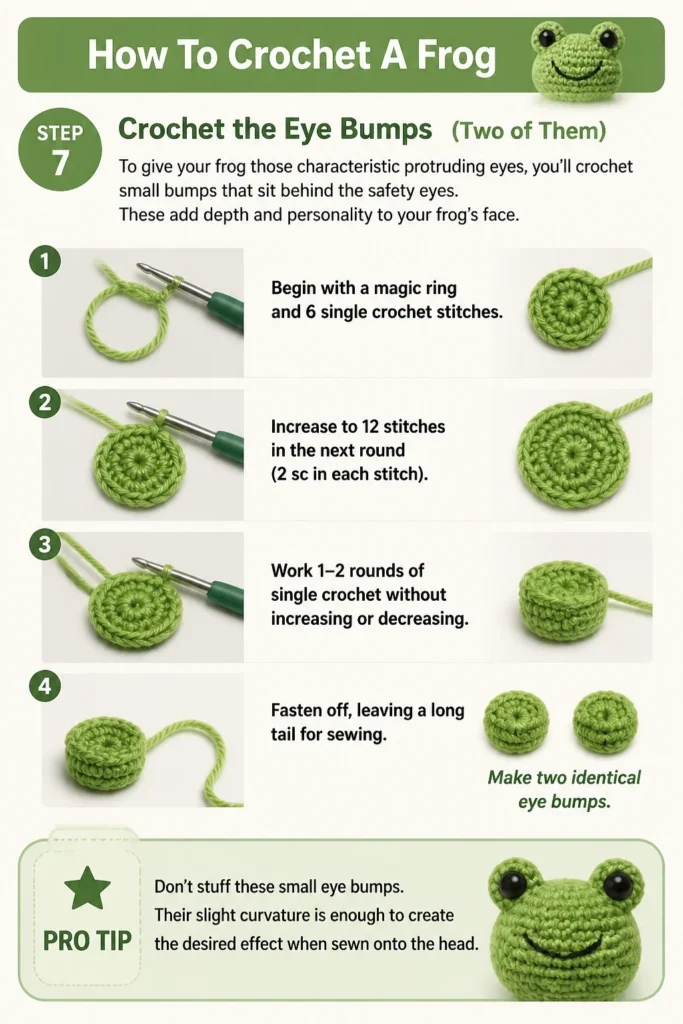
These add depth and personality to your frog’s face.
- Begin with a magic ring and 6 single crochet stitches.
- Increase to 12 stitches in the next round (2 sc in each stitch).
- Work 1-2 rounds of single crochet without increasing or decreasing.
- Fasten off, leaving a long tail for sewing.
- Make two identical eye bumps.
Pro Tip: Don’t stuff these small eye bumps. Their slight curvature is enough to create the desired effect when sewn onto the head.
Step 8: Assemble Your Frog
Now comes the exciting part: bringing all your crocheted pieces together to form your frog!
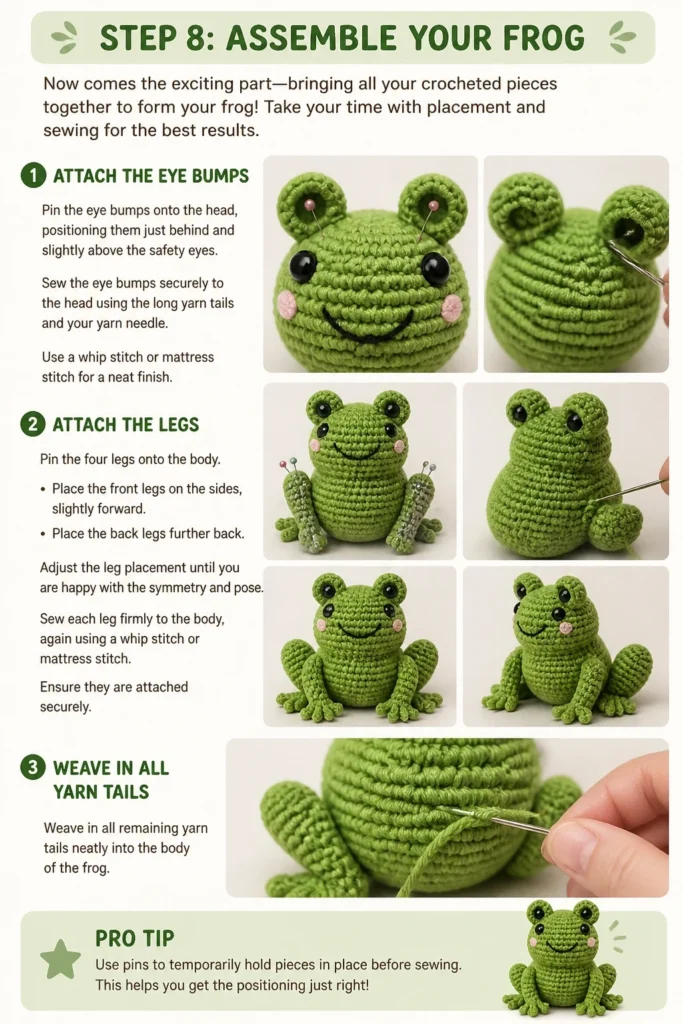
Take your time with placement and sewing for the best results.
- Pin the eye bumps onto the head, positioning them just behind and slightly above the safety eyes.
- Sew the eye bumps securely to the head using the long yarn tails and your yarn needle. Use a whip stitch or mattress stitch for a neat finish.
- Pin the four legs onto the body. Place the front legs on the sides, slightly forward, and the back legs further back.
- Adjust the leg placement until you are happy with the symmetry and pose.
- Sew each leg firmly to the body, again using a whip stitch or mattress stitch. Ensure they are attached securely.
- Weave in all remaining yarn tails neatly into the body of the frog.
Pro Tip: Use pins to temporarily attach all pieces before you start sewing. This allows you to adjust placement and ensure everything is symmetrical and exactly where you want it.
Step 9: Add Final Touches
Small details can truly make your frog unique and give it personality.
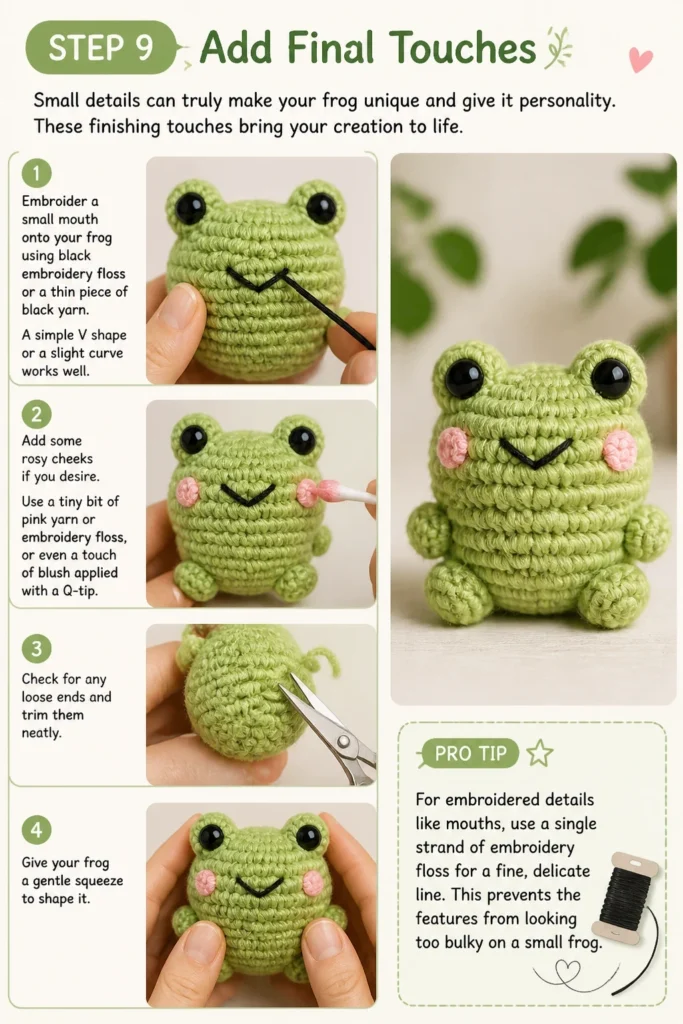
These finishing touches bring your creation to life.
- Embroider a small mouth onto your frog using black embroidery floss or a thin piece of black yarn. A simple “V” shape or a slight curve works well.
- Add some rosy cheeks if you desire. Use a tiny bit of pink yarn or embroidery floss, or even a touch of blush applied with a Q-tip.
- Check for any loose ends and trim them neatly.
- Give your frog a gentle squeeze to shape it.
Pro Tip: For embroidered details like mouths, use a single strand of embroidery floss for a fine, delicate line. This prevents the features from looking too bulky on a small frog.
Common Mistakes to Avoid
Crocheting Too Loosely
Using a hook that is too large for your yarn, or maintaining loose tension, results in gappy stitches. This means your stuffing will show through, making your frog look messy and less polished.
Always choose a hook one or two sizes smaller than recommended on your yarn label for amigurumi. Practice consistent, tight tension to create a dense fabric that keeps stuffing hidden.
Incorrect Stitch Counts
Missing or adding stitches in a round can quickly distort the shape of your frog. A head meant to be round might become egg-shaped, or a leg might curve unevenly.
Always use a stitch marker to denote the beginning of each round. Make a habit of counting your stitches at the end of every single round to catch errors early. It saves time and frustration later.
Under-stuffing or Over-stuffing
An under-stuffed frog will be floppy and lack structure, collapsing easily. An over-stuffed frog will appear lumpy, with stitches stretched taut, potentially even showing the stuffing through the fabric.
Stuff your frog firmly but evenly. Add small amounts of fiberfill at a time, gently pushing it into all areas. Use a blunt tool like the back of your crochet hook to reach tight spots and ensure a smooth, well-defined shape.
Skipping the Magic Ring
Starting with a chain and slip stitch often leaves a small hole in the center of your first round. While fine for some projects, for amigurumi, this creates an undesirable opening at the top of the head or body.
Always begin your amigurumi pieces with a magic ring. This technique allows you to pull the center ring completely closed, creating a perfectly tight start without any gaps.
Troubleshooting
My stitches are gappy and the stuffing shows!
This is a common issue when your tension is too loose or your hook is too large for your yarn weight. The fabric isn’t dense enough to contain the fiberfill.
Try using a crochet hook one or two sizes smaller than what you’re currently using. Focus on maintaining tighter tension as you crochet. Practice can significantly improve your stitch density.
My frog isn’t round/symmetrical!
Uneven shaping often comes from inconsistent stitch counts or varying tension throughout your work. If you accidentally add or miss stitches, the shape will be affected.
Double-check your stitch counts at the end of every round. Use a stitch marker consistently. Ensure your tension remains even; avoid crocheting tightly in some sections and loosely in others.
The pieces don’t line up when sewing!
Attaching limbs and other features can be tricky, and if not aligned correctly, your frog might look lopsided or unbalanced.
Always use pins to temporarily attach all pieces to the main body before you start sewing. Step back and look at your frog from all angles to ensure symmetry. Once you’re happy with the placement, then proceed with your sewing needle.
Key Takeaways
- Gauge and tension are crucial for amigurumi; tighter stitches prevent stuffing from showing.
- Accurate stitch counting prevents misshapen parts and ensures symmetrical results.
- Stuffing correctly gives your frog its character and maintains its desired form.
- Don’t rush the assembly and finishing touches; careful placement makes a big difference.
- Practice makes perfect for smooth shaping and mastering new techniques like the magic ring.
Frequently Asked Questions
What’s the best yarn for a crochet frog?
Worsted weight acrylic or cotton yarn is generally recommended for amigurumi. Acrylic is affordable and comes in many colors, while cotton offers great stitch definition. Beginners often find worsted weight easiest to work with.
Can I make the frog bigger/smaller?
Absolutely! To make a bigger frog, use a thicker yarn and a proportionally larger crochet hook. For a smaller frog, use finer yarn (like sport or fingering weight) and a smaller hook. The pattern instructions will largely remain the same, just scaled.
Are safety eyes truly safe for children?
Safety eyes are generally safe for children over three years old, as they are securely fastened. However, for babies and toddlers under three, it’s safer to embroider the eyes and other facial features using yarn or embroidery floss to eliminate any choking hazard.
How do I hide the yarn tails?
After fastening off, thread the remaining yarn tail onto a yarn needle. Weave the tail through several stitches on the inside of your crocheted piece, changing direction a few times. This secures the tail and hides it completely within the stuffing.
Our Top Recommended Finds
- Ergonomic Crochet Hook Set: These hooks feature comfortable handles, reducing hand fatigue during longer crafting sessions.
- Premium Polyester Fiberfill: High-quality stuffing maintains its loft and shape, ensuring your frog stays plump and cuddly over time.
- Amigurumi Safety Eye Assortment: A variety pack gives you different sizes and colors, perfect for customizing your frog’s unique expression.
Your New Crocheted Companion Awaits
You’ve just crafted your very own adorable crocheted frog, a testament to your growing skills and creativity.
This project is a fantastic stepping stone into the wonderful world of amigurumi.
Why not make a whole family of frogs in different colors, or try your hand at another cute animal? Grab your hook and yarn, and keep creating today!