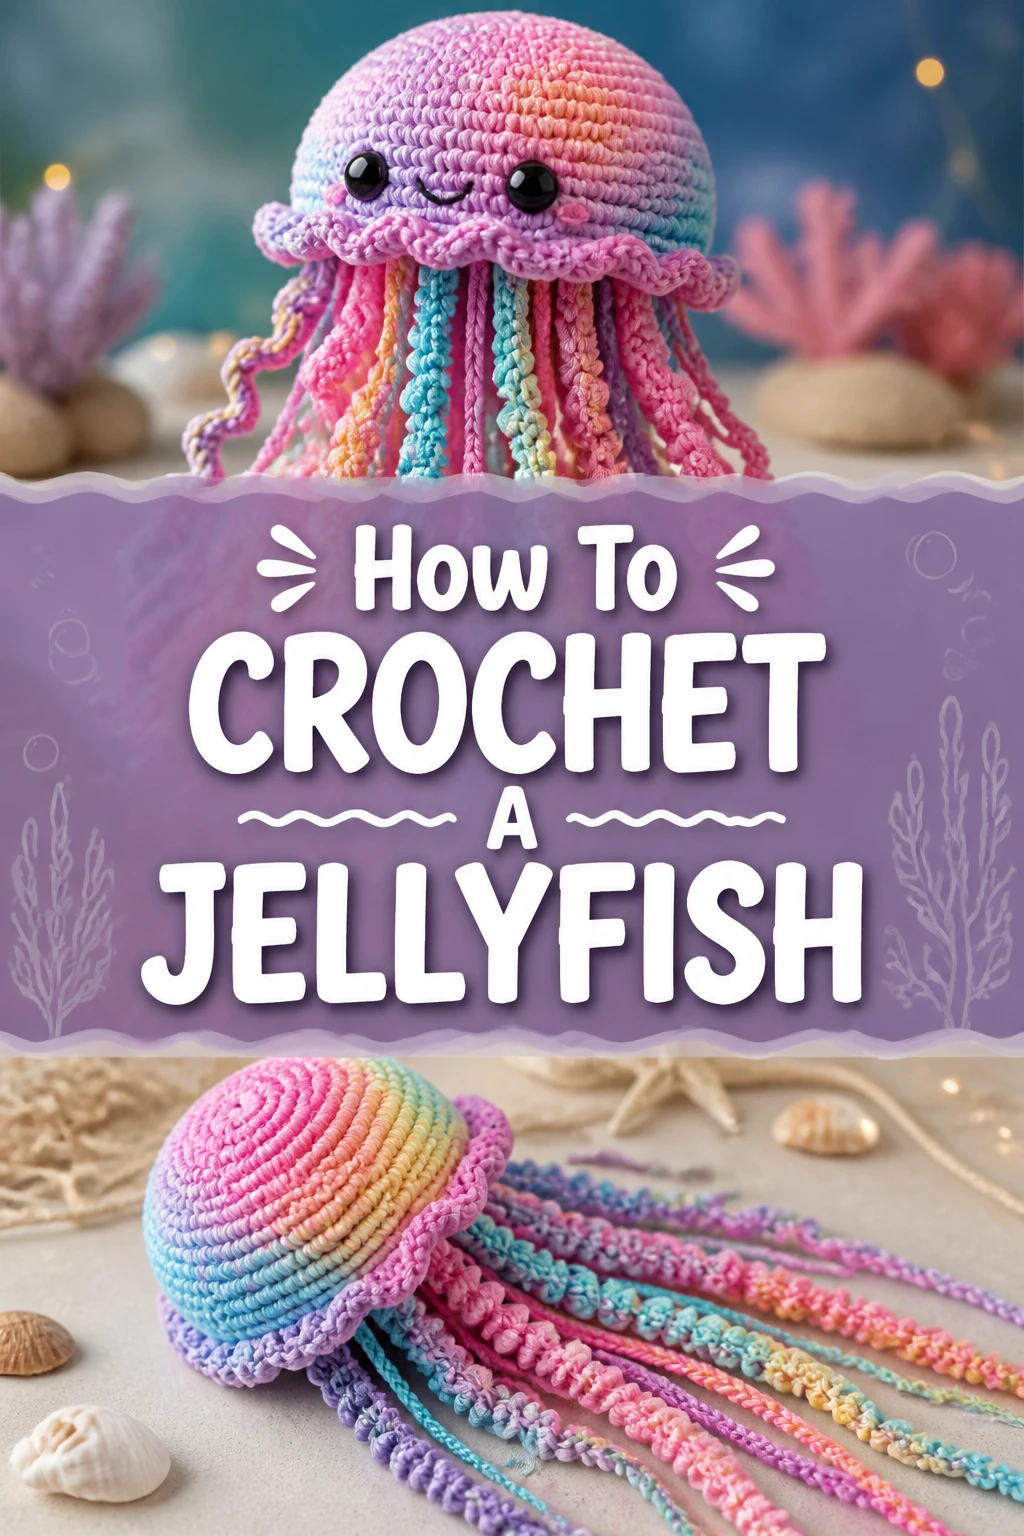
🐙 How To Crochet A Jellyfish
There’s something truly magical about bringing a creature to life with just yarn and a hook. I remember the pure joy of finishing my very first crocheted jellyfish, seeing its little personality emerge. This guide shares all the practical tips and tricks I’ve gathered over the years, making the process smooth and enjoyable for you.
Quick Overview
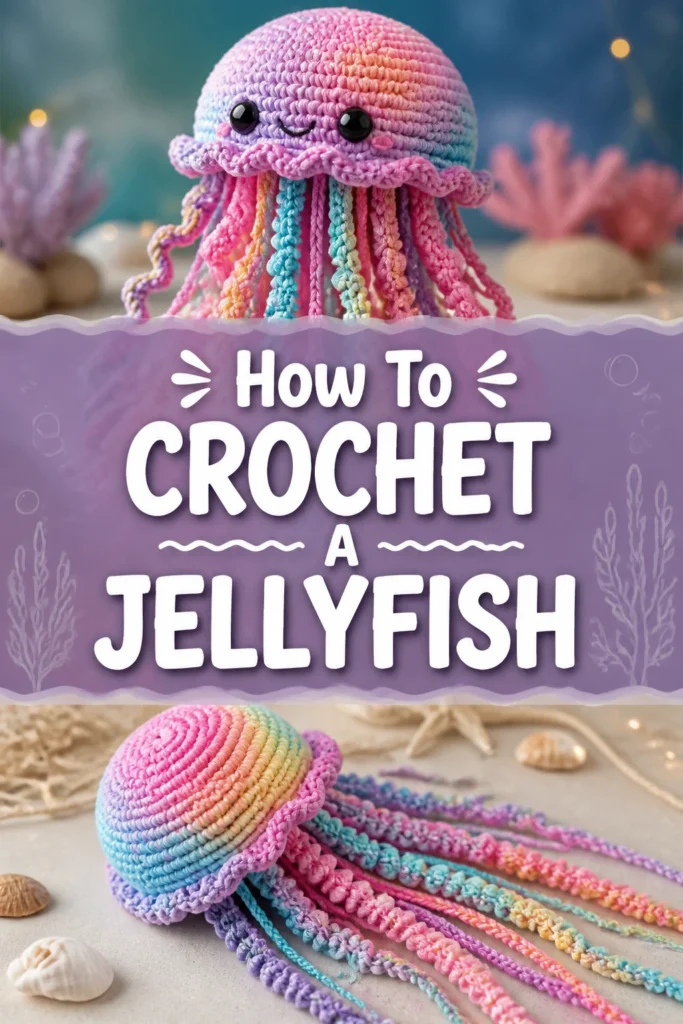
You’re about to create an adorable, squishy jellyfish that makes a perfect gift or a charming decoration. This project is a fantastic way to practice basic crochet stitches while resulting in something truly delightful.
- Time needed: 2-4 hours, depending on your pace and experience.
- Difficulty: Beginner
- What you’ll need: Yarn, crochet hook, stuffing, safety eyes, yarn needle, scissors.
Step-by-Step Instructions
The key to a beautiful jellyfish is consistent tension and careful counting. Don’t rush, and enjoy each stitch as you watch your creation take shape.
Step 1: Gather Your Materials
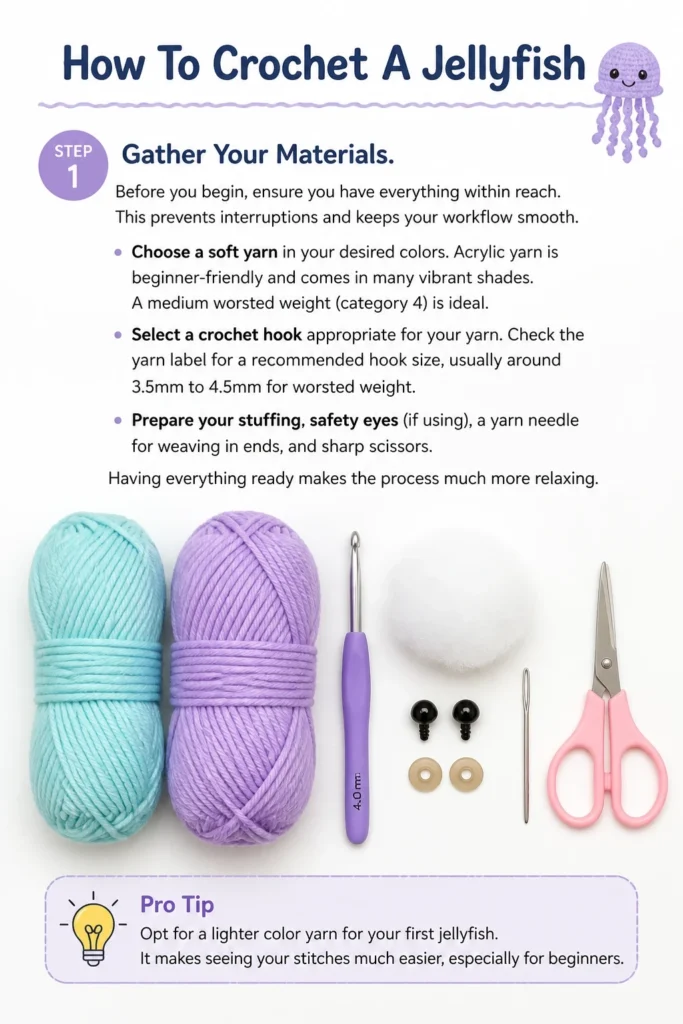
Before you begin, ensure you have everything within reach. This prevents interruptions and keeps your workflow smooth.
Choose a soft yarn in your desired colors. Acrylic yarn is beginner-friendly and comes in many vibrant shades. A medium worsted weight (category 4) is ideal.
Select a crochet hook appropriate for your yarn. Check the yarn label for a recommended hook size, usually around 3.5mm to 4.5mm for worsted weight.
Prepare your stuffing, safety eyes (if using), a yarn needle for weaving in ends, and sharp scissors. Having everything ready makes the process much more relaxing.
Pro Tip: Opt for a lighter color yarn for your first jellyfish. It makes seeing your stitches much easier, especially for beginners.
Step 2: Start the Jellyfish Head (Magic Ring & Increases)
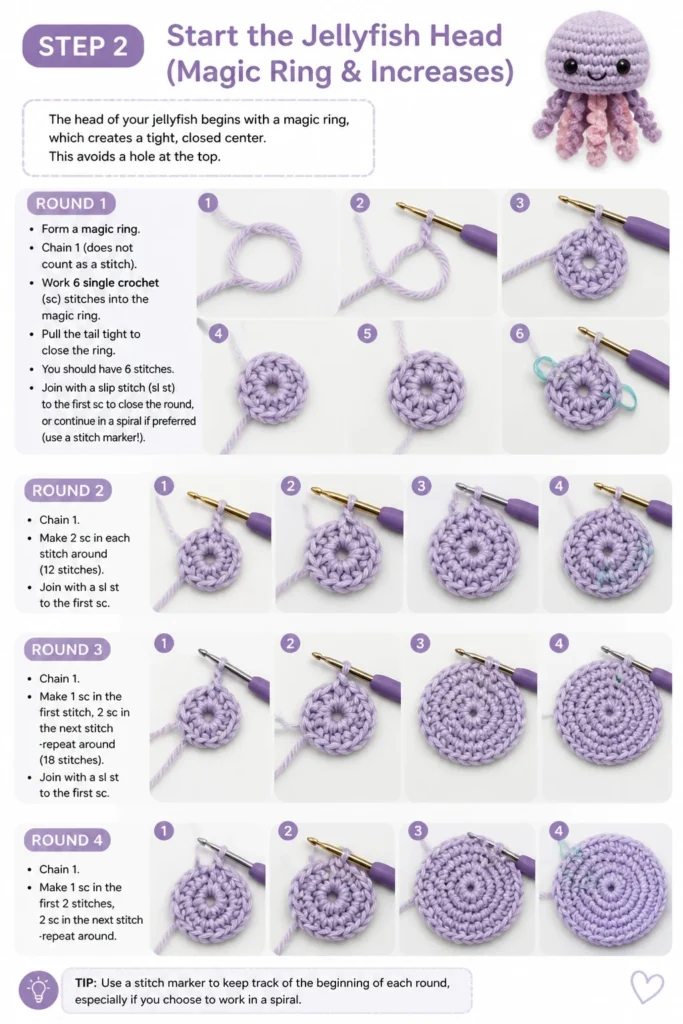
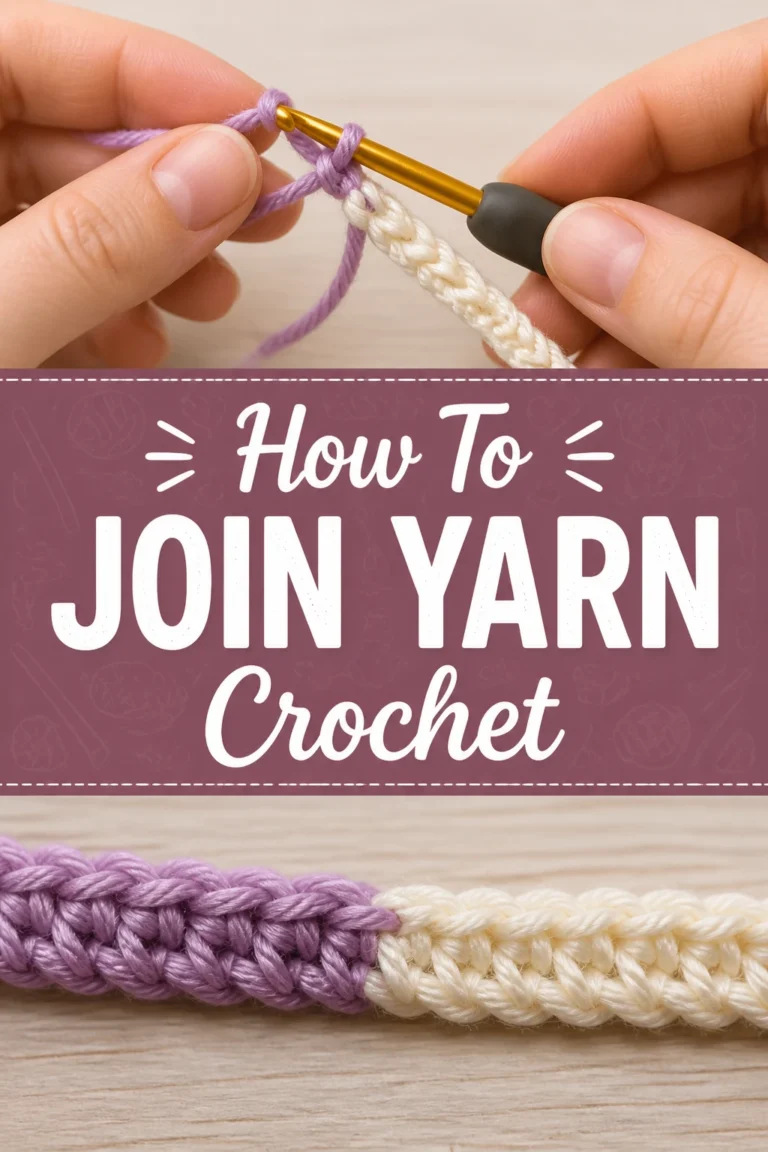
The head of your jellyfish begins with a magic ring, which creates a tight, closed center. This avoids a hole at the top.
Form a magic ring. Chain 1 (does not count as a stitch).
Work 6 single crochet (sc) stitches into the magic ring. Pull the tail tight to close the ring. You should have 6 stitches.
Join with a slip stitch (sl st) to the first sc to close the round, or continue in a spiral if preferred (use a stitch marker!).
Round 2: Chain 1. Make 2 sc in each stitch around (12 stitches). Join with a sl st to the first sc.
Round 3: Chain 1. Make 1 sc in the first stitch, 2 sc in the next stitch repeat around (18 stitches). Join with a sl st.
Round 4: Chain 1. Make 1 sc in the first 2 stitches, 2 sc in the next stitch repeat around (24 stitches). Join with a sl st.
Round 5: Chain 1. Make 1 sc in the first 3 stitches, 2 sc in the next stitch repeat around (30 stitches). Join with a sl st.
Pro Tip: Use a stitch marker in the first stitch of each round, especially when working in a spiral. This helps you keep track of your stitch count and where each round begins and ends.
Step 3: Shape the Jellyfish Body (Even Rounds)
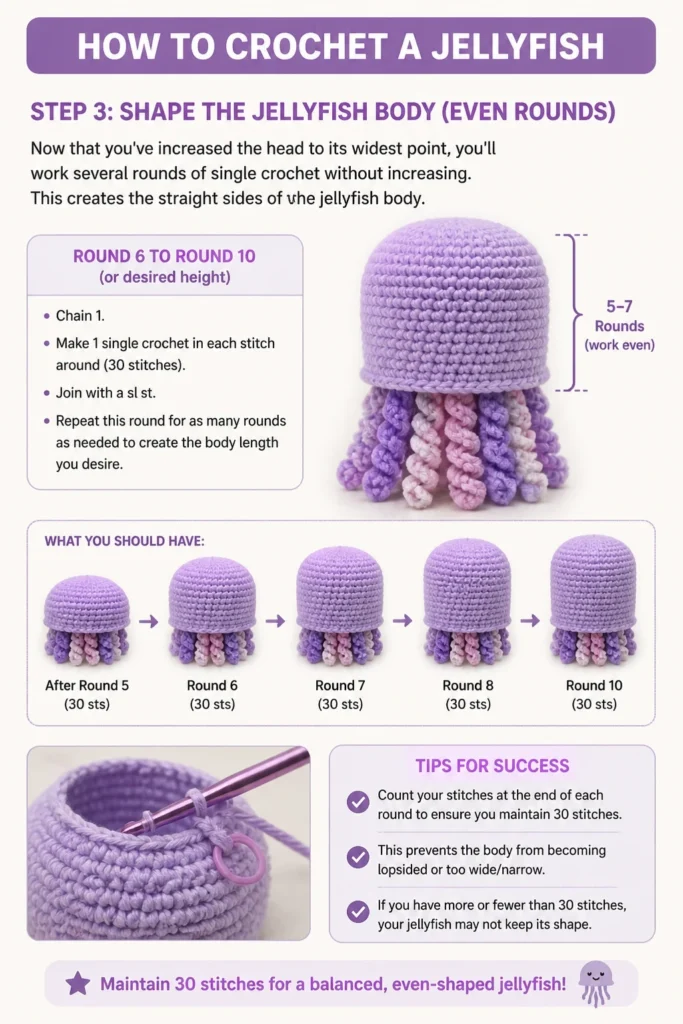
Now that you’ve increased the head to its widest point, you’ll work several rounds of single crochet without increasing. This creates the straight sides of the jellyfish body.
Round 6 to Round 10 (or desired height): Chain 1. Make 1 single crochet in each stitch around (30 stitches). Join with a sl st.
Repeat this round for as many rounds as needed to create the body length you desire. For a standard jellyfish, about 5-7 rounds work well.
Count your stitches at the end of each round to ensure you maintain 30 stitches. This prevents the body from becoming lopsided or too wide/narrow.
Step 4: Attach Safety Eyes and Stuff the Head
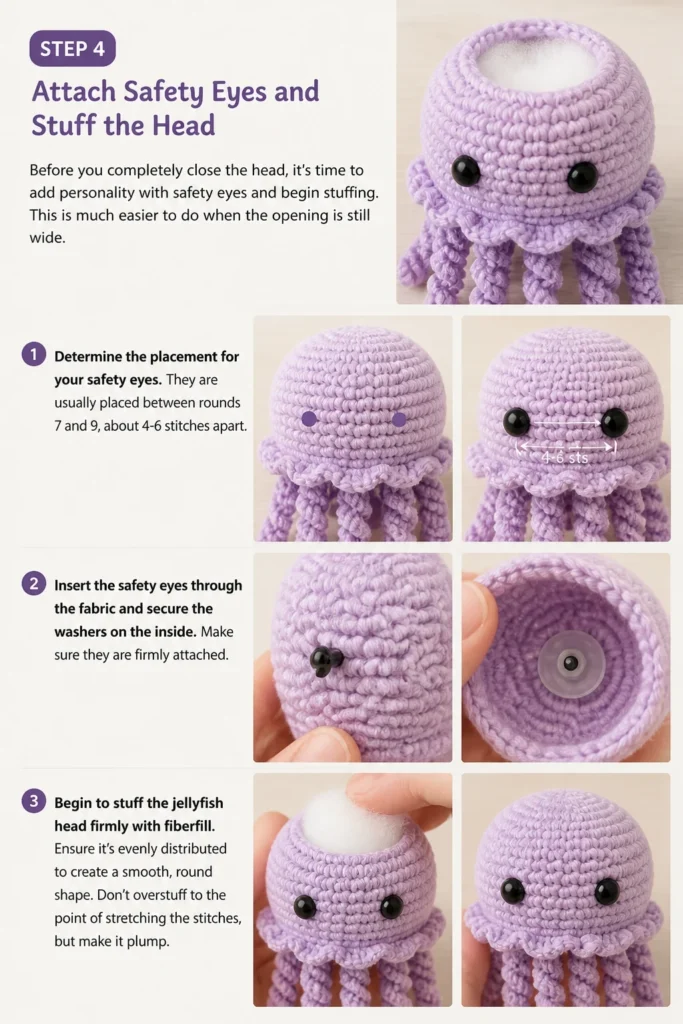
Before you completely close the head, it’s time to add personality with safety eyes and begin stuffing. This is much easier to do when the opening is still wide.
Determine the placement for your safety eyes. They are usually placed between rounds 7 and 9, about 4-6 stitches apart.
Insert the safety eyes through the fabric and secure the washers on the inside. Make sure they are firmly attached.
Begin to stuff the jellyfish head firmly with fiberfill. Ensure it’s evenly distributed to create a smooth, round shape. Don’t overstuff to the point of stretching the stitches, but make it plump.
Step 5: Close the Jellyfish Head (Decreases)
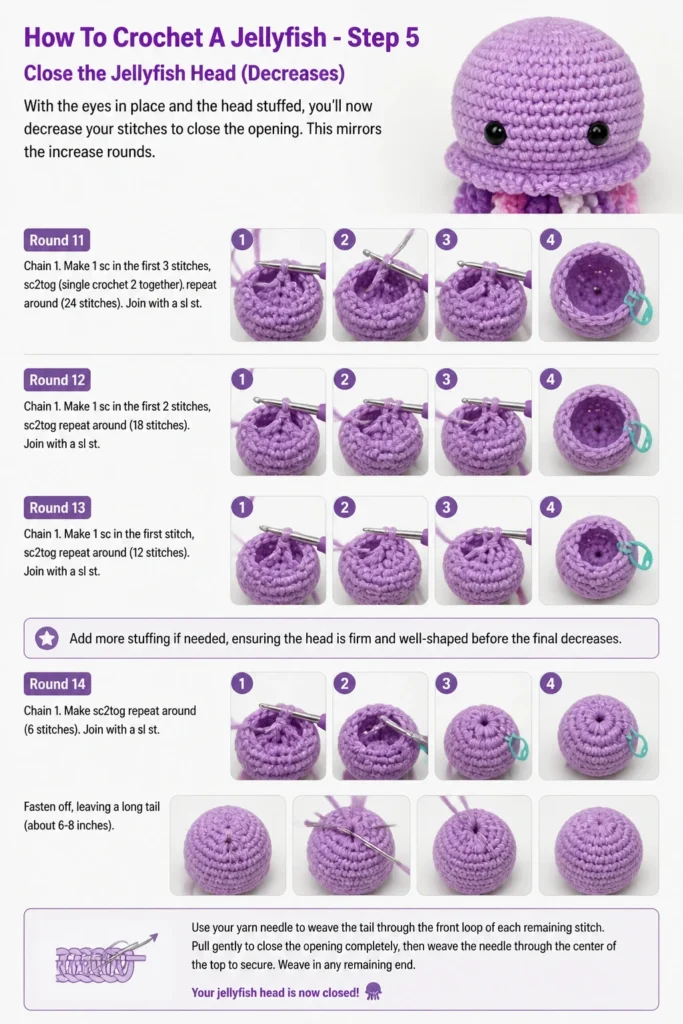
With the eyes in place and the head stuffed, you’ll now decrease your stitches to close the opening. This mirrors the increase rounds.
Round 11: Chain 1. Make 1 sc in the first 3 stitches, sc2tog (single crochet 2 together) repeat around (24 stitches). Join with a sl st.
Round 12: Chain 1. Make 1 sc in the first 2 stitches, sc2tog repeat around (18 stitches). Join with a sl st.
Round 13: Chain 1. Make 1 sc in the first stitch, sc2tog repeat around (12 stitches). Join with a sl st.
Add more stuffing if needed, ensuring the head is firm and well-shaped before the final decreases.
Round 14: Chain 1. Make sc2tog repeat around (6 stitches). Join with a sl st.
Fasten off, leaving a long tail (about 6-8 inches). Use your yarn needle to weave the tail through the front loop of each remaining stitch. Pull tight to close the hole completely. Weave in the remaining tail securely.
Step 6: Create the Tentacles
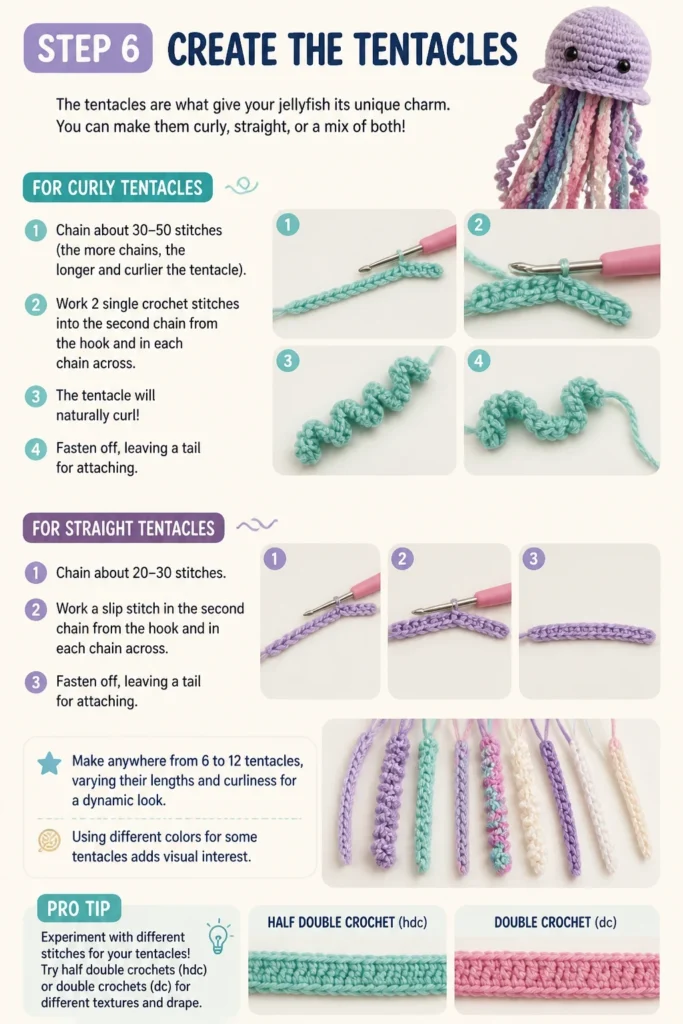
The tentacles are what give your jellyfish its unique charm. You can make them curly, straight, or a mix of both.
For curly tentacles:
Chain about 30-50 stitches (the more chains, the longer and curlier the tentacle).
Work 2 single crochet stitches into the second chain from the hook and in each chain across. The tentacle will naturally curl.
Fasten off, leaving a tail for attaching.
For straight tentacles:
Chain about 20-30 stitches.
Work a slip stitch in the second chain from the hook and in each chain across.
Fasten off, leaving a tail.
Make anywhere from 6 to 12 tentacles, varying their lengths and curliness for a dynamic look. Using different colors for some tentacles adds visual interest.
Pro Tip: Experiment with different stitches for your tentacles! Try half double crochets (hdc) or double crochets (dc) for a different texture and curl intensity. A longer chain with more stitches per chain will result in tighter curls.
Step 7: Attach the Tentacles
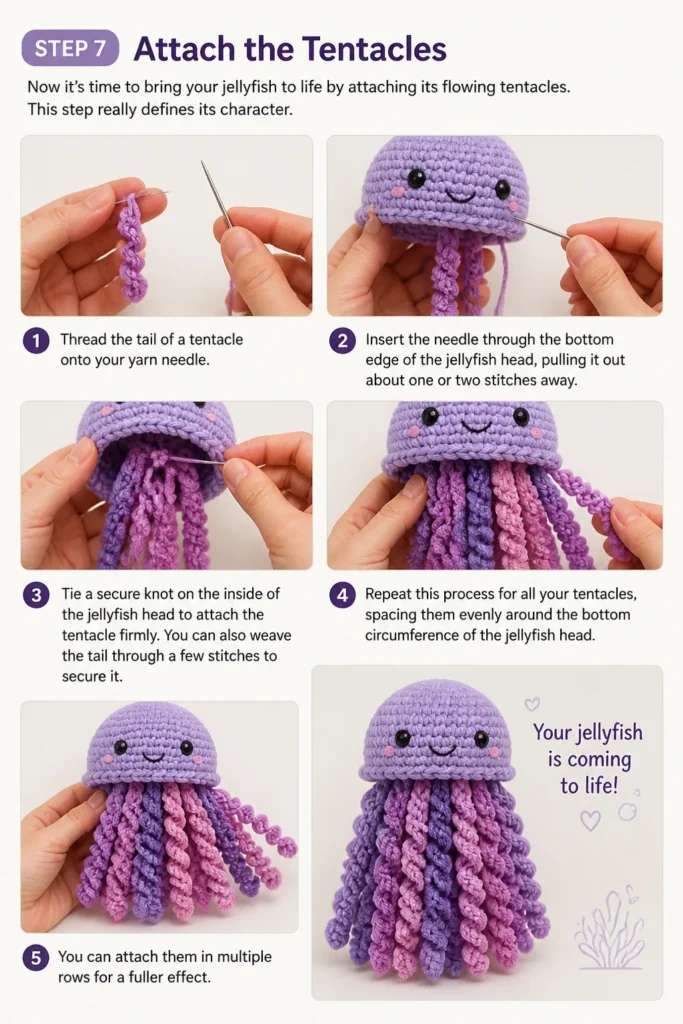
Now it’s time to bring your jellyfish to life by attaching its flowing tentacles. This step really defines its character.
Thread the tail of a tentacle onto your yarn needle.
Insert the needle through the bottom edge of the jellyfish head, pulling it out about one or two stitches away.
Tie a secure knot on the inside of the jellyfish head to attach the tentacle firmly. You can also weave the tail through a few stitches to secure it.
Repeat this process for all your tentacles, spacing them evenly around the bottom circumference of the jellyfish head. You can attach them in multiple rows for a fuller effect.
Step 8: Add Finishing Touches
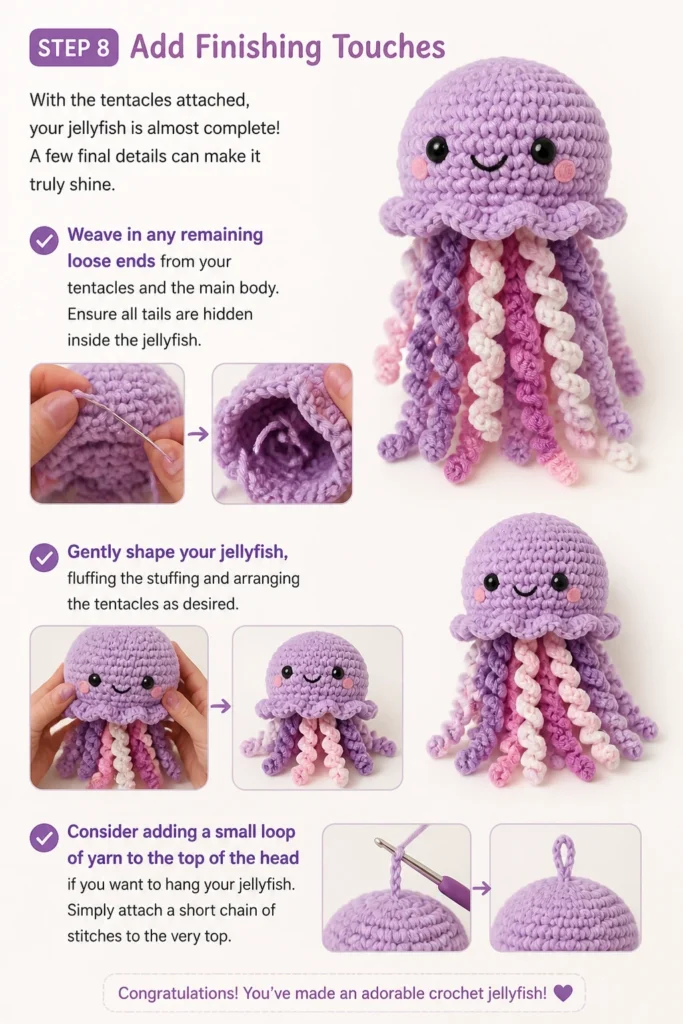
With the tentacles attached, your jellyfish is almost complete! A few final details can make it truly shine.
Weave in any remaining loose ends from your tentacles and the main body. Ensure all tails are hidden inside the jellyfish.
Gently shape your jellyfish, fluffing the stuffing and arranging the tentacles as desired.
Consider adding a small loop of yarn to the top of the head if you want to hang your jellyfish. Simply attach a short chain of stitches to the very top.
Common Mistakes to Avoid
Crocheting is a craft of patience and practice. Being aware of potential pitfalls can save you time and frustration.
Loose Magic Ring
A magic ring that doesn’t close tightly leaves a hole at the top of your jellyfish, which can look unfinished. Ensure you pull the yarn tail as tight as possible to cinch the ring completely. If it still feels loose, try making an extra chain stitch before your first single crochet to secure it further.
Inconsistent Tension
Varying tension can lead to an uneven or lopsided jellyfish. If your stitches are too tight, the fabric will be stiff; too loose, and holes might appear. Practice maintaining an even tension throughout your project. If you notice your tension changing, take a short break or consciously adjust your grip on the yarn and hook.
Incorrect Stitch Count
Missing or adding stitches can quickly throw off the shape of your jellyfish. This is especially critical during increase and decrease rounds. Always count your stitches at the end of each round. Using a stitch marker in the first stitch of every round is an invaluable habit to prevent miscounts.
Under or Over Stuffing
The amount of stuffing drastically affects your jellyfish’s final appearance. Under-stuffing results in a floppy, shapeless jellyfish, while over-stuffing can stretch your stitches, creating gaps and making the fabric look strained. Aim for a firm, yet squishy feel, ensuring the stuffing is evenly distributed.
Troubleshooting
Even experienced crocheters run into snags. Here are solutions to some common issues you might encounter.
Jellyfish Looks Lopsided
If your jellyfish head isn’t perfectly round, it’s likely due to inconsistent tension or an incorrect stitch count in one or more rounds. Carefully re-examine your stitch counts, especially in the increase and decrease rounds. If the issue is minor, sometimes gentle shaping and strategic stuffing can help balance it out. For more significant problems, unraveling a few rounds to correct the stitch count might be the best solution.
Tentacles Don’t Curl Enough
If your curly tentacles are too straight, you might not have worked enough stitches into each chain. To achieve a tighter curl, try working 2-3 single crochet stitches (or even half double crochets) into each chain stitch, rather than just two. Using a smaller hook size for the tentacles can also enhance the curl.
Holes Appearing in the Fabric
Visible holes can occur if your tension is too loose or if your hook size is too large for your chosen yarn. To fix this, try using a smaller crochet hook. Additionally, ensure you are not accidentally skipping stitches or splitting yarn, which can create gaps. When stuffing, be mindful not to push the fiberfill too hard against the fabric, which can also stretch stitches open.
Key Takeaways
Creating your crocheted jellyfish is a rewarding experience that builds fundamental skills. Remember these core principles for success.
- Always start with a magic ring for a neat, closed top.
- Count your stitches at the end of every round to maintain shape.
- Use stitch markers to keep track of your progress, especially in spirals.
- Stuff your jellyfish firmly but evenly for the best shape.
- Vary tentacle styles and lengths for a unique, playful look.
- Don’t be afraid to experiment with yarn colors and hook sizes.
Frequently Asked Questions
New to crochet or just curious? Here are answers to some common questions about making jellyfish.
What is the best type of yarn for a crocheted jellyfish?
Acrylic yarn is highly recommended for beginners. It’s affordable, widely available, comes in many colors, and is easy to work with. It also washes well, making it perfect for toys. Cotton yarn can also be used for a slightly denser feel.
How do I make my jellyfish child-safe?
To make your jellyfish safe for babies and young children, omit the plastic safety eyes. Instead, embroider the eyes using black yarn. Ensure all tentacles are securely attached and all yarn tails are woven in very tightly so there are no loose pieces that could pose a choking hazard.
Can I make the jellyfish bigger or smaller?
Absolutely! To make a bigger jellyfish, use a thicker yarn and a larger hook size, and add more increase rounds and body rounds. To make it smaller, use thinner yarn, a smaller hook, and fewer increase/body rounds. Adjust the number of stitches in your initial magic ring and subsequent increase/decrease patterns accordingly.
How do I wash my crocheted jellyfish?
If made with acrylic yarn, most crocheted jellyfish can be gently hand-washed with mild soap and cool water. Squeeze out excess water without twisting, then reshape and let it air dry completely. For machine washing, place it in a laundry bag on a delicate cycle with cold water, and then air dry.
Our Top Recommended Finds
Having the right tools makes all the difference in your crochet journey. These items can elevate your crafting experience.
- Ergonomic Crochet Hook Set: A set with comfortable handles reduces hand fatigue, allowing you to crochet for longer periods without discomfort.
- Stitch Markers: Essential for keeping track of your rounds and preventing miscounts, especially when working in a spiral.
- Yarn Needle Set: A variety of blunt-tipped needles helps you seamlessly weave in ends and attach components without splitting yarn.
Your Next Creative Adventure Awaits
You’ve just created a charming crocheted jellyfish, a testament to your growing skills! This project is a wonderful foundation for exploring more amigurumi patterns.
Why not try making a small octopus next, or perhaps a starfish? The techniques you’ve learned here, like magic rings, increases, and decreases, are fundamental to countless other projects. Keep practicing, keep creating, and most importantly, keep enjoying the magic of crochet!