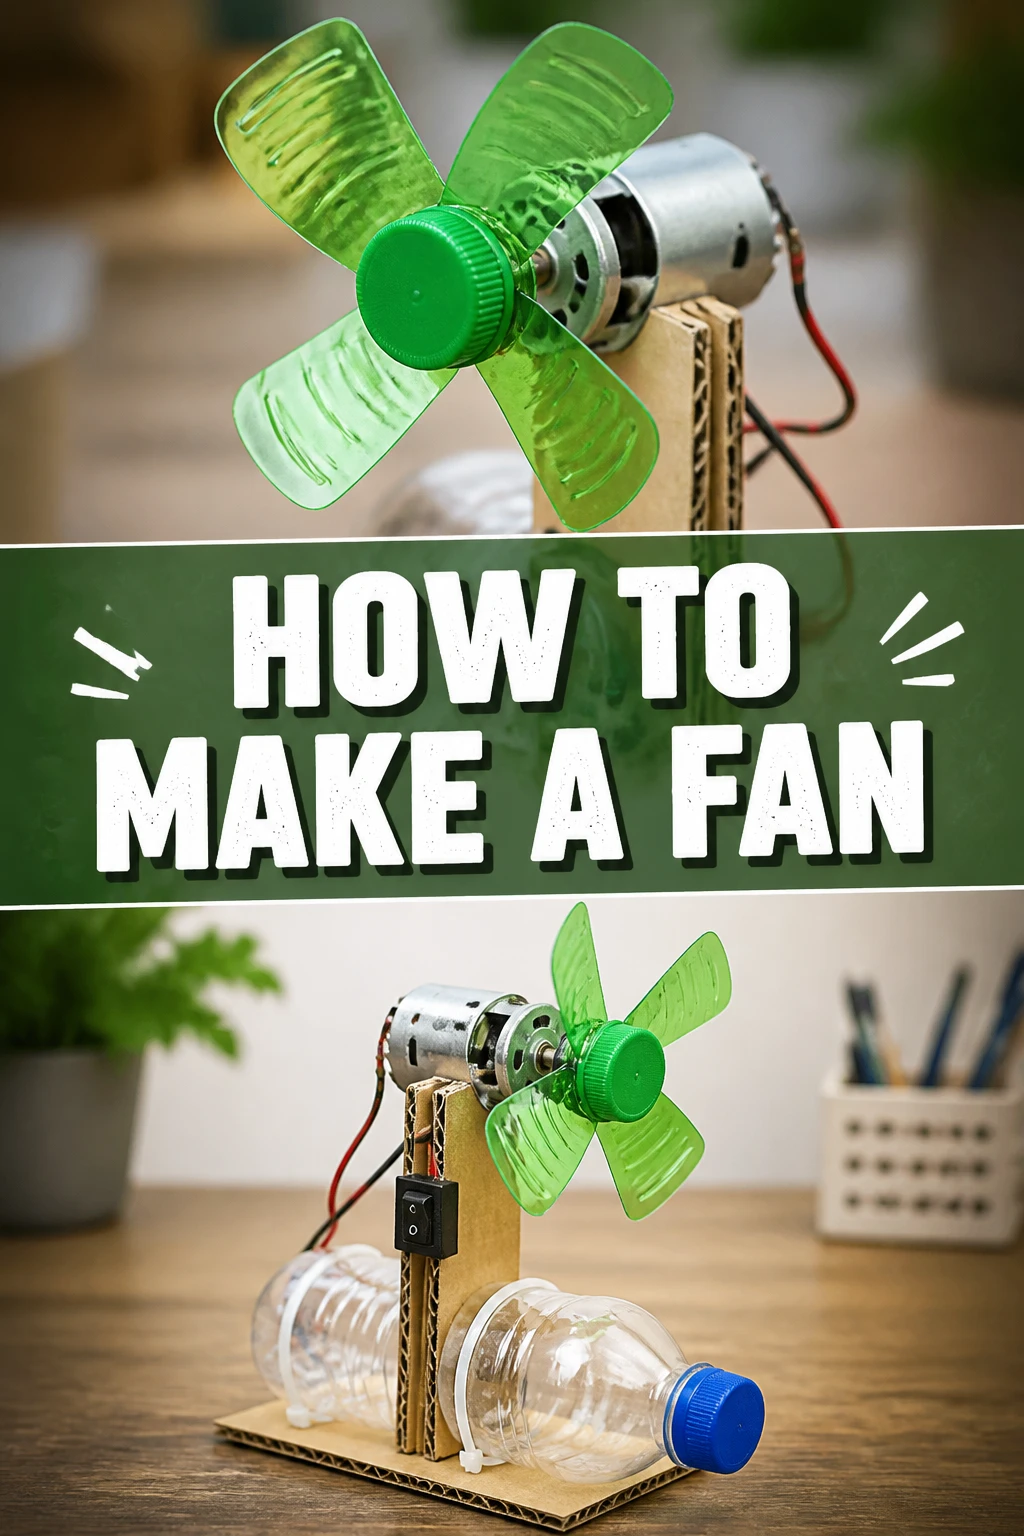
🌬️ How To Make A Fan
Remember that sweltering summer day when your AC broke, and you wished for a simple breeze?
I’ve been there, frantically trying to cool down with anything I could find.
This guide comes from my own experiments in DIY cooling, born out of necessity and a bit of curiosity, offering practical, tested steps to create your own functional fan.
Quick Overview
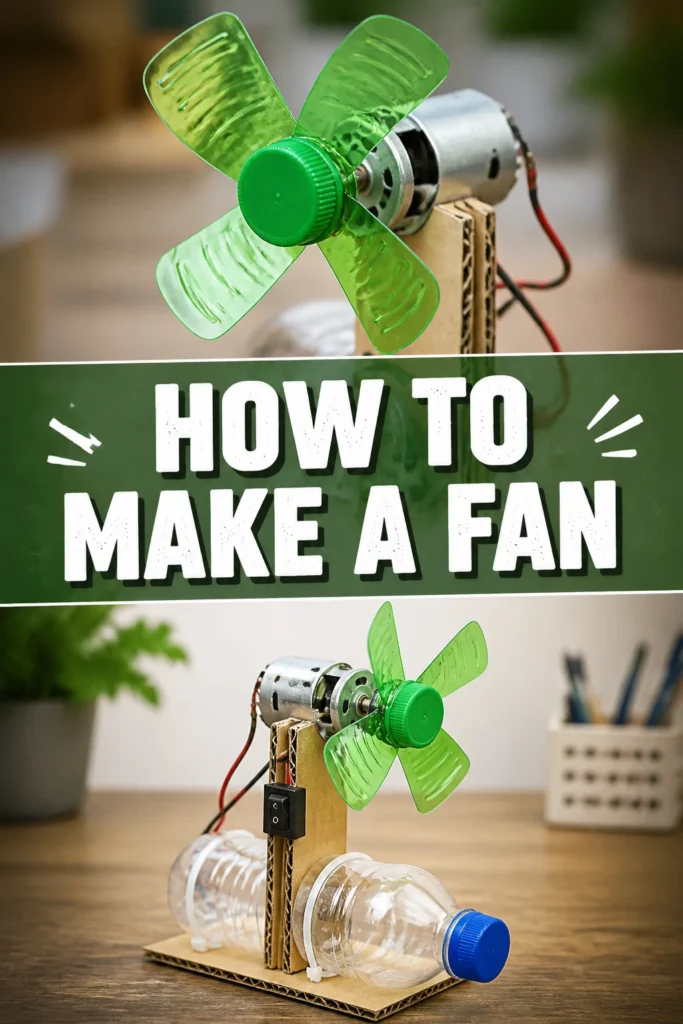
You’re about to embark on a rewarding project, building a simple yet effective fan that can provide a much-needed airflow wherever you need it.
This guide breaks down the process into manageable steps, ensuring you gain hands-on experience and a useful tool.
- Time needed: 1-2 hours (depending on material preparation)
- Difficulty: Beginner
- What you’ll need: Small DC motor, battery holder and batteries, plastic fan blades, wires, an on/off switch, and housing materials like cardboard or plastic.
Step-by-Step Instructions
Step 1: Gather Your Materials
Collect all necessary items before you begin. Having everything neatly laid out streamlines the building process and prevents interruptions, allowing for a smoother workflow.
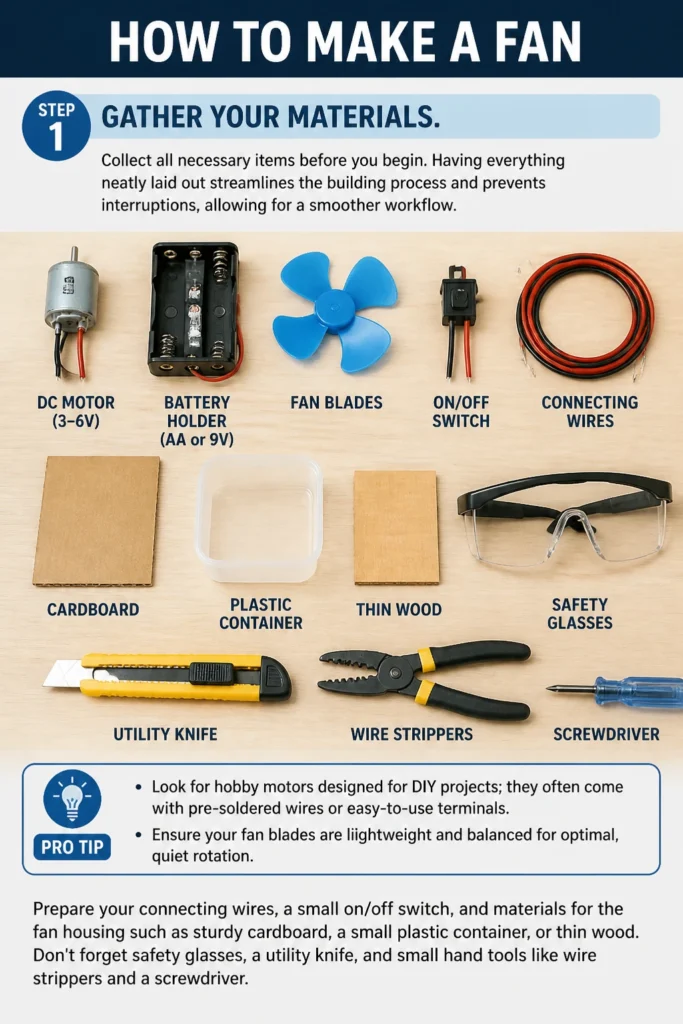
You’ll need a small DC motor, typically 3-6V, which is common for hobby projects. A battery holder compatible with AA or 9V batteries will provide the power source.
Pro Tip: Look for hobby motors designed for DIY projects; they often come with pre-soldered wires or easy-to-use terminals. Ensure your fan blades are lightweight and balanced for optimal, quiet rotation.
Prepare your connecting wires, a small on/off switch, and materials for the fan housing such as sturdy cardboard, a small plastic container, or thin wood. Don’t forget safety glasses, a utility knife, and small hand tools like wire strippers and a screwdriver.
Step 2: Prepare the Motor
Inspect your DC motor for any pre-attached wires or terminals. If there are no wires, you’ll need to carefully solder two wires to the motor’s terminals.
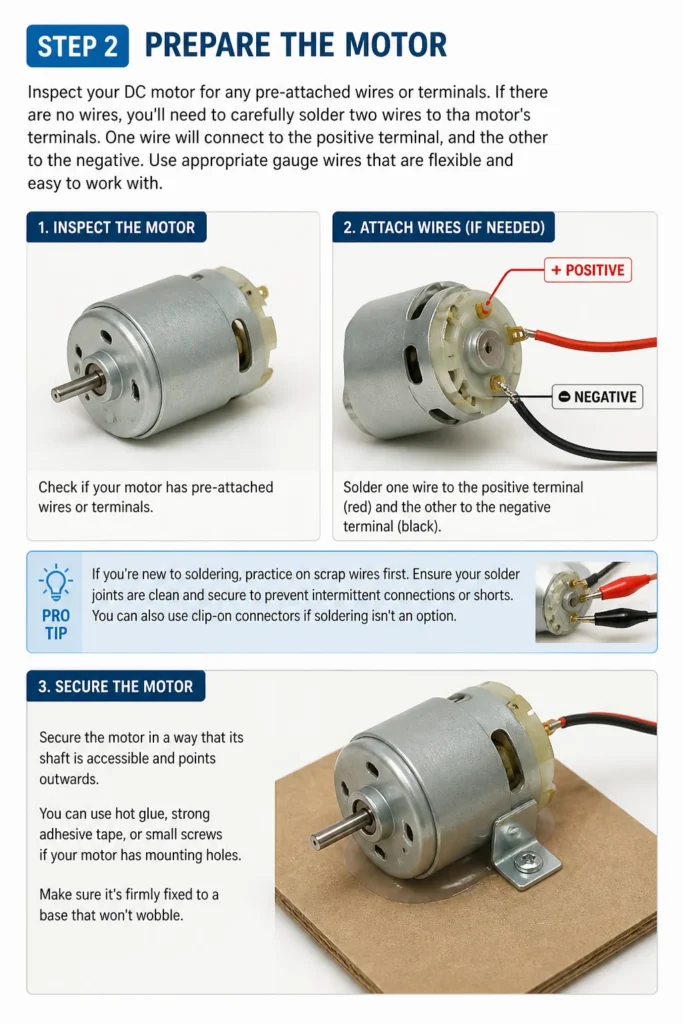
One wire will connect to the positive terminal, and the other to the negative. Use appropriate gauge wires that are flexible and easy to work with.
Pro Tip: If you’re new to soldering, practice on scrap wires first. Ensure your solder joints are clean and secure to prevent intermittent connections or shorts. You can also use clip-on connectors if soldering isn’t an option.
Secure the motor in a way that its shaft is accessible and points outwards. You can use hot glue, strong adhesive tape, or small screws if your motor has mounting holes. Make sure it’s firmly fixed to a base that won’t wobble.
Step 3: Attach Fan Blades
Mount the fan blades onto the motor shaft. Most small DC motors have a D-shaped or round shaft, and many fan blades come with a hub designed to fit these.
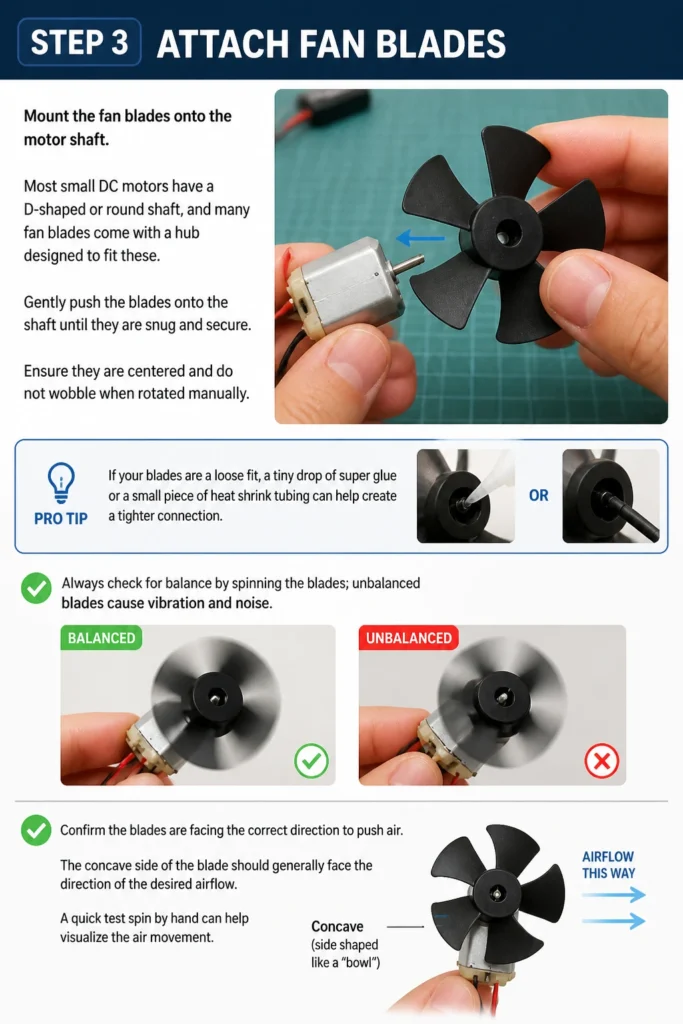
Gently push the blades onto the shaft until they are snug and secure. Ensure they are centered and do not wobble when rotated manually.
Pro Tip: If your blades are a loose fit, a tiny drop of super glue or a small piece of heat shrink tubing can help create a tighter connection. Always check for balance by spinning the blades; unbalanced blades cause vibration and noise.
Confirm the blades are facing the correct direction to push air. The concave side of the blade should generally face the direction of the desired airflow. A quick test spin by hand can help visualize the air movement.
Step 4: Connect the Power Source
Wire the battery holder to your motor. Connect one wire from the motor to one terminal of your on/off switch.
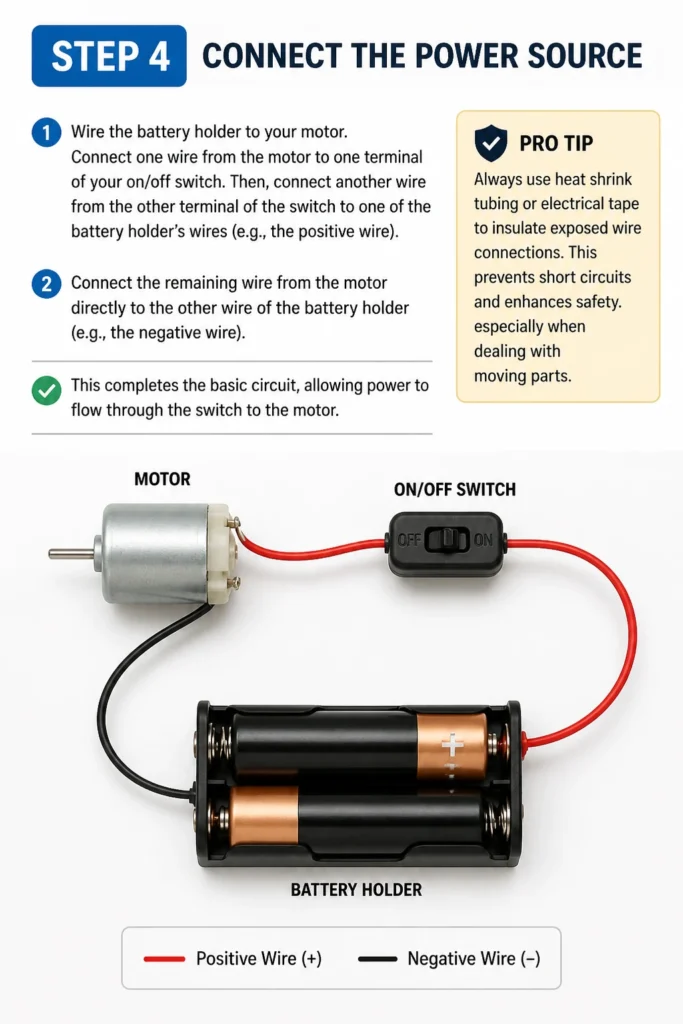
Then, connect another wire from the other terminal of the switch to one of the battery holder’s wires (e.g., the positive wire).
Pro Tip: Always use heat shrink tubing or electrical tape to insulate exposed wire connections. This prevents short circuits and enhances safety, especially when dealing with moving parts.
Connect the remaining wire from the motor directly to the other wire of the battery holder (e.g., the negative wire). This completes the basic circuit, allowing power to flow through the switch to the motor.
Step 5: Add a Switch
Integrate the on/off switch into your circuit. As mentioned, one wire from the motor should pass through the switch before reaching the battery holder’s positive terminal.
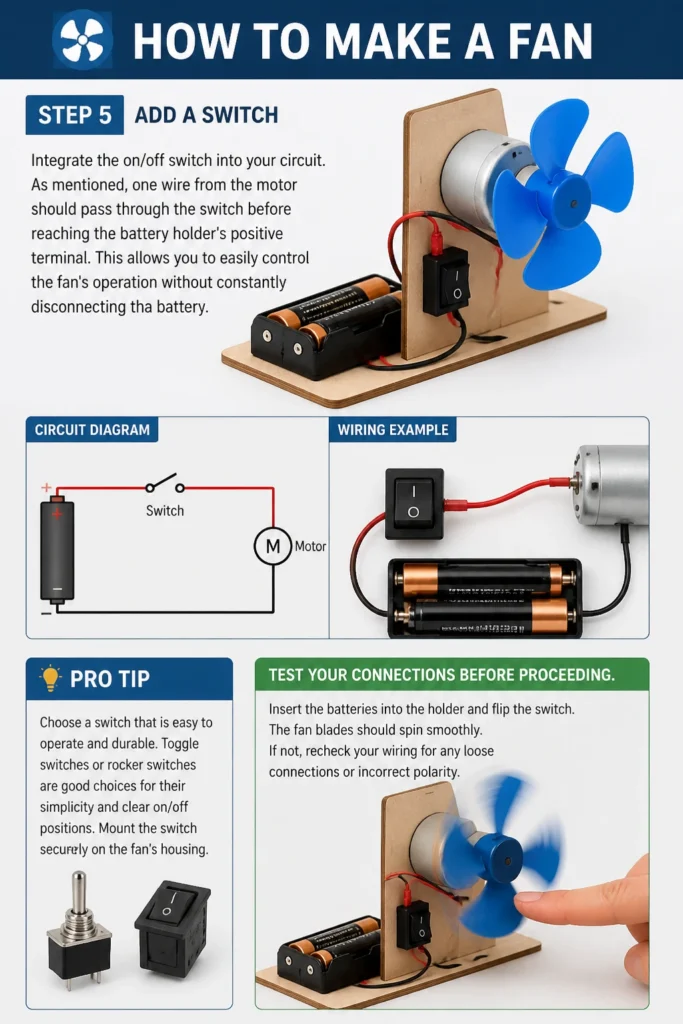
This allows you to easily control the fan’s operation without constantly disconnecting the battery.
Pro Tip: Choose a switch that is easy to operate and durable. Toggle switches or rocker switches are good choices for their simplicity and clear on/off positions. Mount the switch securely on the fan’s housing.
Test your connections before proceeding. Insert the batteries into the holder and flip the switch. The fan blades should spin smoothly. If not, recheck your wiring for any loose connections or incorrect polarity.
Step 6: Build the Housing
Design and construct a protective housing for your fan. This housing serves multiple purposes: it protects the motor and wiring, directs the airflow, and provides stability.
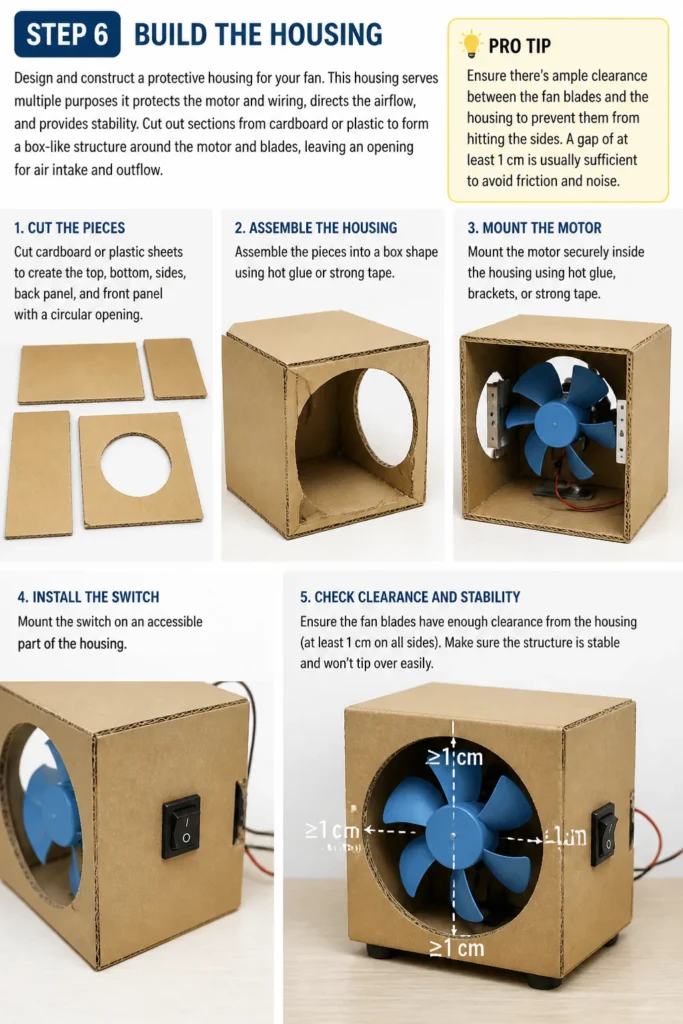
Cut out sections from cardboard or plastic to form a box-like structure around the motor and blades, leaving an opening for air intake and outflow.
Pro Tip: Ensure there’s ample clearance between the fan blades and the housing to prevent them from hitting the sides. A gap of at least 1 cm is usually sufficient to avoid friction and noise.
Mount the motor securely within this housing. You can use hot glue, strong double-sided tape, or small brackets. The switch should also be mounted on an accessible part of the housing. Make sure the structure is stable and won’t tip over easily.
Step 7: Test Your Fan
Perform a comprehensive test of your newly built fan. Place it on a flat, stable surface and switch it on. Observe the fan’s operation carefully.
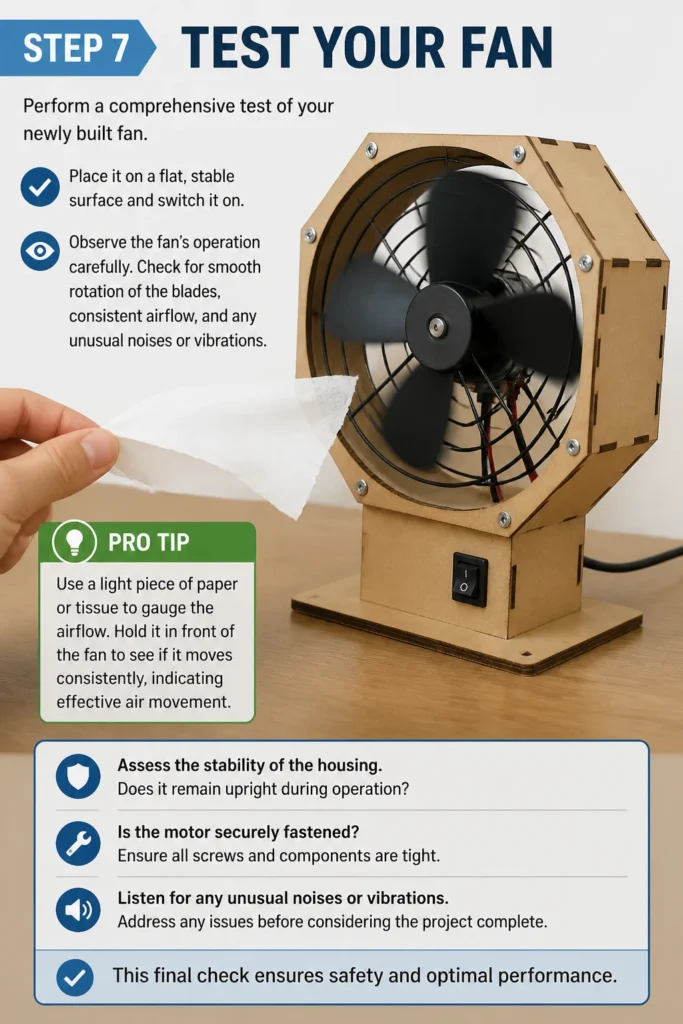
Check for smooth rotation of the blades, consistent airflow, and any unusual noises or vibrations.
Pro Tip: Use a light piece of paper or tissue to gauge the airflow. Hold it in front of the fan to see if it moves consistently, indicating effective air movement.
Assess the stability of the housing. Does it remain upright during operation? Is the motor securely fastened? Address any issues before considering the project complete. This final check ensures safety and optimal performance.
Step 8: Refine and Secure
Reinforce any weak points in your housing or connections. Add extra glue or tape where needed to ensure everything is solid and durable.
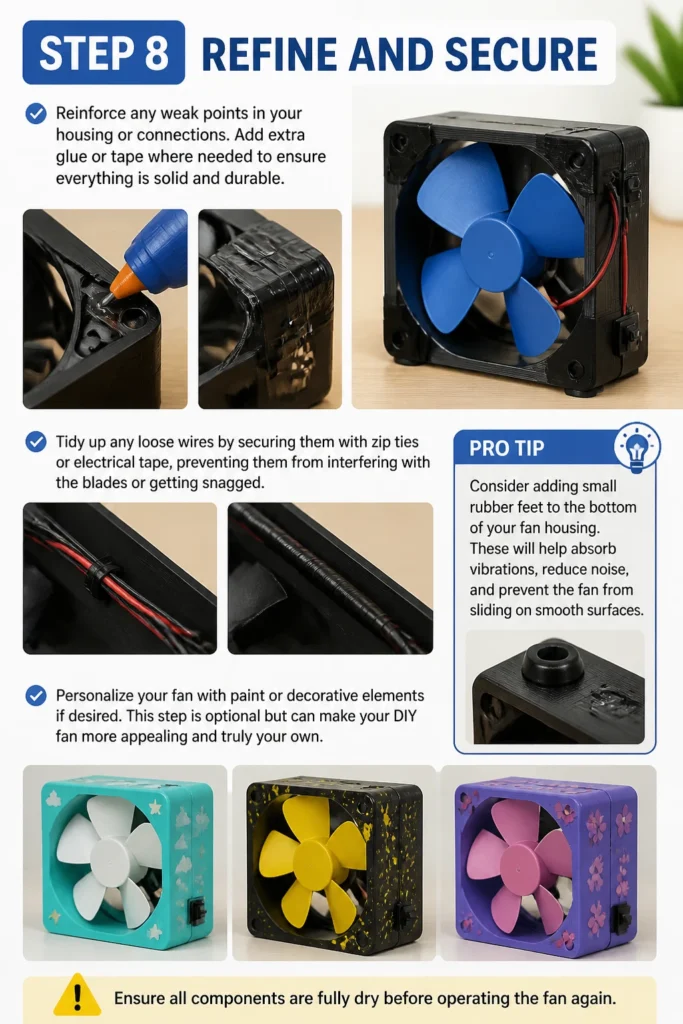
Tidy up any loose wires by securing them with zip ties or electrical tape, preventing them from interfering with the blades or getting snagged.
Pro Tip: Consider adding small rubber feet to the bottom of your fan housing. These will help absorb vibrations, reduce noise, and prevent the fan from sliding on smooth surfaces.
Personalize your fan with paint or decorative elements if desired. This step is optional but can make your DIY fan more appealing and truly your own. Ensure all components are fully dry before operating the fan again.
Common Mistakes to Avoid
Improper Blade Attachment
A common mistake is not securing the fan blades properly to the motor shaft. If the blades are loose, they can wobble excessively, creating noise and reducing airflow. In severe cases, they might even fly off during operation, posing a safety risk.
Always ensure the blades are pushed firmly onto the shaft and are centered. If necessary, use a small amount of adhesive or a piece of heat shrink tubing to create a tighter, more stable connection.
Incorrect Wiring
Connecting wires incorrectly is another frequent pitfall. Reversing the polarity can cause the motor to spin in the wrong direction, pushing air away from you instead of towards you. Loose connections might prevent the fan from turning on at all or cause intermittent operation.
Double-check all your wiring against a simple circuit diagram. Ensure positive goes to positive, and negative to negative, often indicated by wire colors. Secure all connections tightly, preferably by soldering and insulating with heat shrink tubing.
Unstable Housing
Neglecting to build a stable housing for the fan can lead to problems. A flimsy or poorly balanced housing might cause the fan to tip over during operation, especially if the motor or blades create vibrations. This can damage the fan or whatever it falls onto.
Design your housing with a wide, stable base. Use sturdy materials like thick cardboard, wood, or rigid plastic. Ensure the motor is centrally mounted and the overall weight distribution helps keep the fan upright.
Overloading the Motor
Using blades that are too large or heavy for your chosen motor can overload it. An overloaded motor will draw too much current, heat up excessively, and may have a significantly reduced lifespan. It might also spin too slowly, providing little airflow.
Always match the size and weight of your fan blades to the specifications of your motor. Most small DC motors work best with lightweight plastic blades that are typically 5-10 cm in diameter. If the motor feels hot to the touch after a few minutes, your blades might be too demanding.
Troubleshooting
Fan Doesn’t Turn On
If your fan fails to start, first check your power source. Ensure the batteries are fresh and inserted correctly into the battery holder, with the correct polarity. Sometimes, batteries can be dead or inserted backwards.
Next, inspect all wire connections. Look for any loose wires, poor solder joints, or breaks in the insulation. Test the switch by bypassing it temporarily (connecting the wires directly) to see if the fan spins, which indicates a faulty switch.
Fan Vibrates Excessively
Excessive vibration usually points to an imbalance in the fan blades or an insecure motor mounting. Carefully examine the blades to ensure they are perfectly centered on the motor shaft and not bent or damaged.
If the blades are balanced, check how the motor is secured within its housing. It might be loose or mounted unevenly. Reinforce the motor’s attachment points with more adhesive or tighten any screws to eliminate movement.
Weak Airflow
If your fan spins but produces very little airflow, the issue could be related to the motor’s speed, blade angle, or an obstruction. First, confirm the blades are spinning in the correct direction to push air towards you.
Also, check that the blades are not too small or too flat for the motor’s speed. Some blades have a steeper pitch designed for better airflow. Ensure there are no obstructions around the fan’s intake or exhaust that might be impeding air movement.
Key Takeaways
- Material selection is crucial for both performance and safety.
- Secure and insulated electrical connections prevent short circuits and ensure reliable operation.
- Balanced fan blades are essential for minimizing vibration and maximizing airflow efficiency.
- Always prioritize safety by wearing protective gear and handling tools carefully.
- A stable housing not only protects components but also directs airflow effectively.
- Thorough testing and refining are vital steps to ensure your DIY fan works as intended.
Frequently Asked Questions
Can I use a larger motor?
Yes, you can use a larger motor, but be mindful of its voltage and current requirements. A larger motor will likely need a more substantial power source (e.g., more batteries or a higher voltage battery pack) and may require sturdier housing materials to handle its increased power and potential vibrations.
How can I make it portable?
To make your fan portable, focus on a compact design and a self-contained power source. Use a small battery pack (like a 9V battery or a small Li-ion pack) and build a lightweight, durable housing. Adding a handle or a clip can further enhance its portability.
What if I don’t have pre-made blades?
You can craft your own blades from stiff plastic sheets, thin aluminum, or even sturdy cardboard. Cut out a circular shape and then create evenly spaced cuts from the edge towards the center, bending each section slightly to form an airfoil. Ensure they are balanced and securely attached to the motor shaft.
Is it safe to leave running?
A well-constructed DIY fan using low-voltage components is generally safe to leave running for extended periods. However, always monitor it for overheating, especially the motor. If the motor gets excessively hot, it indicates it might be overloaded or running too long, and you should switch it off.
Our Top Recommended Finds
- Mini DC Motor Kit: Often includes a motor, fan blades, and a battery holder, providing a convenient starting point for beginners.
- Heat Shrink Tubing Assortment: Essential for securely insulating electrical connections, preventing shorts, and giving your project a professional finish.
- Craft Knife Set with Cutting Mat: Provides precise tools for cutting housing materials like cardboard or plastic, ensuring clean edges and accurate construction.
Unleash Your Inner Innovator
You’ve just completed a fantastic project, transforming simple components into a functional fan. This hands-on experience builds confidence and practical skills.
Consider how you might expand on this. Perhaps you could explore adding a speed control switch, integrating a solar panel for power, or even designing a more aerodynamic housing.
Don’t stop here; let this project be the spark for your next creative endeavor. Start building and exploring today!