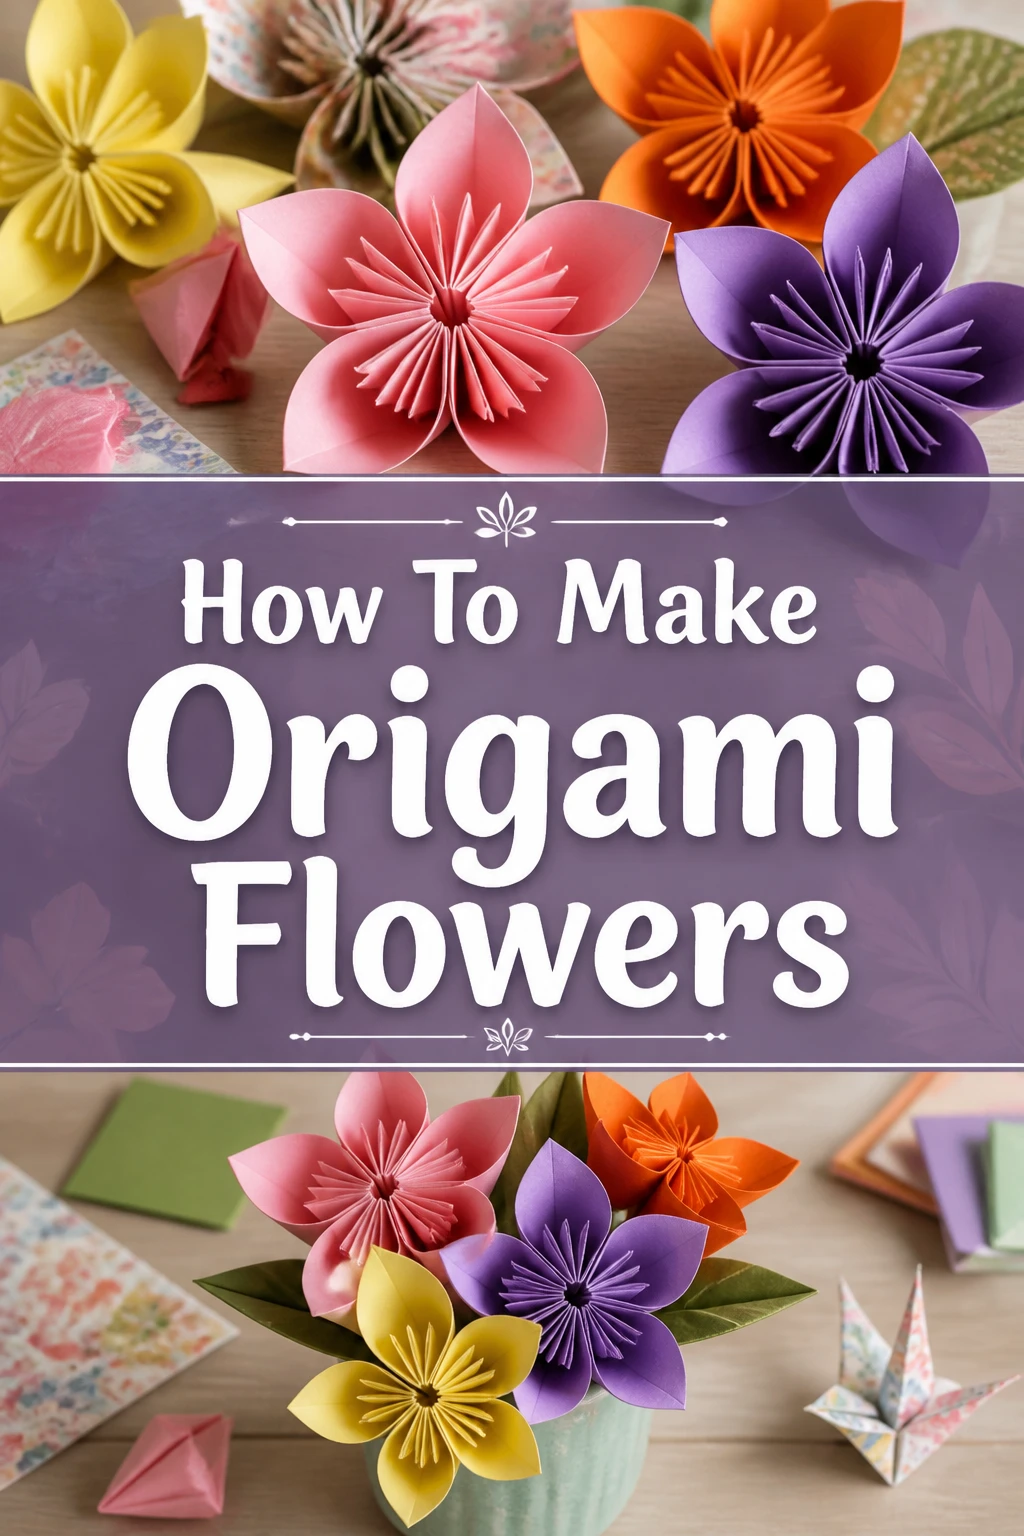
🌸 How To Make Origami Flowers
There’s a unique joy in transforming a simple sheet of paper into something beautiful. Origami flowers bring a touch of timeless elegance to any space. I still remember the quiet satisfaction of completing my very first paper bloom.
This guide shares everything I’ve learned to help you create your own stunning paper flowers. You’ll find the process incredibly rewarding and surprisingly simple.
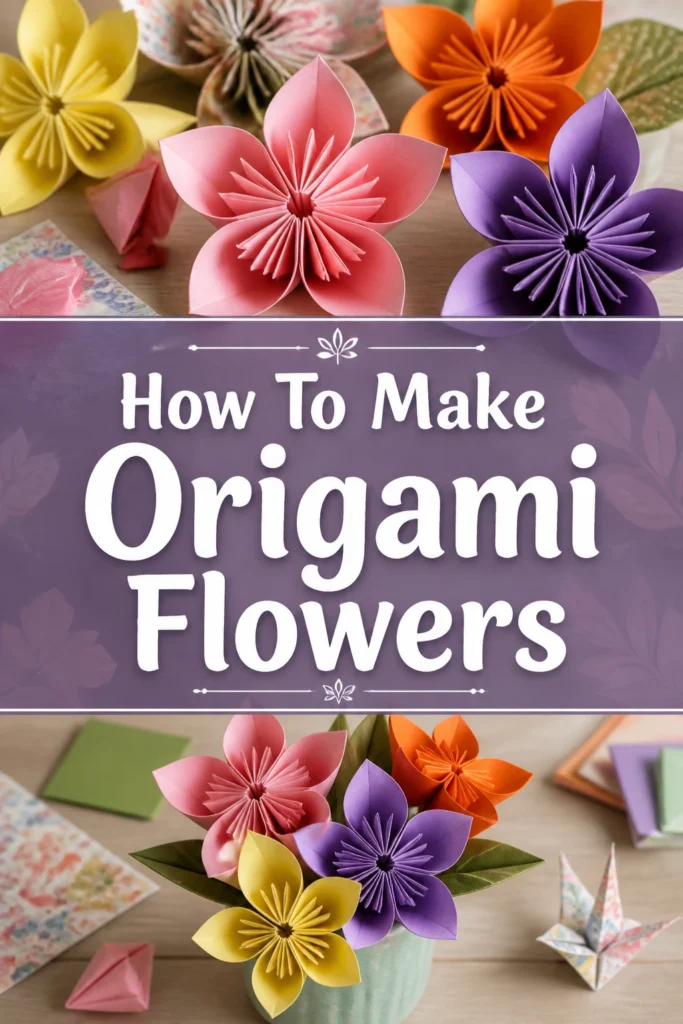
Quick Overview
You’re about to embark on a creative journey, crafting an exquisite origami lily that will impress and delight. This project will introduce you to fundamental origami techniques, building your confidence with each precise fold. By the end, you’ll have a beautiful, handmade flower ready to brighten your day or gift to a friend.
- Time needed: 30-45 minutes per flower
- Difficulty: Beginner-Intermediate
- What you’ll need: Square origami paper (6×6 inches recommended), a flat surface
Step-by-Step Instructions
Step 1: Prepare Your Paper
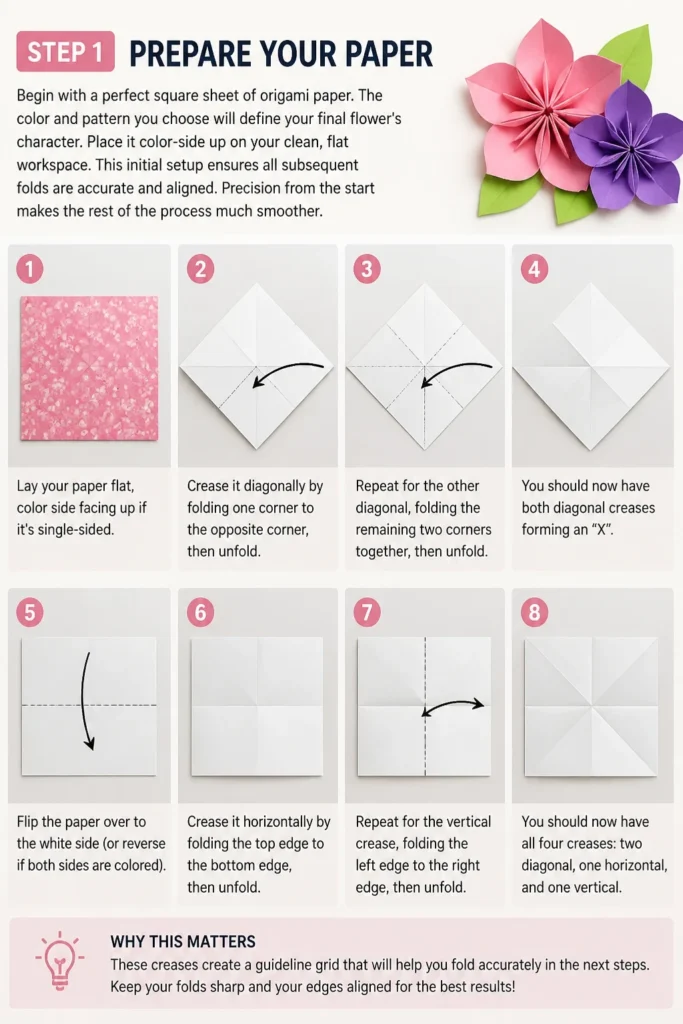
Begin with a perfect square sheet of origami paper. The color and pattern you choose will define your final flower’s character. Place it color-side up on your clean, flat workspace.
This initial setup ensures all subsequent folds are accurate and aligned. Precision from the start makes the rest of the process much smoother.
- Lay your paper flat, color side facing up if it’s single-sided.
- Crease it diagonally by folding one corner to the opposite corner, then unfold.
- Repeat for the other diagonal, folding the remaining two corners together, then unfold.
- Flip the paper over to the white side (or reverse if both sides are colored).
- Crease it horizontally by folding the top edge to the bottom edge, then unfold.
- Repeat for the vertical crease, folding the left edge to the right edge, then unfold.
Pro Tip: Always make your creases sharp and precise. Running your fingernail or a bone folder along the fold ensures clean lines, which are crucial for a well-formed flower.
Step 2: Form the Water Bomb Base
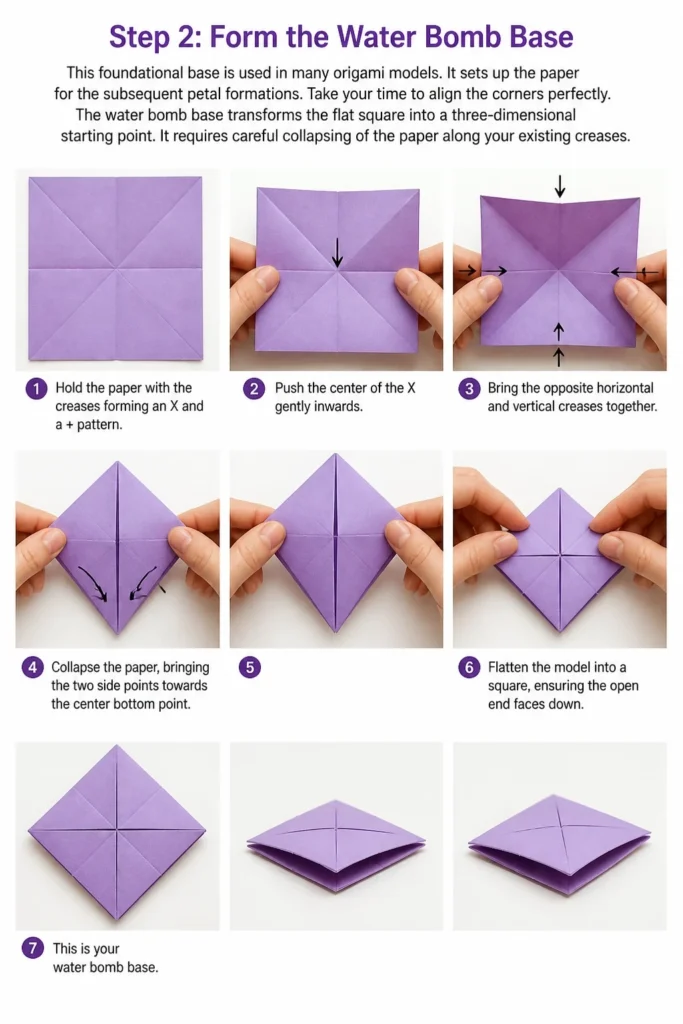
This foundational base is used in many origami models. It sets up the paper for the subsequent petal formations. Take your time to align the corners perfectly.
The water bomb base transforms the flat square into a three-dimensional starting point. It requires careful collapsing of the paper along your existing creases.
- Hold the paper with the creases forming an “X” and a “+” pattern.
- Push the center of the “X” gently inwards.
- Bring the opposite horizontal and vertical creases together.
- Collapse the paper, bringing the two side points towards the center bottom point.
- Flatten the model into a square, ensuring the open end faces down. This is your water bomb base.
Step 3: Create the Petal Folds
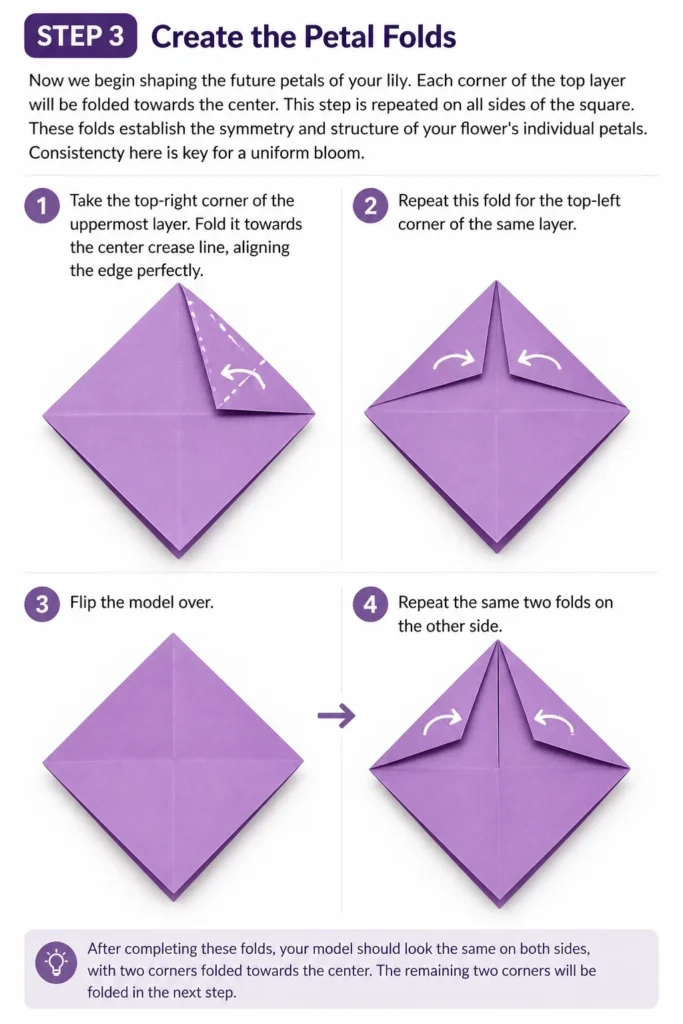
Now we begin shaping the future petals of your lily. Each corner of the top layer will be folded towards the center. This step is repeated on all sides of the square.
These folds establish the symmetry and structure of your flower’s individual petals. Consistency here is key for a uniform bloom.
- Take the top-right corner of the uppermost layer.
- Fold it towards the center crease line, aligning the edge perfectly.
- Repeat this fold for the top-left corner of the same layer.
- Flip the model over and repeat the same two folds on the other side.
Step 4: Fold Down the Top Triangle
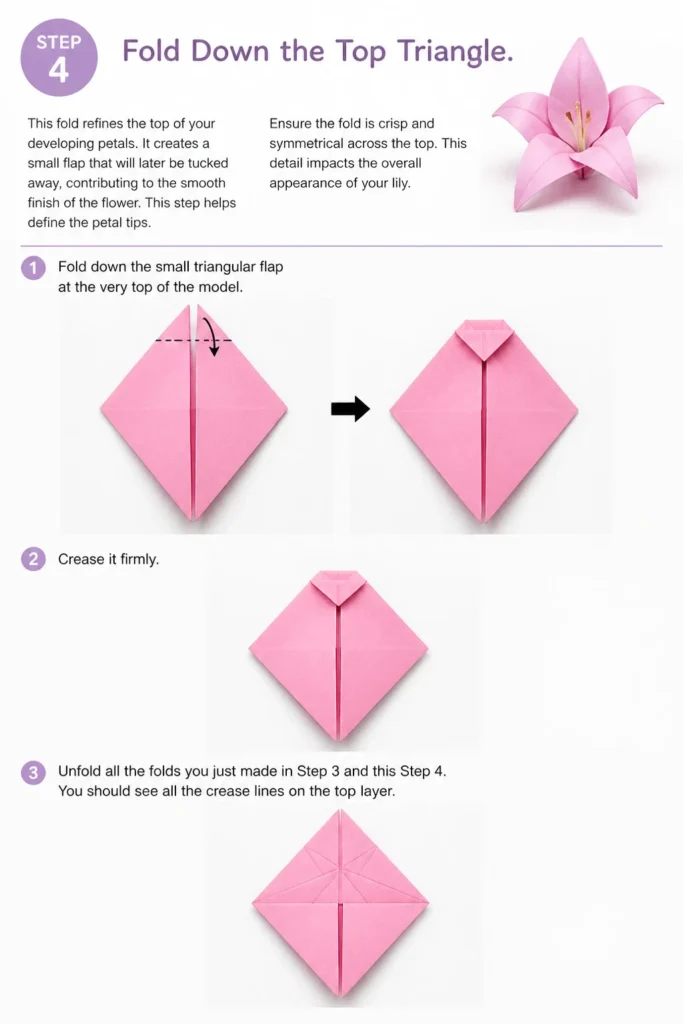
This fold refines the top of your developing petals. It creates a small flap that will later be tucked away, contributing to the smooth finish of the flower. This step helps define the petal tips.
Ensure the fold is crisp and symmetrical across the top. This detail impacts the overall appearance of your lily.
- Fold down the small triangular flap at the very top of the model.
- Crease it firmly.
- Unfold all the folds you just made in Step 3 and this Step 4. You should see all the crease lines on the top layer.
Step 5: Inside Reverse Folds for Petals
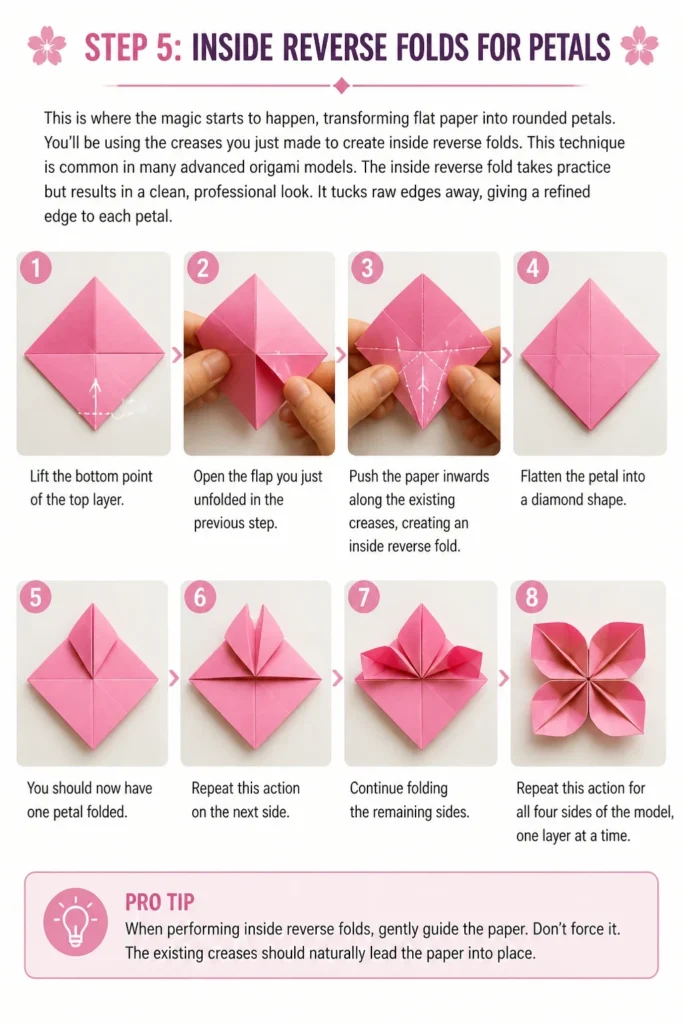
This is where the magic starts to happen, transforming flat paper into rounded petals. You’ll be using the creases you just made to create inside reverse folds. This technique is common in many advanced origami models.
The inside reverse fold takes practice but results in a clean, professional look. It tucks raw edges away, giving a refined edge to each petal.
- Lift the bottom point of the top layer.
- Open the flap you just unfolded in the previous step.
- Push the paper inwards along the existing creases, creating an inside reverse fold.
- Flatten the petal into a diamond shape.
- Repeat this action for all four sides of the model, one layer at a time.
Pro Tip: When performing inside reverse folds, gently guide the paper. Don’t force it. The existing creases should naturally lead the paper into position. If it resists, check your initial creases for accuracy.
Step 6: Narrow the Petals
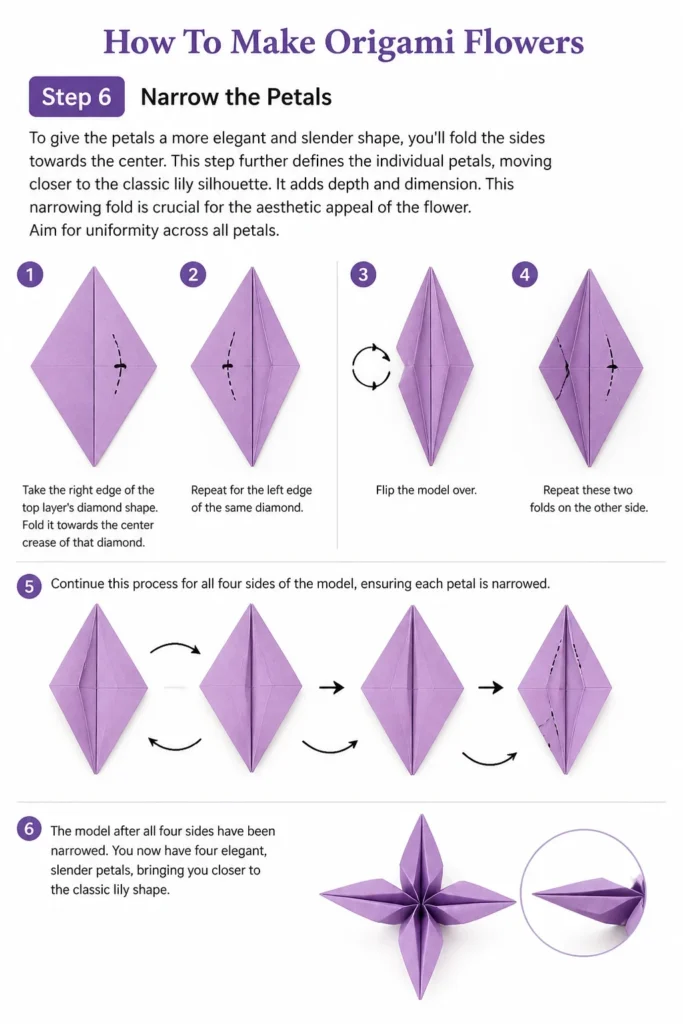
To give the petals a more elegant and slender shape, you’ll fold the sides towards the center. This step further defines the individual petals, moving closer to the classic lily silhouette. It adds depth and dimension.
This narrowing fold is crucial for the aesthetic appeal of the flower. Aim for uniformity across all petals.
- Take the right edge of the top layer’s diamond shape.
- Fold it towards the center crease of that diamond.
- Repeat for the left edge of the same diamond.
- Flip the model over and repeat these two folds on the other side.
- Continue this process for all four sides of the model, ensuring each petal is narrowed.
Step 7: Form the Petal Tips
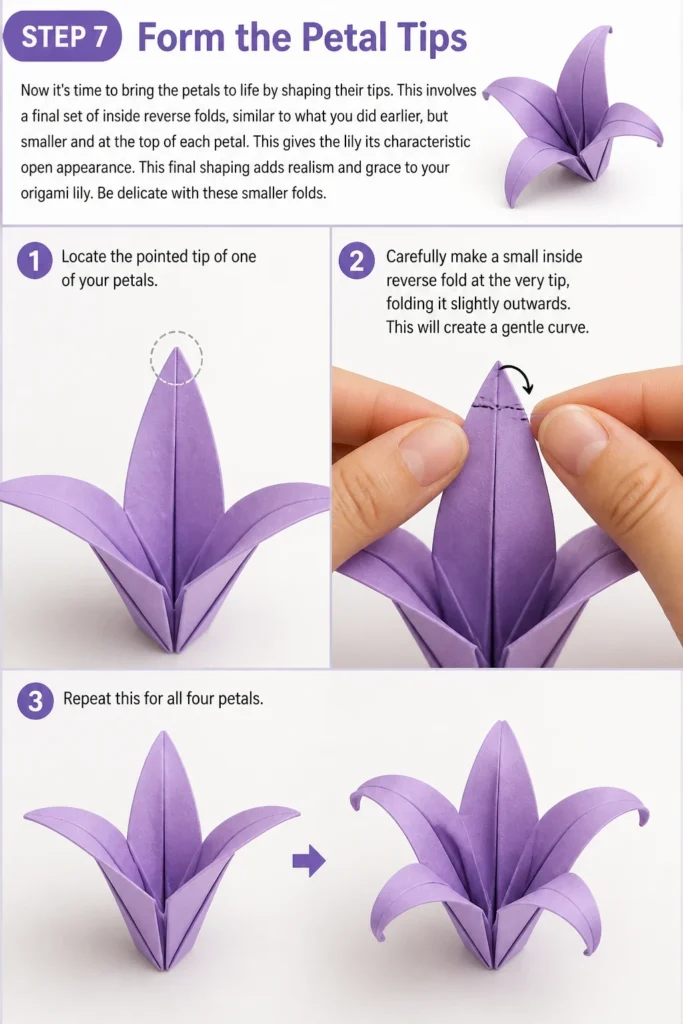
Now it’s time to bring the petals to life by shaping their tips. This involves a final set of inside reverse folds, similar to what you did earlier, but smaller and at the top of each petal. This gives the lily its characteristic open appearance.
This final shaping adds realism and grace to your origami lily. Be delicate with these smaller folds.
- Locate the pointed tip of one of your petals.
- Carefully make a small inside reverse fold at the very tip, folding it slightly outwards. This will create a gentle curve.
- Repeat this for all four petals.
Step 8: Curl the Petals and Finish
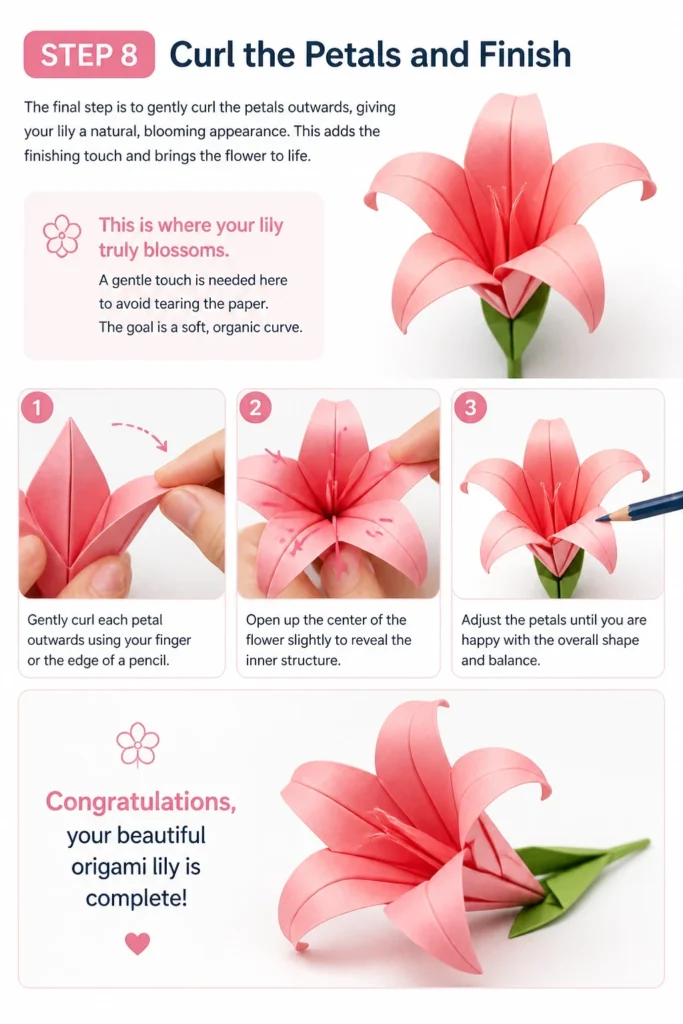
The final step is to gently curl the petals outwards, giving your lily a natural, blooming appearance. This adds the finishing touch and brings the flower to life. This is where your lily truly blossoms.
A gentle touch is needed here to avoid tearing the paper. The goal is a soft, organic curve.
- Gently curl each petal outwards using your finger or the edge of a pencil.
- Open up the center of the flower slightly to reveal the inner structure.
- Adjust the petals until you are happy with the overall shape and balance.
Congratulations, your beautiful origami lily is complete!
Common Mistakes to Avoid
Rushing Your Folds
Origami is an art of patience and precision. Rushing often leads to misaligned edges and sloppy creases, making subsequent steps harder to execute correctly. Take your time with each fold, ensuring edges meet perfectly before creasing firmly. A slow, deliberate approach yields much better results.
Ignoring Crease Accuracy
The initial creases are the foundation of your entire model. If the first diagonal or horizontal folds are off, every subsequent fold will inherit that inaccuracy, leading to a lopsided or incorrect final shape. Always double-check that corners and edges align precisely before pressing down on a crease. Good foundations make for good structures.
Using the Wrong Paper
While you can technically fold any paper, standard printer paper is often too thick and stiff for intricate origami, making clean folds difficult and prone to tearing. Very thin paper can be too flimsy. Opt for dedicated origami paper, which is designed for crisp folds, holds its shape, and comes in ideal weights and sizes.
Not Flattening Bases Properly
When forming bases like the water bomb, it’s crucial to flatten them completely and evenly. If the base isn’t flat and square, the dimensions for the petals will be off, resulting in an asymmetrical flower. Press down firmly and ensure all layers are evenly distributed.
Troubleshooting
My Petals Are Uneven
Uneven petals usually stem from inconsistent folding in earlier steps, especially when creating the water bomb base or the initial petal folds. Go back and check if all sides of your base were truly symmetrical. For future attempts, focus on making each fold identical to its counterpart. Sometimes, gently unfolding and refolding a specific petal can help correct minor discrepancies.
The Paper Tears When I Fold
Tearing can happen if the paper is too thick, if you’re forcing a fold, or if you’re trying to make an overly sharp crease on a weak point. Ensure you’re using appropriate origami paper. When folding, apply gentle, even pressure rather than a sudden, harsh press. If a fold feels too resistant, double-check that you’re following the instructions correctly and not trying to fold through too many layers at once.
My Flower Doesn’t Look Like a Lily
If your flower doesn’t quite resemble a lily, it might be due to a misunderstanding of a specific fold or a lack of definition in the petal shaping. Review the inside reverse fold steps carefully, as these are critical for forming the petals. Also, ensure you’ve curled the petals outwards in the final step to give it that characteristic open bloom. Practice makes perfect, and reviewing video tutorials can often clarify tricky steps.
Key Takeaways
- Precision in initial creases is fundamental for a well-formed origami flower.
- The water bomb base is a key starting point for many floral designs.
- Inside reverse folds are essential for creating defined, professional-looking petals.
- Patience and gentle handling of the paper prevent tears and ensure clean results.
- Consistency in folding all sides of the model leads to a symmetrical and beautiful bloom.
- The final curling step adds a realistic, dynamic touch to your finished flower.
Frequently Asked Questions
Can I use any type of paper for origami flowers?
While you can experiment, traditional origami paper is highly recommended. It’s specifically designed to hold creases well and isn’t too thick or thin, making the folding process much smoother and the final product more refined. Craft paper or decorative scrapbook paper can also work if it’s not too heavy.
How can I make my origami flower last longer?
To preserve your origami flower, keep it away from direct sunlight, which can fade the colors, and moisture, which can warp the paper. You can also spray it with a clear, matte sealant spray (available at craft stores) to protect it from dust and humidity, though this might slightly alter the paper’s texture.
Are there easier origami flowers for beginners?
Absolutely! The origami tulip is a fantastic starting point for absolute beginners, often requiring fewer complex folds than a lily or rose. Once you master the tulip, the lily becomes a natural next step, building on similar basic techniques.
What if my paper keeps slipping during folds?
If your paper is slipping, ensure you’re working on a clean, dry, flat surface. A cutting mat or a piece of felt can sometimes provide a little more friction than a smooth tabletop. Also, ensure your hands are clean and dry, as any oils or moisture can make the paper harder to grip.
Our Top Recommended Finds
- Assorted Origami Paper Pack: Offers a variety of colors and patterns, perfect for experimenting and finding your favorite look.
- Bone Folder Tool: A simple tool that helps create incredibly crisp, clean creases without damaging the paper.
- Origami Book for Beginners: Provides visual guides and step-by-step instructions for many different models, including flowers.
Embrace Your Inner Botanist
You’ve just created something truly special, a testament to patience and creativity. This isn’t just a paper flower; it’s a piece of art born from your own hands. The world of origami is vast and full of possibilities, with countless designs waiting to be explored.
Why stop at one? Experiment with different paper sizes, colors, and even textures to create a whole bouquet. Share your creations with friends or use them to decorate your home. Let this be the start of a wonderful, paper-folding adventure.