🧺 How To Make A Basket
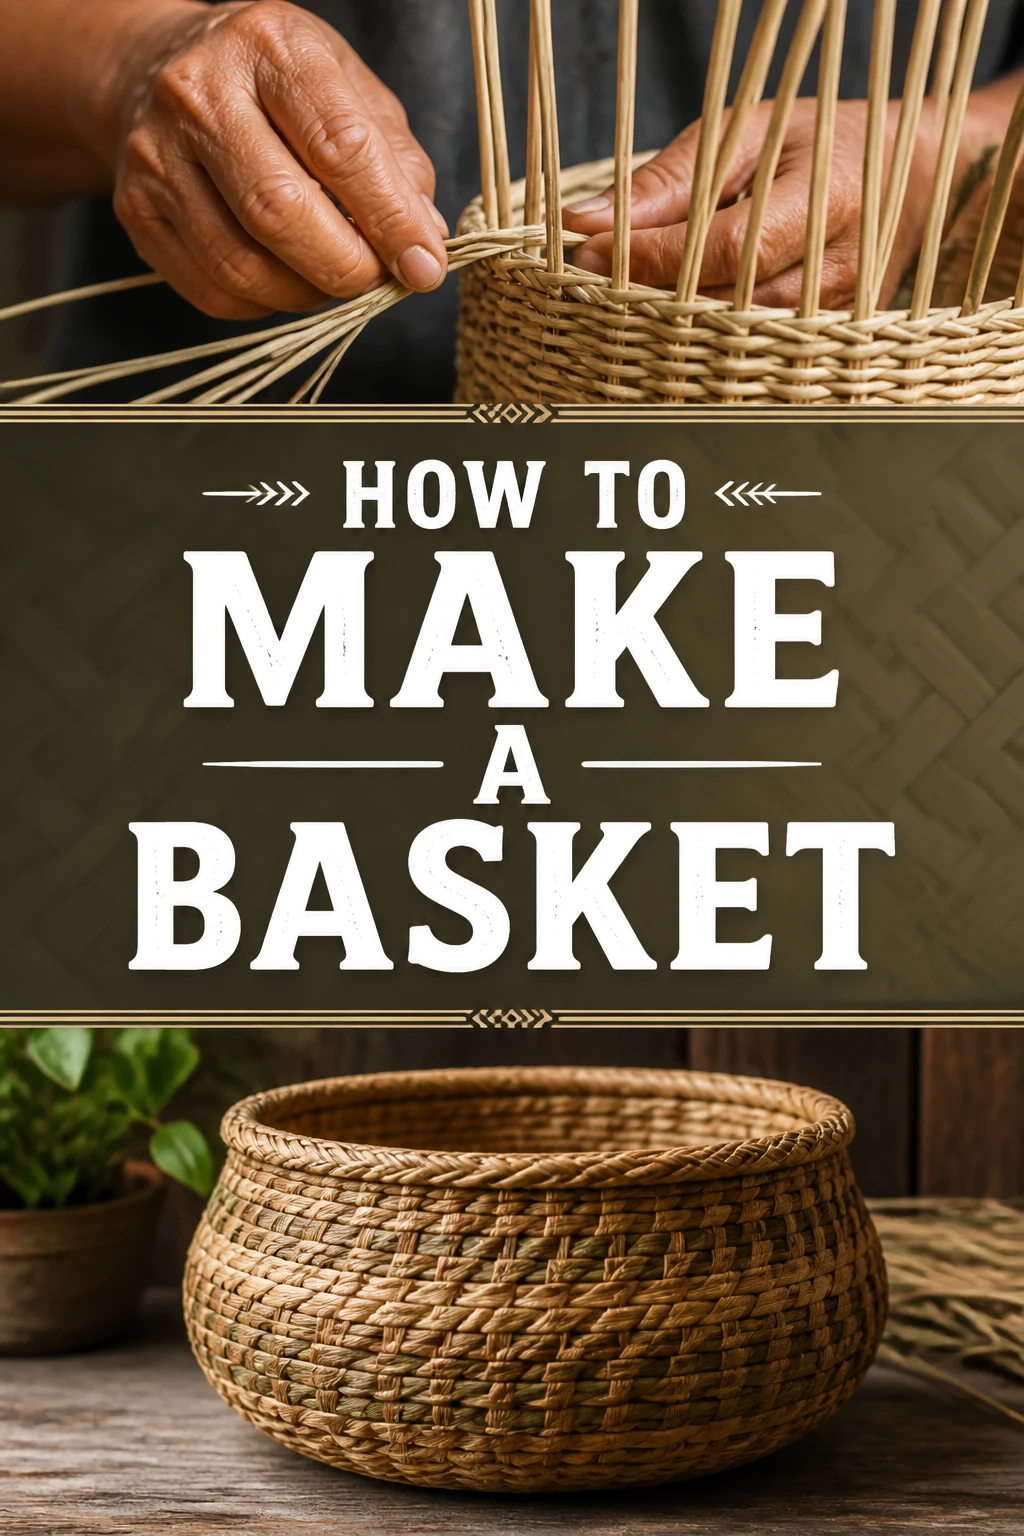
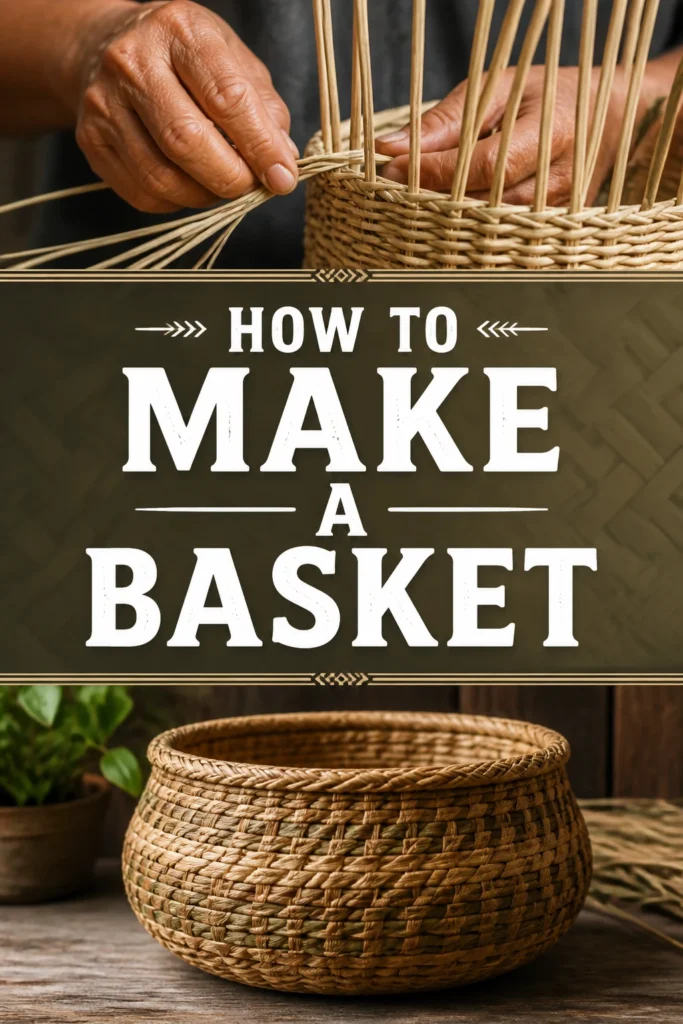
Imagine creating something beautiful and functional with your own hands. Basket making is a timeless craft, offering a unique blend of artistry and practicality. I’ve spent countless hours with reed and fiber, finding immense satisfaction in watching a simple pile of materials transform. This guide shares my experience to help you create your very first basket.
Quick Overview
By following these steps, you will learn the fundamental techniques to construct a sturdy and attractive woven basket. You’ll gain practical skills that can be applied to many other fiber arts projects. This guide focuses on a simple, round basket, perfect for beginners.
- Time needed: 4-8 hours (spread over 1-2 days for drying)
- Difficulty: Beginner
- What you’ll need: Flat oval reed for spokes, flat reed for weavers, round reed for rim, basketry clippers, ruler, awl, spray bottle, soaking tub, towel.
Step-by-Step Instructions
Step 1: Gather Your Materials and Prepare the Reed
Success in basketry starts with proper preparation. Having all your tools and materials ready prevents interruptions and makes the process smoother. Quality reed is essential for a good outcome.
Select your reed. For a beginner’s round basket, you’ll want flat oval reed for the base spokes, flat reed for the weavers, and a piece of round reed for the rim.
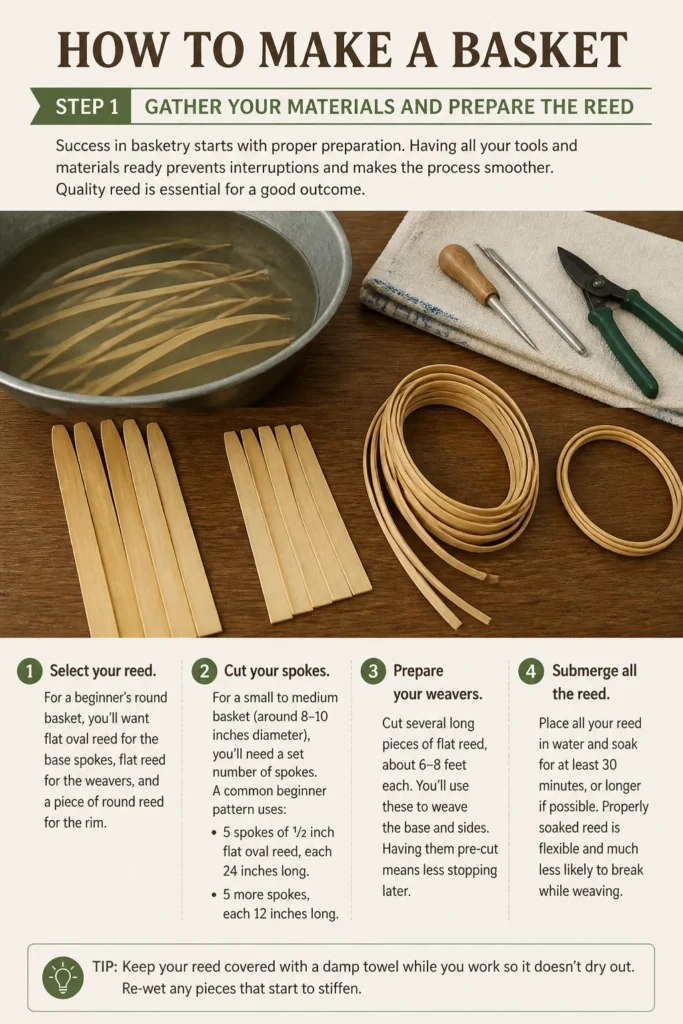
Cut your spokes. For a small to medium basket (around 8-10 inches diameter), you’ll need a set number of spokes. A common beginner pattern uses 5 spokes of 1/2 inch flat oval reed, each 24 inches long. You’ll also need 5 more spokes, each 12 inches long.
Prepare your weavers. Cut several long pieces of flat reed, about 6-8 feet each. You’ll use these to weave the base and sides. Having them pre-cut means less stopping later.
Submerge all your reed in warm water. Let it soak for at least 30 minutes, or until it becomes pliable and flexible. This is crucial for preventing breakage during weaving.
Pro Tip: Different types and thicknesses of reed require varying soaking times. Thicker reed might need an hour or more, while thinner reed softens faster. Always test a piece for flexibility before you begin.
Step 2: Create the Basket’s Base Structure
The base is the foundation of your basket. A strong, well-formed base ensures a stable and even finished product. Take your time with this initial setup.
Arrange your longer spokes. Lay five of the 24-inch flat oval spokes parallel on your work surface. These will form the core of your base.
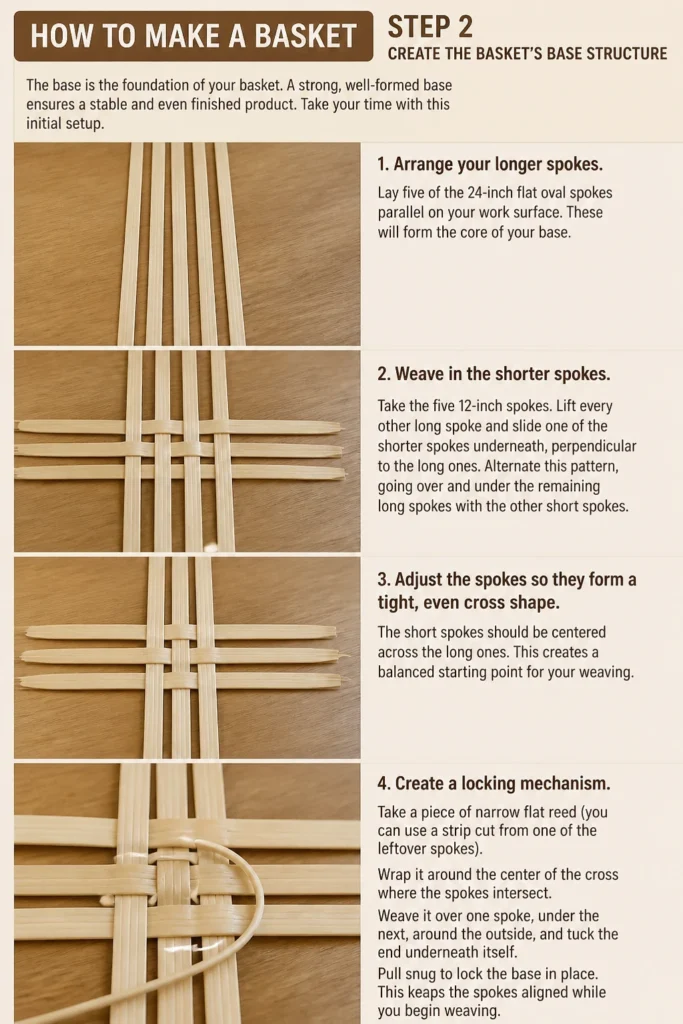
Weave in the shorter spokes. Take the five 12-inch spokes. Lift every other long spoke and slide one of the shorter spokes underneath, perpendicular to the long ones. Alternate this pattern, going over and under the remaining long spokes with the other short spokes.
Adjust the spokes so they form a tight, even cross shape. The short spokes should be centered across the long ones. This creates a balanced starting point for your weaving.
Create a “locking” mechanism. Take a piece of narrow flat reed (your first weaver) and fold it in half. Place the fold around one arm of the cross (either the long or short spokes). This secures your starting point.
Step 3: Weave the Base of the Basket
Weaving the base establishes the initial shape and size. Consistent tension is key here to avoid a lopsided base. You’ll be using a simple over-and-under technique.
Begin weaving with your first weaver. Starting from the folded weaver, bring one end over the next arm of spokes and the other end under it. This is called a “pairing weave” or “twining.”
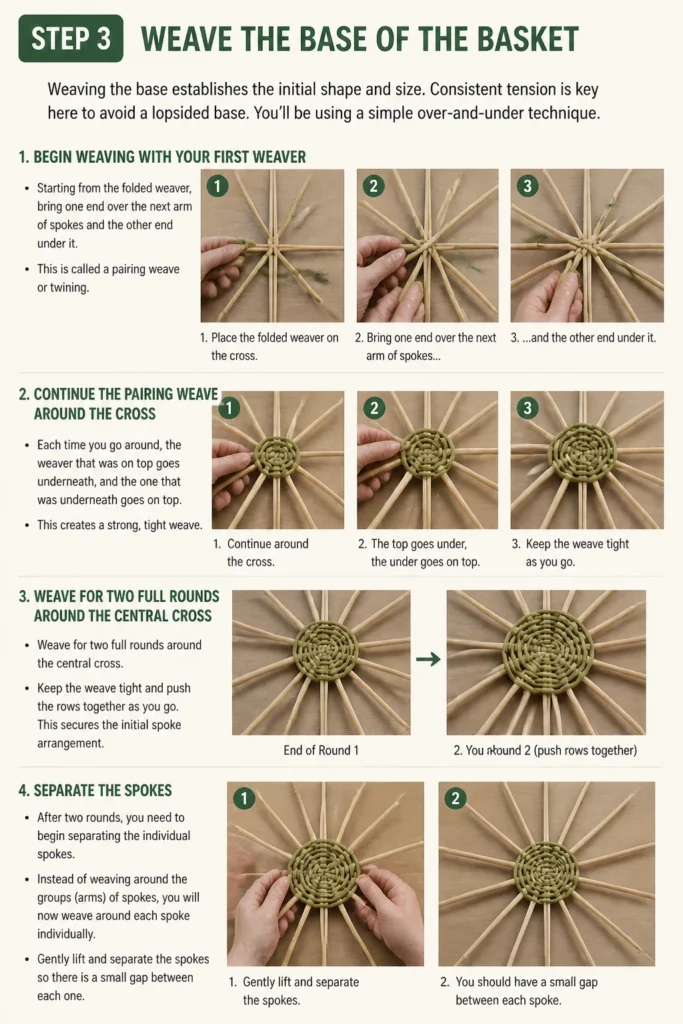
Continue the pairing weave around the cross. Each time you go around, the weaver that was on top goes underneath, and the one that was underneath goes on top. This creates a strong, tight weave.
Weave for two full rounds around the central cross. Keep the weave tight and push the rows together as you go. This secures the initial spoke arrangement.
Separate the spokes. After two rounds, you need to begin separating the individual spokes. Instead of weaving around bundles of 5, you will now weave around each single spoke.
Continue the pairing weave, going around each individual spoke. This will spread out your spokes evenly, like the spokes of a wheel.
Maintain consistent tension. As you weave, gently pull on the weavers to keep the reed taut. This prevents gaps and ensures a firm base.
Weave until your base reaches the desired diameter. For a small utility basket, 6-8 inches across is a good starting point. You will continue adding new weavers by overlapping the ends of old ones with new ones for about an inch.
Pro Tip: When joining a new weaver, always overlap the old and new pieces on the inside of the basket base. This hides the join and keeps the outside appearance neat.
Step 4: Upset the Spokes (Turn Up the Sides)
“Upsetting” the spokes is the process of bending them upwards to form the sides of the basket. This transition is crucial for creating the basket’s walls.
Re-soak your basket base if it has dried out. The spokes must be very pliable for this step to prevent cracking. A quick dip in warm water or a thorough spray with a water bottle works well.
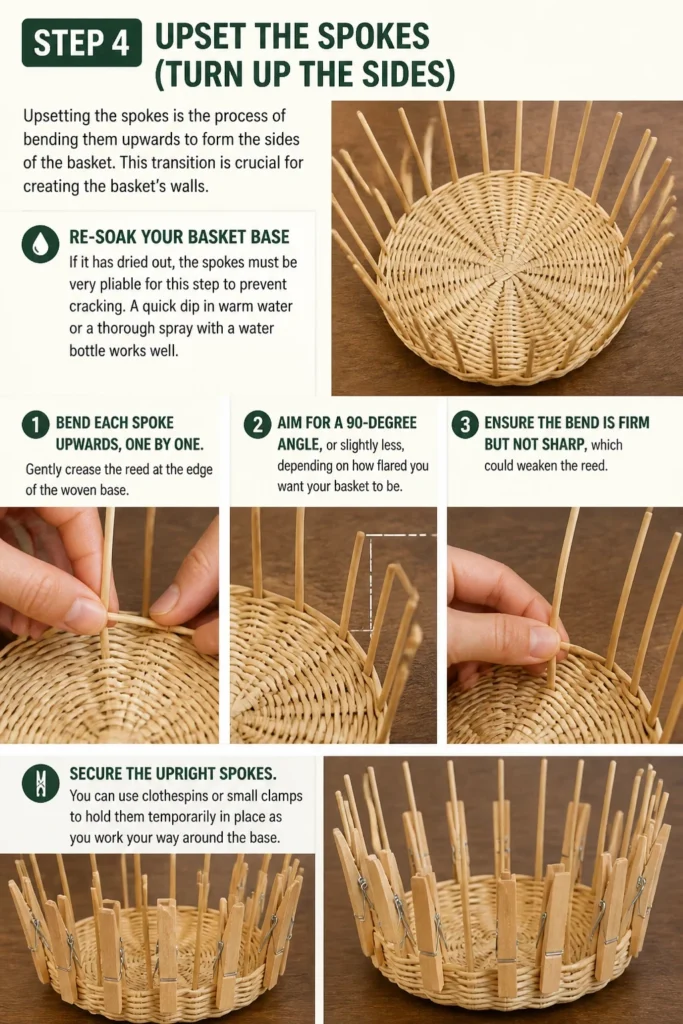
Bend each spoke upwards, one by one. Gently crease the reed at the edge of the woven base. Aim for a 90-degree angle, or slightly less, depending on how flared you want your basket to be.
Ensure the bend is firm but not sharp, which could weaken the reed. Use your thumb to support the spoke at the bend point as you carefully lift it.
Secure the upright spokes. You can use clothespins or small clamps to hold them temporarily in place as you work your way around the base. This helps maintain an even angle.
Pro Tip: For a truly even upset, you can use a flat, heavy object (like a book) to press down on the base while you lift each spoke. This creates a crisp, consistent corner.
Step 5: Weave the Sides of the Basket
Now the basket starts to take shape. This is where you build the walls, layer by layer, using a continuous weaving technique.
Choose your weaving pattern. For a beginner, a simple “over one, under one” weave (called plain weave or randing) is ideal. You’ll use your flat reed weavers for this.
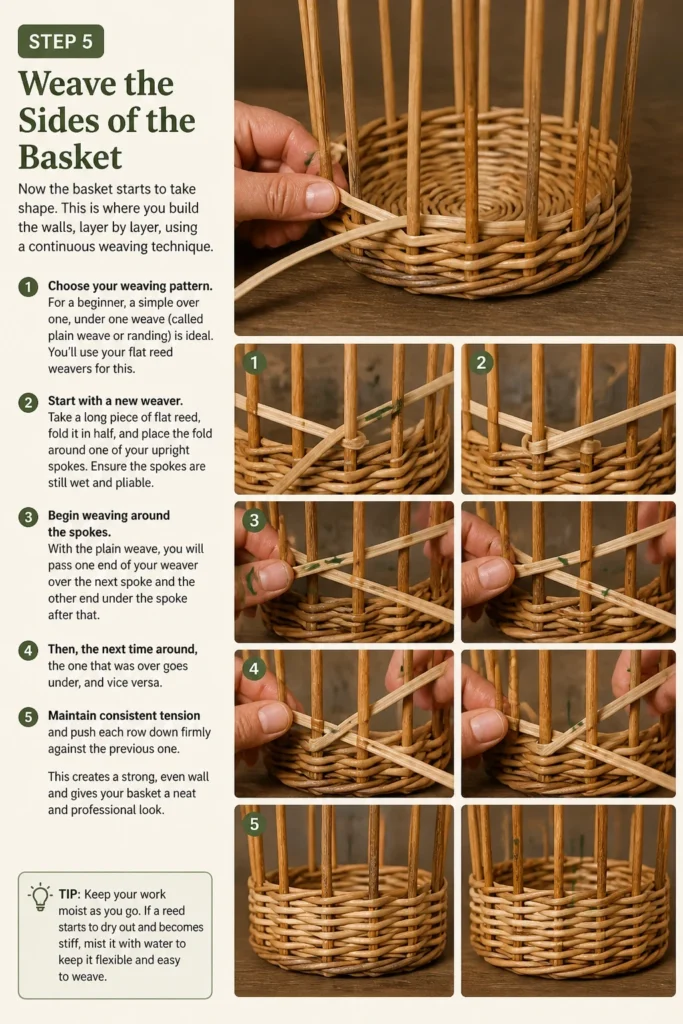
Start with a new weaver. Take a long piece of flat reed, fold it in half, and place the fold around one of your upright spokes. Ensure the spokes are still wet and pliable.
Begin weaving around the spokes. With the plain weave, you will pass one end of your weaver over the next spoke and the other end under the spoke after that. Then, the next time around, the one that was over goes under, and vice versa.
Maintain consistent tension and push each row down firmly against the previous one. This creates a dense, strong wall and prevents gaps.
Add new weavers as needed. When a weaver runs short, overlap the end of the old weaver with the beginning of a new one for about an inch. Again, try to make these joins on the inside of the basket for a cleaner finish.
Shape your basket as you weave. Gently guide the spokes inward for a tapered basket or keep them straight for a cylindrical shape. Periodically check the basket for evenness and adjust as you go.
Weave until your basket reaches the desired height. Remember to leave enough length on your spokes to finish the rim in the next step.
Step 6: Finish the Rim of the Basket
The rim provides structural integrity and a clean, finished edge to your basket. There are many ways to finish a rim, but a simple braided or wrapped rim is good for beginners.
Trim the excess weaving reed. Once you reach your desired height, trim the working weaver, leaving about an inch, and tuck it neatly into the previous row.
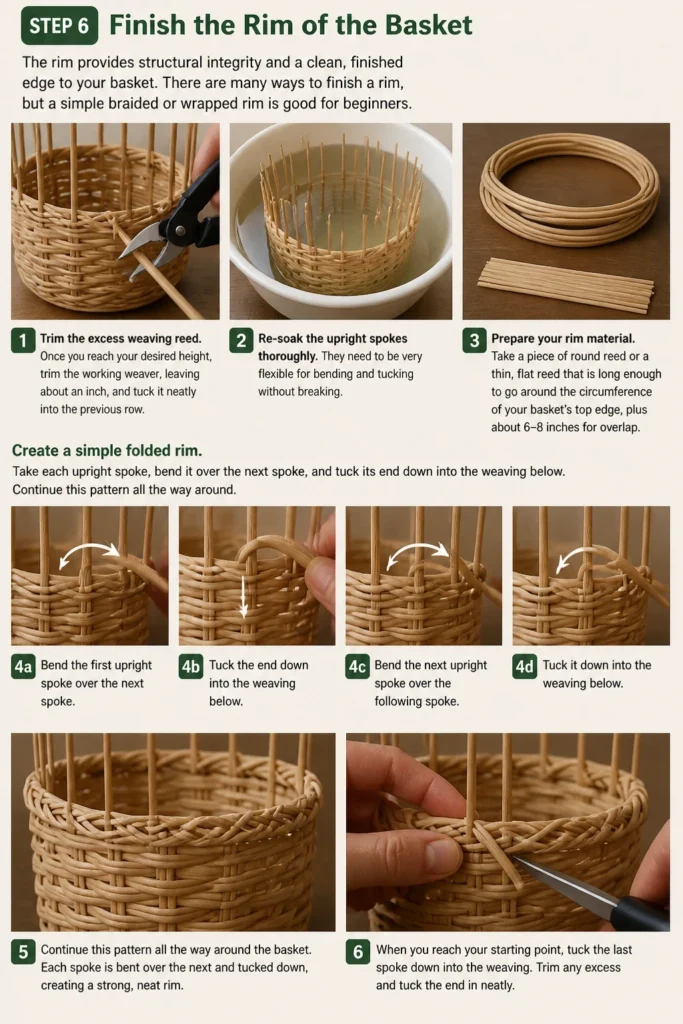
Re-soak the upright spokes thoroughly. They need to be very flexible for bending and tucking without breaking.
Prepare your rim material. Take a piece of round reed or a thin, flat reed that is long enough to go around the circumference of your basket’s top edge, plus about 6-8 inches for overlap.
Create a simple folded rim. Take each upright spoke, bend it over the next spoke, and tuck its end down into the weaving below. Continue this pattern all the way around the basket. This creates a neat, braided effect.
Alternatively, attach a wrapped rim. Once the spokes are bent and tucked, place your round reed or thin flat reed around the top edge, resting on the folded spokes. Use a separate, very thin piece of flat reed to lash (wrap) the rim material tightly to the top edge of the basket. Overlap the ends of the rim material neatly and secure with the lashing reed.
Pro Tip: When tucking spokes, use an awl to gently open a space in the previous rows of weaving. This makes it easier to slide the spoke end through without damaging the basket.
Step 7: Final Touches and Drying
Your basket is almost complete! A few final steps ensure its longevity and appearance.
Trim any stray ends of reed. Use your clippers to snip off any small pieces of reed that are sticking out or look untidy. Aim for a clean, smooth finish.
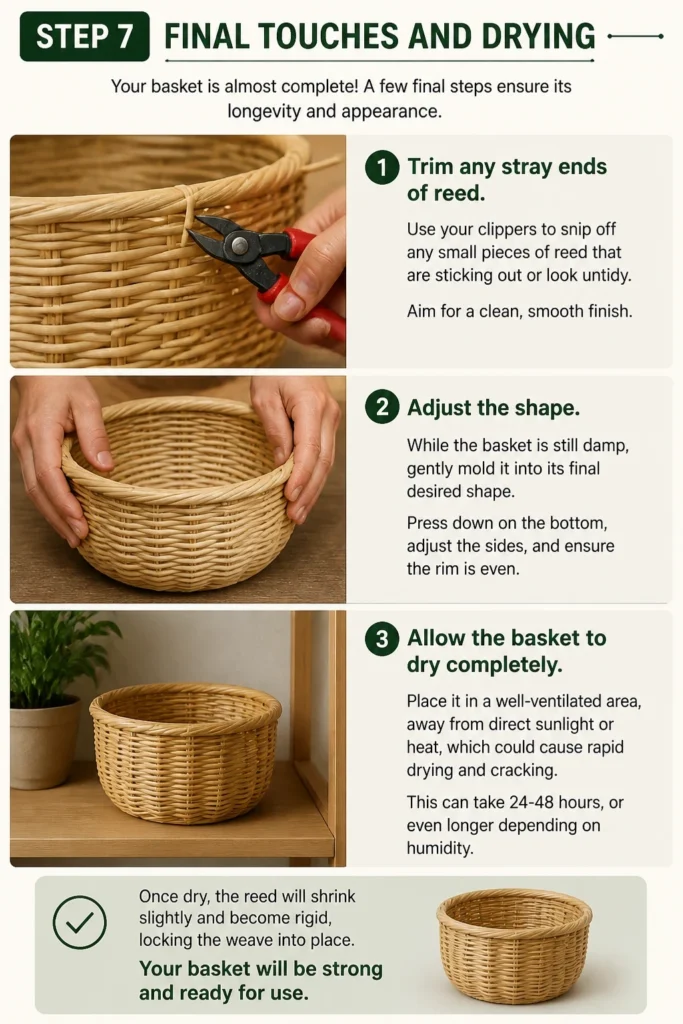
Adjust the shape. While the basket is still damp, gently mold it into its final desired shape. Press down on the bottom, adjust the sides, and ensure the rim is even.
Allow the basket to dry completely. Place it in a well-ventilated area, away from direct sunlight or heat, which could cause rapid drying and cracking. This can take 24-48 hours, or even longer depending on humidity.
Once dry, the reed will shrink slightly and become rigid, locking the weave into place. Your basket will be strong and ready for use.
Common Mistakes to Avoid
Uneven Tension
One of the most common pitfalls for beginners is inconsistent tension during weaving. If you pull some weavers tighter than others, your basket will become lopsided, wavy, or have gaps. Always strive for a gentle, even pull on your weaving material.
To correct this, pause frequently and assess your work. If you notice an area is looser, gently push the rows together and apply slightly more tension to the new weavers. Practice makes perfect in developing a consistent touch.
Forgetting to Keep Reed Wet
Reed, especially flat reed, becomes brittle when dry. Trying to bend or weave dry reed will inevitably lead to breakage, frustration, and wasted material. Always keep your reed pliable.
Always have a spray bottle filled with warm water nearby. If your basket or a section of reed starts to feel stiff, give it a good spray. For longer breaks, cover your basket with a damp towel to prevent it from drying out completely.
Poor Base Formation
A weak or uneven base compromises the entire basket. If the spokes are not evenly spaced or the initial few rows of weaving are loose, the basket will wobble and lack stability.
Spend extra time on the base. Ensure your spokes are perfectly centered and spread evenly before you begin weaving the side walls. Push the early rows of weaving tightly together to create a solid foundation.
Rushing the Process
Basket making is a meditative craft that rewards patience. Rushing through steps often leads to mistakes, broken reed, and a less satisfying result. Enjoy the process.
Allow yourself ample time for each stage. If you feel tired or frustrated, take a break. Come back to your project with fresh eyes and renewed focus. Quality over speed always yields a better basket.
Troubleshooting
Basket is Wobbly or Lopsided
This usually stems from uneven tension in the weaving or an improperly formed base. If the base isn’t flat, or the side weaving is tighter on one side, the basket will lean.
If the basket is still damp, you might be able to gently reshape it. Push down on the base to flatten it and gently adjust the angle of the sides. For a dry basket, soak it thoroughly in warm water, then carefully reshape it before letting it dry completely again. Pay close attention to even tension on your next project.
Reed Breaks Frequently
Reed breakage is a sign that the material is too dry or you are bending it too sharply. It can also happen if the reed has a natural flaw.
Ensure your reed is adequately soaked and remains wet throughout the process. Use a spray bottle frequently. When bending, apply gentle, even pressure rather than a sharp crease. If a piece of reed repeatedly breaks in the same spot, it might be a weak spot; simply cut out the damaged section and start with a fresh piece, overlapping it neatly.
Gaps Appearing in Weaving
Gaps between rows indicate that you’re not pushing the weavers down firmly enough against the previous row, or your tension is too loose.
As you weave, make a conscious effort to push each new row of weaving down firmly against the one before it using your thumb or a blunt tool. Maintain a consistent, firm tension on your weavers. If gaps appear, you might be able to gently “coax” the reed closer together while the basket is still wet.
Key Takeaways
- Preparation is paramount: Always soak your reed thoroughly.
- A strong, even base is critical for a stable basket.
- Consistent tension throughout the weaving prevents lopsided results.
- Keep your reed wet using a spray bottle to avoid breakage.
- Patience and attention to detail are your best tools.
- The rim provides both structure and a polished finish.
Frequently Asked Questions
What materials can I use for basket making besides reed?
Many natural materials can be used for basketry. Popular choices include willow, rattan, pine needles, sweetgrass, raffia, and even newspaper or fabric strips. Each material offers a unique texture and requires slightly different preparation and weaving techniques.
How do I make my basket waterproof?
Traditional reed baskets are not inherently waterproof. To make them water-resistant, you can apply a sealant. Options include clear polyurethane varnish, shellac, or a beeswax finish. Ensure the basket is completely dry before applying any sealant, and follow the product’s instructions for application and curing.
Can I add a handle to my basket?
Absolutely! Adding a handle is a common and practical addition. Handles can be made from a thicker piece of reed, a bent branch, or even rope. They are typically woven into the side walls during the weaving process or securely attached to the rim after the basket is finished.
How do I clean my finished basket?
For most natural fiber baskets, a light dusting or wiping with a dry cloth is usually sufficient. If it needs deeper cleaning, you can gently wipe it with a damp cloth (not soaking wet) and a mild soap solution. Rinse with a clean, damp cloth and allow it to air dry completely in a well-ventilated area to prevent mold.
Our Top Recommended Finds
- Basketry Starter Kit: A comprehensive kit often includes various types of reed, an awl, clippers, and sometimes even instructions for a first project. It’s a great way to get everything you need in one go.
- Heavy-Duty Shears/Clippers: Good quality clippers designed for basketry or gardening will make clean cuts through reed, preventing frayed ends and making the process much smoother.
- Soaking Tub or Tray: A dedicated tub or large tray makes soaking your reed much easier and cleaner than using a kitchen sink. Look for something long enough to accommodate your longest reed pieces.
Weave Your Own Story
Creating your first basket is more than just a craft project; it’s an invitation to connect with ancient traditions and the satisfaction of making something truly unique. Each bend of the reed, each careful weave, builds not just a basket but also your skill and confidence. Don’t be afraid to experiment with different materials or designs once you’ve mastered the basics.
Your hands now hold the knowledge to transform simple fibers into a functional work of art. Take the first step today. Gather your materials, find a quiet space, and begin weaving your own beautiful story. What will you create next?