⛵️ How To Make A Boat
There’s a unique satisfaction in building something with your own hands, especially when that something floats. I remember the thrill of launching my first small skiff, a project that taught me immense patience and practical skills.
This guide draws on that hands-on experience, breaking down the often intimidating process of boat building into manageable steps.
You’re about to embark on a rewarding journey that culminates in your very own vessel.
Quick Overview
This guide will walk you through the process of constructing a simple, yet sturdy, small boat, typically using the “stitch and glue” plywood method. You’ll learn the fundamental techniques to create a seaworthy craft.
Imagine the pride of paddling or motoring across calm waters in a boat you built yourself.
- Time needed: 40-80 hours (spread over several weeks)
- Difficulty: Intermediate
- What you’ll need: Marine plywood, epoxy resin, fiberglass cloth, measuring tools, saws, clamps, safety gear.
Step-by-Step Instructions
Step 1: Plan Your Design and Gather Blueprints
Every great boat starts with a solid plan. Do not skip this crucial first phase, as it dictates all subsequent steps.
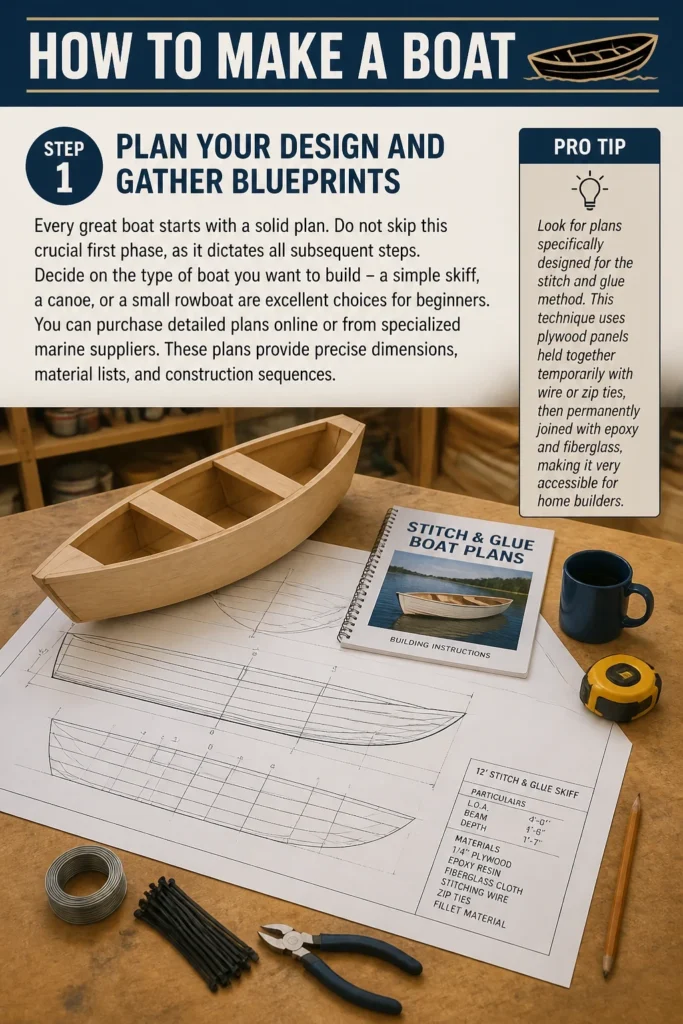
Decide on the type of boat you want to build – a simple skiff, a canoe, or a small rowboat are excellent choices for beginners.
You can purchase detailed plans online or from specialized marine suppliers. These plans provide precise dimensions, material lists, and construction sequences.
Pro Tip: Look for plans specifically designed for the “stitch and glue” method. This technique uses plywood panels held together temporarily with wire or zip ties, then permanently joined with epoxy and fiberglass, making it very accessible for home builders.
Step 2: Collect All Materials and Tools
Once you have your plans, create a comprehensive list of everything required. This includes wood, epoxy, fiberglass, and all necessary tools.
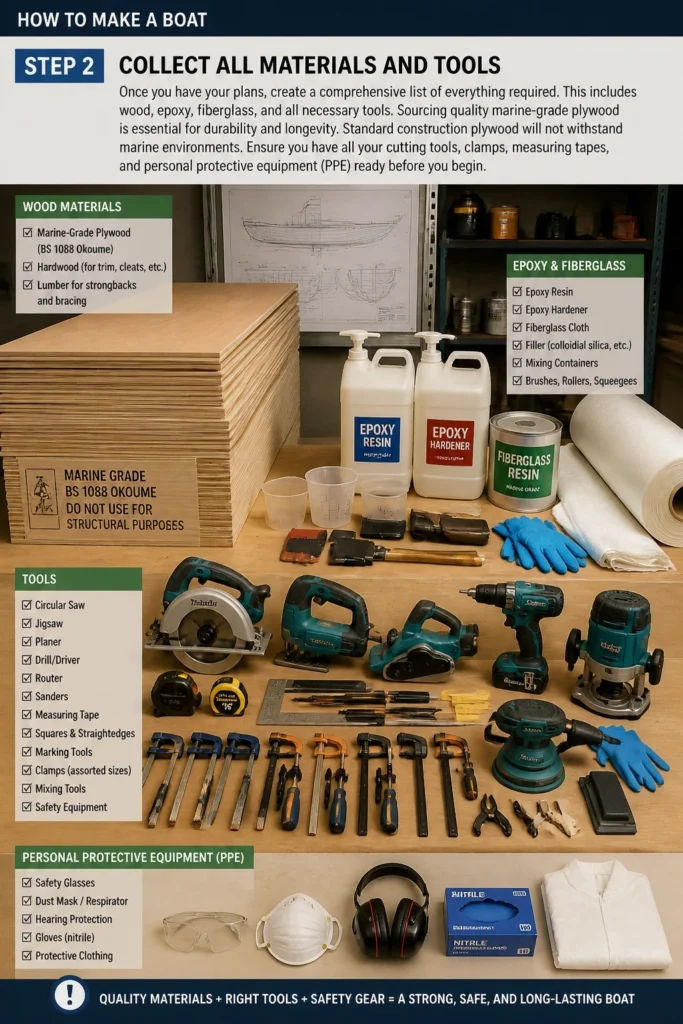
Sourcing quality marine-grade plywood is essential for durability and longevity. Standard construction plywood will not withstand marine environments.
Ensure you have all your cutting tools, clamps, measuring tapes, and personal protective equipment (PPE) ready before you begin.
Step 3: Accurately Mark and Cut Plywood Panels
Transfer the dimensions from your blueprints onto the plywood sheets with extreme precision. Use a sharp pencil and a long straightedge for accuracy.
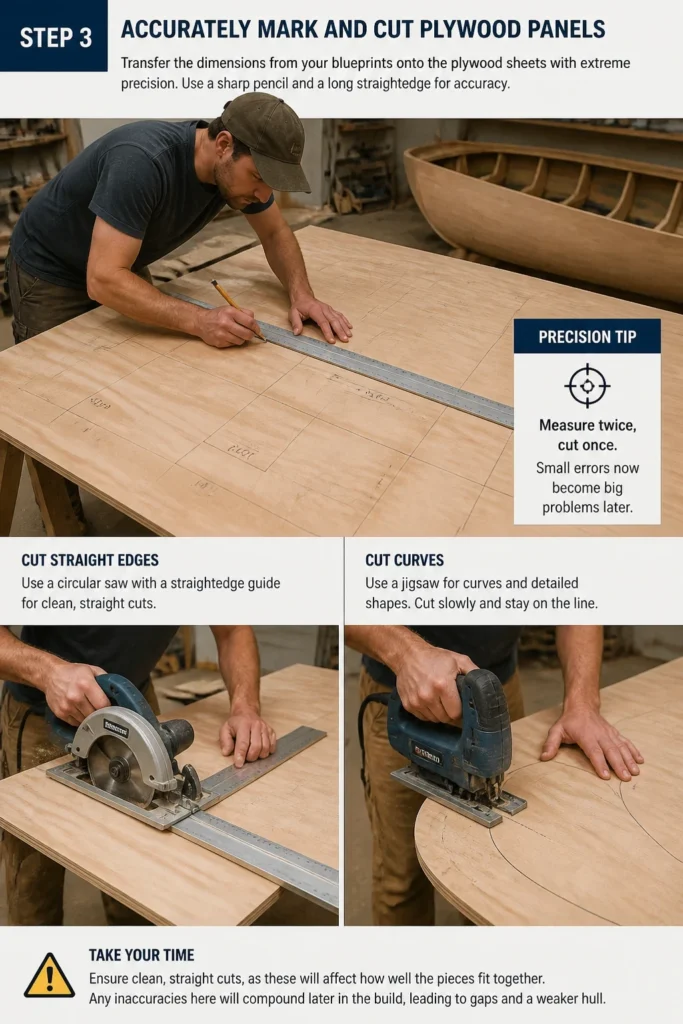
Cut the panels carefully using a circular saw or jigsaw, depending on the curves. Take your time to ensure clean, straight cuts, as these will affect how well the pieces fit together.
Any inaccuracies here will compound later in the build, leading to gaps and a weaker hull.
Step 4: “Stitch” the Hull Panels Together
This is where the boat begins to take shape. Position your cut plywood panels according to the plans.
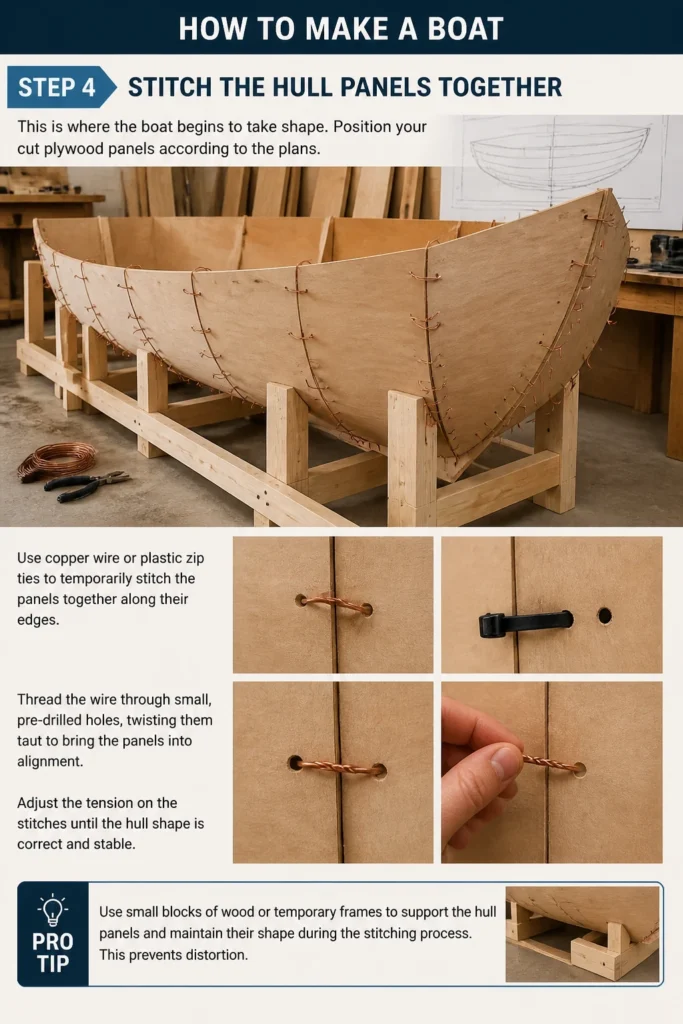
Use copper wire or plastic zip ties to temporarily “stitch” the panels together along their edges. Thread the wire through small, pre-drilled holes, twisting them taut to bring the panels into alignment.
Adjust the tension on the stitches until the hull shape is correct and stable.
Pro Tip: Use small blocks of wood or temporary frames to support the hull panels and maintain their shape during the stitching process. This prevents distortion.
Step 5: Apply Epoxy Fillets and Fiberglass Tape to Seams
With the hull stitched, it’s time to make the seams permanent and watertight. Mix epoxy resin with a thickening agent (like colloidal silica) to create a peanut butter-like consistency.
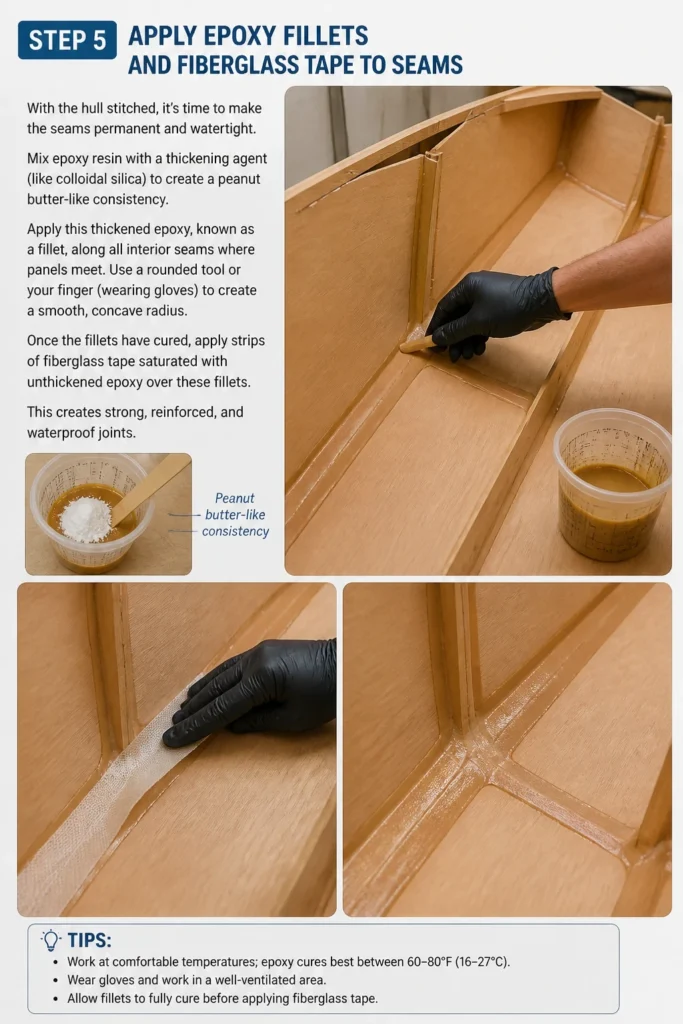
Apply this thickened epoxy, known as a fillet, along all interior seams where panels meet. Use a rounded tool or your finger (wearing gloves) to create a smooth, concave radius.
Once the fillets have cured, apply strips of fiberglass tape saturated with unthickened epoxy over these fillets. This creates strong, reinforced, and waterproof joints.
Step 6: Fiberglass the Exterior of the Hull
The exterior of the hull needs protection and strength. Lay fiberglass cloth over the entire outer surface of the hull, ensuring it lies flat and smooth.
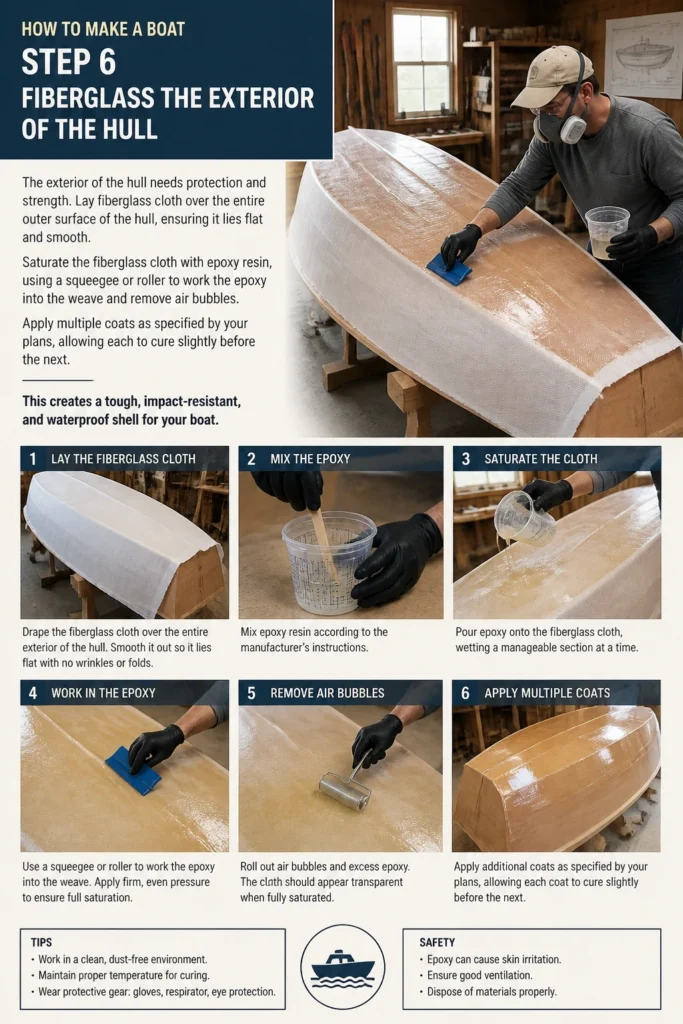
Saturate the fiberglass cloth with epoxy resin, using a squeegee or roller to work the epoxy into the weave and remove air bubbles. Apply multiple coats as specified by your plans, allowing each to cure slightly before the next.
This creates a tough, impact-resistant, and waterproof shell for your boat.
Step 7: Install Interior Components and Finish Details
With the main hull structure complete, focus on the interior. Install seats, flotation compartments, and any other internal bracing or bulkheads.
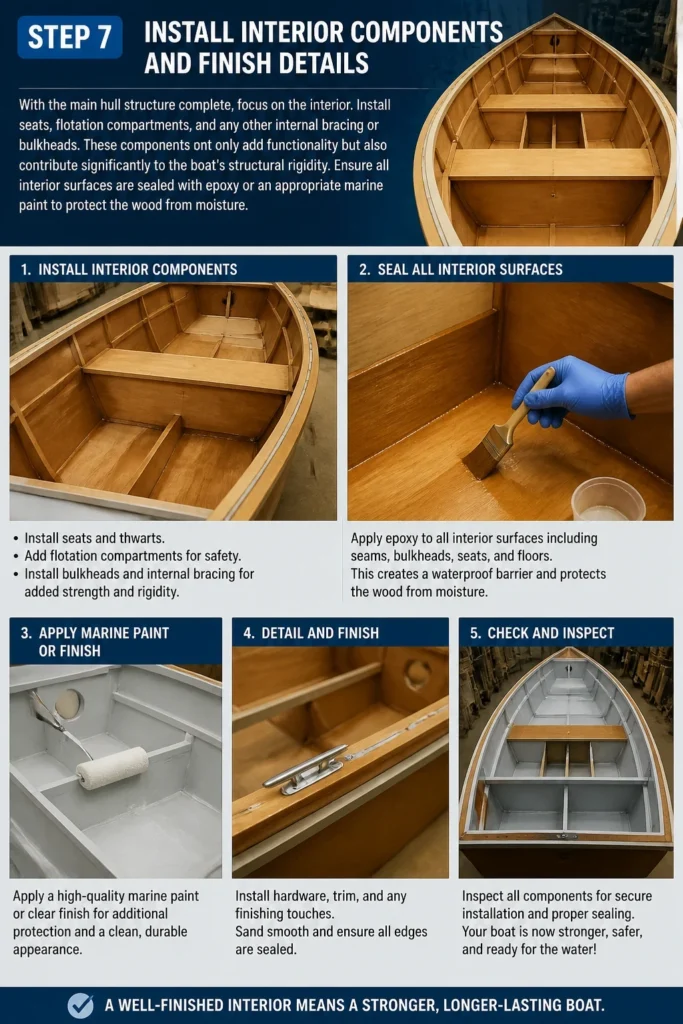
These components not only add functionality but also contribute significantly to the boat’s structural rigidity.
Ensure all interior surfaces are sealed with epoxy or an appropriate marine paint to protect the wood from moisture.
Step 8: Sand, Prime, and Paint Your Boat
Prepare the exterior surfaces for painting by sanding them smooth. This removes any bumps or imperfections from the fiberglassing process.
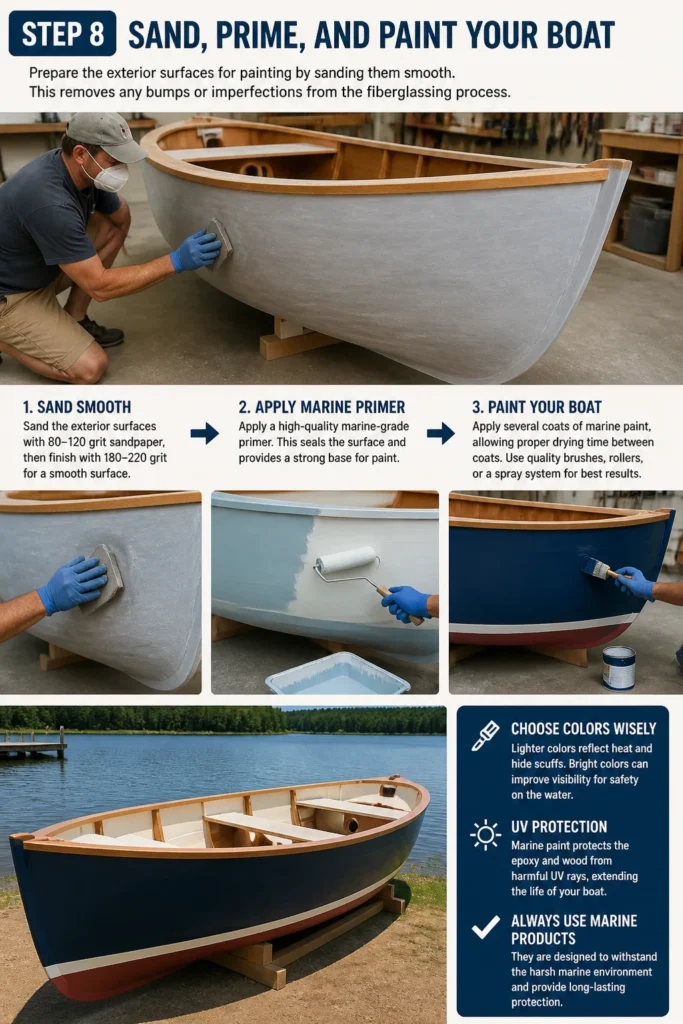
Apply a marine-grade primer, followed by several coats of marine paint. Choose colors that you like, but also consider visibility on the water.
This final step not only enhances the boat’s appearance but also provides crucial UV protection for the epoxy and wood.
Common Mistakes to Avoid
Poor Measurement and Cutting
Rushing through the marking and cutting phase is a common pitfall. Even slight inaccuracies can lead to panels that don’t fit snugly, creating large gaps.
These gaps require excessive amounts of epoxy to fill, weakening the joint and adding unnecessary weight. Always double-check your measurements before making any cuts.
Inadequate Epoxy Mixing
Epoxy resin is a two-part system, requiring precise ratios of resin and hardener to cure properly. Failing to mix thoroughly or using incorrect ratios will result in epoxy that remains tacky or never fully hardens.
This compromises the structural integrity and waterproofing of your boat. Always follow the manufacturer’s instructions for mixing precisely.
Neglecting Safety Precautions
Working with epoxy, fiberglass, and power tools requires diligent safety measures. Many builders become complacent and skip wearing gloves, respirators, or eye protection.
Epoxy can cause skin irritation and respiratory issues, and fiberglass dust is an irritant. Always wear appropriate PPE to protect your health throughout the build.
Rushing the Cure Time
Epoxy needs specific temperatures and time to fully cure and achieve maximum strength. Trying to speed up the process by applying subsequent coats too soon or working in cold conditions will lead to a weaker bond.
Patience is key in boat building. Allow each epoxy layer to cure adequately before moving to the next step, as specified by the epoxy manufacturer.
Troubleshooting
My Epoxy Isn’t Hardening Properly
This is almost always due to incorrect mixing ratios or insufficient mixing of the two epoxy components. Review your epoxy manufacturer’s instructions carefully.
Ensure you are measuring accurately by weight or volume, as specified. Mix for the recommended duration, scraping the sides and bottom of the mixing pot thoroughly.
I Have Leaks After Launching
Leaks often indicate areas where epoxy fillets or fiberglass tape were not applied continuously or were poorly saturated. Inspect all internal seams for small gaps or pinholes.
Dry the area completely, then sand lightly and apply additional epoxy fillet or fiberglass tape over the problematic spot. Ensure thorough saturation and cure time.
My Hull Panels Are Warped or Distorted
Warping can occur if panels are not adequately supported during the stitching and epoxying process, or if they were stored improperly before use. It can also happen if the stitching tension was uneven.
If the distortion is minor, you might be able to correct it with internal bracing or by applying pressure while epoxy cures. For significant warping, you may need to carefully cut and replace the affected section, which is a more advanced repair.
Key Takeaways
- Thorough planning and accurate measurements are the foundation of a successful build.
- Always use marine-grade materials for durability and performance on the water.
- Patience is paramount; allow epoxy to cure fully at each stage.
- Prioritize safety by wearing appropriate personal protective equipment.
- The “stitch and glue” method is an excellent starting point for aspiring boat builders.
- Properly sealing and painting your boat protects your investment and ensures longevity.
Frequently Asked Questions
How much does it cost to build a small boat?
The cost varies widely depending on the size and complexity of your chosen design, as well as the quality of materials. For a basic plywood skiff, expect to spend anywhere from $500 to $2000 on materials and epoxy.
This cost does not typically include tools you may already own. Investing in quality materials pays off in the long run with a more durable boat.
What kind of wood is best for boat building?
Marine-grade plywood is the most common and recommended material for amateur builders using the stitch and glue method. It is specifically manufactured with waterproof glue and void-free cores.
Species like Okoume and Meranti are popular choices for marine plywood due to their strength-to-weight ratio and rot resistance. Avoid standard exterior-grade plywood.
Can I build a boat without any prior woodworking experience?
Yes, absolutely! Many beginner boat builders start with little to no prior experience. The key is to choose a simple design specifically for novices and to follow the plans diligently.
Online forums, videos, and local boat-building classes can also provide invaluable support and guidance as you learn.
Do I need to register my homemade boat?
Registration requirements depend on your local laws and the size/type of your boat. Most motorized boats, regardless of size, require registration.
Small, unmotorized boats like canoes or kayaks often do not, but it’s crucial to check with your local marine or wildlife authority for specific regulations in your area.
Our Top Recommended Finds
- Marine Epoxy Kit: A high-quality, slow-cure marine epoxy system for strong, waterproof bonds.
- Japanese Pull Saw: Excellent for precise, clean cuts in plywood, especially for intricate shapes.
- Personal Flotation Device (PFD): Essential safety gear for anyone on the water, whether building or boating.
Your Crafting Adventure Begins Now
Building a boat is more than just a project; it’s an educational and deeply satisfying journey. You’ll develop new skills, test your patience, and ultimately create something tangible that brings joy.
Don’t let the scale of the project deter you. Break it down into these manageable steps, and celebrate each milestone along the way.
Take the plunge, gather your first materials, and start shaping your dream vessel today. The open water awaits your handmade creation.