🤖 How To Make A Robot
Building your own robot might seem like a futuristic dream, but it’s surprisingly accessible today.
Years ago, I started with a simple blinking LED circuit, which eventually led to my first wheeled robot navigating my living room.
This guide will walk you through each practical step, making the process clear and rewarding.
Quick Overview
You’re about to embark on an exciting journey to create an autonomous machine. This guide will help you design, build, and program a functional robot from scratch.
- Time needed: 10-20 hours (spread over several days/weeks)
- Difficulty: Beginner to Intermediate
- What you’ll need: Basic electronics, a microcontroller, sensors, motors, and a few tools.
Step-by-Step Instructions
Step 1: Define Your Robot’s Purpose
Every great robot starts with a clear mission. Deciding what your robot will do guides every subsequent choice you make.
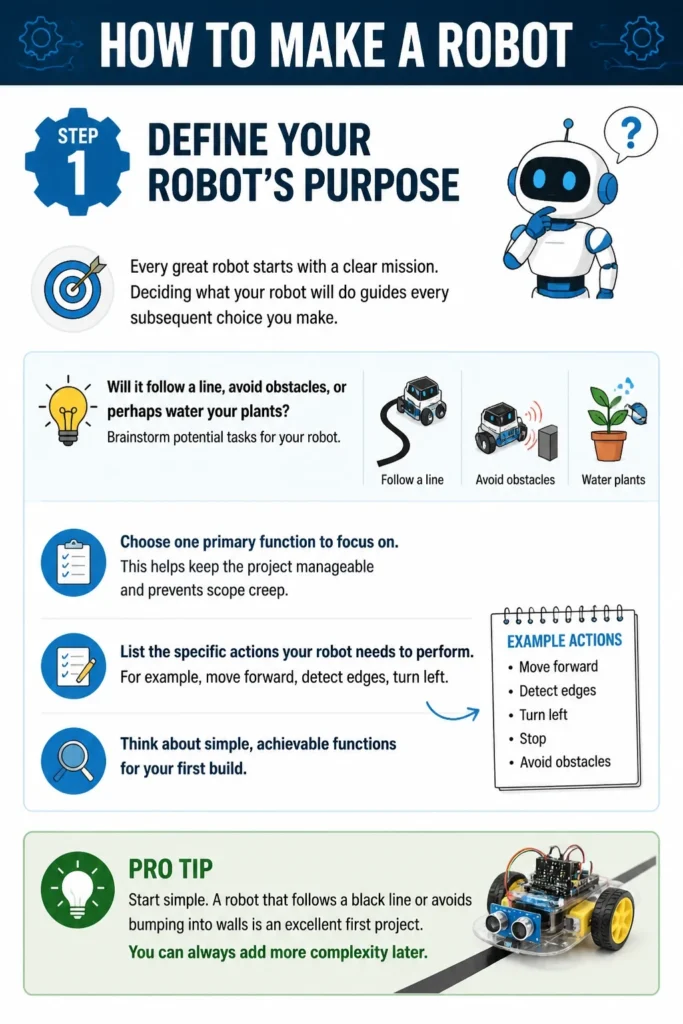
Will it follow a line, avoid obstacles, or perhaps water your plants?
- Brainstorm potential tasks for your robot. Think about simple, achievable functions for your first build.
- Choose one primary function to focus on. This helps keep the project manageable and prevents scope creep.
- List the specific actions your robot needs to perform. For example, “move forward,” “detect edges,” “turn left.”
Pro Tip: Start simple. A robot that follows a black line or avoids bumping into walls is an excellent first project. You can always add more complexity later.
Step 2: Sketch and Design the Concept
Once you know your robot’s purpose, it’s time to visualize it. This step translates your ideas into a tangible blueprint.
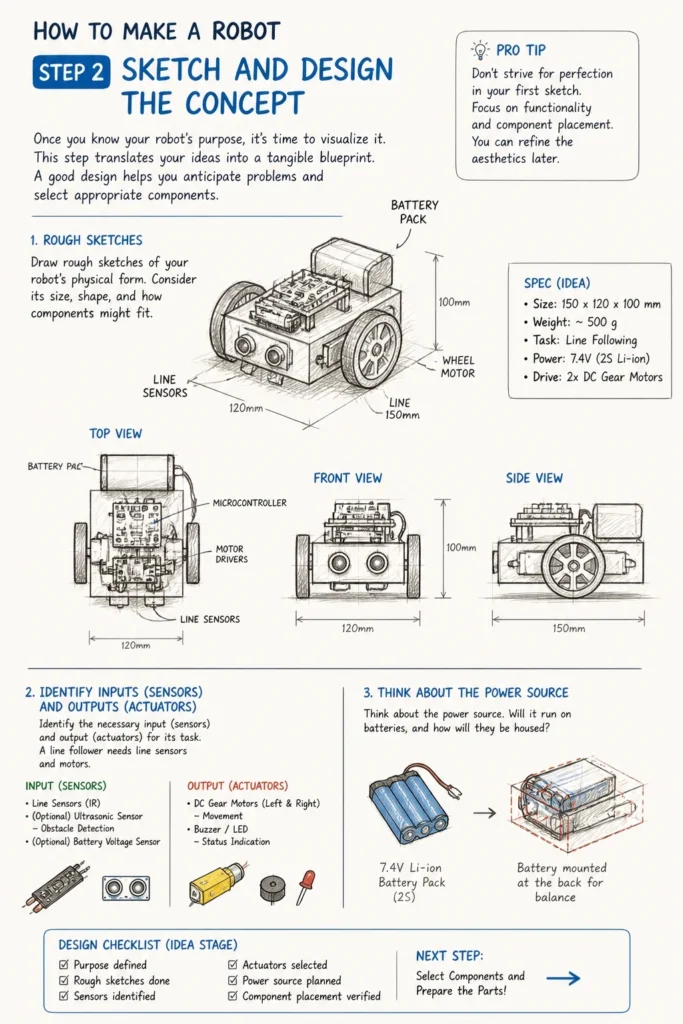
A good design helps you anticipate problems and select appropriate components.
- Draw rough sketches of your robot’s physical form. Consider its size, shape, and how components might fit.
- Identify the necessary input (sensors) and output (actuators) for its task. A line follower needs line sensors and motors.
- Think about the power source. Will it run on batteries, and how will they be housed?
Pro Tip: Don’t strive for perfection in your first sketch. Focus on functionality and component placement. You can refine the aesthetics later.
Step 3: Gather Your Components
This is where your design starts to come to life. Selecting the right parts is crucial for your robot’s success.
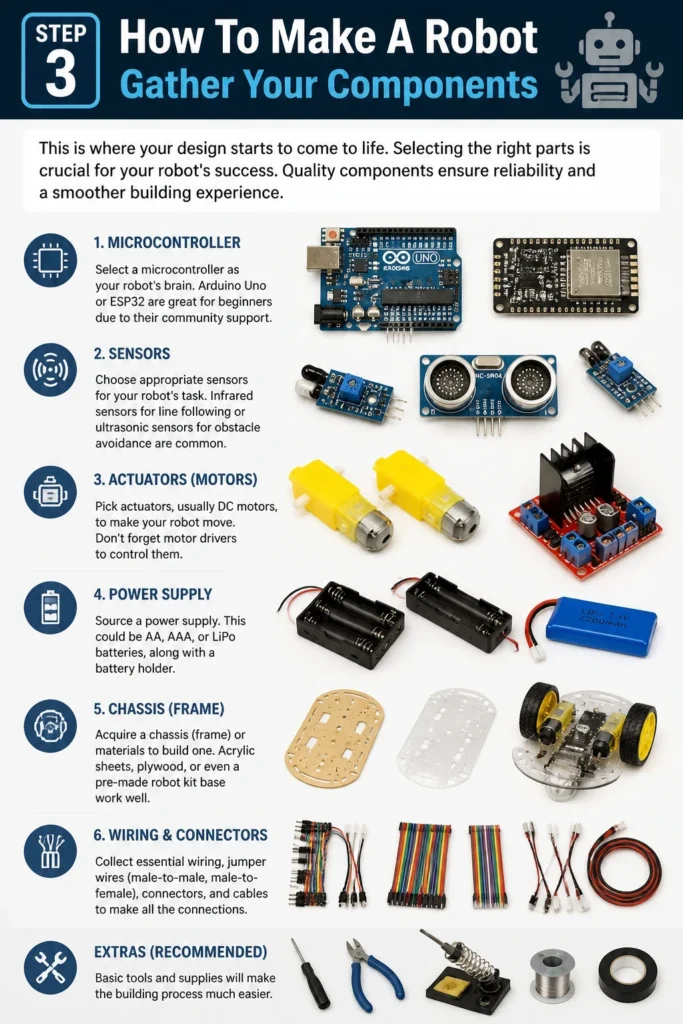
Quality components ensure reliability and a smoother building experience.
- Select a microcontroller as your robot’s brain. Arduino Uno or ESP32 are great for beginners due to their community support.
- Choose appropriate sensors for your robot’s task. Infrared sensors for line following or ultrasonic sensors for obstacle avoidance are common.
- Pick actuators, usually DC motors, to make your robot move. Don’t forget motor drivers to control them.
- Source a power supply. This could be AA, AAA, or LiPo batteries, along with a battery holder.
- Acquire a chassis (frame) or materials to build one. Acrylic sheets, plywood, or even a pre-made robot kit base work well.
- Collect essential wiring, a breadboard, resistors, LEDs, and jumper cables for connections.
Pro Tip: Buy a few extra basic components like resistors and jumper wires. They are inexpensive and useful for troubleshooting or future projects.
Step 4: Assemble the Chassis and Mount Components
The chassis provides the structural foundation for your robot. It holds everything together securely.
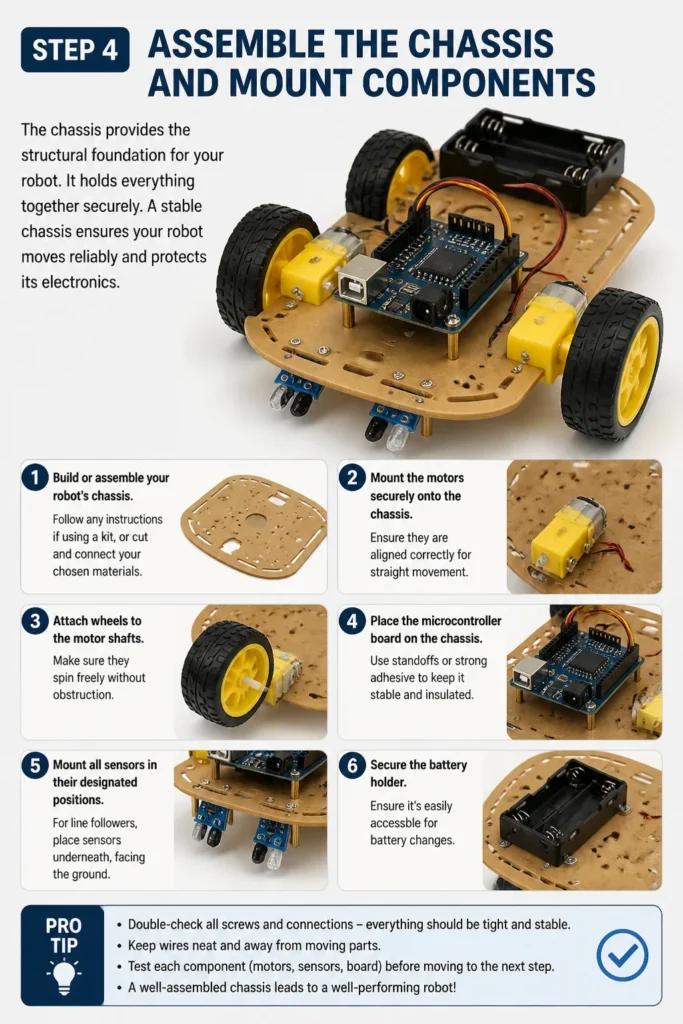
A stable chassis ensures your robot moves reliably and protects its electronics.
- Build or assemble your robot’s chassis. Follow any instructions if using a kit, or cut and connect your chosen materials.
- Mount the motors securely onto the chassis. Ensure they are aligned correctly for straight movement.
- Attach wheels to the motor shafts. Make sure they spin freely without obstruction.
- Place the microcontroller board on the chassis. Use standoffs or strong adhesive to keep it stable and insulated.
- Mount all sensors in their designated positions. For line followers, place sensors underneath, facing the ground.
- Secure the battery holder. Ensure it’s easily accessible for battery changes.
Pro Tip: Use zip ties or hot glue sparingly for temporary fixes during testing. For final assembly, use screws or proper mounting hardware for durability.
Step 5: Wire the Electronics
This step involves connecting all your components to the microcontroller. Careful wiring prevents short circuits and ensures proper function.
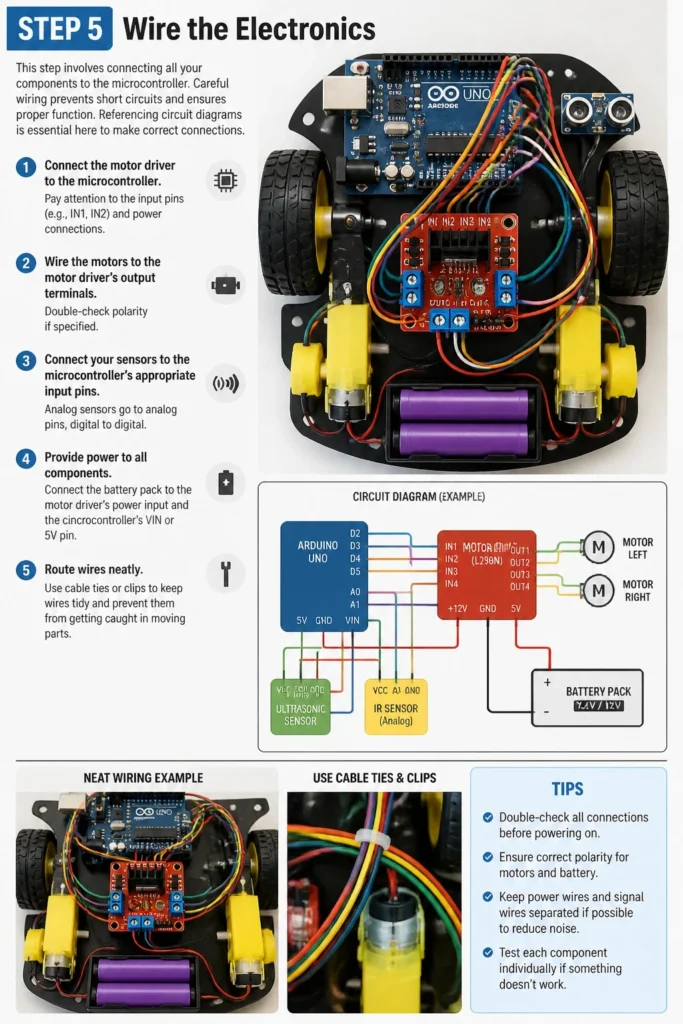
Referencing circuit diagrams is essential here to make correct connections.
- Connect the motor driver to the microcontroller. Pay attention to the input pins (e.g., IN1, IN2) and power connections.
- Wire the motors to the motor driver’s output terminals. Double-check polarity if specified.
- Connect your sensors to the microcontroller’s appropriate input pins. Analog sensors go to analog pins, digital to digital.
- Provide power to all components. Connect the battery pack to the motor driver’s power input and the microcontroller’s VIN or 5V pin.
- Route wires neatly. Use cable ties or clips to keep wires tidy and prevent them from getting caught in moving parts.
Pro Tip: Always disconnect power before wiring or making changes to your circuit. Use a breadboard for initial sensor and power connections to easily test and adjust.
Step 6: Write the Robot’s Code
Now you give your robot its instructions. The code is the brain that tells your hardware what to do and when.
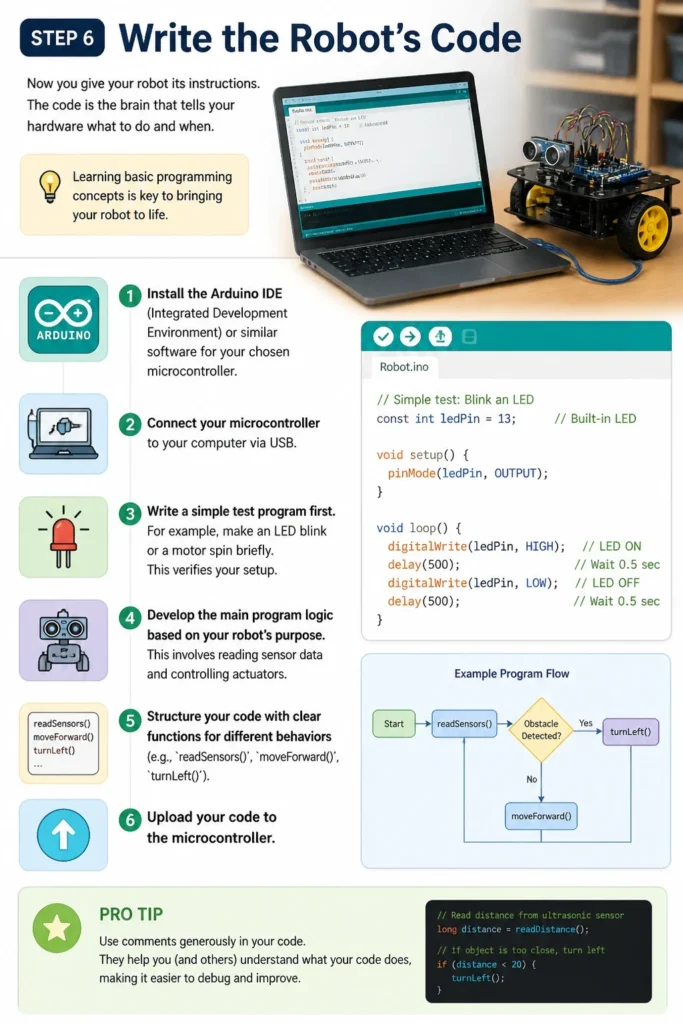
Learning basic programming concepts is key to bringing your robot to life.
- Install the Arduino IDE (Integrated Development Environment) or similar software for your chosen microcontroller.
- Connect your microcontroller to your computer via USB.
- Write a simple test program first. For example, make an LED blink or a motor spin briefly. This verifies your setup.
- Develop the main program logic based on your robot’s purpose. This involves reading sensor data and controlling actuators.
- Structure your code with clear functions for different behaviors (e.g., `readSensors()`, `moveForward()`, `turnLeft()`).
- Upload your code to the microcontroller.
Pro Tip: Use comments generously in your code. They explain what each part does, making it easier for you (and others) to understand and debug later. Break complex problems into smaller, manageable code segments.
Step 7: Test and Debug
This iterative process is crucial for a successful robot. Rarely does a robot work perfectly on the first try.
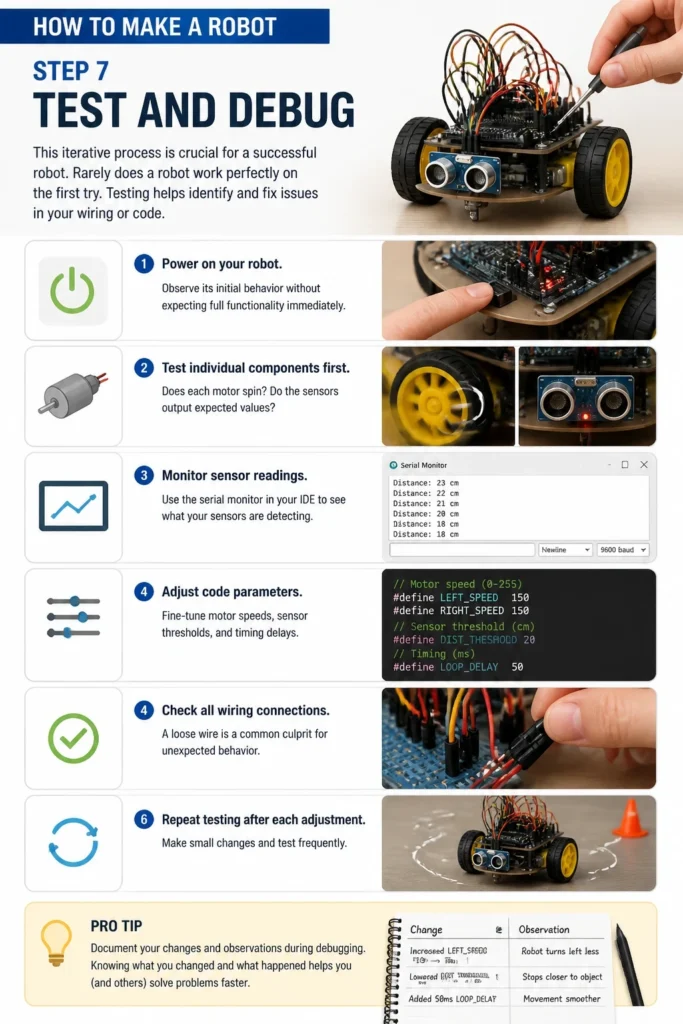
Testing helps identify and fix issues in your wiring or code.
- Power on your robot. Observe its initial behavior without expecting full functionality immediately.
- Test individual components first. Does each motor spin? Do the sensors output expected values?
- Monitor sensor readings. Use the serial monitor in your IDE to see what your sensors are detecting.
- Adjust code parameters. Fine-tune motor speeds, sensor thresholds, and timing delays.
- Check all wiring connections. A loose wire is a common culprit for unexpected behavior.
- Repeat testing after each adjustment. Make small changes and test frequently.
Pro Tip: Document your changes and observations during debugging. Knowing what you changed and its effect helps pinpoint the root cause of problems faster.
Step 8: Refine and Enhance
Once your robot performs its basic function, you can start making it better. This step adds polish and extra features.
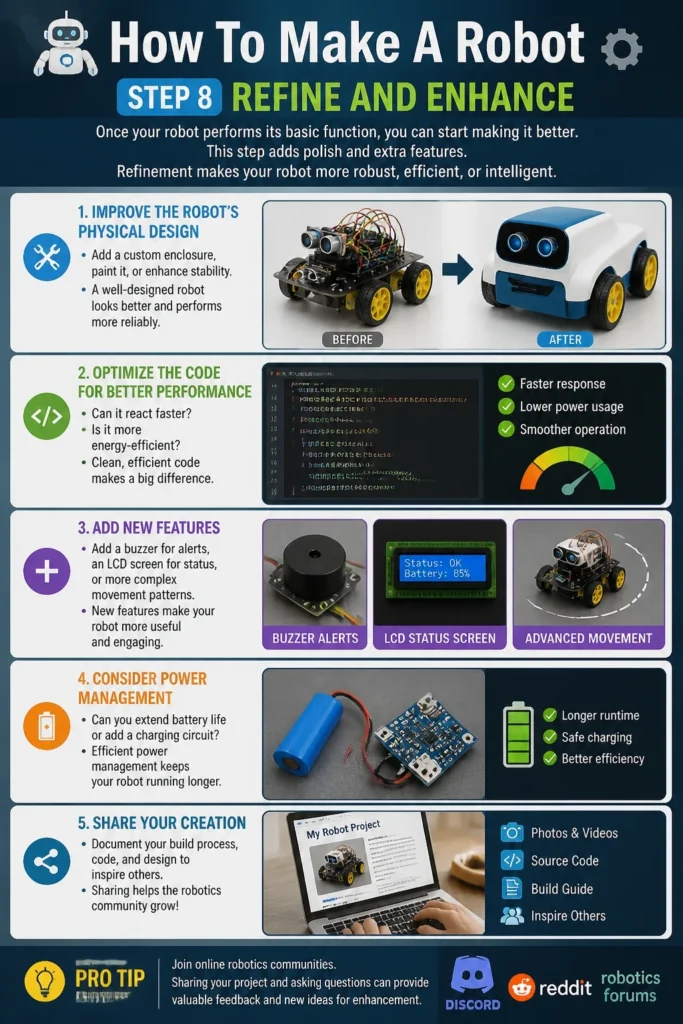
Refinement makes your robot more robust, efficient, or intelligent.
- Improve the robot’s physical design. Add a custom enclosure, paint it, or enhance stability.
- Optimize the code for better performance. Can it react faster? Is it more energy-efficient?
- Add new features. Perhaps a buzzer for alerts, an LCD screen for status, or more complex movement patterns.
- Consider power management. Can you extend battery life or add a charging circuit?
- Share your creation. Document your build process, code, and design to inspire others.
Pro Tip: Join online robotics communities. Sharing your project and asking questions can provide valuable feedback and new ideas for enhancement.
Common Mistakes to Avoid
Ignoring Power Requirements
Many beginners underestimate the power needed for motors and multiple sensors. A weak power supply can lead to erratic behavior, brownouts, or components not working at all. Always ensure your battery pack and voltage regulator can provide sufficient current for all parts, especially during peak demand.
Messy Wiring
A jumble of wires makes troubleshooting a nightmare. It also increases the risk of short circuits or wires snagging on moving parts. Plan your wiring, use appropriate lengths, and secure connections with zip ties or heat shrink tubing for a clean and reliable setup.
Over-Complicating the First Project
It’s tempting to want a robot that does everything. However, trying to build a highly complex robot as a first project often leads to frustration and abandonment. Start with a single, achievable goal, master it, and then gradually add more features. This builds confidence and skills.
Skipping the Testing Phase
Rushing through testing or assuming everything will work perfectly is a common pitfall. Thoroughly test each component and each section of your code individually before integrating them. This isolates problems and makes debugging far more efficient.
Troubleshooting
Robot Doesn’t Move or Moves Erratically
First, check your power supply. Ensure batteries are charged and correctly connected. Next, inspect motor and motor driver wiring for loose connections or incorrect polarity. Verify your code sends the correct signals to the motor driver. Sometimes, the motor driver itself might be faulty or improperly initialized in the code.
Sensors Aren’t Reading Correctly
Begin by checking the sensor’s wiring to the microcontroller. Ensure power (VCC) and ground (GND) are correct, and the data pin is connected to the right input. Use the serial monitor to print raw sensor values; this helps confirm if the sensor is outputting data. If values are consistently zero or maximum, the sensor might be faulty or the code is misinterpreting its output.
Code Upload Fails
This often indicates a communication issue between your computer and the microcontroller. Verify you have selected the correct board type and COM port in your IDE. Ensure all drivers for your microcontroller are installed. Disconnect any other USB devices that might be interfering, and try a different USB cable or port.
Key Takeaways
- Start with a clear, simple purpose for your robot to manage complexity.
- Plan your design and gather components carefully before assembly.
- Pay close attention to wiring and secure all connections properly.
- Write your code incrementally, testing small sections as you go.
- Embrace the testing and debugging process as a valuable learning experience.
- Iterate and refine your robot to improve its functionality and design.
Frequently Asked Questions
What’s the best microcontroller for a beginner?
The Arduino Uno is widely recommended for beginners. It’s easy to use, has extensive documentation, and a huge community ready to help. Its straightforward programming environment makes it ideal for learning the basics of robotics and electronics.
Do I need to know how to code to make a robot?
Yes, basic programming skills are essential. Most hobby robots use microcontrollers that require code to function. Languages like C++ (used with Arduino) or Python (for Raspberry Pi) are common. There are many online tutorials and courses available to get you started.
How much does it cost to build a robot?
The cost varies significantly depending on complexity and components. A basic line-following robot might cost anywhere from $50 to $150 for parts. More advanced robots with specialized sensors or powerful motors can easily exceed $300 or more. Starting with a kit can be a cost-effective way to begin.
Can I use recycled materials for my robot?
Absolutely! Using recycled materials for the chassis or non-electronic components is a great way to save money and be creative. Cardboard, plastic containers, or old toy parts can be repurposed. Just ensure they provide sufficient structural integrity for your robot’s intended function.
Our Top Recommended Finds
- Arduino Starter Kit: Includes an Arduino Uno, breadboard, sensors, wires, and a project guide. Perfect for learning electronics and coding fundamentals.
- L298N Motor Driver Module: An affordable and widely used module for controlling two DC motors. Essential for any mobile robot project.
- SG90 Micro Servo Motors: Small, inexpensive servo motors useful for steering, small arms, or sensor manipulation.
Your Robot Awaits: Start Building Today
You now have a practical roadmap to bring your robot ideas to life. From defining its purpose to refining its actions, each step builds towards a tangible, working creation.
Don’t let the thought of complex electronics deter you. Every expert builder started with a simple project and learned along the way.
Grab your components, fire up your IDE, and begin crafting your very own automated companion. The satisfaction of seeing your robot move for the first time is truly unmatched.