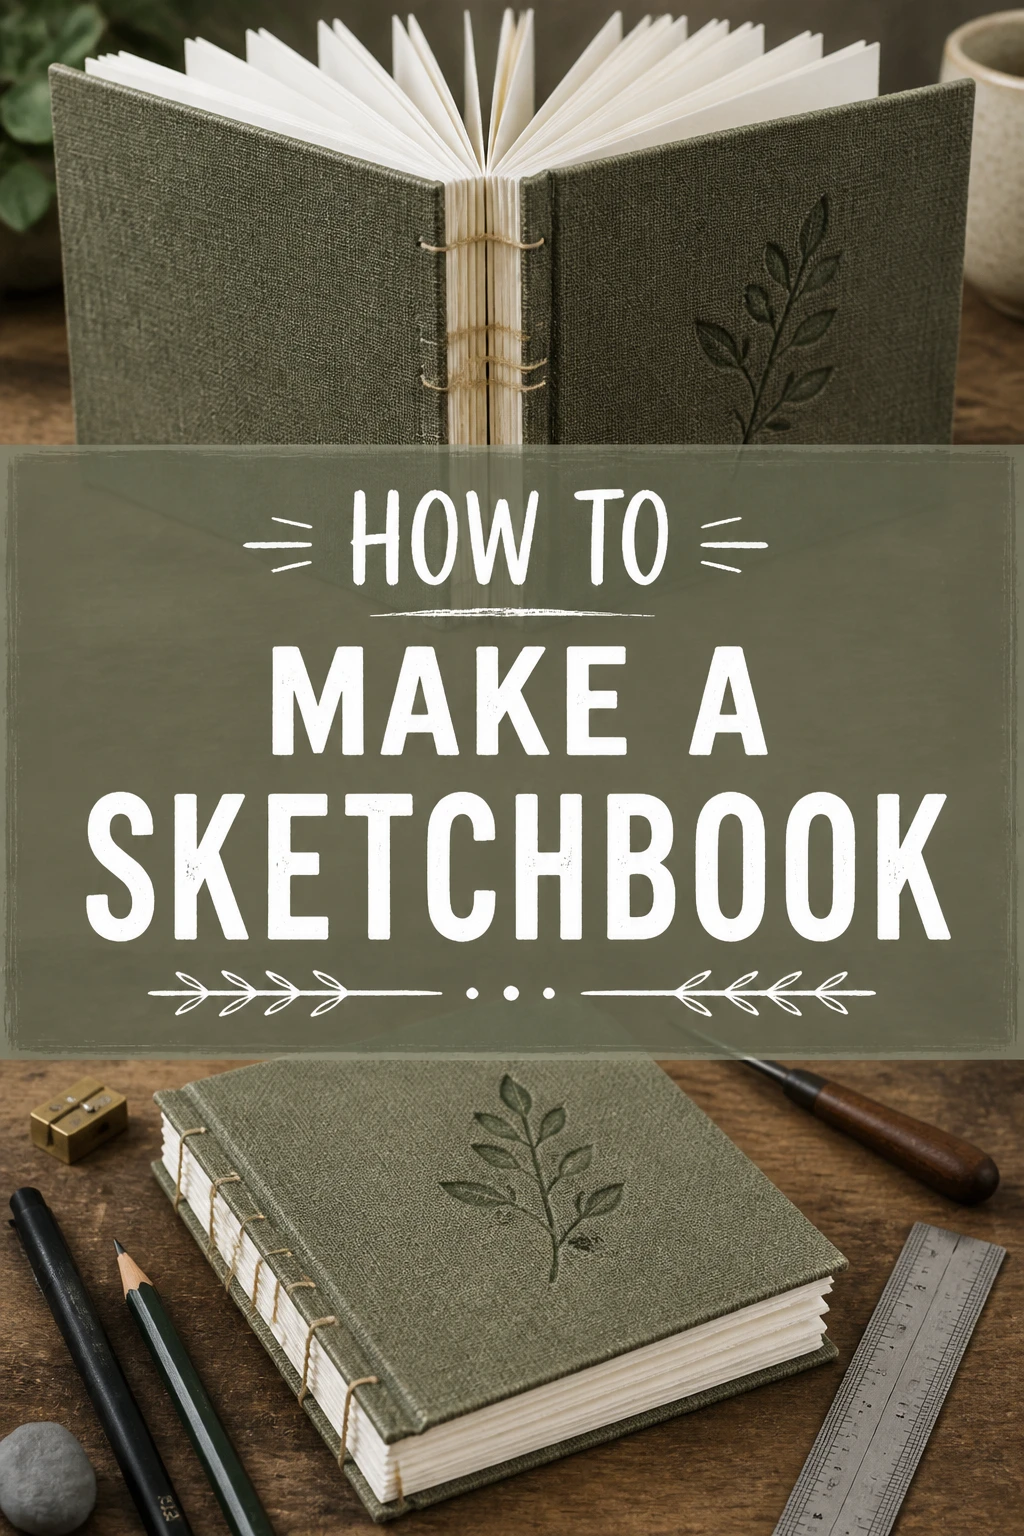
🎨 How To Make A Sketchbook
There’s a unique satisfaction that comes from creating something with your own hands, especially when it’s a tool for your creativity. Imagine filling pages in a book you crafted yourself. I’ve spent countless hours binding books and sketchbooks, and I can tell you it transforms the artistic process. This guide will walk you through making a personal sketchbook, giving you a deeper connection to your art.
Quick Overview
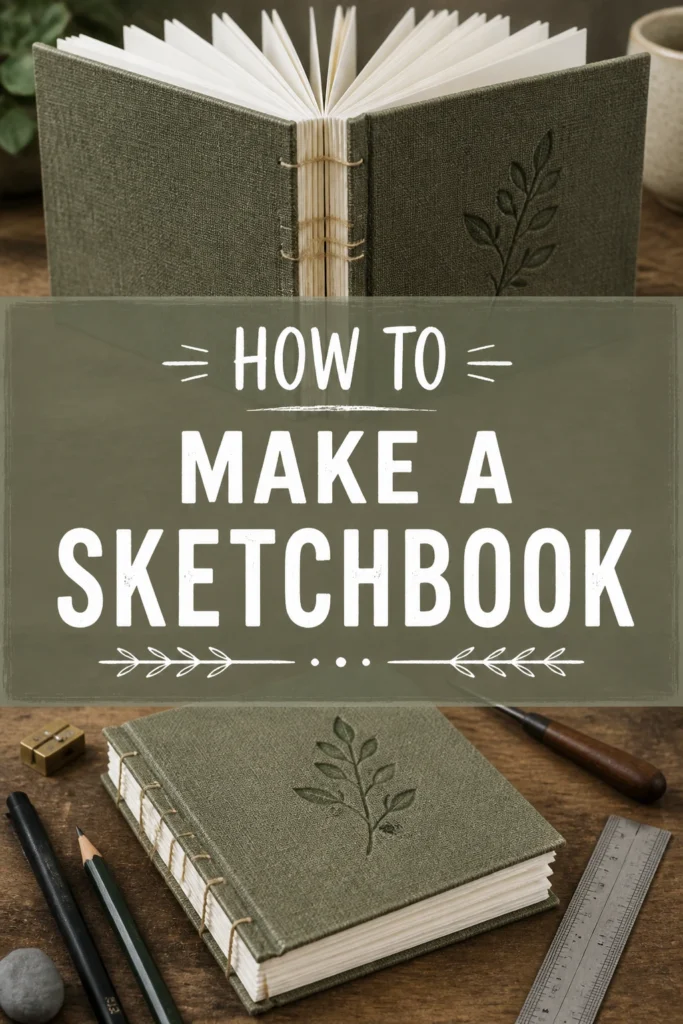
Making your own sketchbook is a rewarding project that allows for complete customization. You’ll assemble your chosen papers and bind them into a sturdy cover, creating a unique canvas for your ideas.
- Time needed: 2-4 hours (depending on complexity and drying time)
- Difficulty: Beginner to Intermediate
- What you’ll need: Paper, cover material, cutting tools, adhesive, binding thread, awl, needle.
Step-by-Step Instructions
Step 1: Gather Your Materials
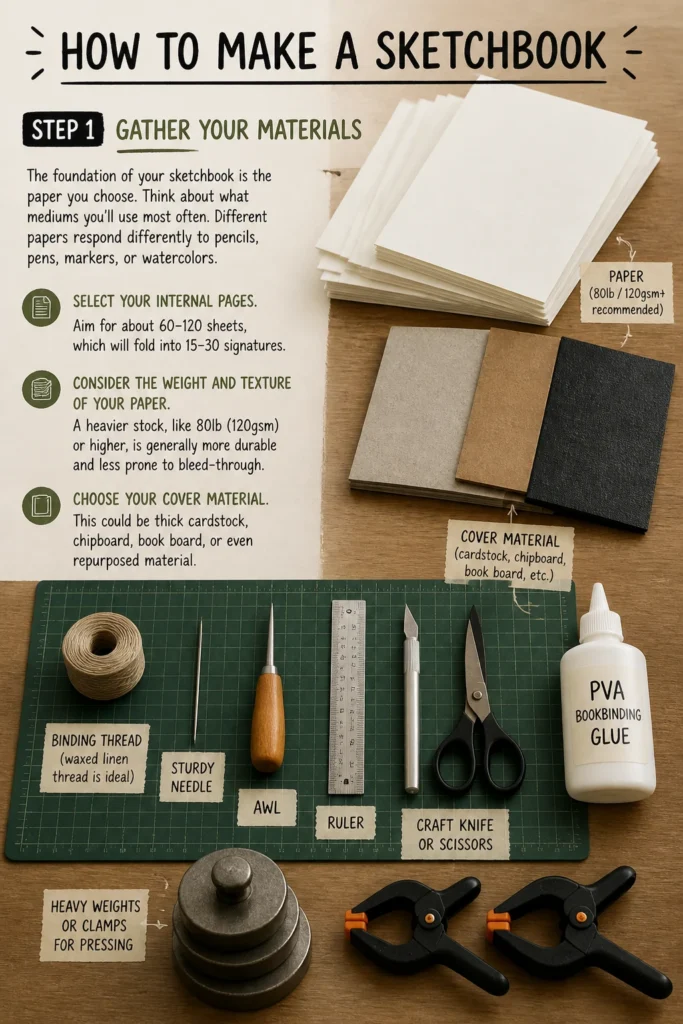
The foundation of your sketchbook is the paper you choose. Think about what mediums you’ll use most often. Different papers respond differently to pencils, pens, markers, or watercolors.
Consider the weight and texture of your paper. A heavier stock, like 80lb (120gsm) or higher, is generally more durable and less prone to bleed-through.
- Select your internal pages. Aim for about 60-120 sheets, which will fold into 15-30 signatures.
- Choose your cover material. This could be thick cardstock, chipboard, book board, or even repurposed material.
- Gather binding thread (waxed linen thread is ideal), a sturdy needle, an awl, a ruler, a craft knife or scissors, and PVA bookbinding glue.
- Prepare a cutting mat and some heavy weights or clamps for pressing.
Step 2: Prepare Your Paper
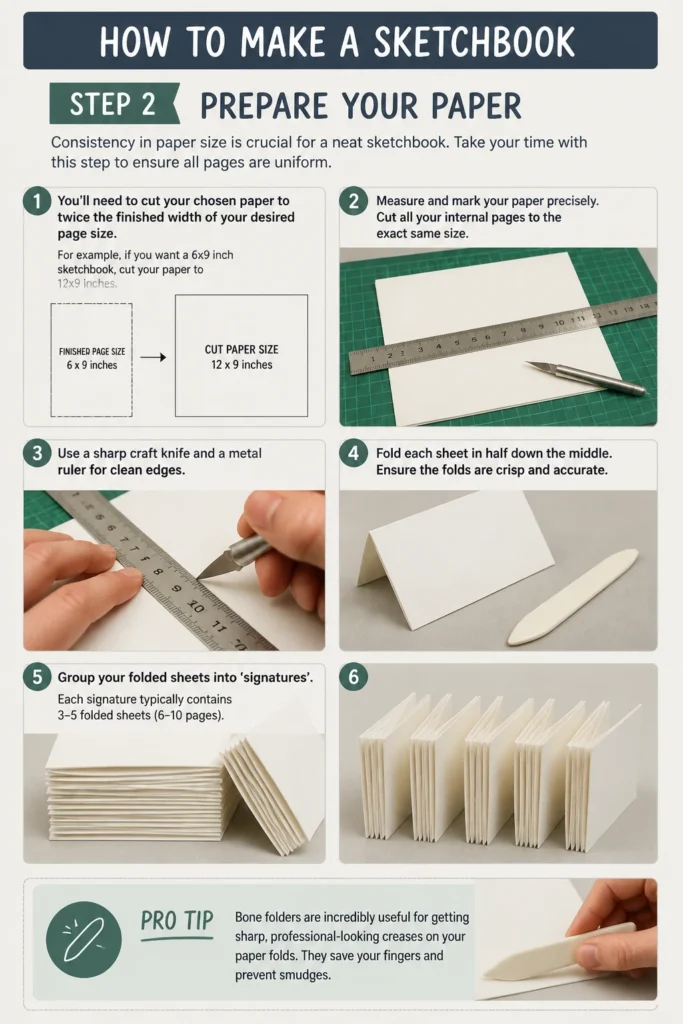
Consistency in paper size is crucial for a neat sketchbook. Take your time with this step to ensure all pages are uniform.
You’ll need to cut your chosen paper to twice the finished width of your desired page size. For example, if you want a 6×9 inch sketchbook, cut your paper to 12×9 inches.
- Measure and mark your paper precisely.
- Cut all your internal pages to the exact same size. Use a sharp craft knife and a metal ruler for clean edges.
- Fold each sheet in half down the middle. Ensure the folds are crisp and accurate.
- Group your folded sheets into ‘signatures’. Each signature typically contains 3-5 folded sheets (6-10 pages).
Pro Tip: Bone folders are incredibly useful for getting sharp, professional-looking creases on your paper folds. They save your fingers and prevent smudges.
Step 3: Prepare Your Signatures for Binding
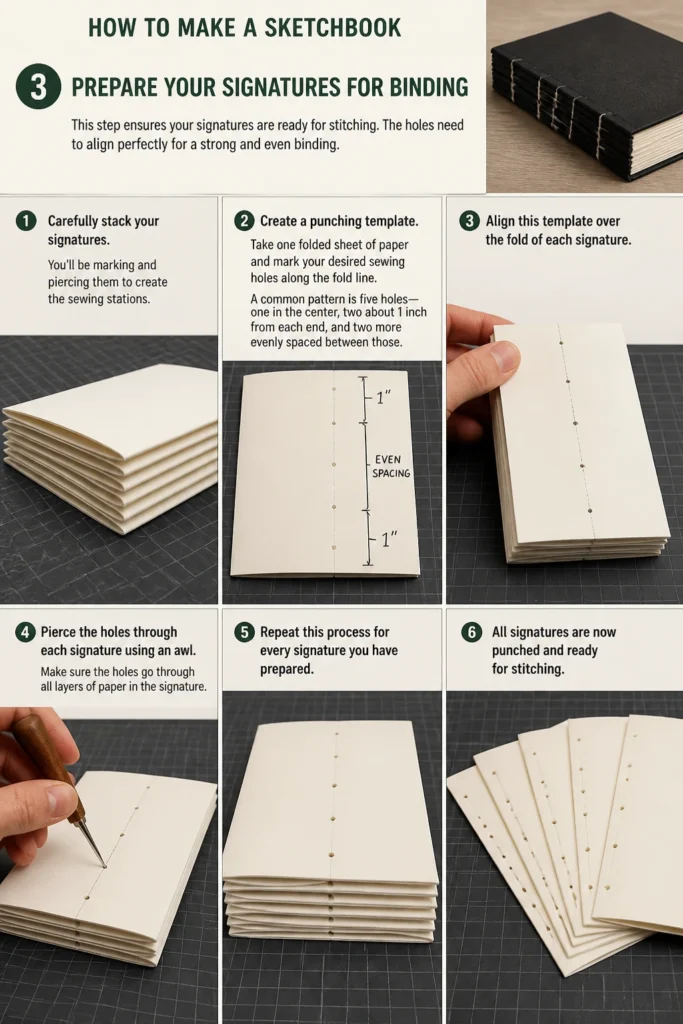
This step ensures your signatures are ready for stitching. The holes need to align perfectly for a strong and even binding.
Carefully stack your signatures. You’ll be marking and piercing them to create the sewing stations.
- Create a punching template. Take one folded sheet of paper and mark your desired sewing holes along the fold line. A common pattern is five holes: one in the center, two about 1 inch from each end, and two more evenly spaced between those.
- Align this template over the fold of each signature.
- Pierce the holes through each signature using an awl. Make sure the holes go through all layers of paper in the signature.
- Repeat this process for every signature you have prepared.
Step 4: Construct Your Cover
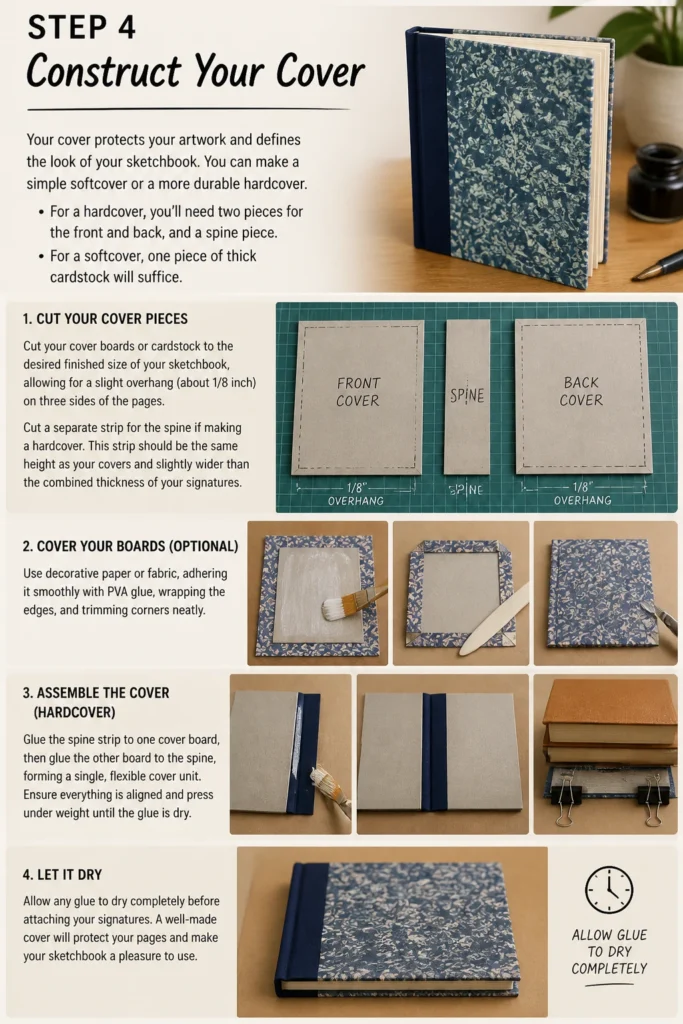
Your cover protects your artwork and defines the look of your sketchbook. You can make a simple softcover or a more durable hardcover.
For a hardcover, you’ll need two pieces for the front and back, and a spine piece. For a softcover, one piece of thick cardstock will suffice.
- Cut your cover boards or cardstock to the desired finished size of your sketchbook, allowing for a slight overhang (about 1/8 inch) on three sides of the pages.
- Cut a separate strip for the spine if making a hardcover. This strip should be the same height as your covers and slightly wider than the combined thickness of your signatures.
- Cover your boards if desired. Use decorative paper or fabric, adhering it smoothly with PVA glue, wrapping the edges, and trimming corners neatly.
- Allow any glue to dry completely under weight before proceeding.
Step 5: Stitch Your Signatures
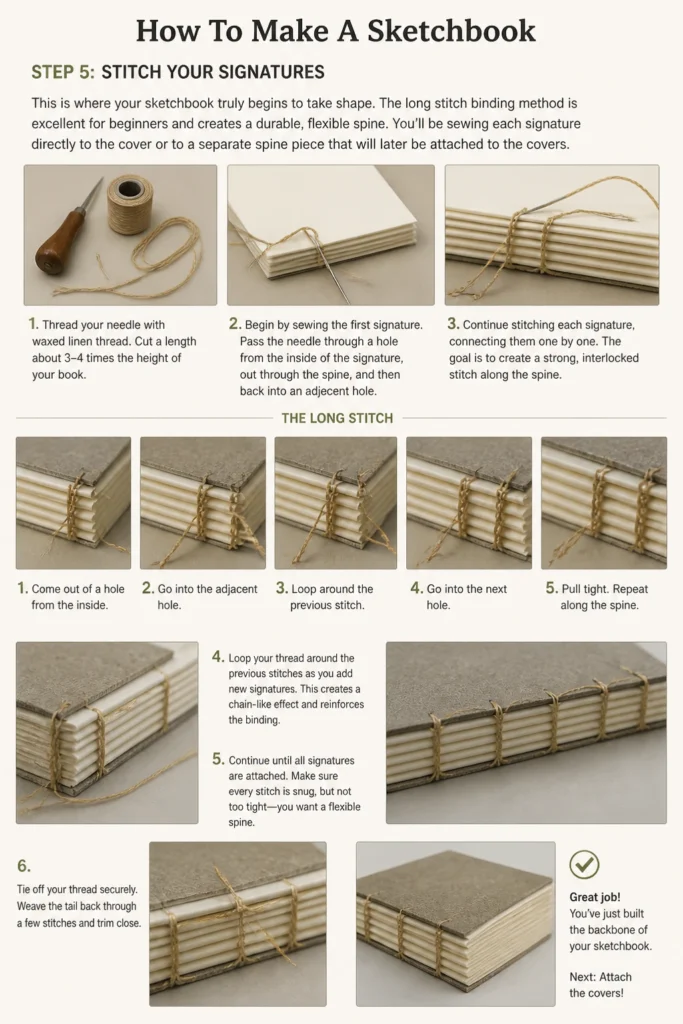
This is where your sketchbook truly begins to take shape. The long stitch binding method is excellent for beginners and creates a durable, flexible spine.
You’ll be sewing each signature directly to the cover or to a separate spine piece that will later be attached to the covers.
- Thread your needle with waxed linen thread. Cut a length about 3-4 times the height of your book.
- Begin by sewing the first signature. Pass the needle through a hole from the inside of the signature, out through the spine, and then back into an adjacent hole.
- Continue stitching each signature, connecting them one by one. The goal is to create a strong, interlocked stitch along the spine.
- Loop your thread around the previous stitches as you add new signatures. This creates a chain-like effect and reinforces the binding.
- Secure your final stitch with a knot, ensuring it is tight but not tearing the paper.
Pro Tip: Watch a few video tutorials on “long stitch binding” or “coptic binding” for a visual guide. Seeing the thread path can make this step much clearer.
Step 6: Attach the Spine to Your Cover (Hardcover Only)
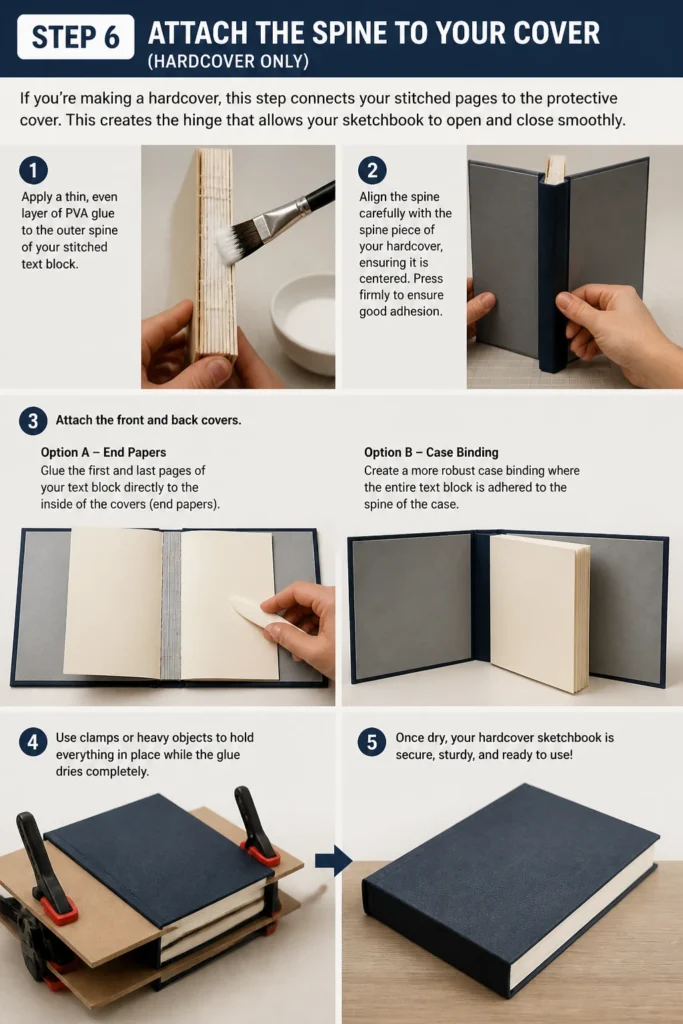
If you’re making a hardcover, this step connects your stitched pages to the protective cover.
This creates the hinge that allows your sketchbook to open and close smoothly.
- Apply a thin, even layer of PVA glue to the outer spine of your stitched text block.
- Align the spine carefully with the spine piece of your hardcover, ensuring it is centered.
- Press firmly to ensure good adhesion.
- Attach the front and back covers. You can either glue the first and last pages of your text block directly to the inside of the covers (end papers) or create a more robust “case binding” where the entire text block is adhered to the spine of the case.
- Use clamps or heavy objects to hold everything in place while the glue dries completely.
Step 7: Finishing Touches and Pressing
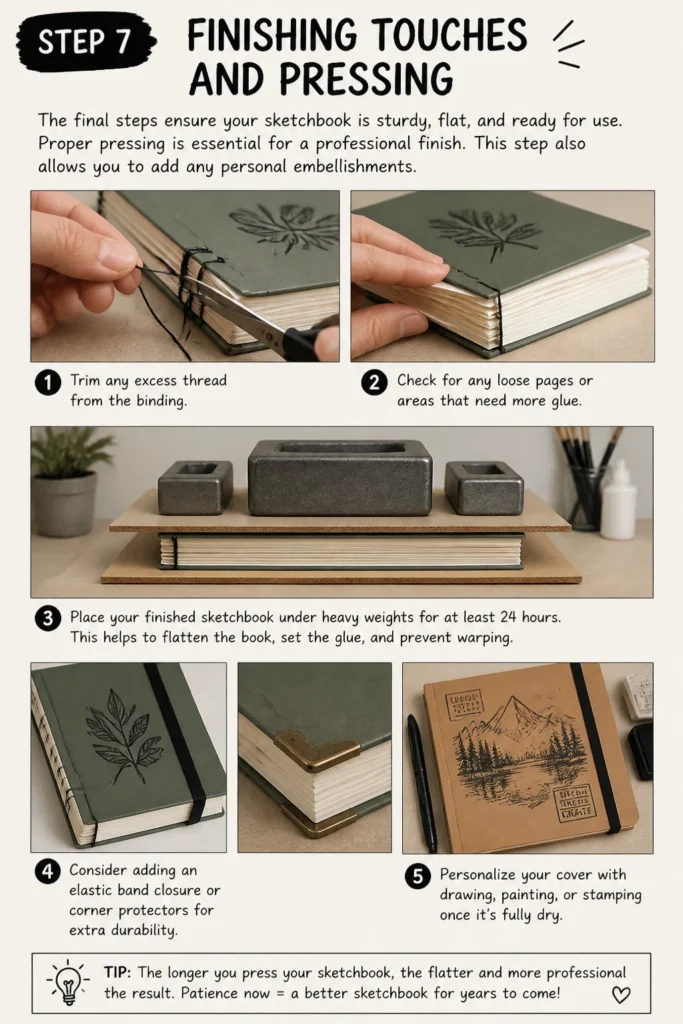
The final steps ensure your sketchbook is sturdy, flat, and ready for use. Proper pressing is essential for a professional finish.
This step also allows you to add any personal embellishments.
- Trim any excess thread from the binding.
- Check for any loose pages or areas that need more glue.
- Place your finished sketchbook under heavy weights for at least 24 hours. This helps to flatten the book, set the glue, and prevent warping.
- Consider adding an elastic band closure or corner protectors for extra durability.
- Personalize your cover with drawing, painting, or stamping once it’s fully dry.
Common Mistakes to Avoid
Inconsistent Paper Cuts
Cutting your paper unevenly is a common pitfall. If your pages aren’t all the same size, your finished sketchbook will have a messy, uneven edge. Always use a sharp blade, a metal ruler, and a cutting mat, taking your time to measure accurately for every single sheet.
Skipping the Bone Folder
Many beginners overlook the importance of a bone folder. Simply folding paper by hand often results in rounded, soft creases, which can make your signatures bulky and difficult to bind neatly. Using a bone folder creates sharp, crisp folds that lie flat, resulting in a much more professional and compact book block.
Rushing the Glue Drying Process
Impatience with glue is a frequent mistake. If you don’t allow sufficient drying time, especially under weight, your book’s structure can warp, or the binding might not hold securely. Always follow the glue’s instructions and give your sketchbook ample time to dry completely, ideally for 24 hours or more, pressed flat.
Over-Tightening or Under-Tightening Stitches
Binding requires a delicate balance. Stitching too tightly can tear the paper, especially at the holes, while loose stitches result in a floppy, unstable book block. Practice on scrap paper first to get a feel for the tension. The stitches should be snug enough to hold the signatures firmly together without distorting the paper.
Troubleshooting
Pages are Uneven After Binding
If your pages appear uneven, it likely stems from inconsistent cutting or folding. Next time, double-check all measurements before cutting and use a bone folder to ensure sharp, uniform creases on every sheet. For the current book, you can carefully trim the edges with a sharp craft knife and ruler, but this might reduce the overall page size slightly.
Binding Feels Loose or Flimsy
A loose binding usually means the thread wasn’t pulled taut enough during stitching. Review your stitching technique, making sure each loop is snug against the previous one and the spine. For a book that’s already bound, you might be able to carefully re-tension some visible stitches, or reinforce the spine with a thin layer of bookbinding glue applied directly to the threads.
Cover is Warped or Bowed
Warping often occurs if the cover material wasn’t pressed flat while drying, or if too much glue was used unevenly. To prevent this, always apply glue sparingly and evenly, and ensure the entire book (especially the cover) is pressed under heavy, flat objects for a full 24 hours after assembly. For a warped cover, try re-pressing it for an extended period, perhaps between two very flat, heavy boards.
Key Takeaways
- Precision in cutting and folding paper is fundamental for a professional-looking sketchbook.
- Choosing the right paper and cover materials directly impacts your sketchbook’s durability and function.
- A bone folder is an invaluable tool for creating crisp, flat folds and seams.
- Patience during the gluing and pressing stages is critical for a strong, warp-free book.
- The long stitch binding method is accessible for beginners and creates a flexible, sturdy spine.
- Personalizing your sketchbook’s cover makes it uniquely yours and enhances the creative experience.
Frequently Asked Questions
Can I use regular printer paper for my sketchbook?
While you can technically use printer paper, it’s generally thin and prone to bleed-through, especially with markers or ink. For a more satisfying and durable sketchbook, consider paper that is at least 80lb (120gsm) or heavier, designed for art.
What kind of glue should I use?
PVA (polyvinyl acetate) bookbinding glue is highly recommended. It’s acid-free, flexible when dry, and specifically designed for book construction. Avoid craft glues that can be too brittle or cause paper to wrinkle.
How many signatures should I put in my sketchbook?
The number of signatures depends on the paper thickness and your desired book thickness. Generally, 15-30 signatures, each containing 3-5 folded sheets, creates a substantial yet manageable sketchbook. Too many sheets per signature can make piercing difficult and the book harder to open flat.
Can I make a sketchbook that opens completely flat?
Yes, certain binding methods like Coptic stitch or long stitch are excellent for creating sketchbooks that lay completely flat when open. This is a huge advantage for artists who want to draw across a full two-page spread without battling a curved spine.
Our Top Recommended Finds
- Quality Sketch Paper: Look for acid-free drawing paper in pads or large sheets, ranging from 80lb to 140lb (120-200gsm), suitable for various dry media and light washes.
- Reliable Bookbinding Adhesive: A good quality PVA bookbinding glue is essential. It offers strong, flexible adhesion without yellowing over time.
- Durable Cover Material: Chipboard or book board provides a sturdy foundation for hardcover sketchbooks. Alternatively, heavy cardstock (100lb/270gsm or more) works well for softcover options.
Your Next Creative Adventure Awaits
You’ve now got the skills to craft your very own sketchbook, a personal canvas waiting for your unique vision. This project isn’t just about making a book; it’s about deepening your connection to your art and creating a space that inspires you.
Don’t let the thought of a blank page intimidate you. Pick up your newly made sketchbook, choose your favorite drawing tool, and make your first mark today. Experiment with different papers, cover designs, and binding techniques to find what truly sparks your creativity.