🛠️ How To Build A Shed
Thinking about adding a shed to your backyard?
It’s a fantastic project that can transform your outdoor space, offering much-needed storage or a dedicated workspace.
Having built several sheds over the years, from basic garden storage to more complex workshops, I’ve learned the ins and outs of making the process smooth and rewarding, and I’m here to share that experience with you.
Quick Overview
This guide will walk you through the entire process of building a sturdy, functional shed, from planning and foundation to framing and finishing.
You’ll gain the confidence to tackle this significant home improvement project yourself.
- Time needed: 3-7 days (depending on size, complexity, and your experience level)
- Difficulty: Intermediate
- What you’ll need: Lumber, concrete, roofing materials, siding, fasteners, power tools (saw, drill), hand tools (hammer, tape measure, level, square), safety gear.
Step-by-Step Instructions
Step 1: Plan Your Shed and Site
Decide on the shed’s purpose, size, and style. Consider what you’ll store or do inside to determine the ideal dimensions.
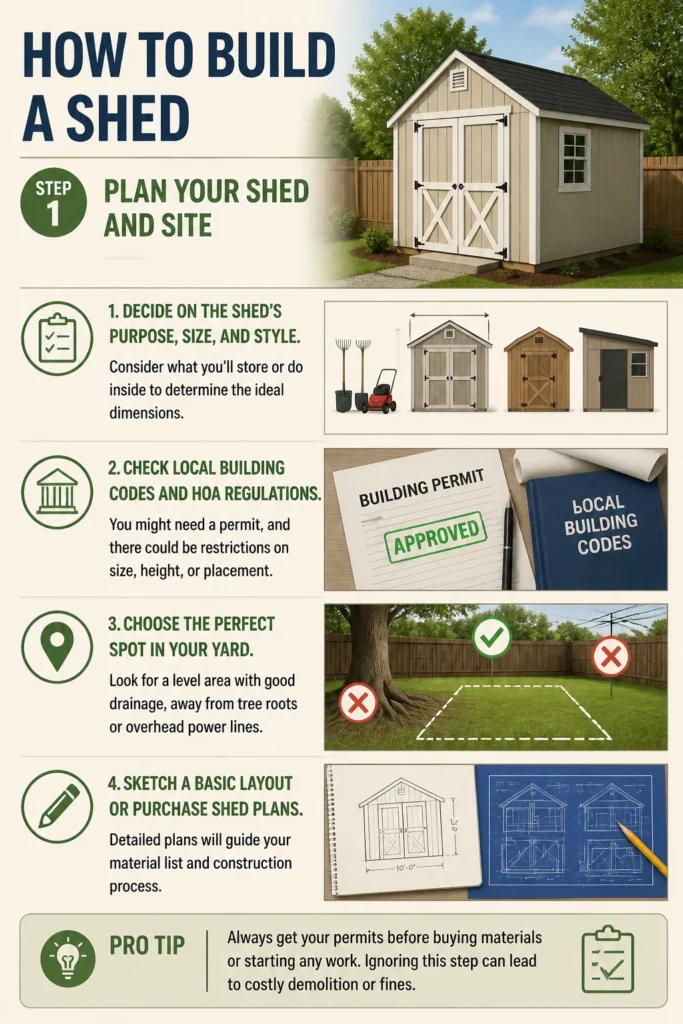
Check local building codes and HOA regulations. You might need a permit, and there could be restrictions on size, height, or placement.
Choose the perfect spot in your yard. Look for a level area with good drainage, away from tree roots or overhead power lines.
Sketch a basic layout or purchase shed plans. Detailed plans will guide your material list and construction process.
Pro Tip: Always get your permits before buying materials or starting any work. Ignoring this step can lead to costly demolition or fines.
Step 2: Prepare the Site and Build the Foundation
Clear the chosen area of any debris, rocks, or vegetation. Ensure the ground is level.
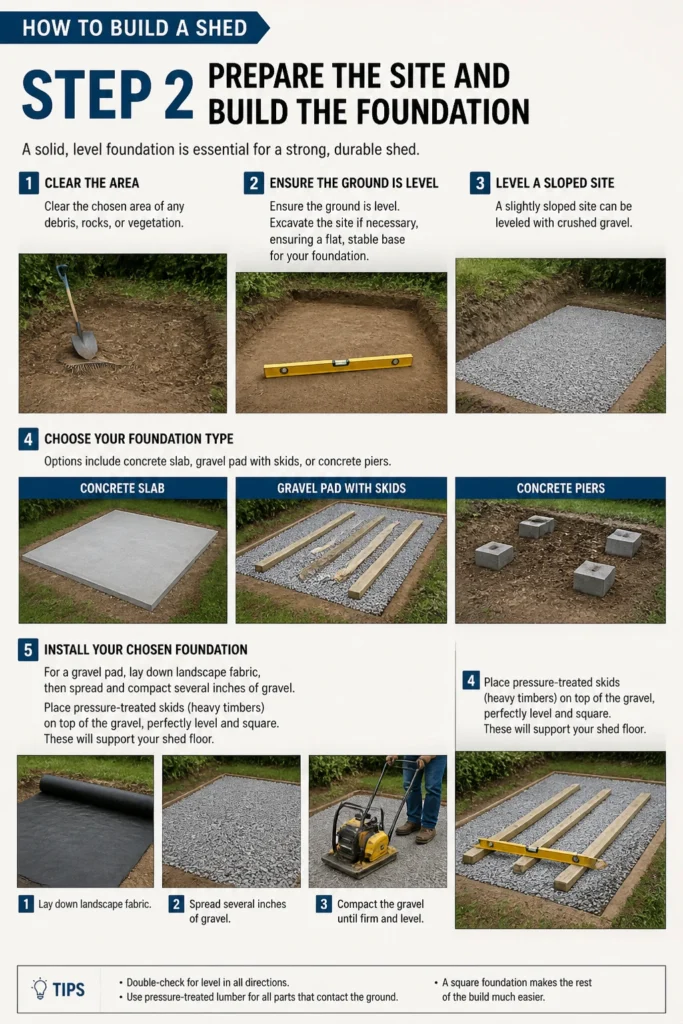
Excavate the site if necessary, ensuring a flat, stable base for your foundation. A slightly sloped site can be leveled with crushed gravel.
Choose your foundation type. Options include concrete slab, gravel pad with skids, or concrete piers.
Install your chosen foundation. For a gravel pad, lay down landscape fabric, then spread and compact several inches of gravel.
Place pressure-treated skids (heavy timbers) on top of the gravel, perfectly level and square. These will support your shed floor.
Step 3: Construct the Floor Frame
Cut pressure-treated lumber for the rim joists and floor joists according to your plans.
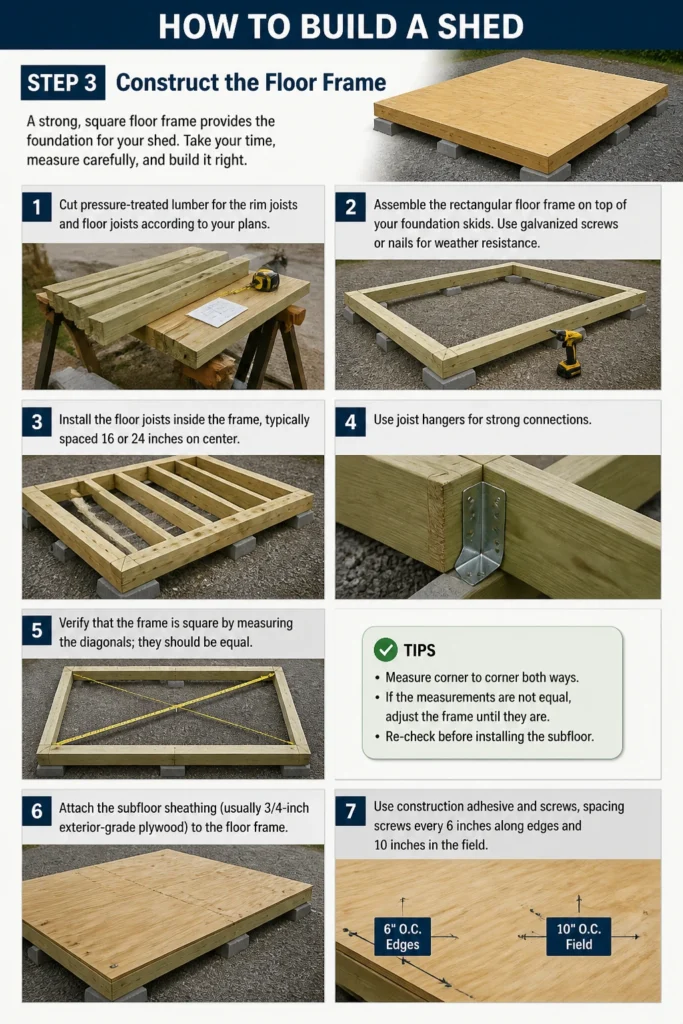
Assemble the rectangular floor frame on top of your foundation skids. Use galvanized screws or nails for weather resistance.
Install the floor joists inside the frame, typically spaced 16 or 24 inches on center. Use joist hangers for strong connections.
Verify that the frame is square by measuring the diagonals; they should be equal.
Attach the subfloor sheathing (usually 3/4-inch exterior-grade plywood) to the floor frame. Use construction adhesive and screws, spacing screws every 6 inches along edges and 10 inches in the field.
Step 4: Frame the Walls
Cut lumber for the bottom plates, top plates, studs, and headers for each wall.
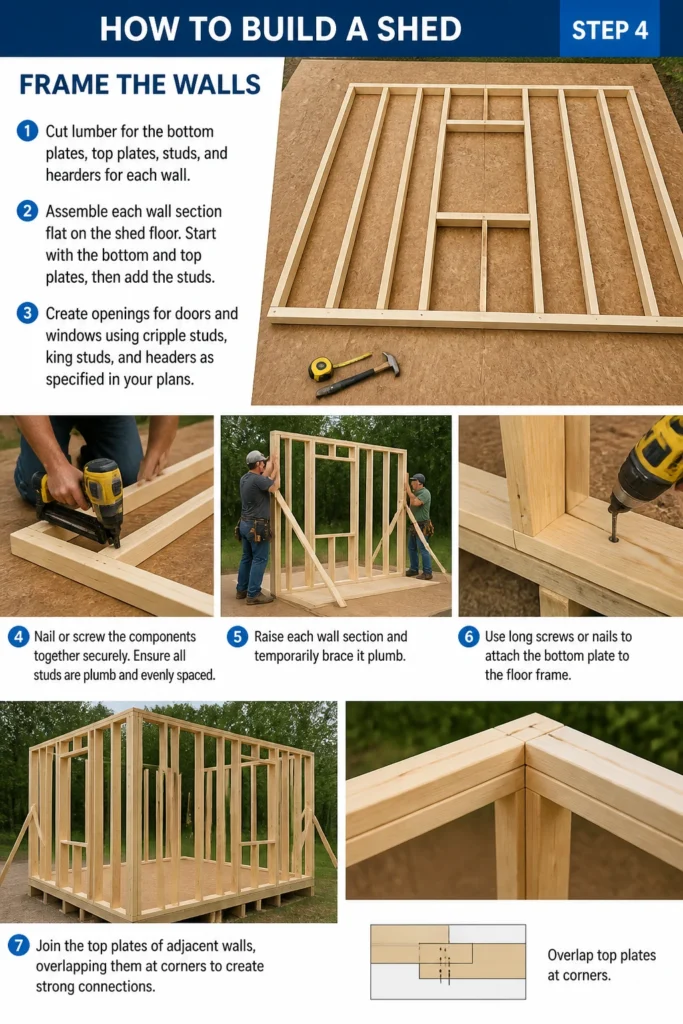
Assemble each wall section flat on the shed floor. Start with the bottom and top plates, then add the studs.
Create openings for doors and windows using cripple studs, king studs, and headers as specified in your plans.
Nail or screw the components together securely. Ensure all studs are plumb and evenly spaced.
Raise each wall section and temporarily brace it plumb. Use long screws or nails to attach the bottom plate to the floor frame.
Join the top plates of adjacent walls, overlapping them at corners to create strong connections.
Step 5: Build the Roof Structure
Determine your roof style. Common options include gable, lean-to, or gambrel.
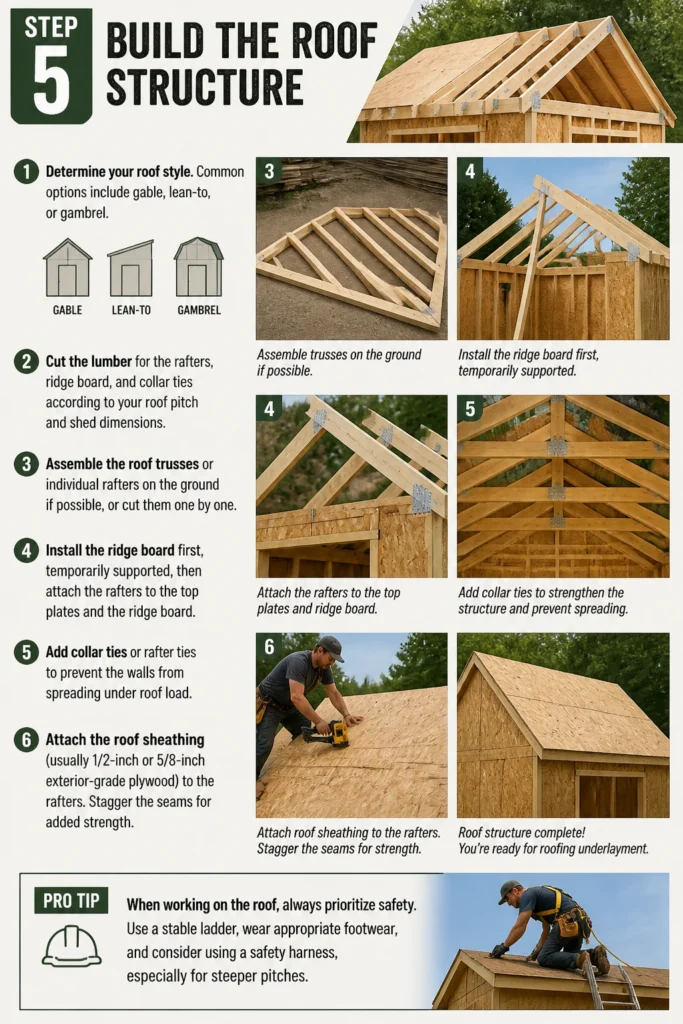
Cut the lumber for the rafters, ridge board, and collar ties according to your roof pitch and shed dimensions.
Assemble the roof trusses or individual rafters on the ground if possible, or cut them one by one.
Install the ridge board first, temporarily supported, then attach the rafters to the top plates and the ridge board.
Add collar ties or rafter ties to prevent the walls from spreading under roof load.
Attach the roof sheathing (usually 1/2-inch or 5/8-inch exterior-grade plywood) to the rafters. Stagger the seams for added strength.
Pro Tip: When working on the roof, always prioritize safety. Use a stable ladder, wear appropriate footwear, and consider using a safety harness, especially for steeper pitches.
Step 6: Install Roofing and Siding
Apply roofing felt (tar paper) over the roof sheathing. Start at the bottom and overlap each course by several inches.
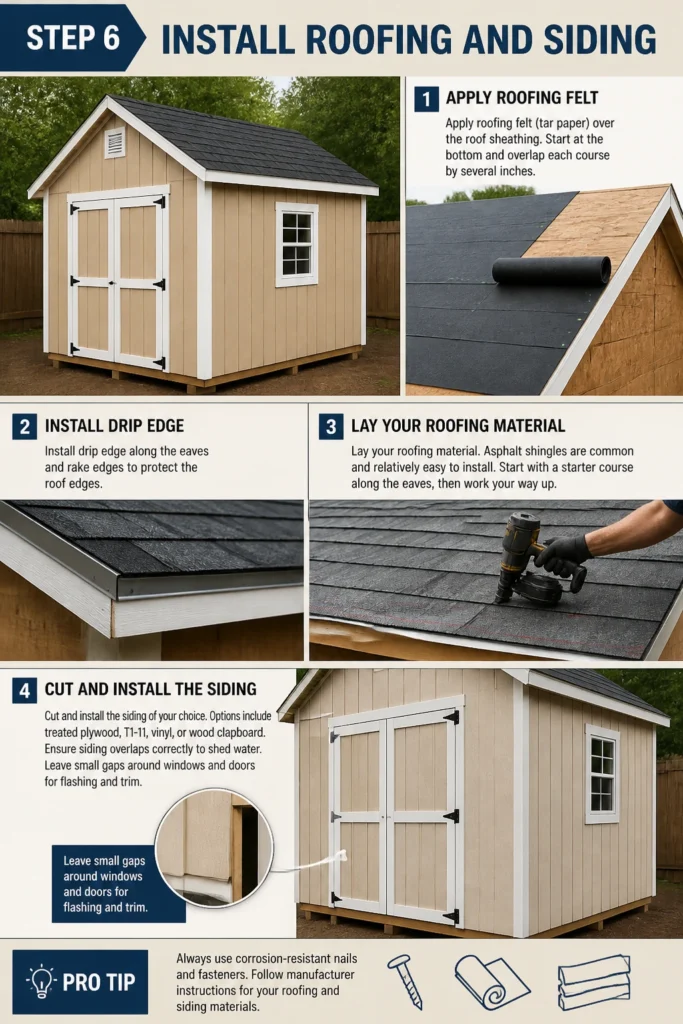
Install drip edge along the eaves and rake edges to protect the roof edges.
Lay your roofing material. Asphalt shingles are common and relatively easy to install. Start with a starter course along the eaves, then work your way up.
Cut and install the siding of your choice. Options include treated plywood, T1-11, vinyl, or wood clapboard.
Ensure siding overlaps correctly to shed water. Leave small gaps around windows and doors for flashing and trim.
Step 7: Add Doors and Windows
Install pre-hung doors or build your own shed door. Ensure the opening is square and plumb.
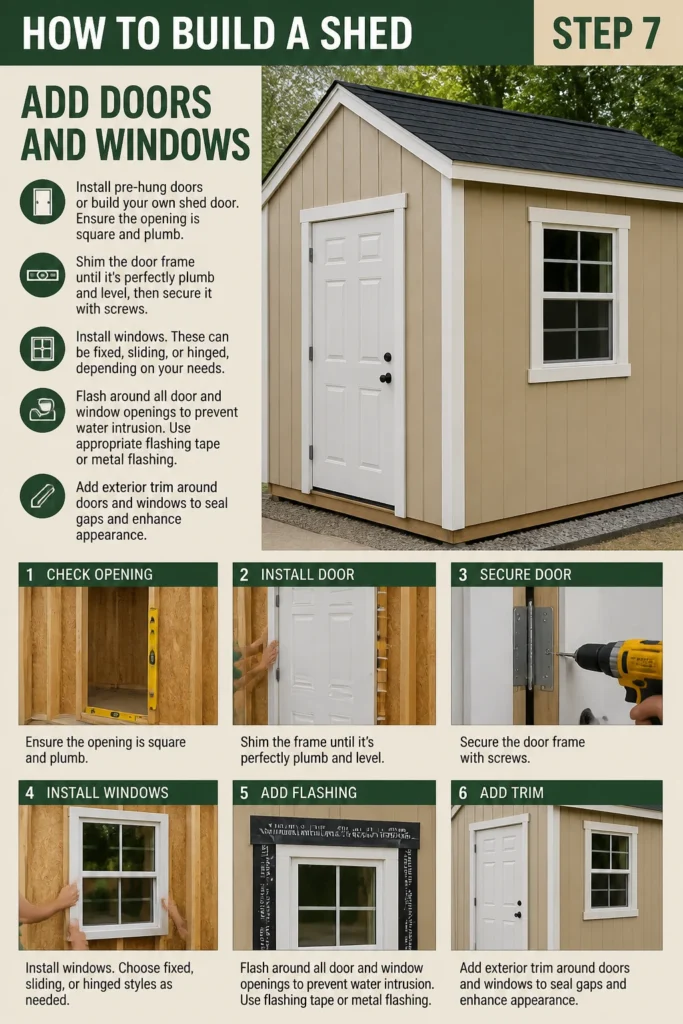
Shim the door frame until it’s perfectly plumb and level, then secure it with screws.
Install windows. These can be fixed, sliding, or hinged, depending on your needs.
Flash around all door and window openings to prevent water intrusion. Use appropriate flashing tape or metal flashing.
Add exterior trim around doors and windows to seal gaps and enhance appearance.
Step 8: Finish the Exterior and Interior
Paint or stain the exterior of your shed to protect it from the elements and match your home’s aesthetic.
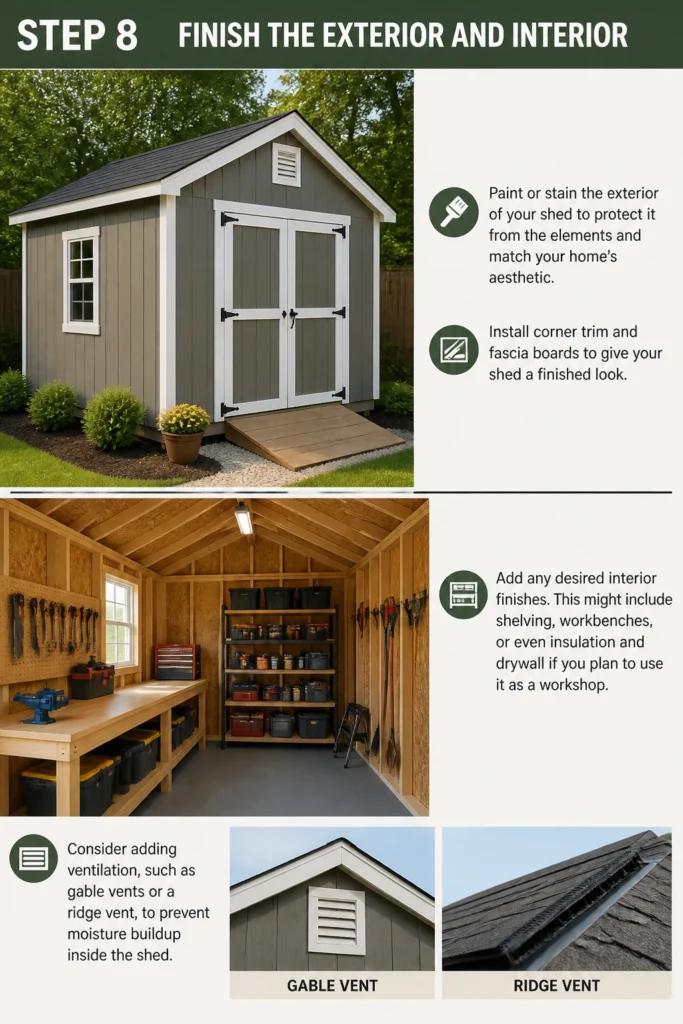
Install corner trim and fascia boards to give your shed a finished look.
Add any desired interior finishes. This might include shelving, workbenches, or even insulation and drywall if you plan to use it as a workshop.
Consider adding ventilation, such as gable vents or a ridge vent, to prevent moisture buildup inside the shed.
Common Mistakes to Avoid
Skipping Permits and Codes
Many people assume a small shed doesn’t require a permit. This can be a costly error.
Building without a permit can lead to fines, forced demolition, or issues when selling your property.
Always check with your local planning department and homeowners’ association before you even start digging.
Inadequate Foundation Preparation
A poor foundation is the root of many shed problems. If the ground isn’t level or properly compacted, your shed will settle unevenly.
This leads to warped walls, sticking doors, and premature structural failure.
Invest time in site preparation and building a robust, level foundation that can properly support the shed’s weight.
Ignoring Water Management
Water is the enemy of any outdoor structure. Failing to properly flash windows and doors, or neglecting to install a drip edge, invites rot and mold.
Ensure all exterior joints are sealed, and consider gutters to direct rainwater away from the foundation.
Proper water management significantly extends the life of your shed.
Rushing the Framing
It’s tempting to speed through the framing, but accuracy here is paramount. Walls that aren’t plumb or square will cause headaches down the line.
Doors won’t close properly, roof lines will be crooked, and siding won’t lay flat.
Take your time, measure twice, and use a level and square constantly to ensure everything is perfectly aligned.
Troubleshooting
Shed Door Sticks or Won’t Close
This is often due to the shed settling unevenly or the door frame not being perfectly square during installation.
Check the foundation for any signs of settling. You may need to add shims under the door frame or adjust the hinges.
Sometimes, planing a small amount of wood off the sticking edge of the door can resolve minor issues.
Roof Leaks
Leaks typically occur at seams, around vents, or where flashing is inadequate.
Inspect the roof carefully for missing shingles, cracked caulk, or improperly installed flashing.
Repair or replace damaged sections of roofing and ensure all penetrations are properly sealed with roofing cement or new flashing.
Moisture or Condensation Inside
Lack of proper ventilation is the usual culprit for interior moisture, especially in humid climates.
Install gable vents or a ridge vent to allow air circulation. You might also consider adding a vapor barrier to the interior walls if insulating.
Ensure there’s adequate airflow under the shed floor if it’s not on a concrete slab.
Key Takeaways
- Thorough planning and permit acquisition are critical first steps for any shed project.
- A solid, level foundation is non-negotiable for the long-term stability of your shed.
- Precision in framing, especially keeping walls plumb and square, prevents many future problems.
- Effective water management through proper flashing, roofing, and site drainage protects your investment.
- Don’t rush the process; patience and attention to detail lead to a durable and attractive shed.
- Safety should always be your top priority, especially when working with power tools or at heights.
Frequently Asked Questions
How long does it typically take to build a shed?
The time varies greatly depending on the shed’s size, complexity, and your experience. A small, basic shed might take a dedicated weekend or two.
Larger, more elaborate sheds with multiple windows, doors, and complex rooflines can easily take a week or more of consistent effort.
Having a helper can significantly speed up the process.
Do I need a concrete slab for my shed?
Not necessarily. While a concrete slab offers a very durable and stable foundation, it’s not always required.
Many sheds are built on a gravel pad with pressure-treated skids or concrete piers.
The best foundation depends on your local climate, soil conditions, shed size, and what you plan to store inside.
Can I build a shed by myself?
Yes, many smaller sheds can be built by one person, especially with careful planning and the right tools.
However, tasks like raising wall sections or installing large roof panels are much easier and safer with an extra set of hands.
Consider enlisting a friend for these critical stages.
What’s the best type of wood for a shed?
Pressure-treated lumber is essential for any wood that will be in contact with the ground, such as skids and floor joists.
For framing, standard untreated dimensional lumber (like 2x4s or 2x6s) is suitable.
Exterior-grade plywood or OSB is used for subflooring and roof sheathing.
Our Top Recommended Finds
- Circular Saw: An indispensable tool for quickly and accurately cutting all your lumber. Look for one with a good blade and safety features.
- Cordless Drill/Driver: Perfect for driving screws and drilling pilot holes, offering convenience and portability around the job site.
- 4-Foot Level: Essential for ensuring your foundation, walls, and floor are perfectly plumb and level, preventing many headaches later on.
Your Backyard Transformation Awaits
Building a shed is a rewarding project that offers immense practical value and a great sense of accomplishment.
It demands patience, attention to detail, and a willingness to learn, but the results are well worth the effort.
Gather your plans, prepare your site, and take the first step towards creating that extra space you’ve always wanted.