👖 How To Rip Your Jeans
I remember wanting that perfect distressed look for my jeans, but finding the right pair felt impossible. Buying pre-ripped jeans can be expensive and often doesn’t quite match your vision.
That’s why I started ripping my own, and it’s surprisingly easy once you know the tricks. This guide shares everything I’ve learned to help you create your ideal custom distressed denim.

Quick Overview
Transforming your plain jeans into a stylish, ripped pair is a rewarding DIY project. You’ll learn how to create authentic-looking rips, distressing, and frayed edges. Get ready to personalize your denim wardrobe.
- Time needed: 45-90 minutes (depending on desired complexity)
- Difficulty: Beginner
- What you’ll need: Jeans, sharp scissors, razor blade/utility knife, sandpaper/pumice stone, cardboard (optional), tweezers
Step-by-Step Instructions
Step 1: Choose Your Jeans Wisely
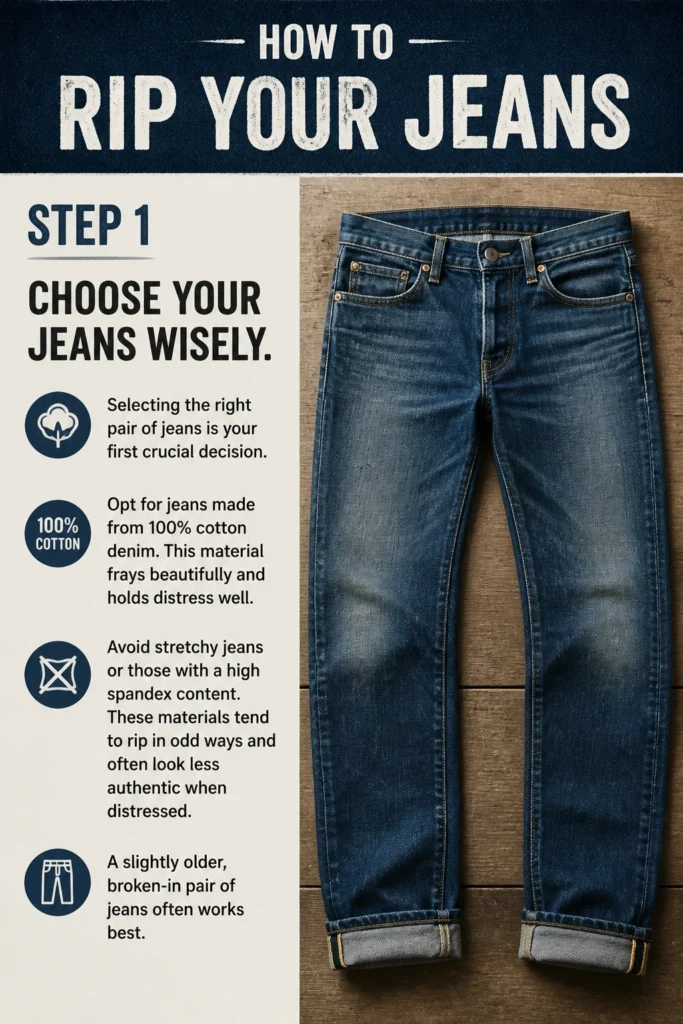
Selecting the right pair of jeans is your first crucial decision. Opt for jeans made from 100% cotton denim. This material frays beautifully and holds distress well.
Avoid stretchy jeans or those with a high spandex content. These materials tend to rip in odd ways and often look less authentic when distressed. A slightly older, broken-in pair of jeans often works best.
Step 2: Gather Your Tools and Prep Your Workspace
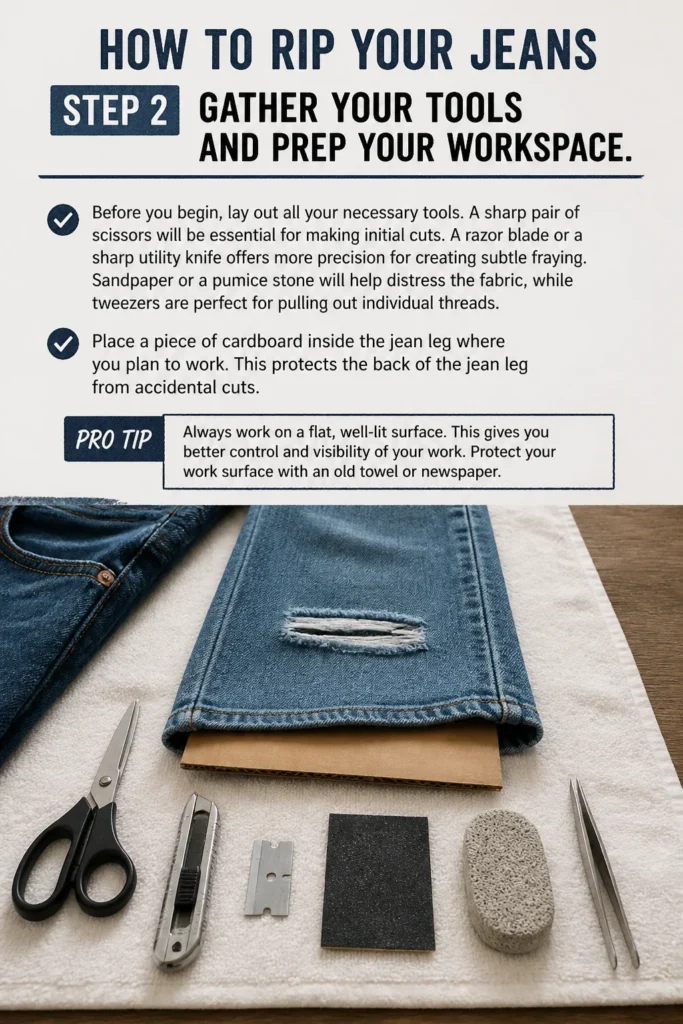
Before you begin, lay out all your necessary tools. A sharp pair of scissors will be essential for making initial cuts. A razor blade or a sharp utility knife offers more precision for creating subtle fraying.
Sandpaper or a pumice stone will help distress the fabric, while tweezers are perfect for pulling out individual threads. Place a piece of cardboard inside the jean leg where you plan to work. This protects the back of the jean leg from accidental cuts.
Pro Tip: Always work on a flat, well-lit surface. This gives you better control and visibility of your work. Protect your work surface with an old towel or newspaper.
Step 3: Mark Your Rip Locations
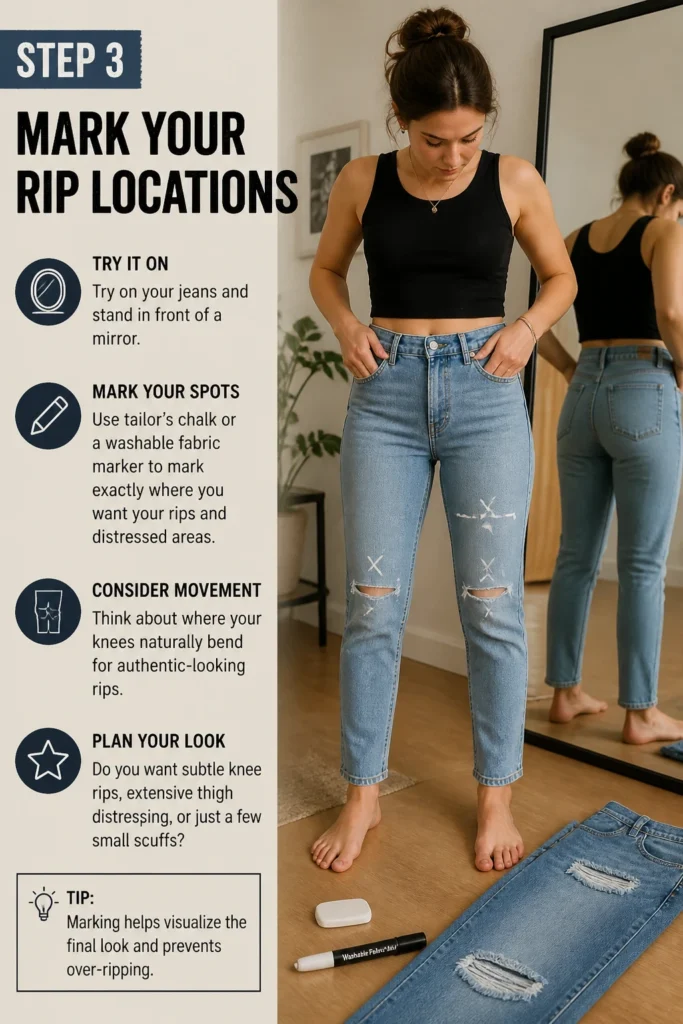
Try on your jeans and stand in front of a mirror. Use tailor’s chalk or a washable fabric marker to mark exactly where you want your rips and distressed areas. Consider where your knees naturally bend for authentic-looking rips.
Think about the overall aesthetic you’re aiming for. Do you want subtle knee rips, extensive thigh distressing, or just a few small scuffs? Marking helps visualize the final look and prevents over-ripping.
Step 4: Start with Initial Cuts
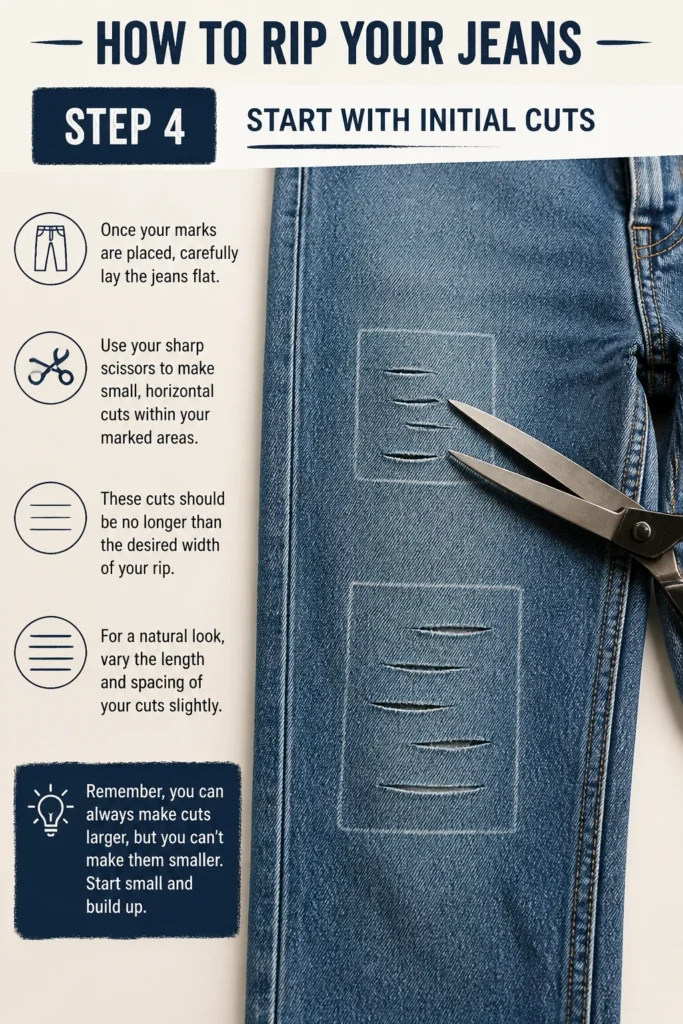
Once your marks are placed, carefully lay the jeans flat. Use your sharp scissors to make small, horizontal cuts within your marked areas. These cuts should be no longer than the desired width of your rip.
For a natural look, vary the length and spacing of your cuts slightly. Remember, you can always make cuts larger, but you can’t make them smaller. Start small and build up.
Step 5: Fray and Distress with a Razor Blade
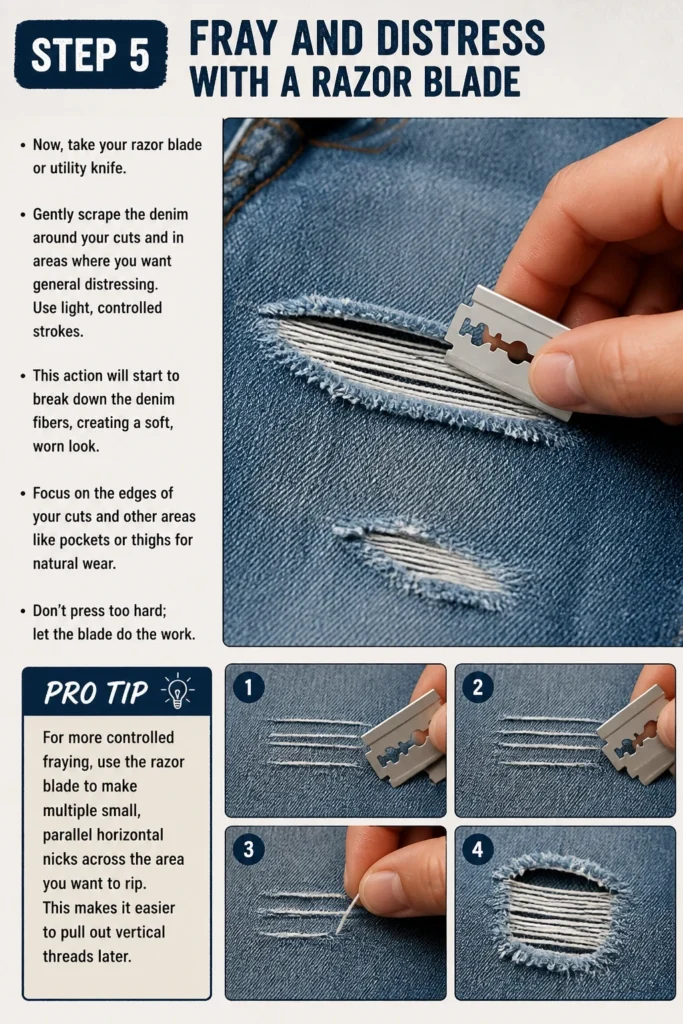
Now, take your razor blade or utility knife. Gently scrape the denim around your cuts and in areas where you want general distressing. Use light, controlled strokes.
This action will start to break down the denim fibers, creating a soft, worn look. Focus on the edges of your cuts and other areas like pockets or thighs for natural wear. Don’t press too hard; let the blade do the work.
Pro Tip: For more controlled fraying, use the razor blade to make multiple small, parallel horizontal nicks across the area you want to rip. This makes it easier to pull out vertical threads later.
Step 6: Use Sandpaper for Worn Patches
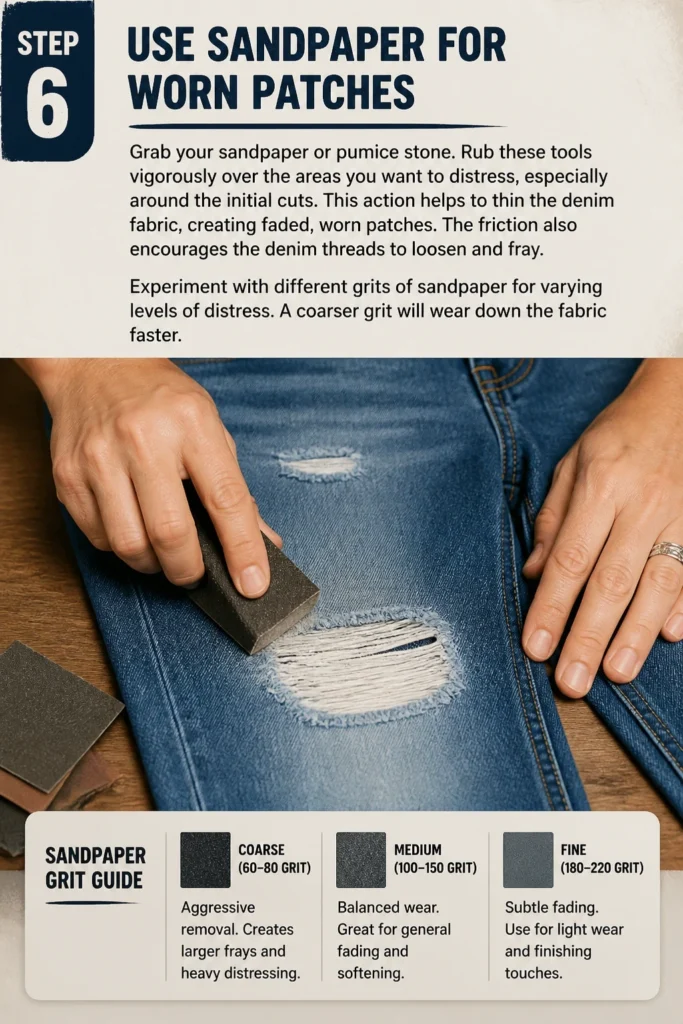
Grab your sandpaper or pumice stone. Rub these tools vigorously over the areas you want to distress, especially around the initial cuts. This action helps to thin the denim fabric, creating faded, worn patches.
The friction also encourages the denim threads to loosen and fray. Experiment with different grits of sandpaper for varying levels of distress. A coarser grit will wear down the fabric faster.
Step 7: Pull Out Vertical Threads (The White Threads)
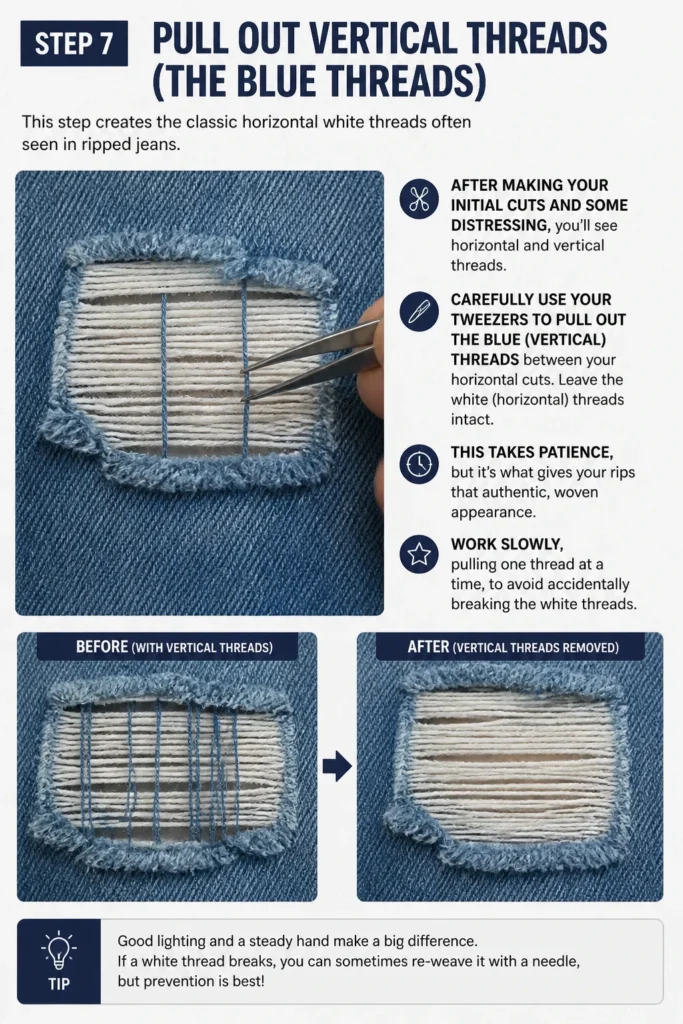
This step creates the classic horizontal white threads often seen in ripped jeans. After making your initial cuts and some distressing, you’ll see horizontal and vertical threads. Carefully use your tweezers to pull out the blue (vertical) threads between your horizontal cuts.
Leave the white (horizontal) threads intact. This takes patience, but it’s what gives your rips that authentic, woven appearance. Work slowly, pulling one thread at a time, to avoid accidentally breaking the white threads.
Step 8: Refine and Expand Your Rips
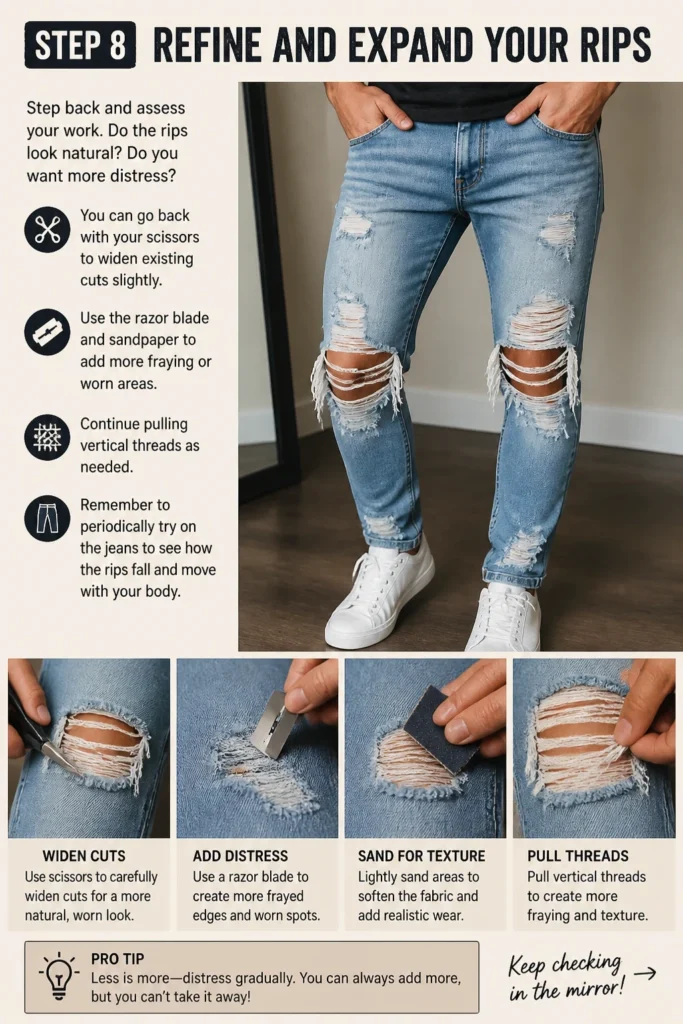
Step back and assess your work. Do the rips look natural? Do you want more distress? You can go back with your scissors to widen existing cuts slightly.
Use the razor blade and sandpaper to add more fraying or worn areas. Continue pulling vertical threads as needed. Remember to periodically try on the jeans to see how the rips fall and move with your body.
Step 9: Wash and Dry Your Jeans
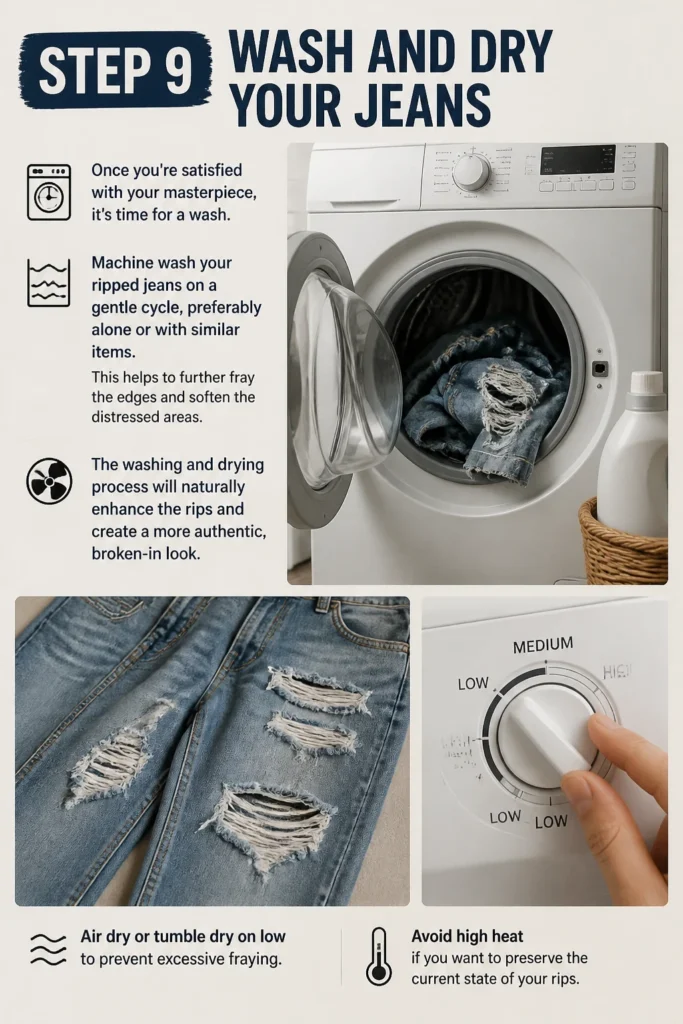
Once you’re satisfied with your masterpiece, it’s time for a wash. Machine wash your ripped jeans on a gentle cycle, preferably alone or with similar items. This helps to further fray the edges and soften the distressed areas.
The washing and drying process will naturally enhance the rips and create a more authentic, broken-in look. Air dry or tumble dry on low to prevent excessive fraying. Avoid high heat if you want to preserve the current state of your rips.
Common Mistakes to Avoid
Cutting Straight Across
A common error is making one long, straight horizontal cut. This often results in a harsh, unnatural-looking rip that doesn’t fray well and can widen too quickly. Instead, make several shorter, slightly staggered cuts. This technique encourages more organic fraying and a more authentic distressed appearance.
Over-Ripping in One Go
It’s tempting to get all the rips done at once, but going too far too quickly is a big mistake. You can always add more rips or expand existing ones, but you can’t un-rip your jeans. Start with smaller cuts and less distressing, then gradually build up the intensity. Patience is key to achieving a balanced look.
Ignoring Fabric Stretch
Forgetting about the stretch in your jeans can lead to disappointing results. If your jeans have a high spandex content, the rips might stretch out excessively or warp into strange shapes. Always choose 100% cotton denim or denim with very minimal stretch for the best and most stable rips. Stretchy fabric tends to look less natural when distressed.
Forgetting the Cardboard Protector
Skipping the cardboard insert can lead to accidentally cutting through both layers of your jeans. This is a simple mistake with frustrating consequences. Always slide a piece of cardboard or a thick magazine inside the leg you’re working on. It provides a protective barrier and a firm surface to work against, preventing unwanted damage.
Troubleshooting
Rips Aren’t Fraying Enough
If your rips look too clean or the edges aren’t fraying as much as you’d like, you might need to apply more friction. Take your sandpaper or pumice stone and rub more vigorously along the edges of your cuts. You can also use a stiff brush or a coarse sponge. This helps to loosen the denim fibers further, encouraging them to fray.
Rips Are Too Small or Not Noticeable
Sometimes, after the initial cuts, the rips don’t stand out enough. To make them more prominent, carefully revisit the area. Use your scissors to slightly extend the horizontal cuts you’ve already made. Then, with tweezers, gently pull out more of the vertical blue threads. This will expose more of the white horizontal threads, making the rip more visible.
Accidentally Cut Too Much
If you accidentally make a rip larger than intended, don’t panic. While you can’t completely undo a cut, you can often minimize the damage. Consider adding a denim patch underneath the rip, either sewn in place or ironed on. This provides a backing and can even add a cool, intentional design element. Alternatively, embrace it as part of the unique, distressed character of your jeans.
Key Takeaways
- Choose 100% cotton jeans for the best and most authentic-looking rips.
- Always use a cardboard protector inside the jean leg to prevent accidental cuts.
- Start with small cuts and gradually expand; you can always add more, but you can’t subtract.
- Utilize various tools like scissors, razor blades, and sandpaper for different distressing effects.
- Patience is crucial when pulling out vertical threads to expose the white horizontal ones.
- A final wash and dry cycle will help set the rips and enhance their natural appearance.
Frequently Asked Questions
Can I rip any type of jeans?
While you can technically make cuts in any jeans, 100% cotton denim works best. Stretchy jeans with high spandex content tend to create less natural-looking rips that can warp or stretch out of shape. For truly authentic results, stick to rigid or low-stretch denim.
How do I prevent rips from getting too big?
The best way to prevent rips from growing excessively is to start small. Make short, controlled cuts and distress gradually. Avoid making long, continuous cuts. Also, using a gentle wash cycle and air drying can help preserve the current size of your rips. Some people even sew a small stitch at the ends of a rip to stop it from expanding further.
What if I don’t have a razor blade?
If you don’t have a dedicated razor blade or utility knife, you can still achieve great results. A sharp pair of scissors can be used to fray edges by gently scraping the fabric. The edge of a kitchen knife (used carefully) or even a cheese grater can also create distressed textures. Sandpaper and a pumice stone are excellent alternatives for wearing down the fabric.
How do I get the white horizontal threads to show?
To expose the white horizontal threads, you first need to make a few parallel horizontal cuts in the denim. Then, using tweezers, carefully pull out the blue (vertical) threads that run between these cuts. The white threads will remain, creating the classic ripped look. This process requires patience but yields the most authentic results.
Our Top Recommended Finds
- Craft Scissors: A sharp, comfortable pair of craft scissors makes clean initial cuts easy and prevents jagged edges.
- Utility Knife with Replaceable Blades: Offers precise control for detailed fraying and distressing, and blades can be swapped when dull.
- Fine-Grit Sandpaper Assortment: Allows for varied levels of distressing, from subtle wear to more pronounced thinning of the denim.
Unleash Your Denim Creativity
Now you have all the knowledge and tools to transform your plain jeans into a unique fashion statement. Don’t be afraid to experiment with different rip styles and distressed patterns. Each pair of jeans you rip will be a one-of-a-kind creation, reflecting your personal style.
Grab an old pair of jeans today and start your denim customization journey. You’ll be amazed at what you can achieve with a little patience and creativity. Show off your handmade distressed denim with pride!