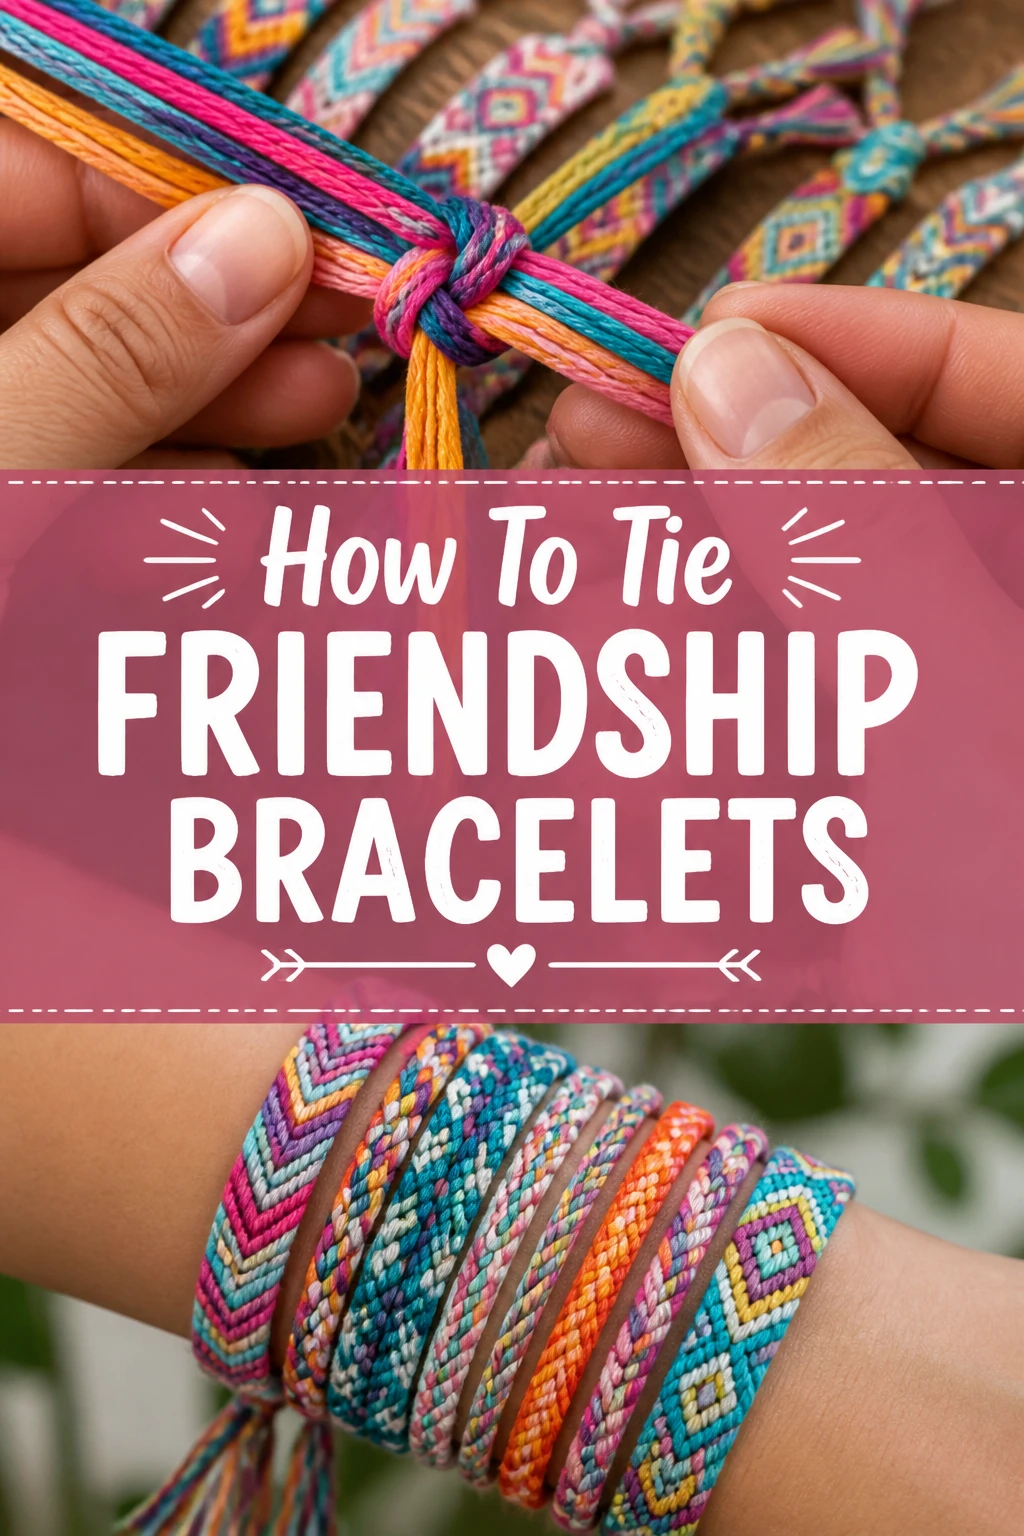
How To Tie Friendship Bracelets
I remember making my first friendship bracelet for my best friend back in grade school.
It wasn’t perfect, but the joy it brought was immeasurable.
This guide shares the simple techniques I’ve refined over years of crafting, ensuring you can create beautiful, lasting symbols of connection.
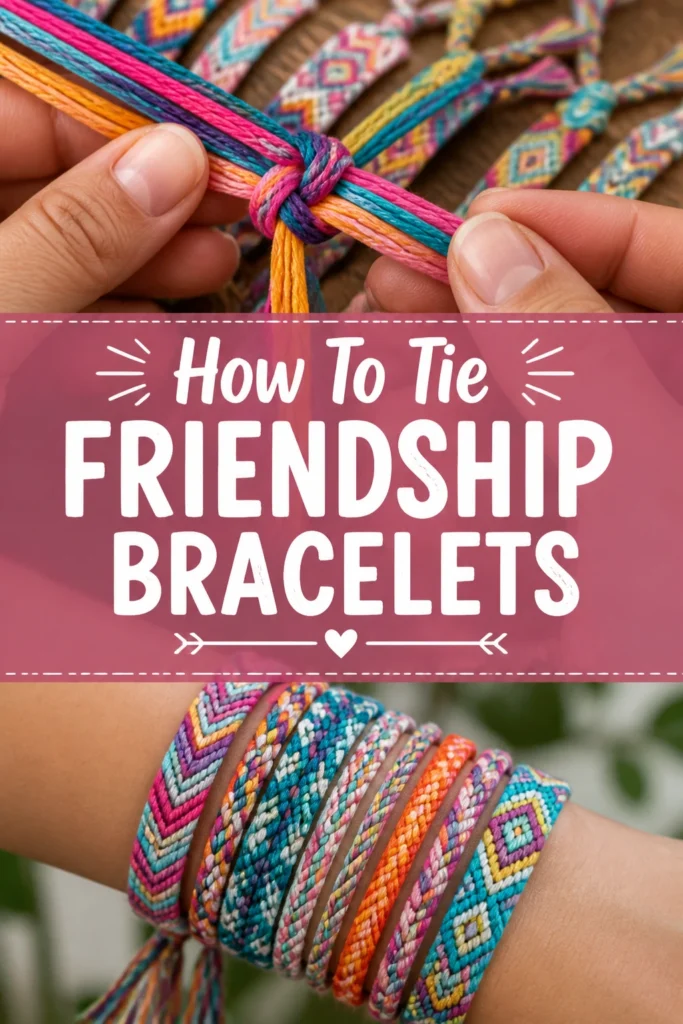
Quick Overview
You’re about to learn the foundational knots and techniques to create your very own handmade friendship bracelets.
By the end of this guide, you’ll be able to craft simple yet meaningful gifts for your loved ones.
- Time needed: 30-60 minutes (depending on pattern complexity)
- Difficulty: Beginner
- What you’ll need: Embroidery floss, scissors, tape or clipboard, a ruler
Step-by-Step Instructions
Step 1: Gather Your Materials
Before you begin knotting, make sure you have everything you need close at hand.
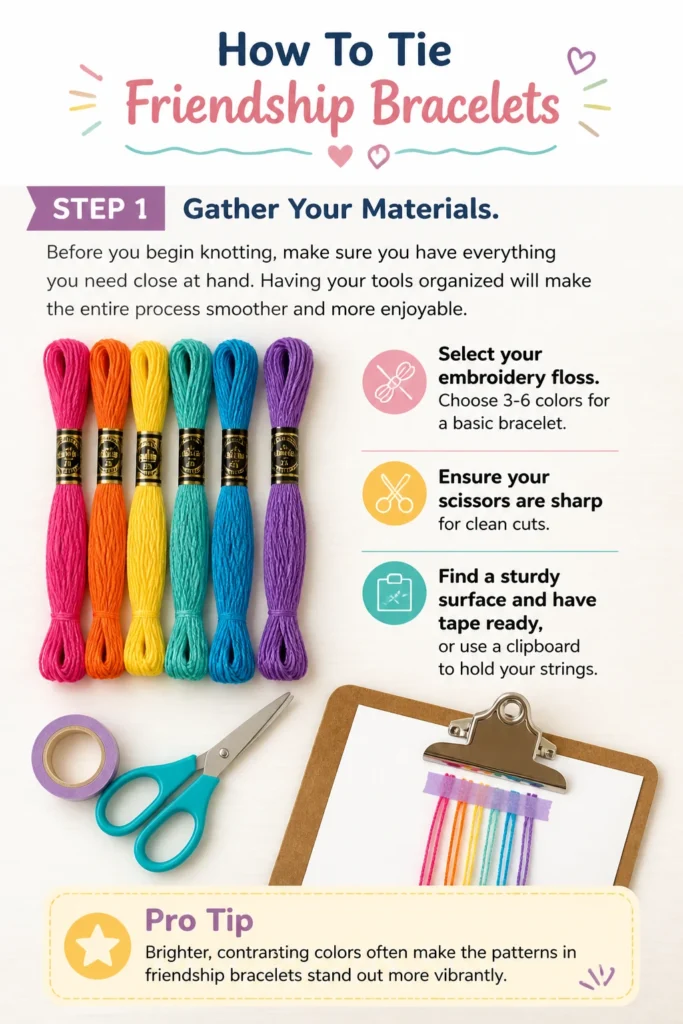
Having your tools organized will make the entire process smoother and more enjoyable.
- Select your embroidery floss. Choose 3-6 colors for a basic bracelet.
- Ensure your scissors are sharp for clean cuts.
- Find a sturdy surface and have tape ready, or use a clipboard to hold your strings.
Pro Tip: Brighter, contrasting colors often make the patterns in friendship bracelets stand out more vibrantly.
Step 2: Prepare Your Strings
The length of your strings is crucial for a comfortable and long-lasting bracelet.
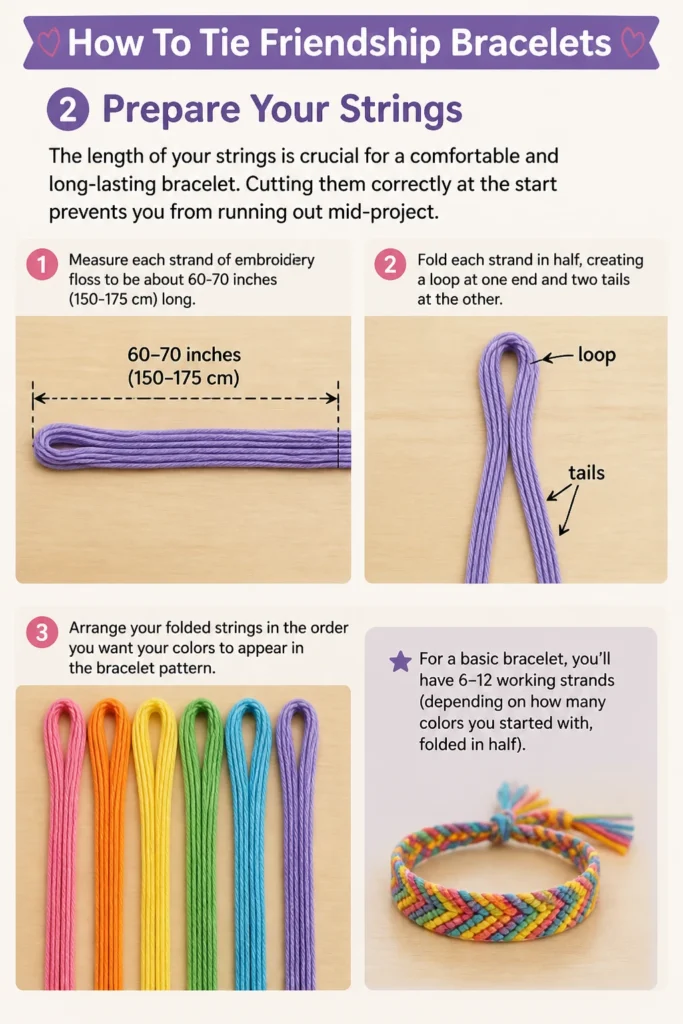
Cutting them correctly at the start prevents you from running out mid-project.
Measure each strand of embroidery floss to be about 60-70 inches (150-175 cm) long.
Fold each strand in half, creating a loop at one end and two tails at the other.
Arrange your folded strings in the order you want your colors to appear in the bracelet pattern.
For a basic bracelet, you’ll have 6-12 working strands (depending on how many colors you started with, folded in half).
Step 3: Secure Your Work
Keeping your strings stable is essential for creating even and consistent knots.
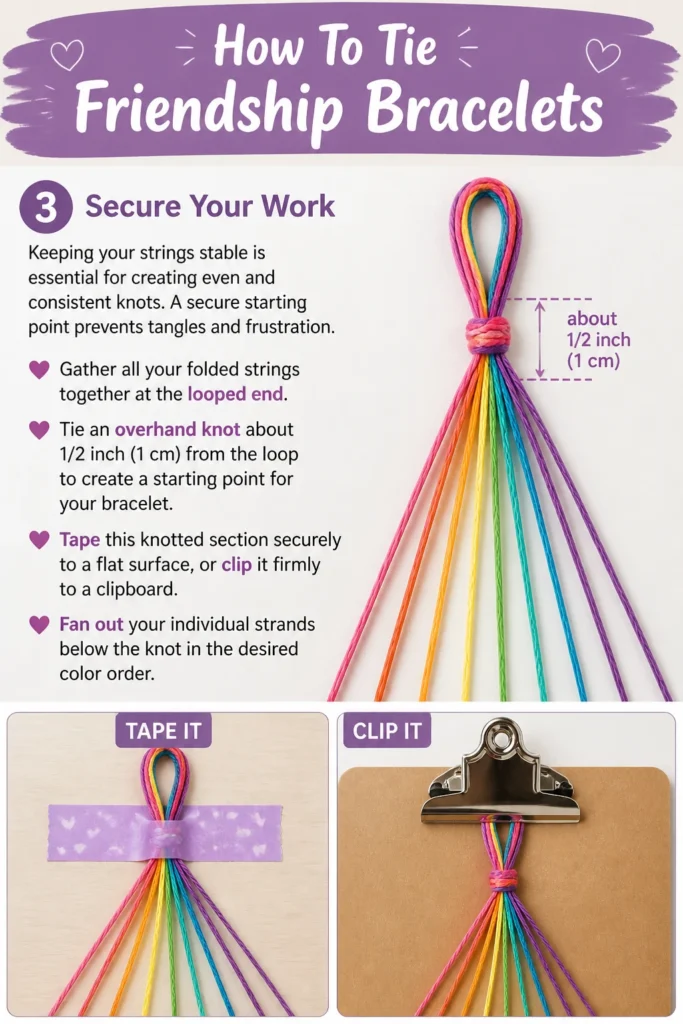
A secure starting point prevents tangles and frustration.
Gather all your folded strings together at the looped end.
Tie an overhand knot about 1/2 inch (1 cm) from the loop to create a starting point for your bracelet.
Tape this knotted section securely to a flat surface, or clip it firmly to a clipboard.
Fan out your individual strands below the knot in the desired color order.
Step 4: Master the Forward Knot (F Knot)
The forward knot is one of the two fundamental knots you’ll use for most friendship bracelet patterns.
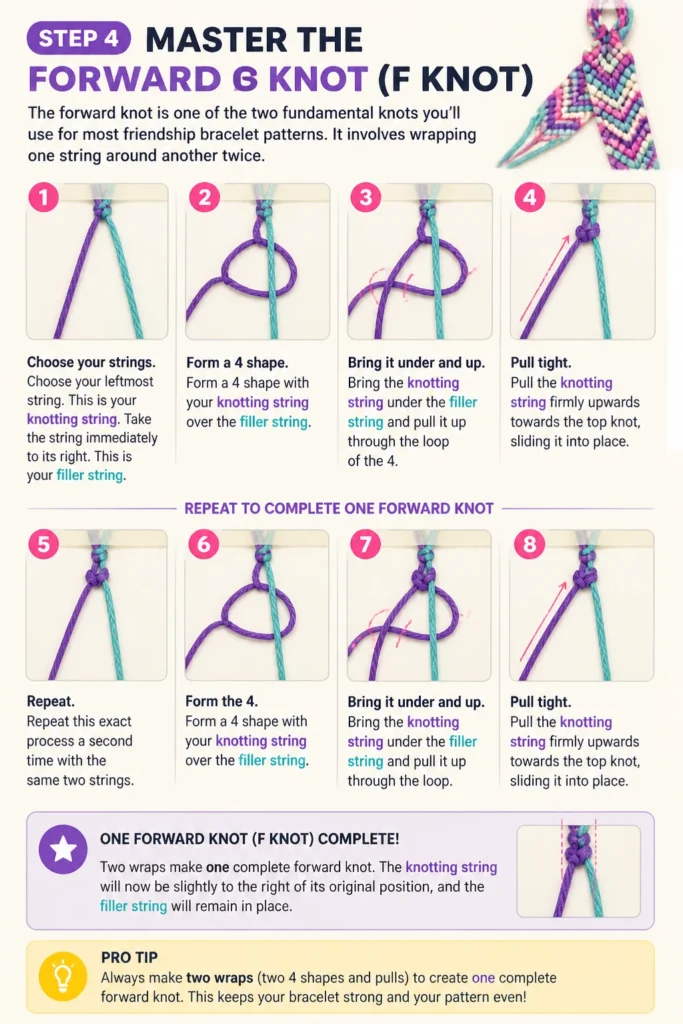
It involves wrapping one string around another twice.
Choose your leftmost string. This is your “knotting string.”
Take the string immediately to its right. This is your “filler string.”
Form a “4” shape with your knotting string over the filler string.
Bring the knotting string under the filler string and pull it up through the loop of the “4.”
Pull the knotting string firmly upwards towards the top knot, sliding it into place.
Repeat this exact process a second time with the same two strings. Two wraps make one complete forward knot.
The knotting string will now be slightly to the right of its original position, and the filler string will remain in place.
Pro Tip: Always make two wraps for each knot. This ensures the knot is secure and the pattern is consistent. Single wraps will unravel or look loose.
Step 5: Create a Candy Stripe Pattern
The candy stripe is one of the easiest patterns to start with, using only forward knots.
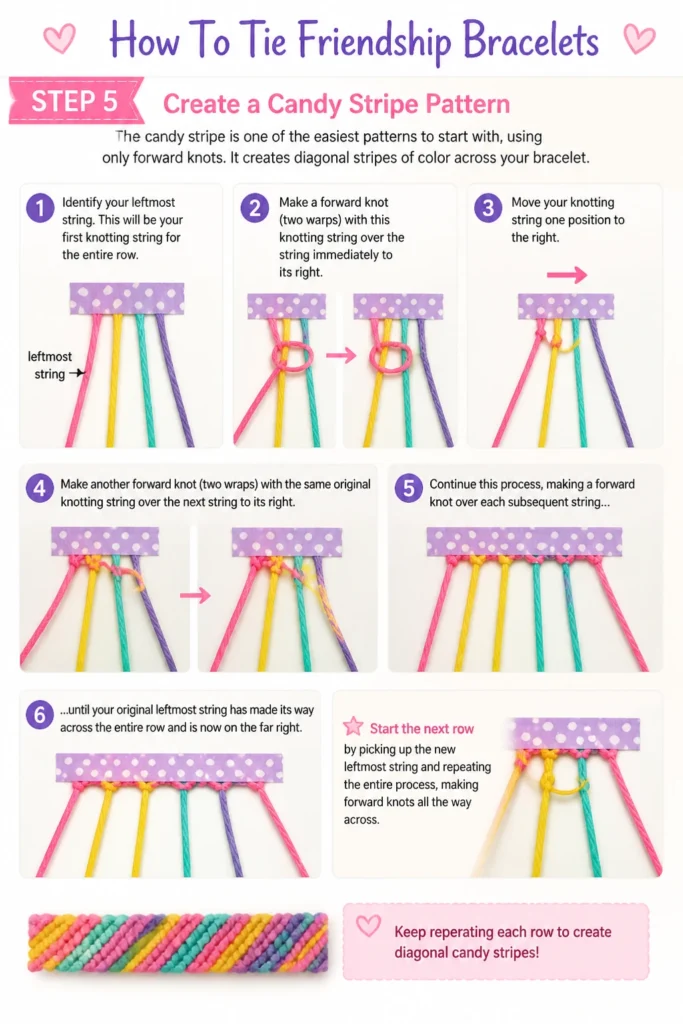
It creates diagonal stripes of color across your bracelet.
Identify your leftmost string. This will be your first knotting string for the entire row.
Make a forward knot (two wraps) with this knotting string over the string immediately to its right.
Move your knotting string one position to the right.
Make another forward knot (two wraps) with the same original knotting string over the next string to its right.
Continue this process, making a forward knot over each subsequent string until your original leftmost string has made its way across the entire row and is now on the far right.
Start the next row by picking up the new leftmost string and repeating the entire process, making forward knots all the way across.
Repeat these rows until your bracelet reaches the desired length.
Step 6: Master the Backward Knot (B Knot)
The backward knot is the mirror image of the forward knot, essential for patterns that move in the opposite direction.
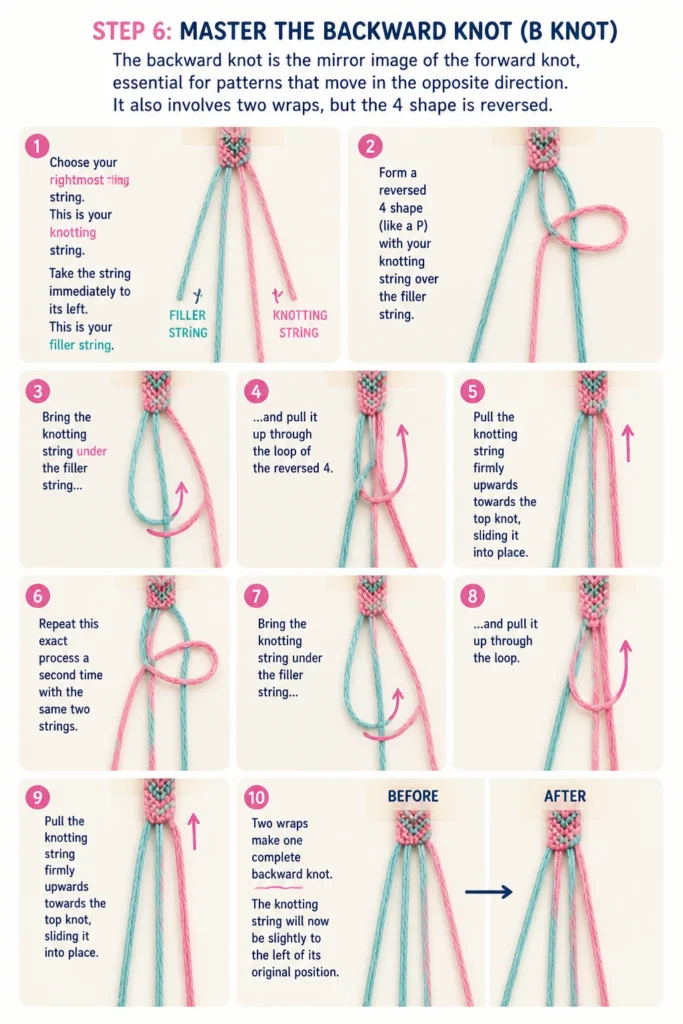
It also involves two wraps, but the “4” shape is reversed.
Choose your rightmost string. This is your “knotting string.”
Take the string immediately to its left. This is your “filler string.”
Form a reversed “4” shape (like a “P”) with your knotting string over the filler string.
Bring the knotting string under the filler string and pull it up through the loop of the reversed “4.”
Pull the knotting string firmly upwards towards the top knot, sliding it into place.
Repeat this exact process a second time with the same two strings. Two wraps make one complete backward knot.
The knotting string will now be slightly to the left of its original position.
Step 7: Create a Chevron Pattern
The chevron pattern is another classic, creating V-shapes that point towards the center of the bracelet.
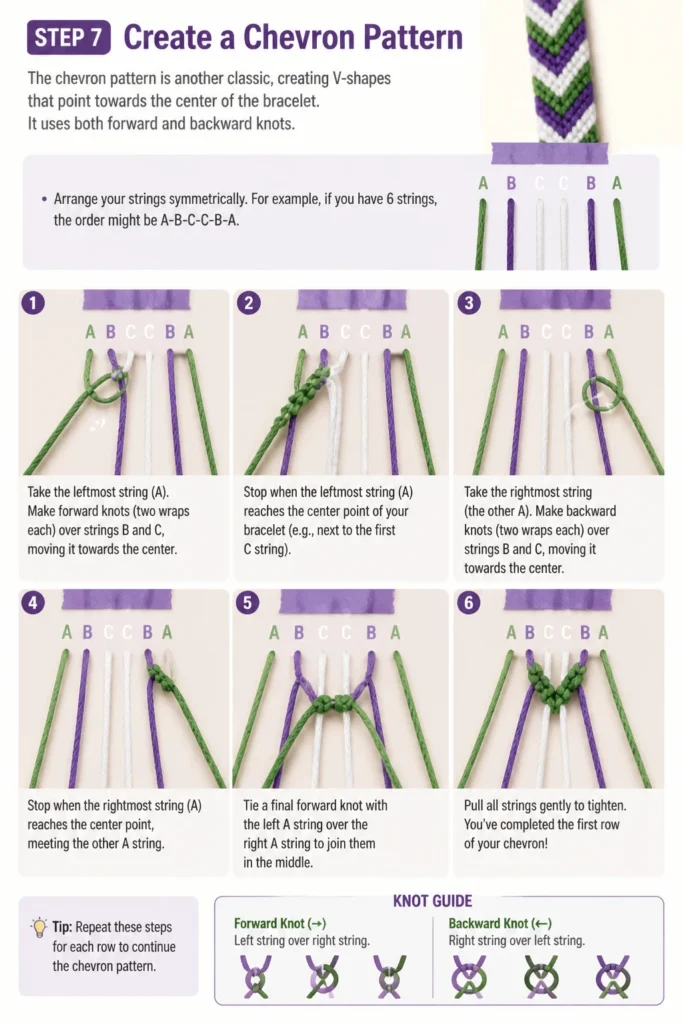
It uses both forward and backward knots.
Arrange your strings symmetrically. For example, if you have 6 strings, the order might be A-B-C-C-B-A.
Take the leftmost string (A). Make forward knots (two wraps each) over strings B and C, moving it towards the center.
Stop when the leftmost string (A) reaches the center point of your bracelet (e.g., next to the first C string).
Take the rightmost string (the other A). Make backward knots (two wraps each) over strings B and C, moving it towards the center.
Stop when the rightmost string (A) reaches the center point, meeting the other A string.
Tie a final forward knot with the left A string over the right A string to join them in the middle, completing the V-shape.
Start the next row with the new leftmost and rightmost strings, repeating the process.
Step 8: Finish Your Bracelet
Once your bracelet reaches the desired length, you need to secure the end for wearing.
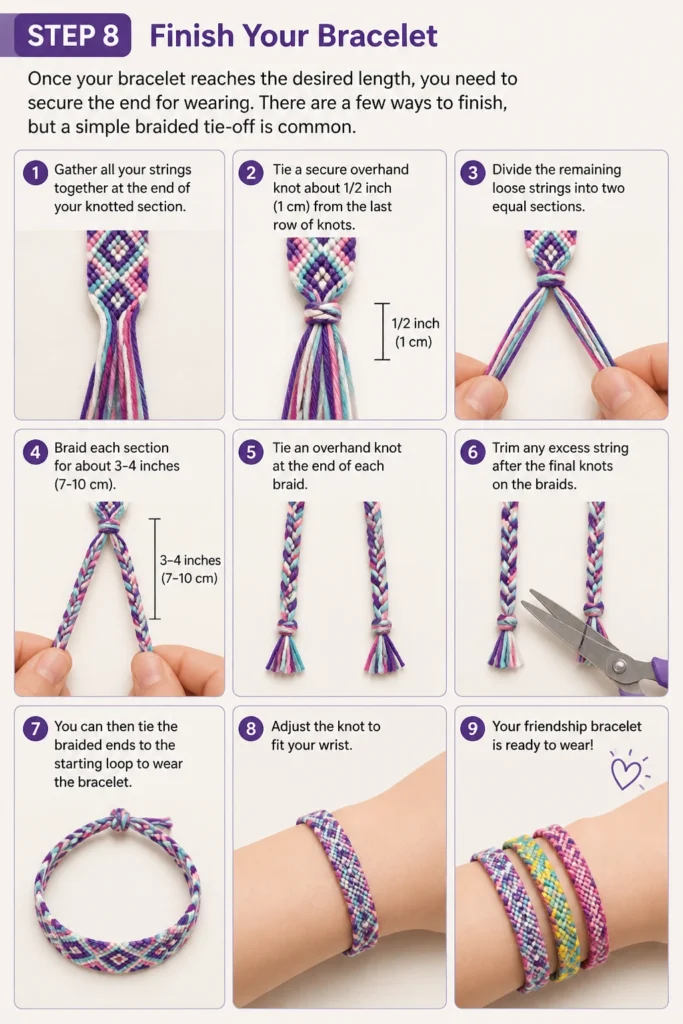
There are a few ways to finish, but a simple braided tie-off is common.
Gather all your strings together at the end of your knotted section.
Tie a secure overhand knot about 1/2 inch (1 cm) from the last row of knots.
Divide the remaining loose strings into two equal sections.
Braid each section for about 3-4 inches (7-10 cm), then tie an overhand knot at the end of each braid.
Trim any excess string after the final knots on the braids.
You can then tie the braided ends to the starting loop to wear the bracelet.
Common Mistakes to Avoid
Tying Knots Too Loosely or Too Tightly
If your knots are too loose, the bracelet will look gappy and the pattern won’t be defined. If they’re too tight, the bracelet can become stiff and difficult to work with, and the strings might fray. Aim for consistent, firm tension that allows the knot to slide into place without distortion.
Mixing Up Knot Directions
A forward knot always moves the knotting string to the right, and a backward knot moves it to the left. Accidentally using the wrong knot can break your pattern and make your bracelet look uneven. Pay close attention to the “4” or reversed “4” shape you’re forming.
Not Securing Your Bracelet Properly
A wobbly starting point or a loose ending knot can ruin your hard work. Always make sure your initial knot is tight and taped down firmly. At the end, ensure all strings are secured with a final knot before trimming to prevent unraveling.
Running Out of String Mid-Project
This is a common frustration. Always start with strings that are generously long, especially for your “knotting strings” which get used up faster. It’s better to have too much string and trim it later than to have too little.
Troubleshooting
Bracelet Looks Uneven or Crooked
This often happens due to inconsistent tension or accidentally skipping a knot. Try to maintain the same pull on your knotting string for every knot. If a section looks particularly off, gently untie the last few knots (you can use a needle to loosen them) and re-tie them carefully.
Strings Get Tangled While Working
Long strings can easily become a mess. To prevent this, consider winding each individual string into a small bobbin or butterfly-wrap. As you knot, unwind only the necessary length of the working string, keeping the rest neatly stored.
Knots Aren’t Tight Enough or Slip
If your knots feel loose, you might not be pulling the second wrap firmly enough. Remember that each complete knot requires two wraps. Ensure you’re sliding both wraps all the way up against the previous knot or the starting knot to create a tight, uniform row.
Key Takeaways
- Practice the forward and backward knots until they feel natural.
- Maintain consistent tension in your knots for an even pattern.
- Prepare your strings by measuring and securing them properly at the start.
- Always make two wraps for each complete knot to ensure security.
- Enjoy the creative process; each handmade bracelet is unique.
- Experiment with different color combinations and patterns as you gain confidence.
Frequently Asked Questions
How long should the strings be for a standard bracelet?
For most adult-sized bracelets, starting with strands about 60-70 inches (150-175 cm) long, then folded in half, is a good general guideline. This length provides enough string for a full bracelet with a little extra for tie-offs, even for patterns that consume more string.
Can I use different types of string besides embroidery floss?
While embroidery floss is ideal due to its smooth texture and wide color range, you can experiment with other threads. Craft thread, thin yarn, or even waxed cotton cord can work, but the texture and thickness will affect the final look and feel of the bracelet.
How do I make the bracelet adjustable?
Instead of braided ties, you can create a sliding square knot closure. After knotting the bracelet, tie a square knot around the two ends with a separate piece of string. This allows the wearer to adjust the bracelet’s size by sliding the knot up and down.
What if I make a mistake in my knotting?
Don’t worry, mistakes happen! For small errors, you can often gently untie the last few knots using a needle or a pin to loosen them. Take your time, correct the error, and then continue knotting. For larger mistakes, it might be easier to start a new section or even a new bracelet if you’re early in the process.
Our Top Recommended Finds
- DMC Embroidery Floss Multi-Pack: A wide range of colors in one set, perfect for beginners to experiment.
- Small Craft Scissors: Sharp, precise scissors are essential for clean cuts and trimming excess string.
- Clipboard with a Strong Clip: Provides a stable, portable workstation, keeping your strings secure as you knot.
Crafting Connections, One Knot at a Time
You now have the fundamental knowledge to begin your journey into the wonderful world of friendship bracelet making.
Each knot you tie is a small act of care, creating a tangible symbol of connection.
Don’t be afraid to try new color combinations or explore more complex patterns as you gain confidence.
Pick out some colorful floss today and start knotting your first bracelet. Who will be the lucky recipient?