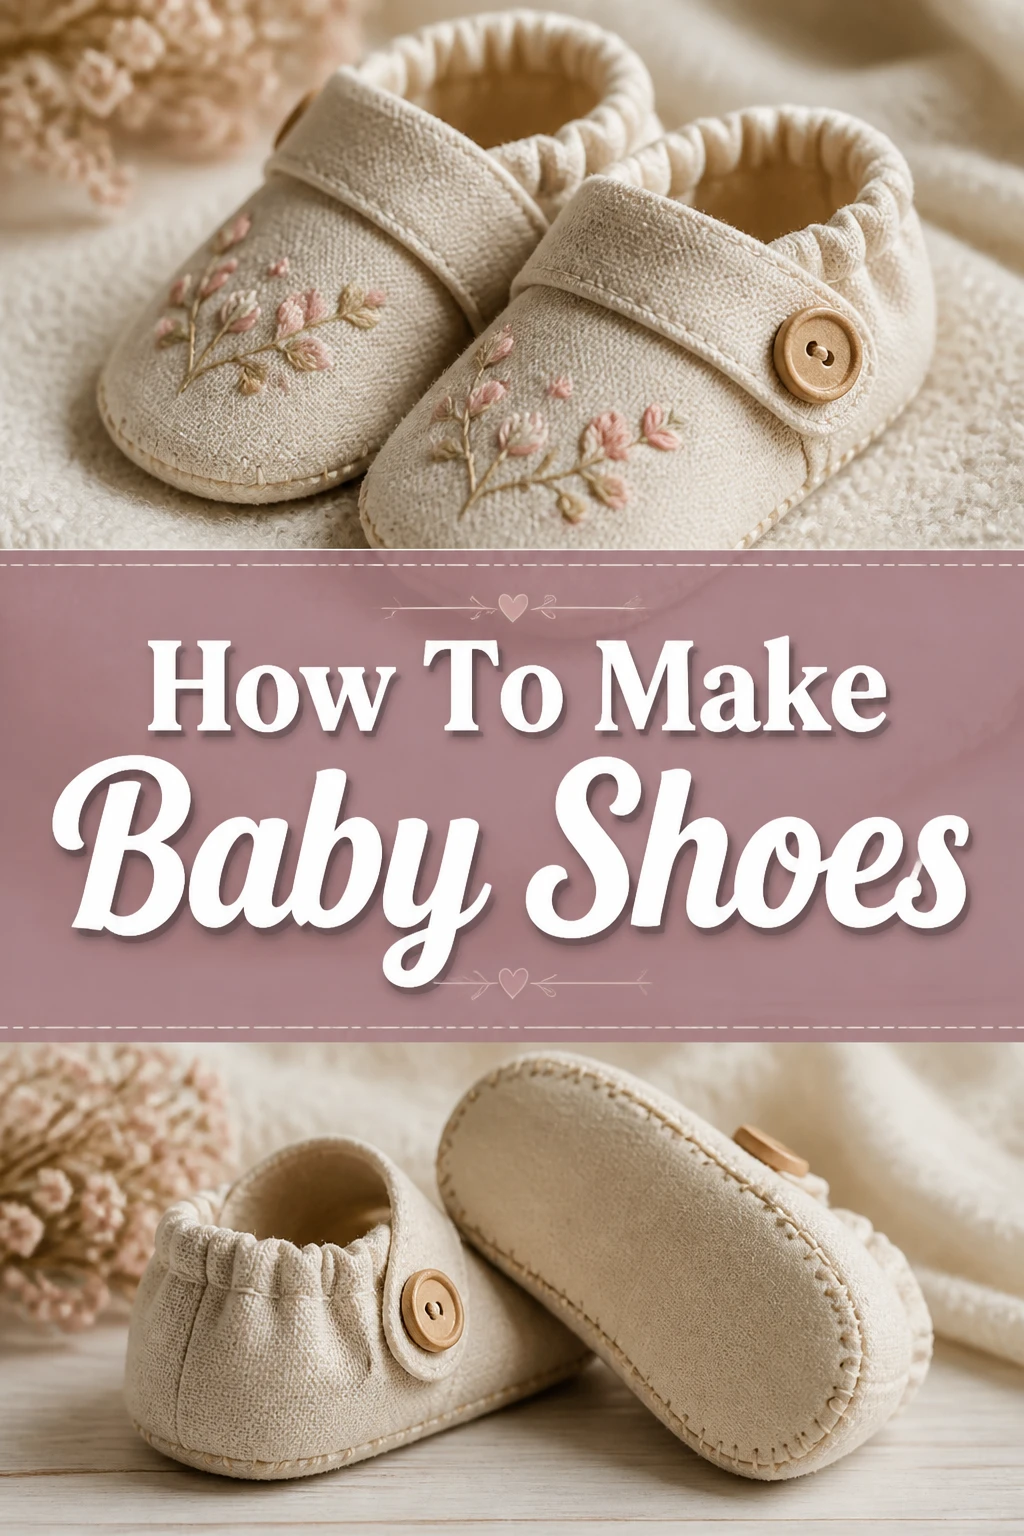
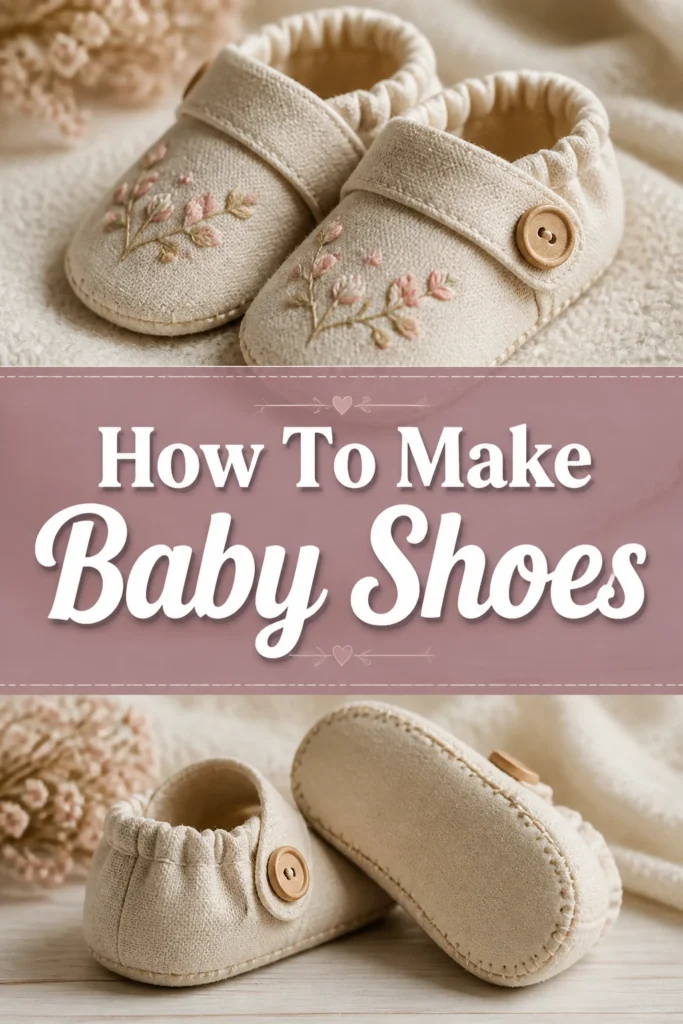
📌 How To Make Baby Shoes
I still remember the first pair of tiny soft-soled shoes I stitched together on a rainy Sunday afternoon.
There is a unique sense of pride that comes from seeing a little one take their first wobbly steps in something you created by hand.
This guide combines years of trial and error to ensure your first pair looks professional and stays securely on those wiggly feet.
Quick Overview
Creating baby shoes is a rewarding project that allows you to customize footwear for comfort, style, and safety.
You will learn how to select the right materials, manage tiny seam allowances, and finish the shoes with a secure elastic casing.
- Time needed: 90 to 120 minutes
- Difficulty: Beginner
- What you’ll need: Soft leather or cotton fabric, sewing machine, elastic, fabric scissors, and a basic pattern.
Step 1: Select Your Materials Carefully
Choose a fabric that is breathable and soft against a baby’s sensitive skin.
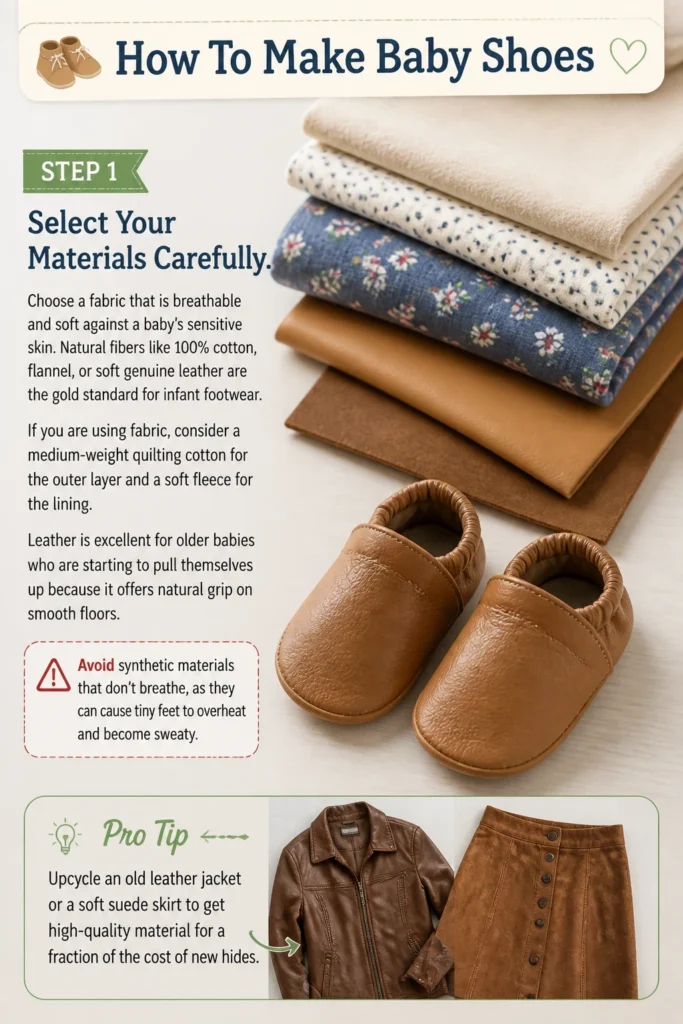
Natural fibers like 100% cotton, flannel, or soft genuine leather are the gold standard for infant footwear.
If you are using fabric, consider a medium-weight quilting cotton for the outer layer and a soft fleece for the lining.
Leather is excellent for older babies who are starting to pull themselves up because it offers natural grip on smooth floors.
Avoid synthetic materials that don’t breathe, as they can cause tiny feet to overheat and become sweaty.
Pro Tip: Upcycle an old leather jacket or a soft suede skirt to get high-quality material for a fraction of the cost of new hides.
Step 2: Prepare Your Pattern and Measurements
Measure the baby’s foot from the back of the heel to the tip of the longest toe.
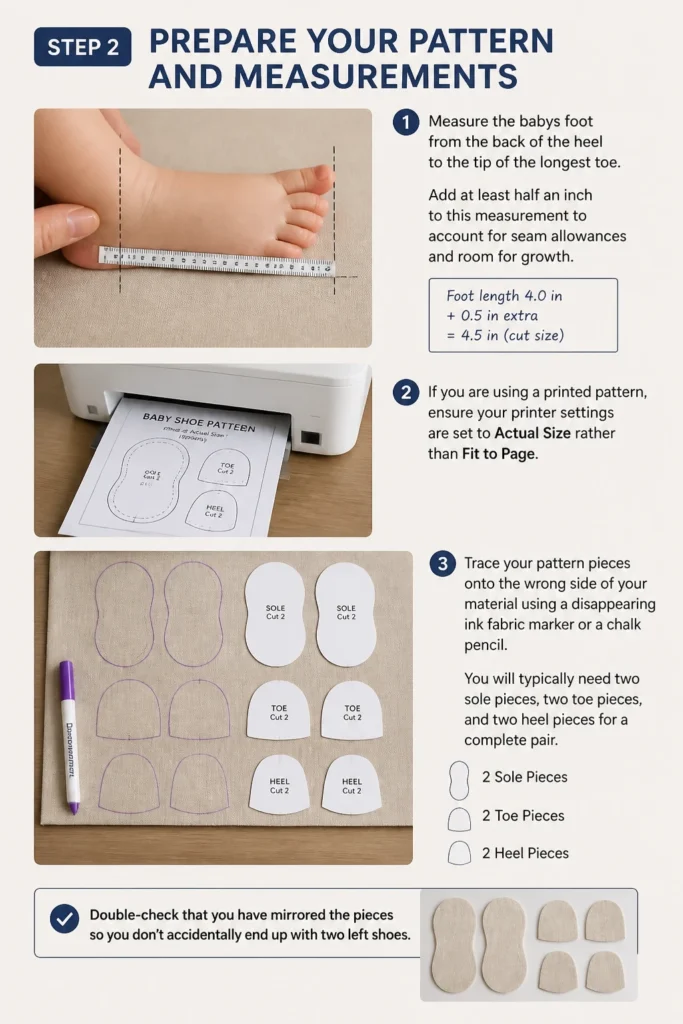
Add at least half an inch to this measurement to account for seam allowances and room for growth.
If you are using a printed pattern, ensure your printer settings are set to “Actual Size” rather than “Fit to Page.”
Trace your pattern pieces onto the wrong side of your material using a disappearing ink fabric marker or a chalk pencil.
You will typically need two sole pieces, two toe pieces, and two heel pieces for a complete pair.
Double-check that you have mirrored the pieces so you don’t accidentally end up with two left shoes.
Step 3: Cut the Pieces with Precision
Use sharp fabric shears or a rotary cutter to get clean, crisp edges on your material.
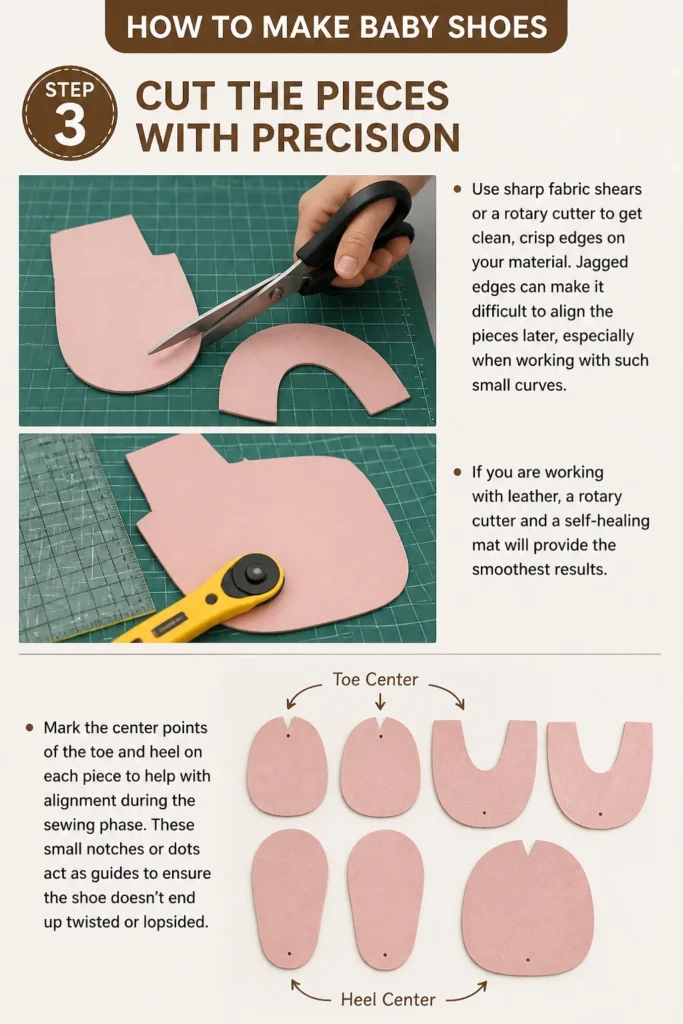
Jagged edges can make it difficult to align the pieces later, especially when working with such small curves.
If you are working with leather, a rotary cutter and a self-healing mat will provide the smoothest results.
Mark the center points of the toe and heel on each piece to help with alignment during the sewing phase.
These small notches or dots act as guides to ensure the shoe doesn’t end up twisted or lopsided.
Step 4: Construct the Heel and Elastic Casing
Fold the top edge of the heel piece over to create a narrow channel for the elastic.
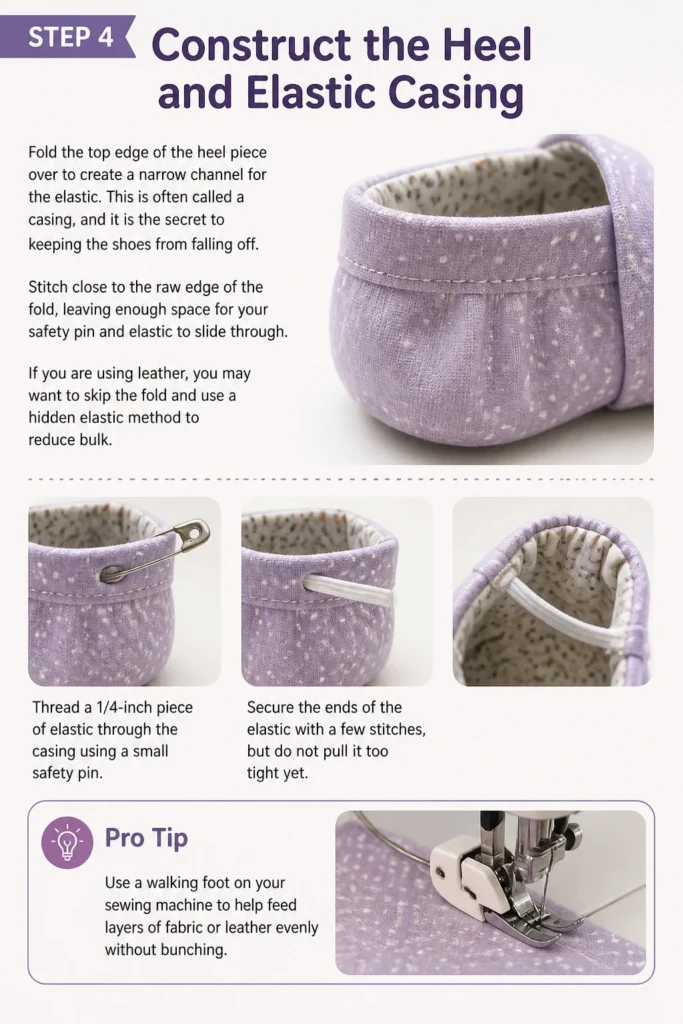
This is often called a casing, and it is the secret to keeping the shoes from falling off.
Stitch close to the raw edge of the fold, leaving enough space for your safety pin and elastic to slide through.
If you are using leather, you may want to skip the fold and use a “hidden” elastic method to reduce bulk.
Thread a 1/4-inch piece of elastic through the casing using a small safety pin.
Secure the ends of the elastic with a few stitches, but do not pull it too tight yet.
Pro Tip: Use a “walking foot” on your sewing machine to help feed layers of fabric or leather evenly without bunching.
Step 5: Assemble the Upper Section
Align the toe piece and the heel piece with their right sides facing each other.
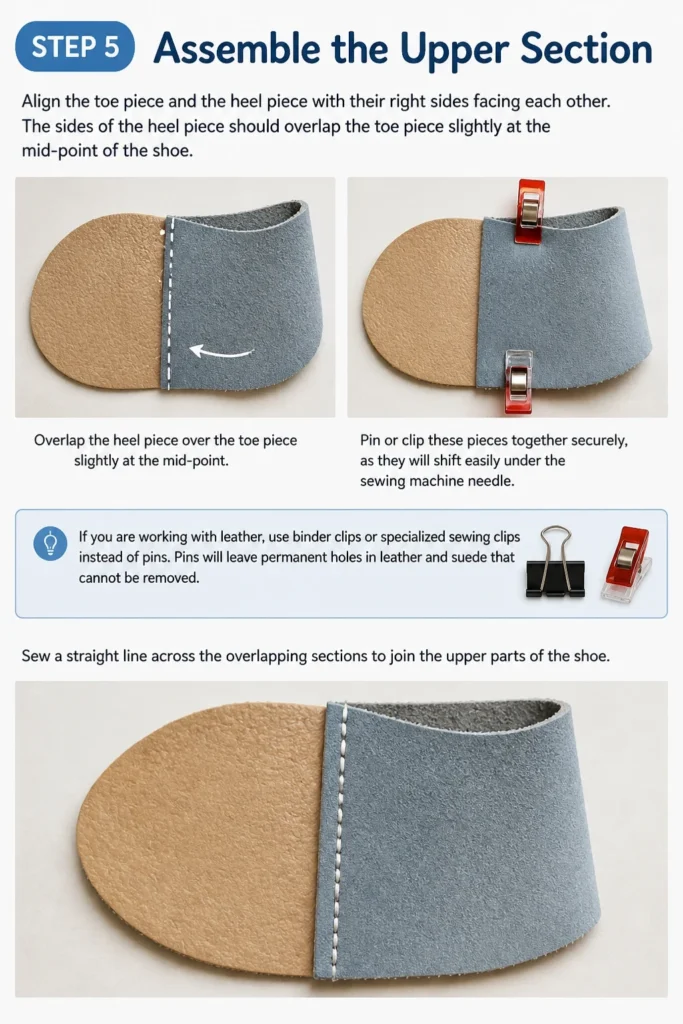
The sides of the heel piece should overlap the toe piece slightly at the mid-point of the shoe.
Pin or clip these pieces together securely, as they will shift easily under the sewing machine needle.
If you are working with leather, use binder clips or specialized sewing clips instead of pins.
Pins will leave permanent holes in leather and suede that cannot be removed.
Sew a straight line across the overlapping sections to join the upper parts of the shoe.
Step 6: Attach the Sole to the Upper
Match the center marks of the sole with the center marks of the toe and heel pieces.
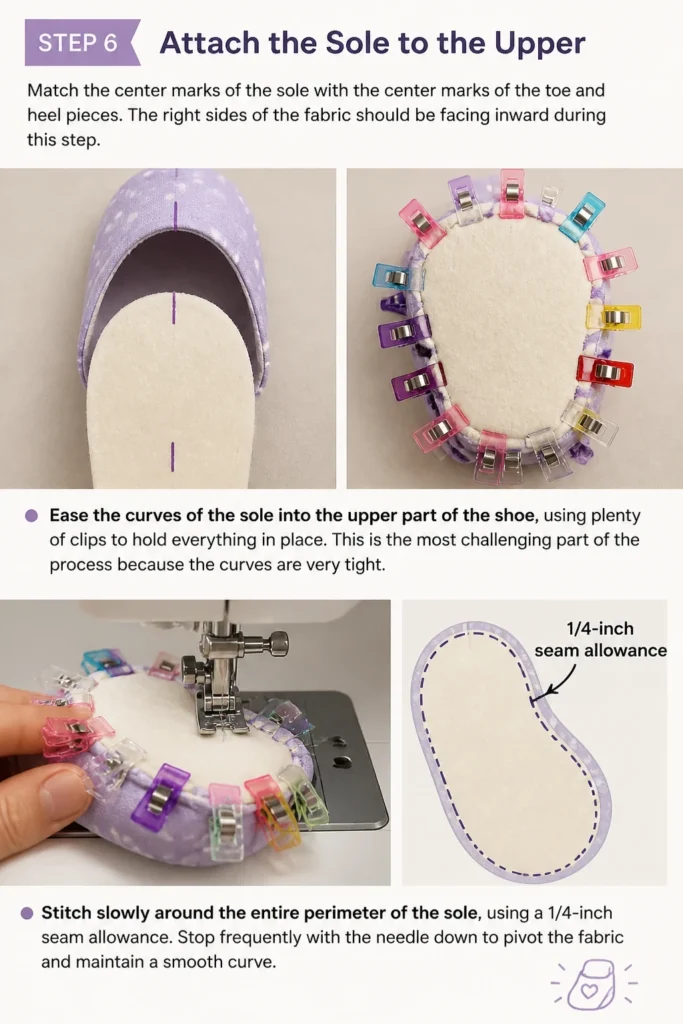
The right sides of the fabric should be facing inward during this step.
Ease the curves of the sole into the upper part of the shoe, using plenty of clips to hold everything in place.
This is the most challenging part of the process because the curves are very tight.
Stitch slowly around the entire perimeter of the sole, using a 1/4-inch seam allowance.
Stop frequently with the needle down to pivot the fabric and maintain a smooth curve.
Step 7: Trim and Notch the Curves
Clip small V-shaped notches into the seam allowance around the toe and heel.
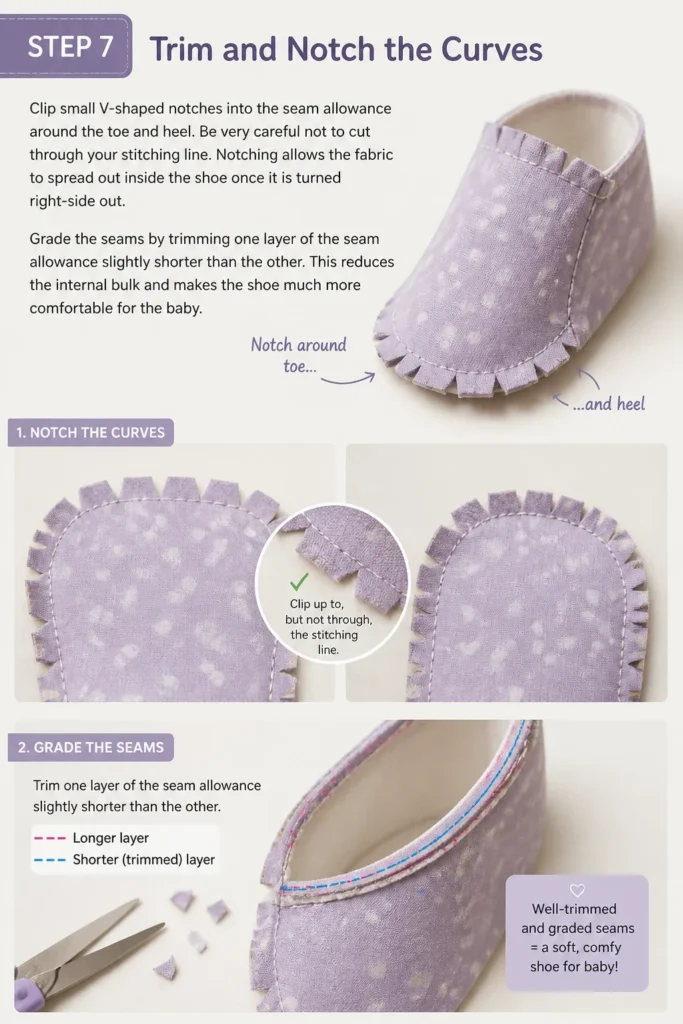
Be very careful not to cut through your stitching line.
Notching allows the fabric to spread out inside the shoe once it is turned right-side out.
Grade the seams by trimming one layer of the seam allowance slightly shorter than the other.
This reduces the internal bulk and makes the shoe much more comfortable for the baby.
Step 8: Turn and Final Shaping
Reach inside the shoe and carefully pull the fabric through the ankle opening.
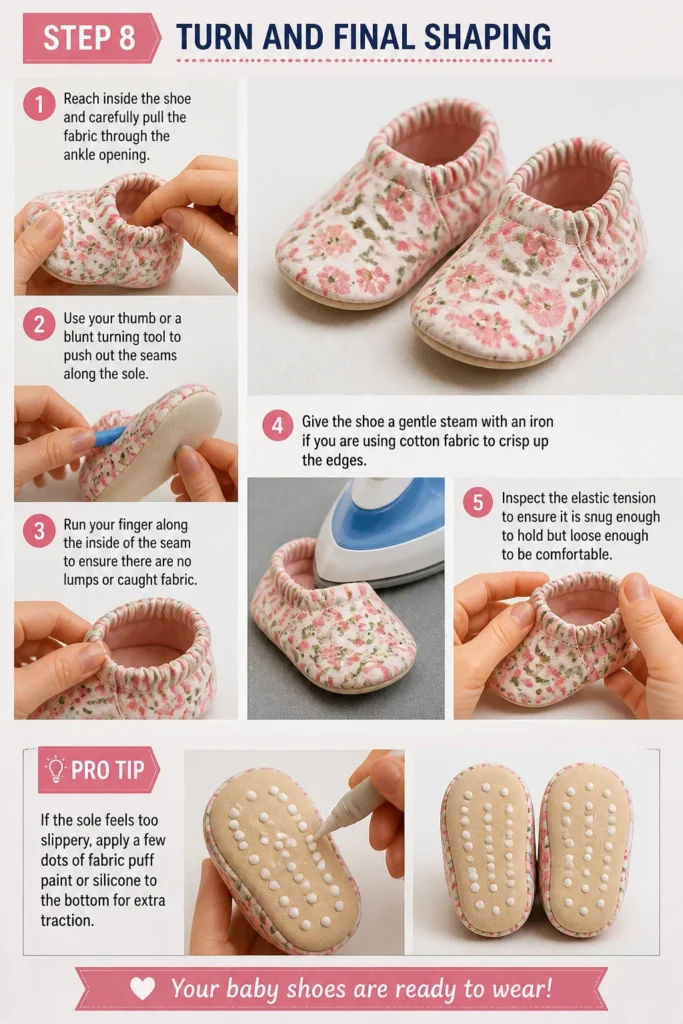
Use your thumb or a blunt turning tool to push out the seams along the sole.
Run your finger along the inside of the seam to ensure there are no lumps or caught fabric.
Give the shoe a gentle steam with an iron if you are using cotton fabric to crisp up the edges.
Inspect the elastic tension to ensure it is snug enough to hold but loose enough to be comfortable.
Pro Tip: If the sole feels too slippery, apply a few dots of fabric puff paint or silicone to the bottom for extra traction.
Common Mistakes to Avoid
Using the Wrong Needle Type
Many beginners try to sew leather shoes with a standard universal needle.
This often results in skipped stitches or a snapped needle because the tip isn’t designed to pierce tough hides.
Always switch to a dedicated leather needle, which has a wedge-shaped point designed to slice through the material cleanly.
Ignoring the Seam Allowance
When working on such a small scale, even a tiny deviation in your seam allowance can drastically change the size of the shoe.
If your pattern calls for a 1/4-inch seam and you sew at 3/8-inch, the shoe may end up being a full size too small.
Use a piece of painter’s tape on your sewing machine throat plate to create a clear guide for your fabric edge.
Choosing Overly Stiff Fabrics
It is tempting to use heavy canvas or thick upholstery fabric to make the shoes durable.
However, stiff fabrics are difficult to turn right-side out and can rub against a baby’s ankle, causing irritation.
Stick to materials that have a bit of “give” and feel soft to the touch.
Troubleshooting
The Machine is Skipping Stitches
This usually happens when the layers of fabric are too thick for the current needle or thread tension.
Try increasing your stitch length slightly to help the machine move the material through the feed dogs.
Ensure you are using a high-quality polyester thread, as cotton thread can sometimes snap under the tension required for leather.
The Shoe Keeps Falling Off
If the shoe slides off the foot, the elastic in the heel casing is likely too loose.
You can usually unpick a small section of the casing to pull the elastic tighter and re-sew it.
Alternatively, you can add a small “heel tab” or a Velcro strap across the bridge of the foot for extra security.
The Toe Area Looks Pointy or Uneven
This is a sign that the notches in the seam allowance weren’t deep enough or frequent enough.
Turn the shoe back inside out and add more clips around the curve of the toe.
When you turn it back, use a chopstick or a specialized turning tool to firmly push the curve into a rounded shape.
Key Takeaways
- Soft-soled shoes are the healthiest option for developing feet because they allow for natural movement.
- Always pre-wash cotton fabrics to prevent the shoes from shrinking the first time they are cleaned.
- Accurate measuring is more important than following age-based size charts, as every baby grows differently.
- Clipped curves and graded seams are the secret to a professional, non-bulky finish.
- Non-slip additions to the sole are essential once a baby starts attempting to stand or cruise.
- Using a walking foot or Teflon foot will make sewing leather and suede much easier.
Frequently Asked Questions
What is the best age for soft-soled baby shoes?
Soft-soled shoes are ideal from birth until the child is walking confidently outdoors. Pediatricians often recommend soft soles because they allow babies to feel the ground, which helps with balance and muscle development.
Can I wash handmade baby shoes in the laundry?
If the shoes are made of cotton or flannel, you can usually wash them on a gentle cycle and air dry them. Leather shoes should never be put in the washing machine; instead, wipe them down with a damp cloth and use a leather conditioner if they become stiff.
How do I know if the shoes are too tight?
You should be able to fit your pinky finger between the baby’s heel and the back of the shoe. If you see red marks on the baby’s skin after they wear the shoes, the elastic is likely too tight or the shoe has been outgrown.
Do I need a heavy-duty sewing machine for leather shoes?
Most modern home sewing machines can handle light to medium-weight garment leather. As long as you use the correct leather needle and go slowly, you do not need an industrial machine for basic baby moccasins.
Our Top Recommended Finds
- Rotary Cutter and Mat Set: This tool allows for much more precise cutting of small, curved pattern pieces than traditional scissors.
- Wonder Clips: These are superior to pins when working with leather or thick layers because they hold firmly without leaving permanent holes.
- Leather Needle Variety Pack: Having various sizes of leather-specific needles ensures you can handle different thicknesses of suede and hide without damaging your machine.
Your Journey Into Tiny Footwear
Now that you understand the mechanics of building a soft-soled shoe, the creative possibilities are endless.
You can experiment with different textures, add adorable animal ears to the toes, or use embroidery to personalize each pair.
Handmade shoes make for incredible heirloom gifts that parents will likely tuck away in a memory box long after the child has outgrown them.
Take a look at your fabric scrap bin today and see what kind of miniature masterpiece you can create.
Once you master this basic construction, you might even find yourself designing a matching pair for every outfit in the nursery.