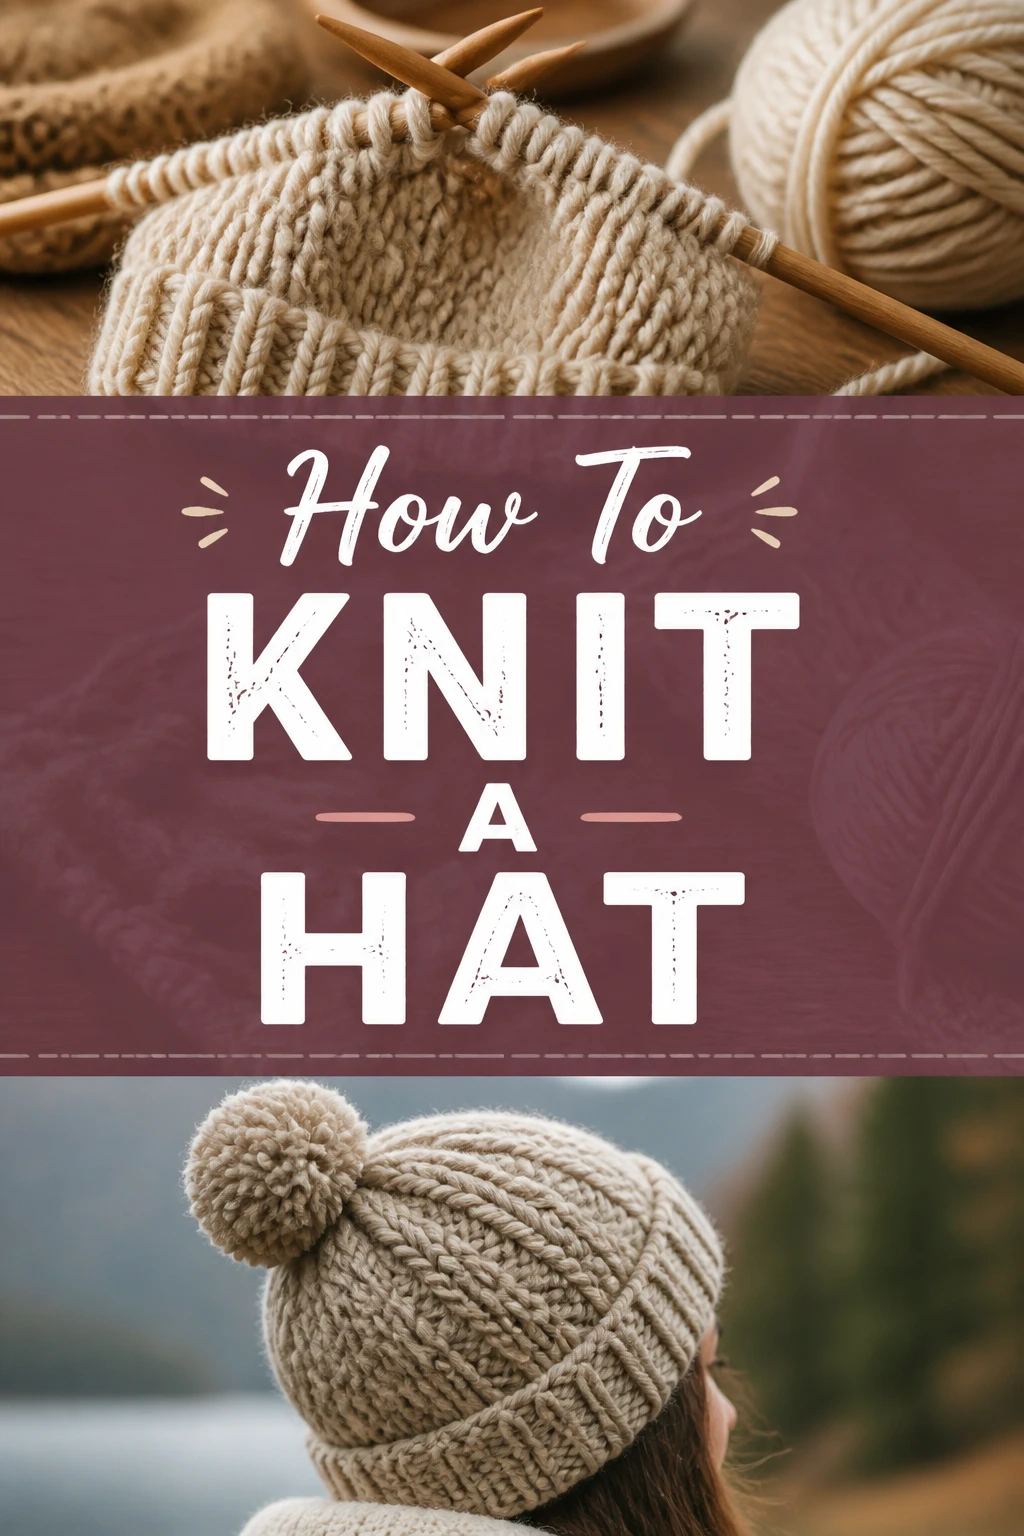
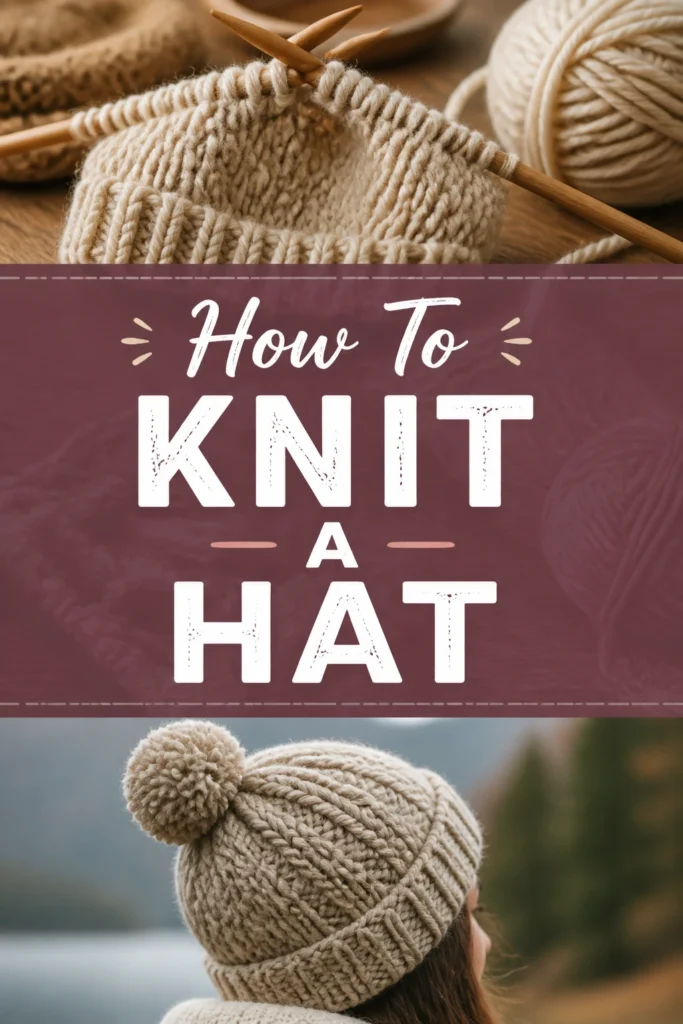
🧶 How To Knit A Hat
There’s something uniquely satisfying about creating something with your own hands. Imagine the warmth and pride of wearing a hat you knitted yourself, or gifting one to a loved one. I still remember the joy of finishing my very first hat, a simple beanie that felt like a monumental achievement. This guide will walk you through every stitch, helping you create your own cozy masterpiece.
You’re about to embark on a wonderful creative journey.
By the end, you’ll have a warm, handmade hat and a new skill.
This guide draws on years of knitting experience to make the process clear and enjoyable.
Quick Overview
You’ll learn to knit a basic beanie-style hat in the round. This project is perfect for building fundamental knitting skills while creating a useful, beautiful item.
- Time needed: 4-8 hours (for beginners, spread over a few sessions)
- Difficulty: Beginner
- What you’ll need: Yarn, circular knitting needles, stitch marker, tapestry needle, scissors
Step-by-Step Instructions
Step 1: Gather Your Supplies
Before you begin, ensure you have all the necessary tools. Having everything ready prevents interruptions and makes the process smoother. A well-prepared workspace is a happy workspace.
You will need a skein of yarn. For beginners, a medium-weight (worsted or aran) acrylic or wool blend is ideal.
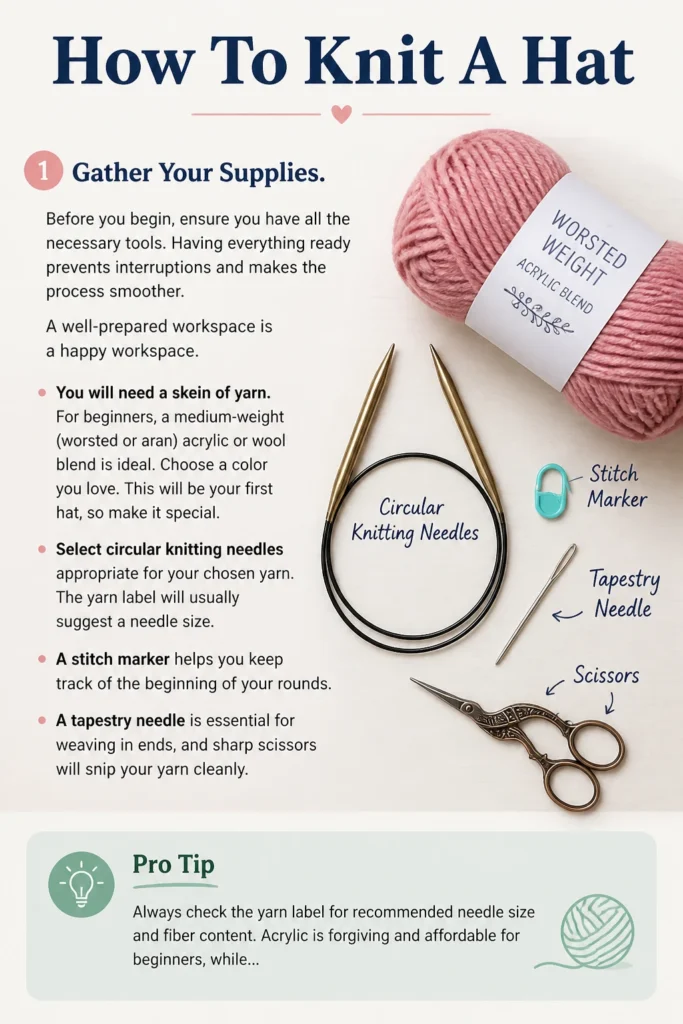
Choose a color you love. This will be your first hat, so make it special.
Select circular knitting needles appropriate for your chosen yarn. The yarn label will usually suggest a needle size.
A stitch marker helps you keep track of the beginning of your rounds.
A tapestry needle is essential for weaving in ends, and sharp scissors will snip your yarn cleanly.
Pro Tip: Always check the yarn label for recommended needle size and fiber content. Acrylic is forgiving and affordable for beginners, while wool offers excellent warmth.
Step 2: Choose Your Yarn and Needles
The right combination of yarn and needles makes a big difference in your hat’s final look and feel. Matching them correctly ensures your stitches are even and the fabric has the desired drape. This step directly impacts your gauge, which we’ll discuss soon.
For a standard adult beanie, a worsted weight yarn (often labeled as “4” on the yarn band) is a great choice.
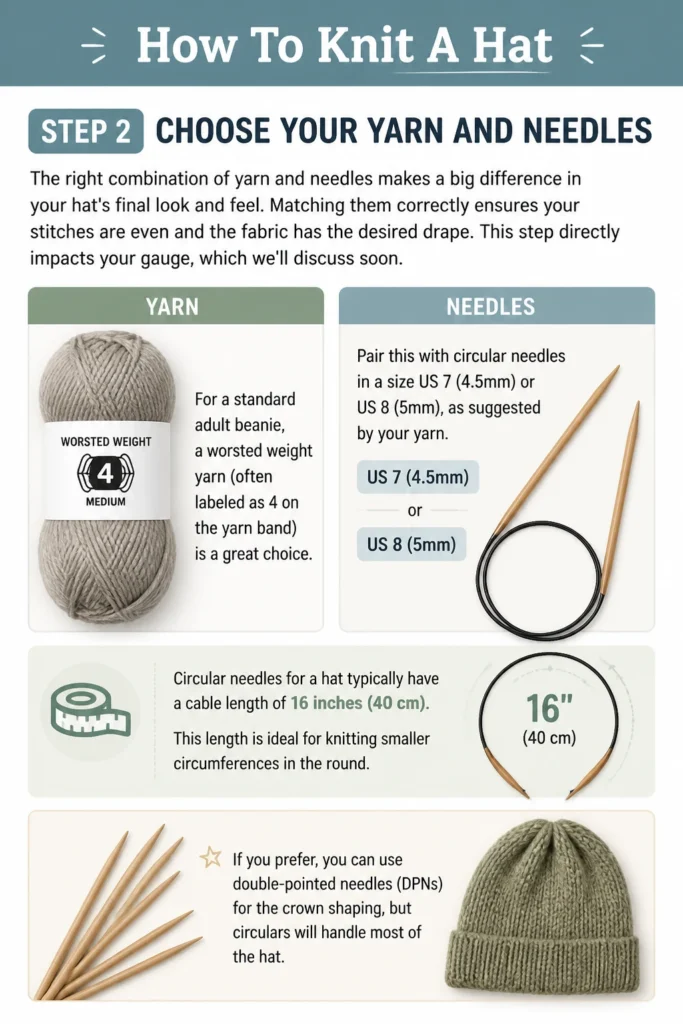
Pair this with circular needles in a size US 7 (4.5mm) or US 8 (5mm), as suggested by your yarn.
Circular needles for a hat typically have a cable length of 16 inches (40 cm). This length is ideal for knitting smaller circumferences in the round.
If you prefer, you can use double-pointed needles (DPNs) for the crown shaping, but circulars will handle most of the hat.
Step 3: Calculate Your Gauge and Cast On Stitches
Gauge refers to the number of stitches and rows per inch. It’s crucial for achieving the correct hat size. Taking time to swatch now saves frustration later.
To determine your gauge, knit a small swatch (at least 4×4 inches) using your chosen yarn and needles.
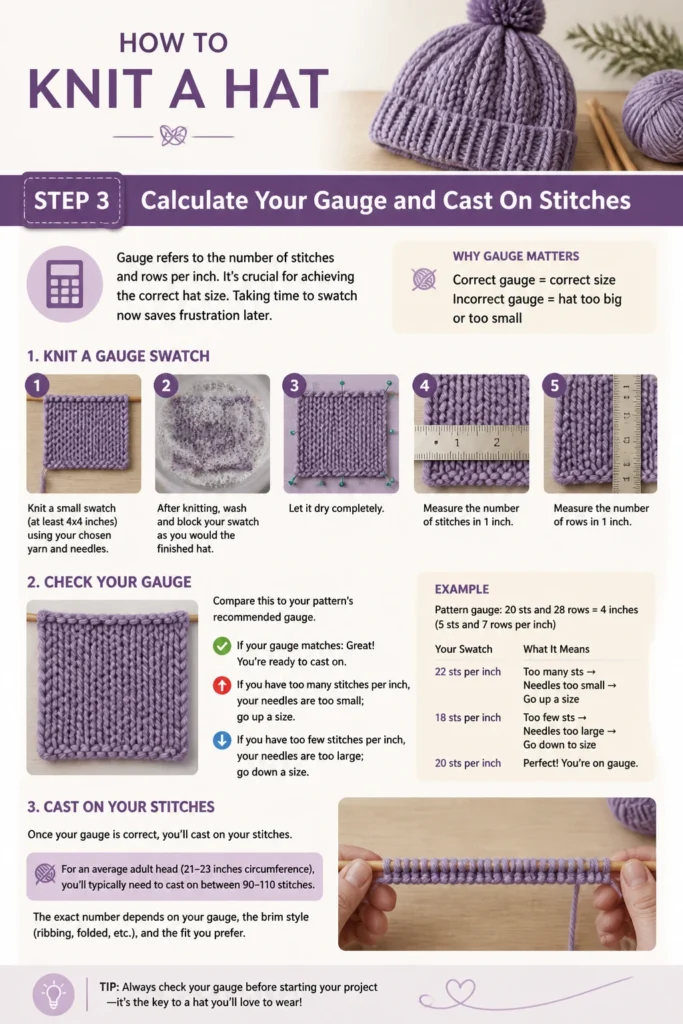
After knitting, wash and block your swatch as you would the finished hat. Let it dry completely.
Measure the number of stitches in 1 inch and the number of rows in 1 inch. Compare this to your pattern’s recommended gauge.
If you have too many stitches per inch, your needles are too small; go up a size. If you have too few, your needles are too large; go down a size.
Once your gauge is correct, you’ll cast on your stitches. For an average adult head (21-23 inches circumference), you’ll typically need to cast on between 90-110 stitches using worsted weight yarn.
Use the long-tail cast-on method for a stretchy and neat edge. This creates a professional-looking brim.
To calculate the exact number of stitches, multiply your head circumference by your stitch gauge (stitches per inch). Round to the nearest even number if your pattern requires it.
Pro Tip: Always cast on one extra stitch if you’re joining in the round. You’ll slip this extra stitch to join, ensuring a seamless connection.
Step 4: Join in the Round and Knit the Brim
Knitting in the round creates a seamless tube, perfect for hats. The brim often uses a ribbed pattern for elasticity and a snug fit. This is where your hat truly starts to take shape.
To join in the round, make sure your cast-on stitches are not twisted on the needle. This is a common mistake that can be frustrating to fix later.
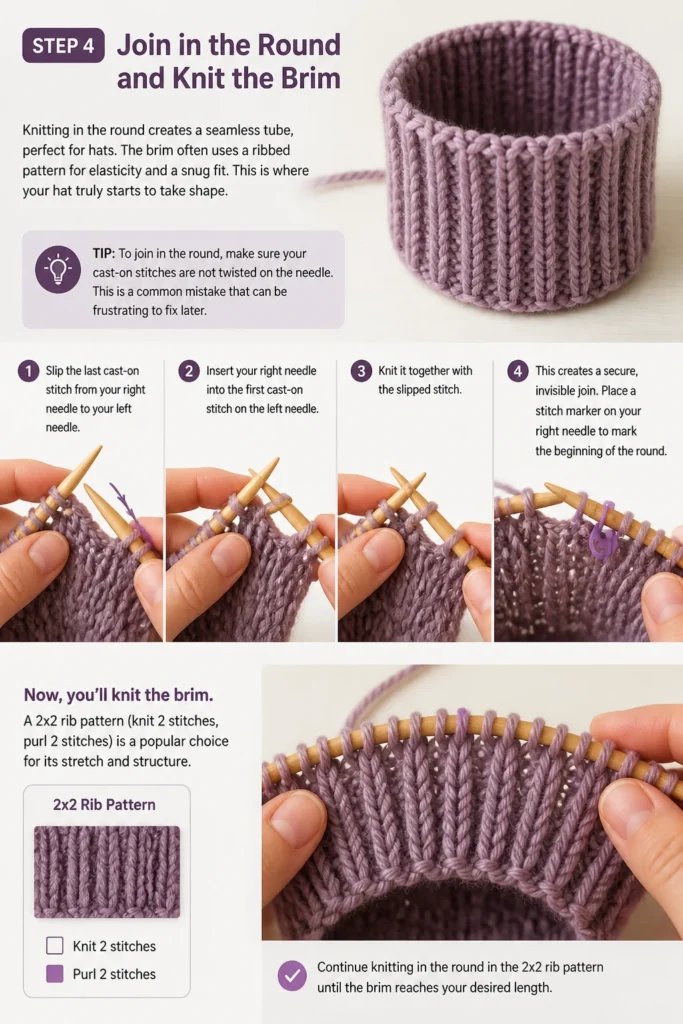
Slip the last cast-on stitch from your right needle to your left needle.
Insert your right needle into the first cast-on stitch on the left needle, and knit it together with the slipped stitch. This creates a secure, invisible join.
Place a stitch marker on your right needle to mark the beginning of the round.
Now, you’ll knit the brim. A 2×2 rib pattern (knit 2 stitches, purl 2 stitches) is a popular choice for its stretch and structure.
Continue knitting in the 2×2 rib pattern until your brim measures about 1-2 inches (2.5-5 cm) in length. This creates a comfortable edge that hugs the head.
Maintain consistent tension for an even, attractive ribbing. This requires practice but pays off in the final product.
Step 5: Knit the Body of the Hat
After the brim, you’ll transition to the main body of the hat. This section is usually simpler, often just knitting every stitch, which creates a smooth stockinette fabric when worked in the round. This is where your hat gains its height.
Once your brim is the desired length, you’ll switch to knitting every stitch for the body of the hat.
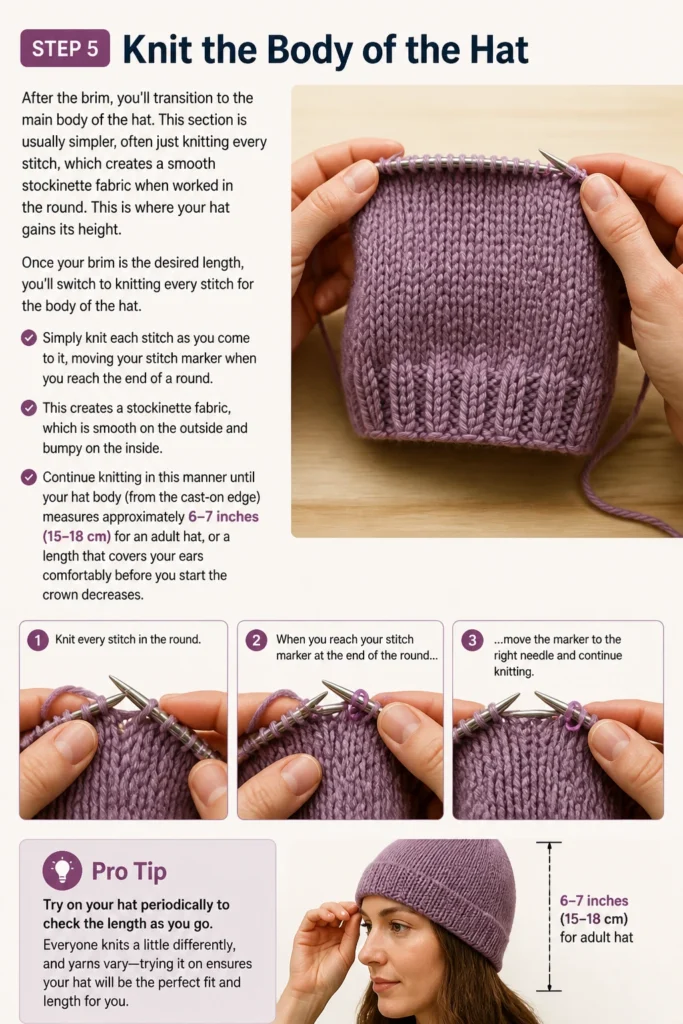
Simply knit each stitch as you come to it, moving your stitch marker when you reach the end of a round.
This creates a stockinette fabric, which is smooth on the outside and bumpy on the inside.
Continue knitting in this manner until your hat body (from the cast-on edge) measures approximately 6-7 inches (15-18 cm) for an adult hat, or a length that covers your ears comfortably before you start the crown decreases.
Pro Tip: Try on your hat periodically to check the length. This helps you customize the fit and ensures you don’t knit it too long or too short before starting the crown.
Step 6: Begin the Crown Decreases
The crown is the top part of the hat that tapers to a close. Decreasing stitches systematically creates this rounded shape. This step requires a bit more attention but is very rewarding.
There are many ways to decrease for a hat crown. A simple and common method involves decreasing evenly over several rounds.
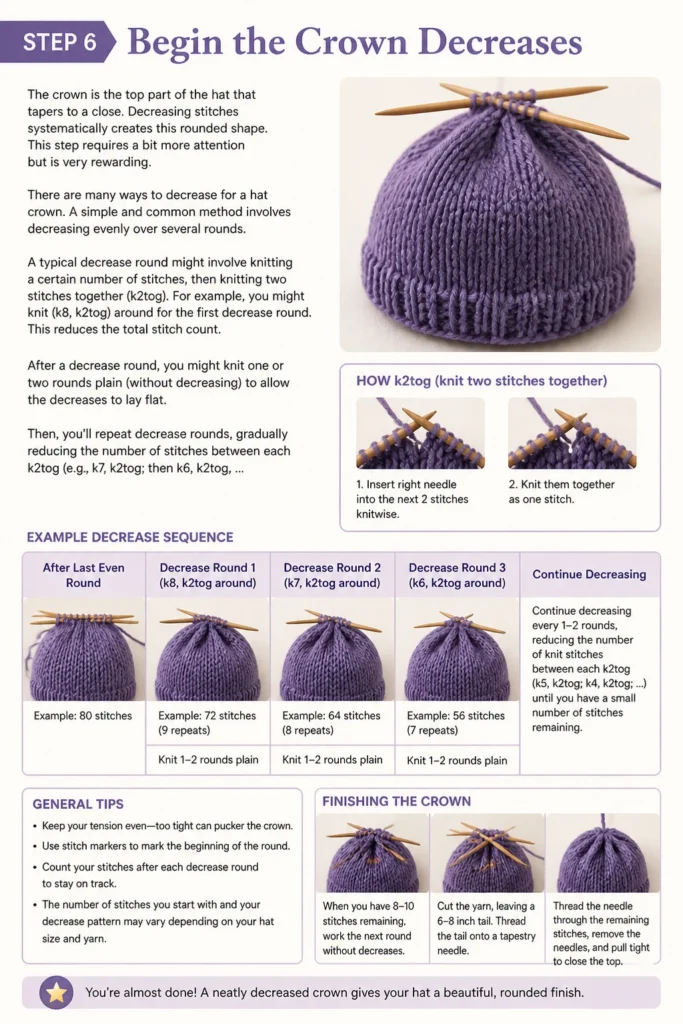
A typical decrease round might involve knitting a certain number of stitches, then knitting two stitches together (k2tog).
For example, you might knit (k8, k2tog) around for the first decrease round. This reduces the total stitch count.
After a decrease round, you might knit one or two rounds plain (without decreasing) to allow the decreases to lay flat.
Then, you’ll repeat decrease rounds, gradually reducing the number of stitches between each k2tog (e.g., k7, k2tog; then k6, k2tog, and so on).
As your stitch count gets smaller, you might find it easier to switch from circular needles to double-pointed needles (DPNs).
Distribute your remaining stitches evenly across 3 or 4 DPNs. This makes knitting the smaller circumference more manageable.
Continue decreasing until you have a small number of stitches left, typically around 8-12 stitches.
Step 7: Finish the Crown and Weave in Ends
The final step in knitting the hat involves closing the remaining stitches and tidying up loose ends. This brings your project to a neat and polished conclusion.
Once you have 8-12 stitches remaining on your needles, cut your working yarn, leaving a tail of about 6-8 inches (15-20 cm).
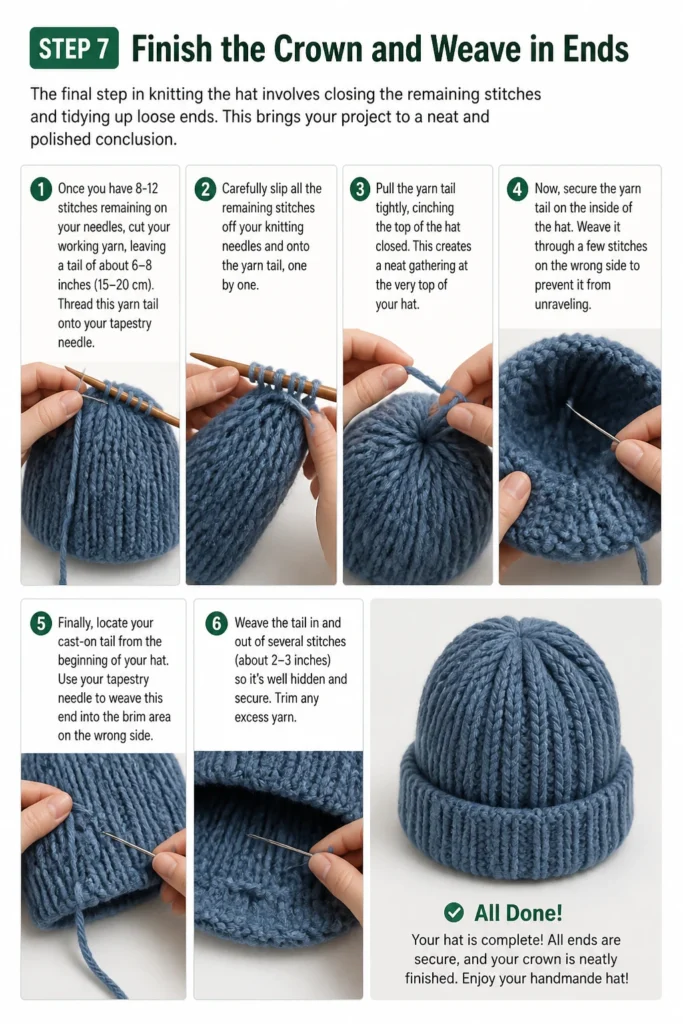
Thread this yarn tail onto your tapestry needle.
Carefully slip all the remaining stitches off your knitting needles and onto the yarn tail, one by one.
Pull the yarn tail tightly, cinching the top of the hat closed. This creates a neat gathering at the very top of your hat.
Now, secure the yarn tail on the inside of the hat. Weave it through a few stitches on the wrong side to prevent it from unraveling.
Finally, locate your cast-on tail from the beginning of your hat. Use your tapestry needle to weave this tail into the brim stitches on the inside of the hat.
Trim any excess yarn close to the fabric, being careful not to cut the knitted stitches.
Your hat is now complete and ready to wear or gift!
Common Mistakes to Avoid
Even experienced knitters make mistakes. Knowing what to watch out for can save you time and frustration, leading to a smoother knitting experience.
Twisted Stitches on Cast-On
A common pitfall for beginners is twisting the cast-on stitches before joining in the round. This results in a Möbius strip effect, where your hat is essentially a continuous loop with a twist. It’s difficult to fix once you’ve knitted several rounds. Before joining, lay your work flat and carefully check that the bottom edge of your stitches forms a neat, untwisted circle. If you see a twist, unravel and re-align before joining.
Incorrect Gauge
Skipping the gauge swatch is tempting, but it’s a critical error. If your gauge is off, your hat will turn out too big, too small, or have a fabric that’s too loose or too dense. Always knit a swatch, block it, and measure it. Adjust your needle size accordingly. A slight difference in gauge can drastically alter the final size of your project.
Dropping Stitches
Accidentally letting a stitch slip off your needle can lead to a run in your fabric. If you notice a dropped stitch a few rows down, it can be scary to fix. Always keep an eye on your needles, especially when putting your work down. If you do drop a stitch, don’t panic. Use a crochet hook or even your knitting needle to pick it back up, following the path of the yarn in the rows below.
Uneven Tension
Inconsistent tension can make your fabric look bumpy or uneven, especially in ribbing. This often happens when you’re learning to knit and haven’t found your rhythm yet. Practice helps immensely. Try to relax your hands and maintain a consistent grip on your yarn and needles. Don’t pull the yarn too tightly or hold it too loosely. Over time, your tension will naturally become more even.
Troubleshooting
Knitting can present a few challenges, but most problems have simple solutions. Don’t get discouraged; these tips will help you overcome common hurdles.
My Hat Is Too Big/Small
This is almost always a gauge issue. If your hat is too big, your stitch gauge is likely too loose, meaning you have fewer stitches per inch than the pattern calls for. Try going down a needle size. If it’s too small, your stitch gauge is too tight, meaning you have more stitches per inch. Go up a needle size. Always re-swatch with the new needles.
I Keep Dropping Stitches
Dropping stitches can be frustrating. Ensure your needles aren’t too slick for your yarn. Some yarns slip off metal needles easily; try bamboo or wood needles for more grip. Also, check your posture and how you hold your needles. Sometimes, a slight adjustment in how you handle your yarn can prevent stitches from sliding off. Use a stitch marker to secure any stitches if you need to set your work down.
My Edges Are Uneven
Uneven edges, especially at the brim, often come from inconsistent tension during the cast-on or the first few rows of ribbing. Practice your cast-on technique to make it consistent. When knitting the first few rows, pay extra attention to maintaining an even tension. Blocking your finished hat can also help to even out minor irregularities in the fabric and edges.
Key Takeaways
- Gauge is your best friend: Always swatch to ensure your hat fits perfectly.
- Practice makes progress: Don’t expect perfection on your first try; enjoy the learning.
- Embrace mistakes: They are opportunities to learn and improve your skills.
- Circular needles are key: They create seamless hats and make knitting in the round easy.
- Finishing details matter: Weaving in ends neatly gives your hat a professional look.
- Enjoy the process: Knitting should be a relaxing and rewarding hobby.
Frequently Asked Questions
Can I knit a hat flat?
Yes, you can knit a hat flat on straight needles. You would knit a rectangular piece of fabric, then seam the sides together to form a tube. Finally, you would gather the top edge to create the crown. While possible, knitting in the round eliminates the need for a seam, resulting in a smoother finish.
What’s the best yarn for a beginner hat?
For beginners, a worsted weight acrylic or a superwash wool blend is highly recommended. Acrylic is affordable, easy to care for, and forgiving of mistakes. Superwash wool is soft, warm, and can be machine washed, making it practical for everyday hats. Avoid very slippery yarns or highly textured yarns for your first project.
How do I know what size needles to use?
The yarn label will usually suggest a range of needle sizes for that specific yarn weight. Start with the middle of that range and knit a gauge swatch. Adjust your needle size up or down based on your swatch to achieve the desired stitch gauge. This ensures your fabric has the right density and your hat will be the correct size.
How do I wash my knitted hat?
Always check your yarn label for specific washing instructions. For most acrylic hats, machine washing on a gentle cycle with cold water and air drying flat is sufficient. For wool hats, especially non-superwash wool, hand washing in cool water with a gentle wool wash is crucial. Squeeze out excess water gently, then lay flat to dry to prevent stretching or felting.
Our Top Recommended Finds
- Circular Knitting Needles Set: A set with interchangeable tips and various cable lengths offers versatility for future projects.
- High-Quality Acrylic Yarn: Look for soft, non-splitting acrylic yarns in worsted weight for easy handling and comfortable wear.
- Stitch Marker Pack: A pack with various types (locking and ring markers) is helpful for different uses and preferences.
Your Next Creative Chapter Awaits
You’ve just knitted a hat, a tangible symbol of your new skill and patience. This is more than just a piece of clothing; it’s a testament to your creativity and dedication. Wear it with pride, or gift it knowing the effort and love woven into every stitch.
Don’t let your needles rest for too long. The world of knitting is vast and full of exciting possibilities.
Consider trying a simple scarf next, experimenting with new stitch patterns, or even venturing into a more complex sweater.
Each project builds on the last, opening new doors to creative expression.
Pick up your needles today and continue your knitting adventure!