✂️ How To Make A Wallet
I remember sitting at my kitchen table with a scrap of leather and a dull utility knife, wondering if I could actually make something useful.
That first wallet was rough around the edges, but it lasted five years and sparked a lifelong passion for leathercraft.
This guide is built from those years of trial and error to help you create a professional-quality piece on your very first try.
Quick Overview
You are about to transform a flat piece of animal hide into a functional, durable bifold wallet that can hold six cards and cash.
- Time needed: 4 to 6 hours
- Difficulty: Beginner
- What you’ll need: Vegetable-tanned leather (3oz weight), a sharp craft knife, waxed thread, two needles, a metal ruler, and contact cement.
Step 1: Select Your Leather
Choose a vegetable-tanned leather for your first project because it is firm and easy to work with. This type of leather holds its shape well and develops a beautiful dark patina over time as you use it.
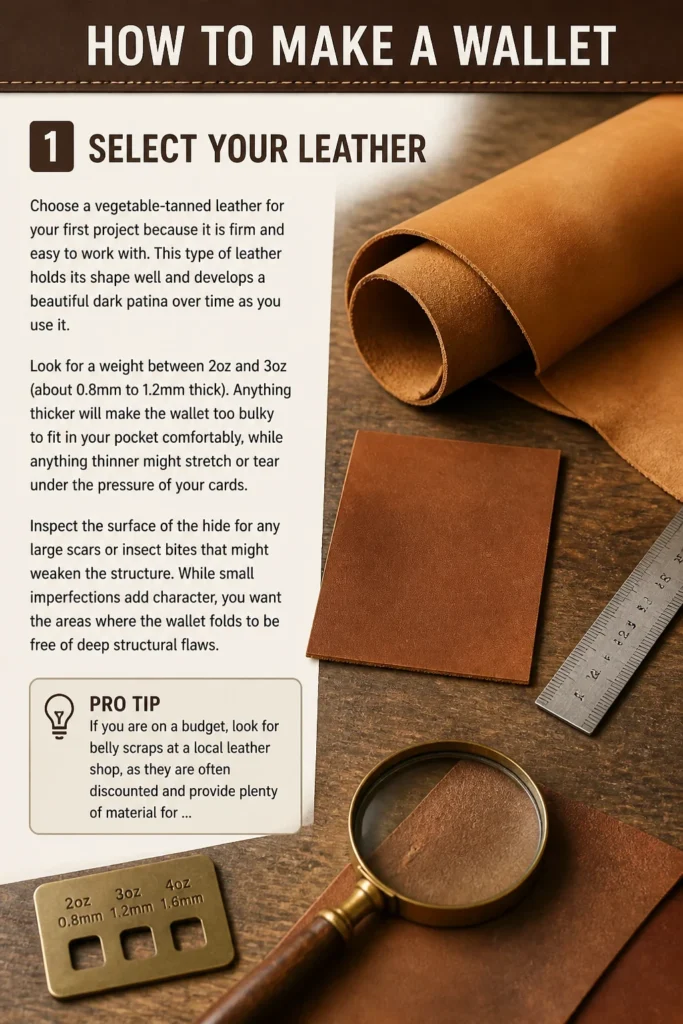
Look for a weight between 2oz and 3oz (about 0.8mm to 1.2mm thick). Anything thicker will make the wallet too bulky to fit in your pocket comfortably, while anything thinner might stretch or tear under the pressure of your cards.
Inspect the surface of the hide for any large scars or insect bites that might weaken the structure. While small imperfections add character, you want the areas where the wallet folds to be free of deep structural flaws.
Pro Tip: If you are on a budget, look for “belly” scraps at a local leather shop, as they are often discounted and provide plenty of material for a small wallet.
Step 2: Create and Trace Your Template
Draw your pattern pieces on a piece of heavy cardstock or manila folder before touching the leather. You will need one large rectangle for the main body (roughly 8.25 by 3.25 inches) and four smaller rectangles for the card pockets.
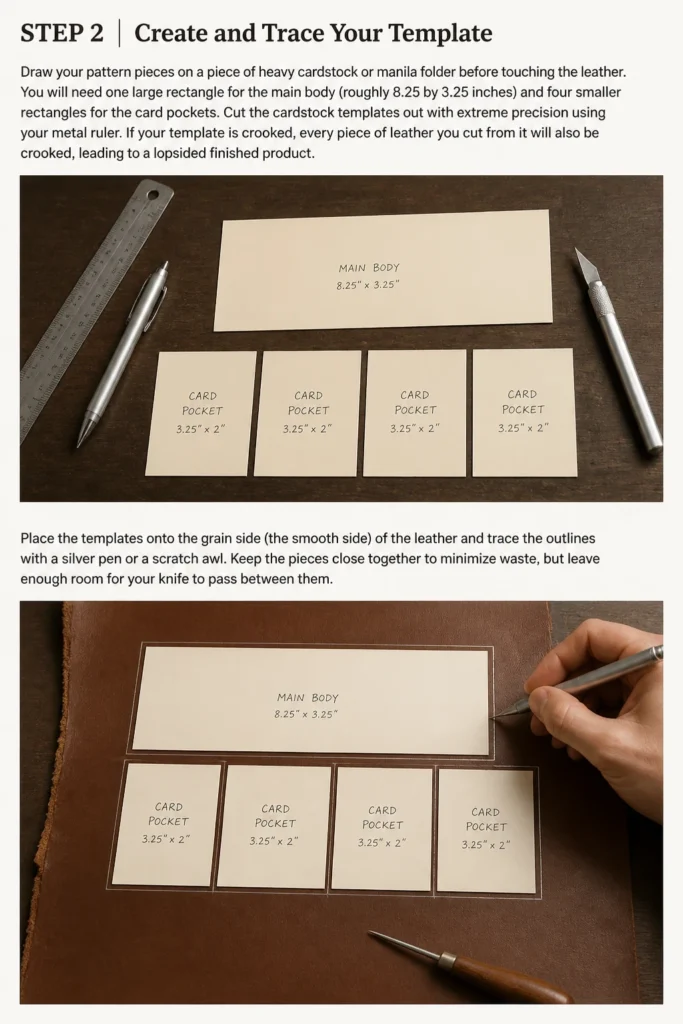
Cut the cardstock templates out with extreme precision using your metal ruler. If your template is crooked, every piece of leather you cut from it will also be crooked, leading to a lopsided finished product.
Place the templates onto the “grain” side (the smooth side) of the leather and trace the outlines with a silver pen or a scratch awl. Keep the pieces close together to minimize waste, but leave enough room for your knife to pass between them.
Step 3: Cut the Leather Pieces
Position your metal ruler firmly along the traced lines and apply significant downward pressure. A ruler that slips mid-cut is the most common cause of ruined leather and accidental finger injuries.
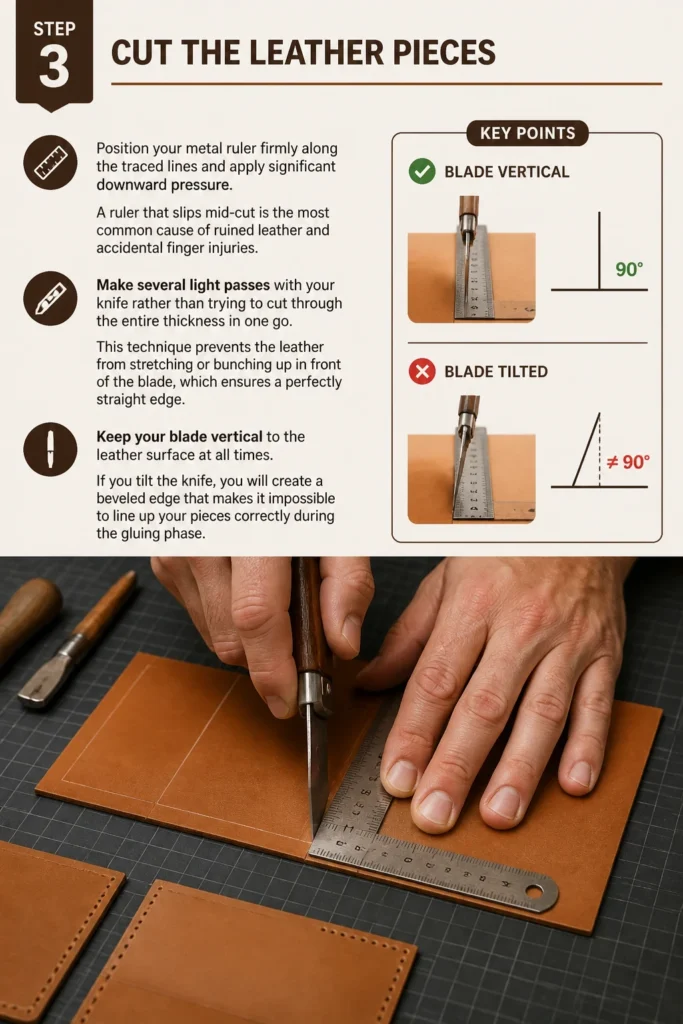
Make several light passes with your knife rather than trying to cut through the entire thickness in one go. This technique prevents the leather from stretching or bunching up in front of the blade, which ensures a perfectly straight edge.
Keep your blade vertical to the leather surface at all times. If you tilt the knife, you will create a beveled edge that makes it impossible to line up your pieces correctly during the gluing phase.
Step 4: Bevel and Burnish the Pocket Tops
Identify the edges of the card pockets that will be “open” once the wallet is assembled. You must finish these edges now because you will not be able to reach them once the pockets are sewn down.
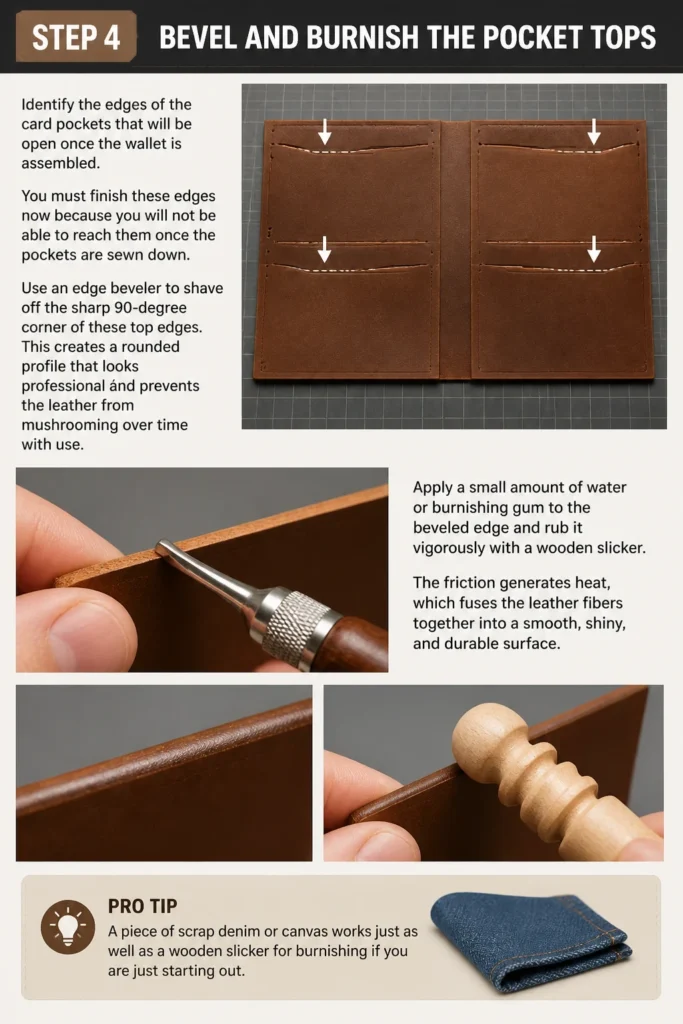
Use an edge beveler to shave off the sharp 90-degree corner of these top edges. This creates a rounded profile that looks professional and prevents the leather from “mushrooming” over time with use.
Apply a small amount of water or burnishing gum to the beveled edge and rub it vigorously with a wooden slicker. The friction generates heat, which fuses the leather fibers together into a smooth, shiny, and durable surface.
Pro Tip: A piece of scrap denim or canvas works just as well as a wooden slicker for burnishing if you are just starting out.
Step 5: Apply Adhesive for Assembly
Rough up the areas where the leather pieces will overlap using a bit of sandpaper or the tip of your awl. Creating a fuzzy texture allows the glue to penetrate deeper into the fibers for a permanent bond.
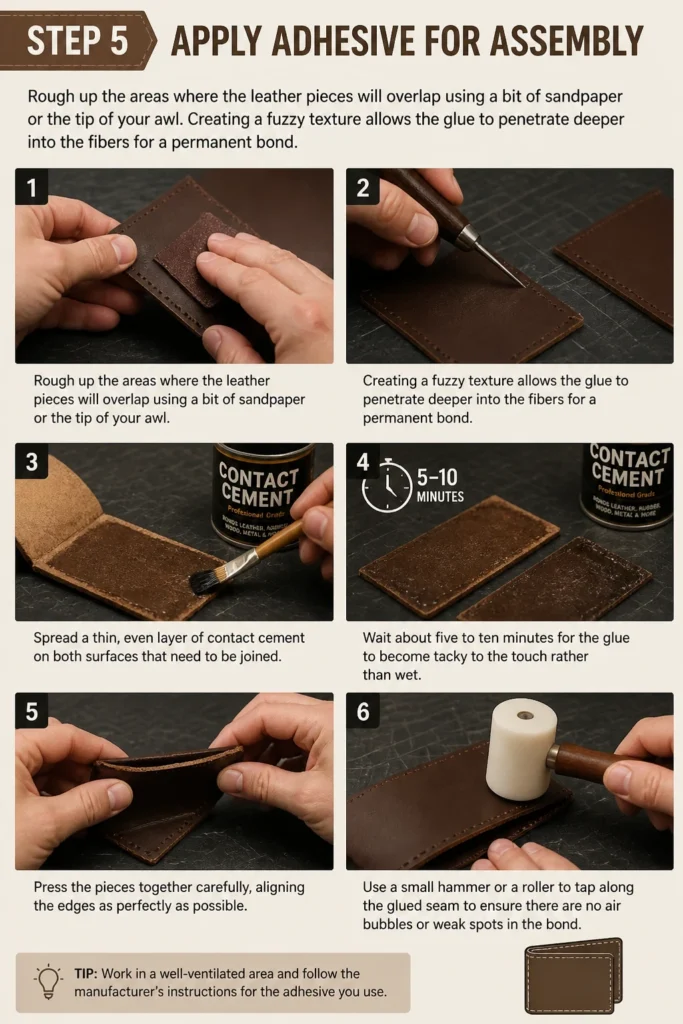
Spread a thin, even layer of contact cement on both surfaces that need to be joined. Wait about five to ten minutes for the glue to become “tacky” to the touch rather than wet.
Press the pieces together carefully, aligning the edges as perfectly as possible. Use a small hammer or a roller to tap along the glued seam to ensure there are no air bubbles or weak spots in the bond.
Step 6: Mark the Stitching Line
Set a wing divider or a stitching groover to about 1/8th of an inch (3mm) from the edge of the leather. Run the tool along the perimeter of the wallet to create a faint guide line for your stitches.
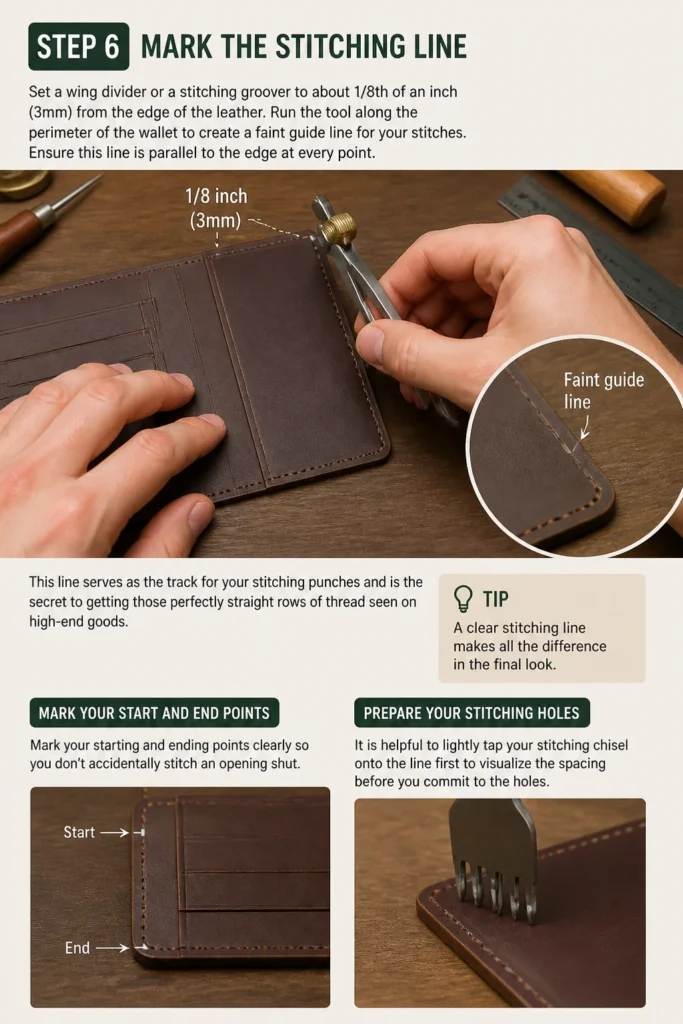
Ensure this line is parallel to the edge at every point. This line serves as the track for your stitching punches and is the secret to getting those perfectly straight rows of thread seen on high-end goods.
Mark your starting and ending points clearly so you don’t accidentally stitch an opening shut. It is helpful to lightly tap your stitching chisel onto the line first to visualize the spacing before you commit to the holes.
Step 7: Punch the Stitching Holes
Place your leather on a specialized poly cutting board or a thick scrap of rubber to protect your tools. Never punch holes directly over a hard surface like stone or metal, as this will instantly dull or snap the teeth of your chisels.
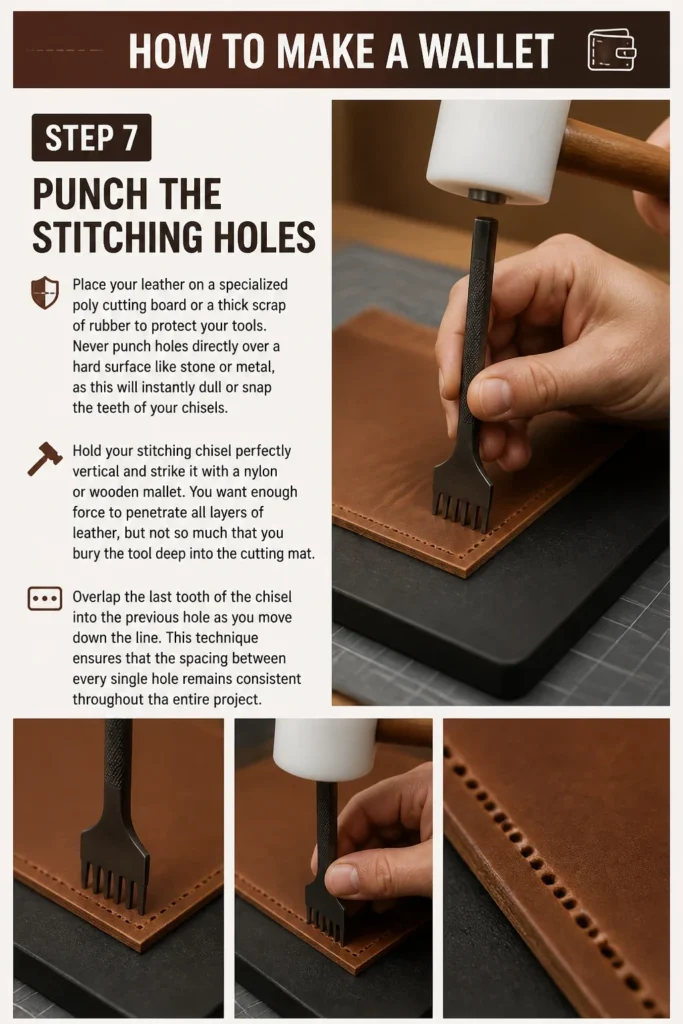
Hold your stitching chisel perfectly vertical and strike it with a nylon or wooden mallet. You want enough force to penetrate all layers of leather, but not so much that you bury the tool deep into the cutting mat.
Overlap the last tooth of the chisel into the previous hole as you move down the line. This technique ensures that the spacing between every single hole remains consistent throughout the entire project.
Step 8: The Saddle Stitch
Measure out a length of waxed thread that is roughly four times the length of the seam you are about to sew. Thread a needle onto each end of the string so that you have a needle at both “heads” of the thread.
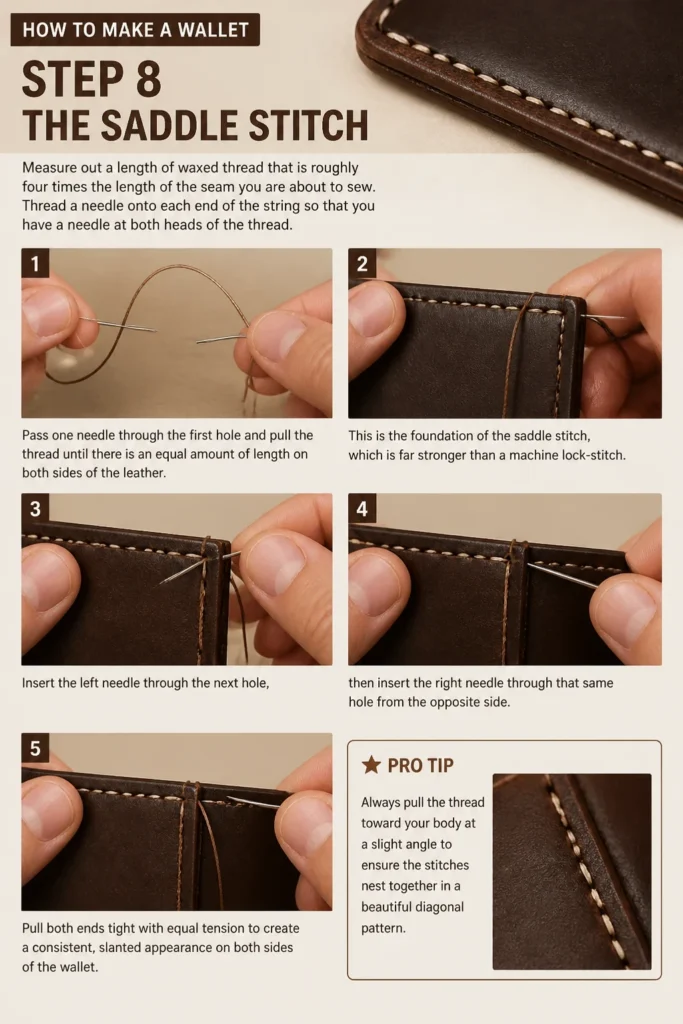
Pass one needle through the first hole and pull the thread until there is an equal amount of length on both sides of the leather. This is the foundation of the saddle stitch, which is far stronger than a machine lock-stitch.
Insert the left needle through the next hole, then insert the right needle through that same hole from the opposite side. Pull both ends tight with equal tension to create a consistent, slanted appearance on both sides of the wallet.
Pro Tip: Always pull the thread toward your body at a slight angle to ensure the stitches “nest” together in a beautiful diagonal pattern.
Step 9: Finish the Exterior Edges
Sand the outside edges of the wallet where the multiple layers of leather meet. Start with 220-grit sandpaper to level the layers and move up to 600-grit until the seam between the pieces disappears entirely.
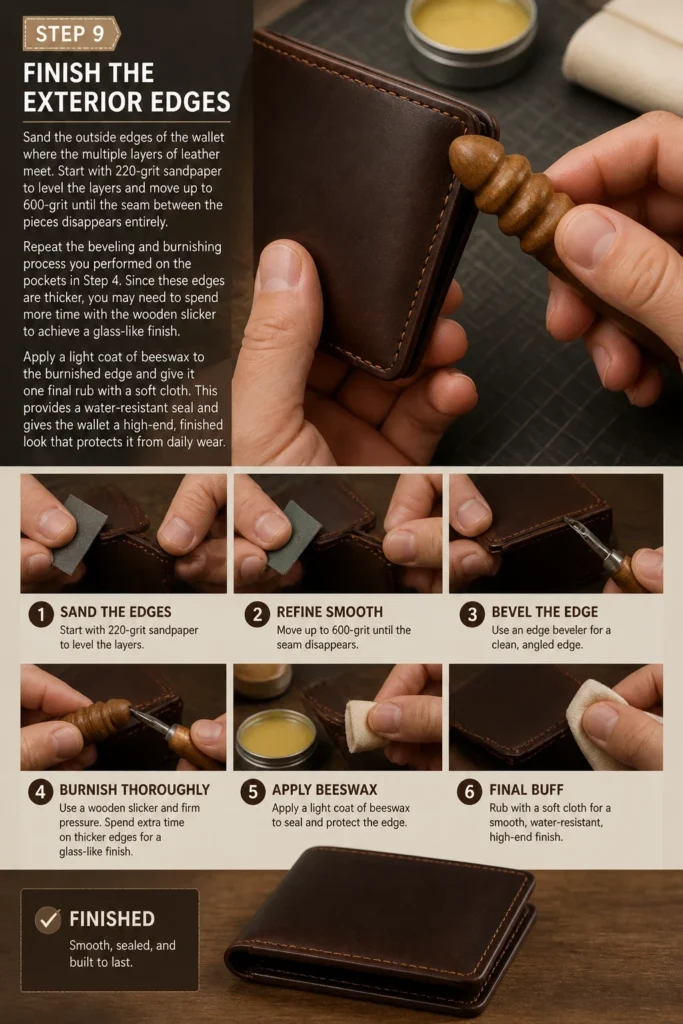
Repeat the beveling and burnishing process you performed on the pockets in Step 4. Since these edges are thicker, you may need to spend more time with the wooden slicker to achieve a glass-like finish.
Apply a light coat of beeswax to the burnished edge and give it one final rub with a soft cloth. This provides a water-resistant seal and gives the wallet a high-end, finished look that protects it from daily wear.
Step 10: Condition and Protect
Wipe the entire wallet down with a clean, dry cloth to remove any dust or stray glue. Check the interior pockets for any sticky residue and clean it out with a small amount of rubbing alcohol if necessary.
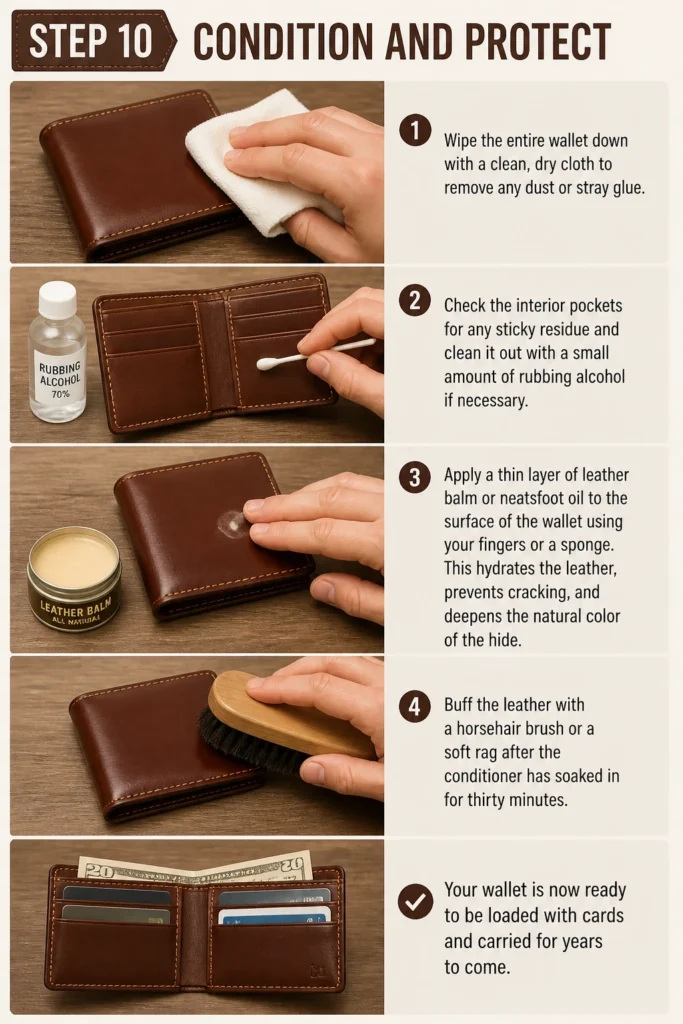
Apply a thin layer of leather balm or neatsfoot oil to the surface of the wallet using your fingers or a sponge. This hydrates the leather, prevents cracking, and deepens the natural color of the hide.
Buff the leather with a horsehair brush or a soft rag after the conditioner has soaked in for thirty minutes. Your wallet is now ready to be loaded with cards and carried for years to come.
Common Mistakes to Avoid
Using the Wrong Knife
Many beginners try to use kitchen scissors or a dull pocket knife to cut their leather. This results in jagged edges and frayed fibers that are impossible to burnish. Always use a fresh, razor-sharp utility blade or a dedicated leather head knife for clean, professional cuts.
Pulling Stitches Too Tight
If you pull your thread with excessive force, the leather will pucker and wrinkle around the holes. This creates a “scalloped” edge that looks messy and can eventually cause the thread to cut through the leather. Aim for firm, consistent tension that seats the thread snugly against the surface without distorting the material.
Skipping the Sanding Process
Trying to burnish edges that haven’t been sanded smooth is a recipe for frustration. If the layers of leather are not perfectly flush, the burnishing tool will only polish the high spots, leaving the gaps visible. Taking ten minutes to sand through various grits is the only way to achieve a seamless, “single piece” look on the edges.
Troubleshooting
The Thread Snapped Mid-Stitch
If your thread breaks, do not panic or try to tie a knot in the middle of the seam. Backstitch three holes into the existing line, cut the thread, and start a new length of thread by overlapping those same three holes. This creates a seamless transition that maintains the structural integrity of the wallet.
The Pockets Are Too Tight For Cards
Leather is a natural material that will stretch over time, but if you can’t get a card in at all, the pocket was likely cut too small. You can sometimes remedy this by slightly dampening the leather with water and forcing two cards into the slot. Let it dry with the cards inside, and the leather will “set” in its new, larger shape.
The Glue Is Peeling Apart
This usually happens because the glue was not allowed to dry long enough before the pieces were joined. If a seam starts to open, carefully pull it apart, scrape away the old glue, and reapply a fresh layer. Ensure you wait until the cement is tacky and no longer looks wet before pressing the pieces back together.
Key Takeaways
- Vegetable-tanned leather in a 2-3oz weight is the ideal choice for durability and ease of use.
- The saddle stitch is the gold standard for handmade wallets because it will not unravel even if a thread breaks.
- Edge finishing through sanding and burnishing is what separates a homemade project from a professional product.
- Always use a metal ruler and multiple light cuts to ensure straight lines and safety.
- Consistency in stitch tension and hole alignment is more important than speed.
Frequently Asked Questions
Do I really need a stitching chisel?
While you can use a single awl to poke every hole, a stitching chisel ensures that the spacing between holes is perfectly uniform. For a beginner, a chisel is the most effective way to achieve a professional look without years of practice. It saves time and reduces the physical strain on your hands during long stitching sessions.
What is the best thread for a leather wallet?
Waxed polyester thread is generally considered the best choice for wallets because it does not rot or stretch over time. Braided threads like Ritza Tiger thread are highly recommended because they lay flat against the leather and are incredibly strong. Avoid using standard sewing machine thread, as it is too thin and will eventually cut through the leather.
How do I keep my edges from fraying?
Fraying occurs when the internal fibers of the leather are exposed and left loose. The burnishing process, which uses friction and a binding agent like gum tragacanth, seals these fibers together. Regular maintenance with a bit of beeswax or leather conditioner will keep those edges smooth and prevent them from opening up over time.
Our Top Recommended Finds
- Precision Craft Knife with Replacement Blades: A sharp blade is your most important safety tool and ensures clean edges that are easy to finish.
- 0.8mm Waxed Polyester Thread: This specific thickness provides a bold, rugged look that complements handmade leather goods perfectly.
- Multi-Size Wooden Edge Slicker: This simple tool allows you to burnish edges of different thicknesses with ease and comfort.
Mastering Your New Craft
Now that you have completed your first wallet, you have the foundational skills to tackle more complex leather projects.
You might consider experimenting with different dyes to create custom colors or trying your hand at a larger project like a passport cover or a small clutch.
The best way to improve is to keep your tools sharp and your workspace organized as you start your next creation today.