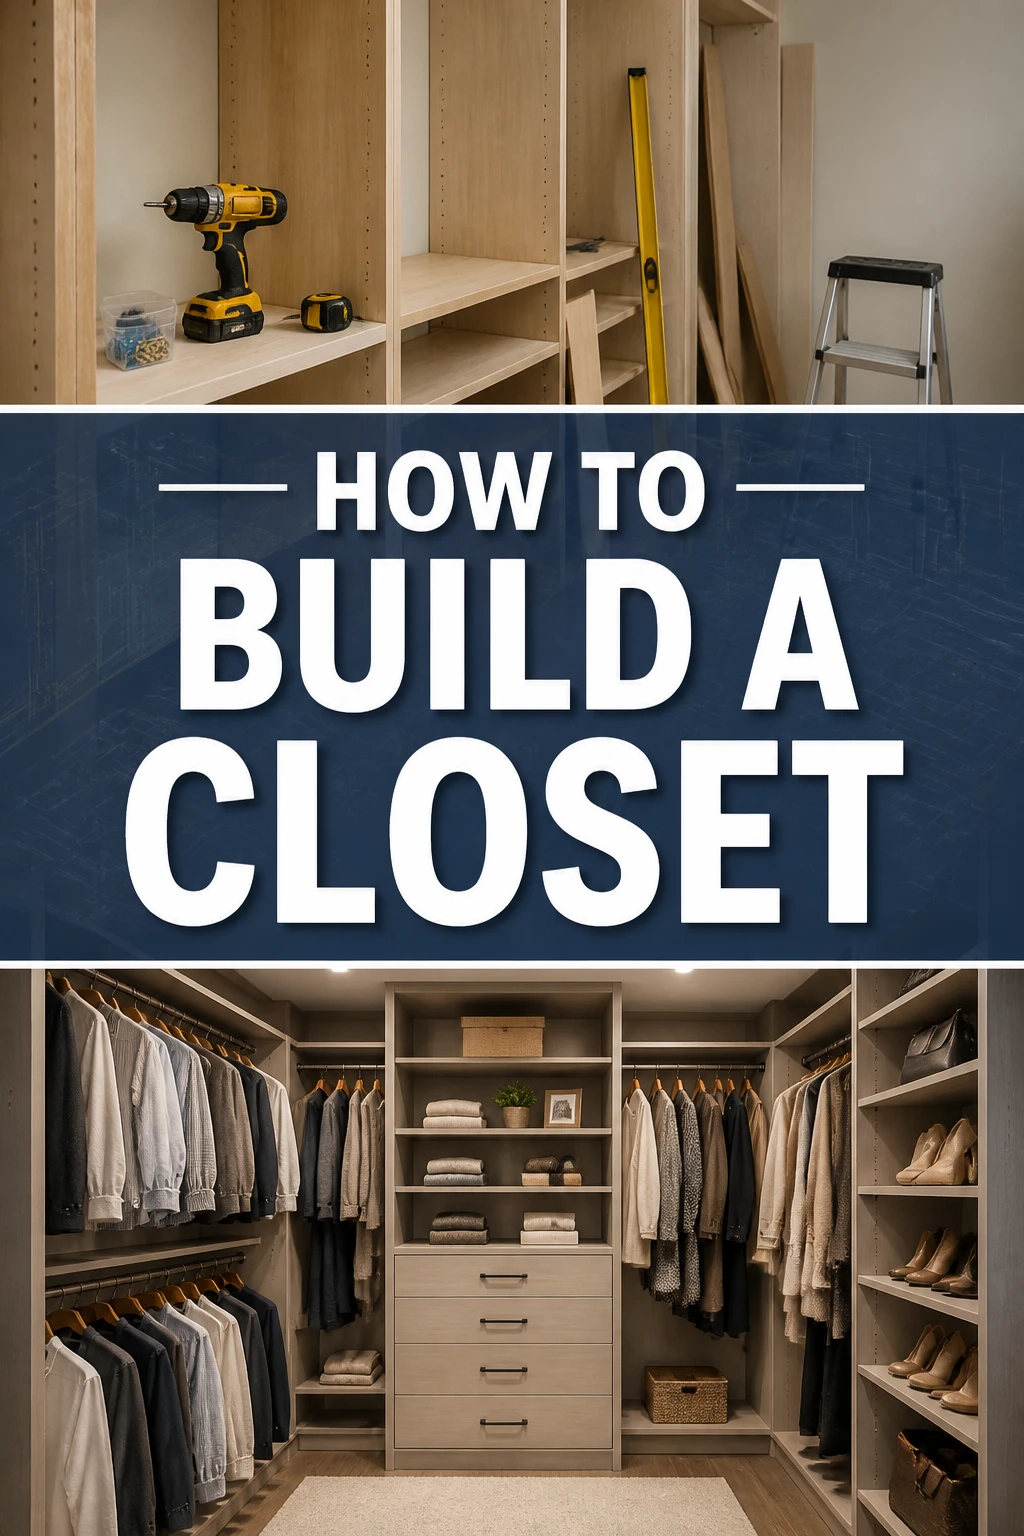
🛠️ How To Build A Closet
Tired of overflowing drawers and a chaotic bedroom floor?
Building your own closet transforms clutter into calm, offering tailored storage solutions right where you need them.
I remember my first custom closet project; it felt daunting at first, but the satisfaction of seeing it come together, perfectly fitting my space, was immense.
Quick Overview
Creating a custom closet might seem like a big undertaking, but with a clear plan and the right approach, it’s a rewarding DIY project. You’ll gain valuable skills and end up with storage perfectly suited to your needs. This guide will walk you through each phase, from initial design to the final paint stroke.
- Time needed: 3-5 full days (spread over a couple of weekends)
- Difficulty: Intermediate
- What you’ll need: Lumber, drywall, fasteners, measuring tools, saw, drill, level, finishing materials
Step-by-Step Instructions
Step 1: Plan Your Vision and Design
Every great closet begins with a thoughtful plan. Before you cut a single board, visualize how you’ll use the space. Consider what you need to store: hanging clothes, folded items, shoes, accessories.
Measure your designated area precisely. Note the height, width, and depth available for your new closet structure.
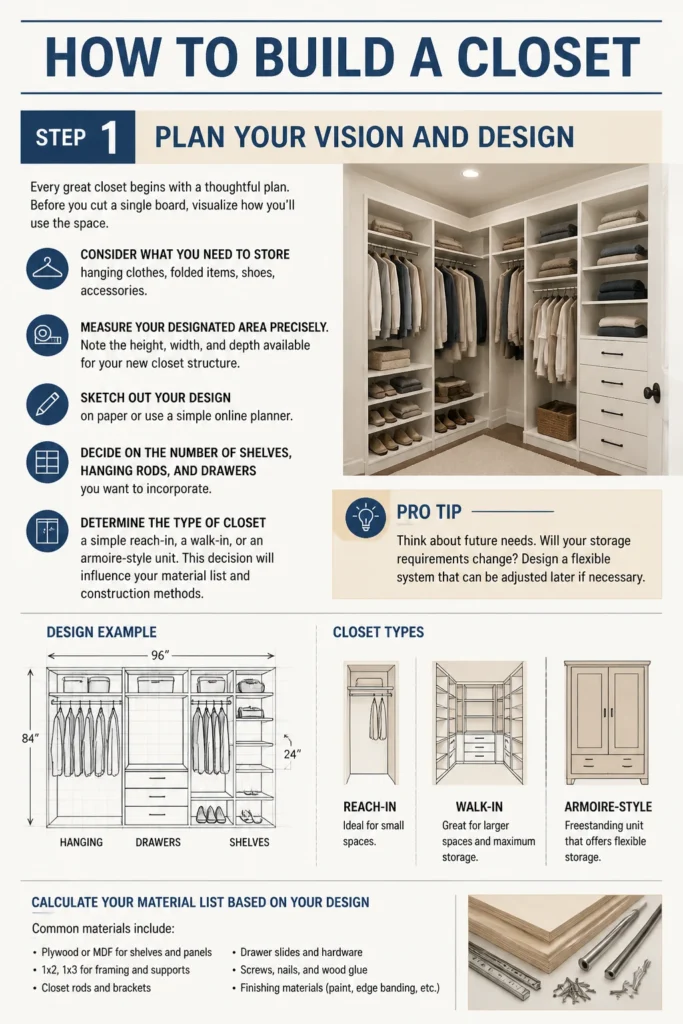
Sketch out your design on paper or use a simple online planner. Decide on the number of shelves, hanging rods, and drawers you want to incorporate.
Pro Tip: Think about future needs. Will your storage requirements change? Design a flexible system that can be adjusted later if necessary.
Determine the type of closet: a simple reach-in, a walk-in, or an armoire-style unit. This decision will influence your material list and construction methods.
Calculate your material list based on your design. Factor in lumber for framing, drywall or paneling, shelving material, closet rods, and trim.
Step 2: Gather Tools and Materials
Having everything on hand before you start saves time and frustration. A well-stocked toolkit makes the building process much smoother.
Collect your essential hand tools: a tape measure, pencil, utility knife, stud finder, level, and a caulk gun.
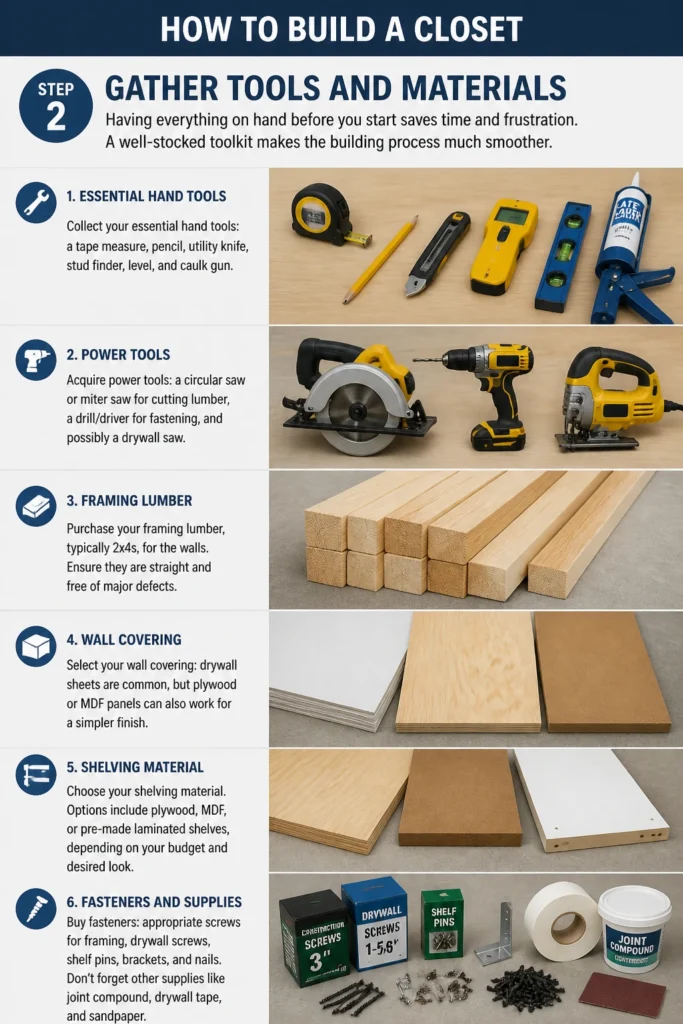
Acquire power tools: a circular saw or miter saw for cutting lumber, a drill/driver for fastening, and possibly a drywall saw.
Purchase your framing lumber, typically 2x4s, for the walls. Ensure they are straight and free of major defects.
Select your wall covering: drywall sheets are common, but plywood or MDF panels can also work for a simpler finish.
Choose your shelving material. Options include plywood, MDF, or pre-made laminated shelves, depending on your budget and desired look.
Buy fasteners: appropriate screws for framing, drywall screws, and finishing nails for trim work.
Don’t forget safety gear: safety glasses, work gloves, and a dust mask are crucial for any construction project.
Step 3: Prepare the Space
A clean and clear workspace is essential for accurate and safe construction. This step ensures your new closet has a solid foundation.
Clear out the area where the closet will be built. Remove any furniture, rugs, or existing fixtures.
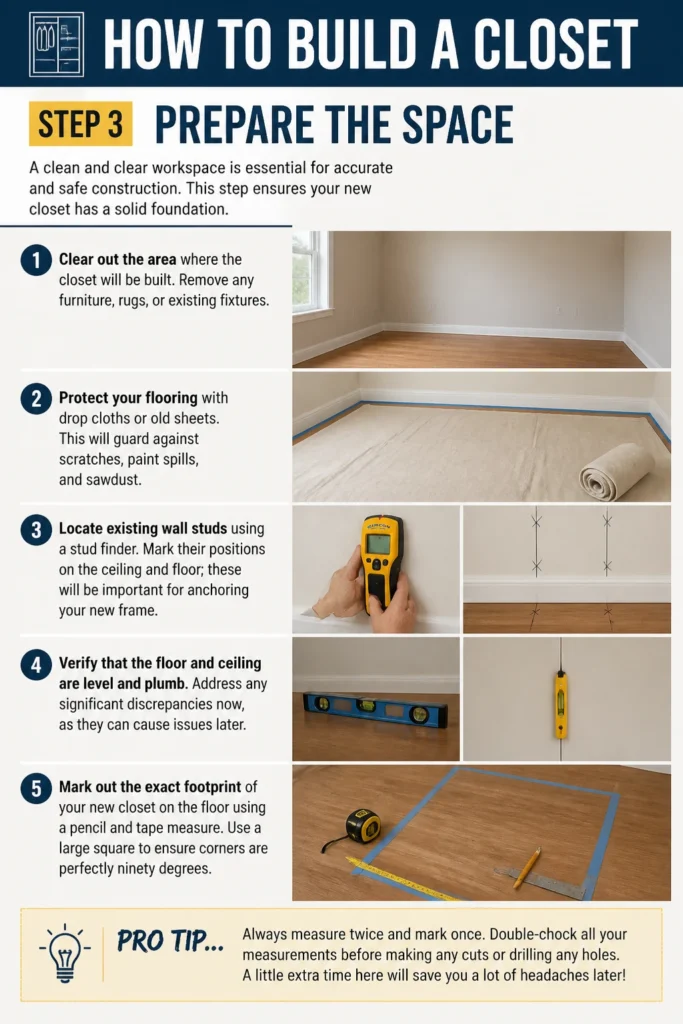
Protect your flooring with drop cloths or old sheets. This will guard against scratches, paint spills, and sawdust.
Locate existing wall studs using a stud finder. Mark their positions on the ceiling and floor; these will be important for anchoring your new frame.
Verify that the floor and ceiling are level and plumb. Address any significant discrepancies now, as they can cause issues later.
Mark out the exact footprint of your new closet on the floor using a pencil and tape measure. Use a large square to ensure corners are perfectly ninety degrees.
Pro Tip: Double-check all your measurements against your plan. It’s much easier to adjust lines on the floor than to fix a crooked wall.
Step 4: Frame the Structure
The framing is the skeleton of your closet. Accurate framing ensures a sturdy and plumb structure for the walls and door opening.
Cut your 2×4 lumber for the bottom plate, top plate, and vertical studs according to your design measurements.
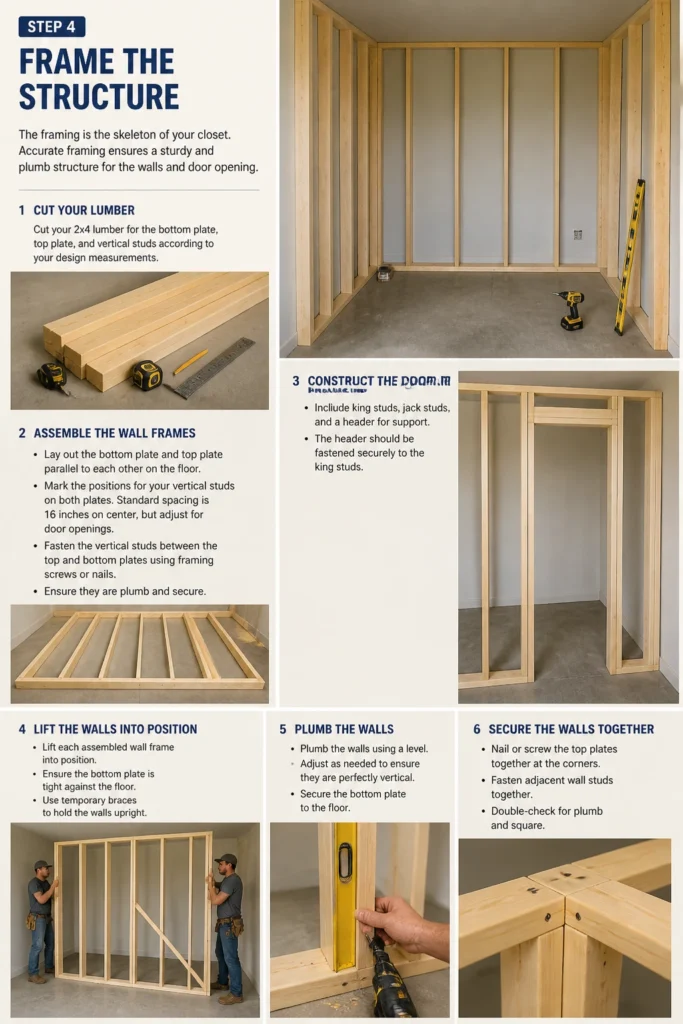
Assemble the wall frames. Start by laying out the bottom plate and top plate parallel to each other on the floor.
Mark the positions for your vertical studs on both plates. Standard spacing is 16 inches on center, but adjust for door openings.
Fasten the vertical studs between the top and bottom plates using framing screws or nails. Ensure they are plumb and secure.
Construct the door frame opening within one of your wall sections. Include king studs, jack studs, and a header for support.
Lift each assembled wall frame into position. Plumb the walls using a level and secure the bottom plate to the floor joists or subfloor.
Anchor the top plate to the ceiling joists. If no joists are directly overhead, add blocking between existing joists for secure attachment.
Connect adjacent wall frames at the corners with screws. Ensure all walls are plumb, level, and square to each other.
Step 5: Install Drywall or Wall Panels
Once the frame is secure, it’s time to enclose the closet walls. This step gives your closet its finished interior and exterior surfaces.
Cut drywall sheets or wall panels to size using a utility knife and a straightedge. Score deeply and snap cleanly.
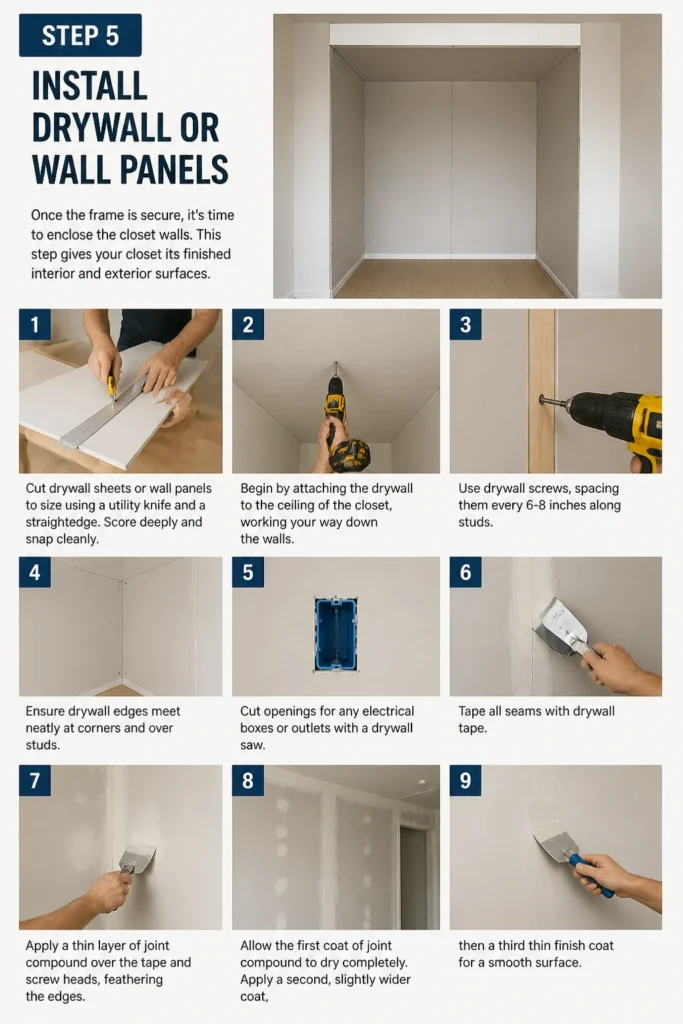
Begin by attaching the drywall to the ceiling of the closet, working your way down the walls. Use drywall screws, spacing them every 6-8 inches along studs.
Ensure drywall edges meet neatly at corners and over studs. Cut openings for any electrical boxes or outlets with a drywall saw.
Tape all seams with drywall tape. Apply a thin layer of joint compound over the tape and screw heads, feathering the edges.
Allow the first coat of joint compound to dry completely. Apply a second, slightly wider coat, then a third thin finish coat for a smooth surface.
Sand the dried joint compound smooth with fine-grit sandpaper. Wipe away all dust before proceeding to the next step.
Pro Tip: For a cleaner look and less sanding, consider using pre-finished wall panels or plywood, which can be painted directly after installation.
Step 6: Finish the Interior
Now you can add the functional elements that make a closet truly useful: shelves and hanging rods. This is where your design vision comes to life.
Install shelf cleats or brackets along the inside walls, according to your design. Use a level to ensure they are perfectly horizontal.
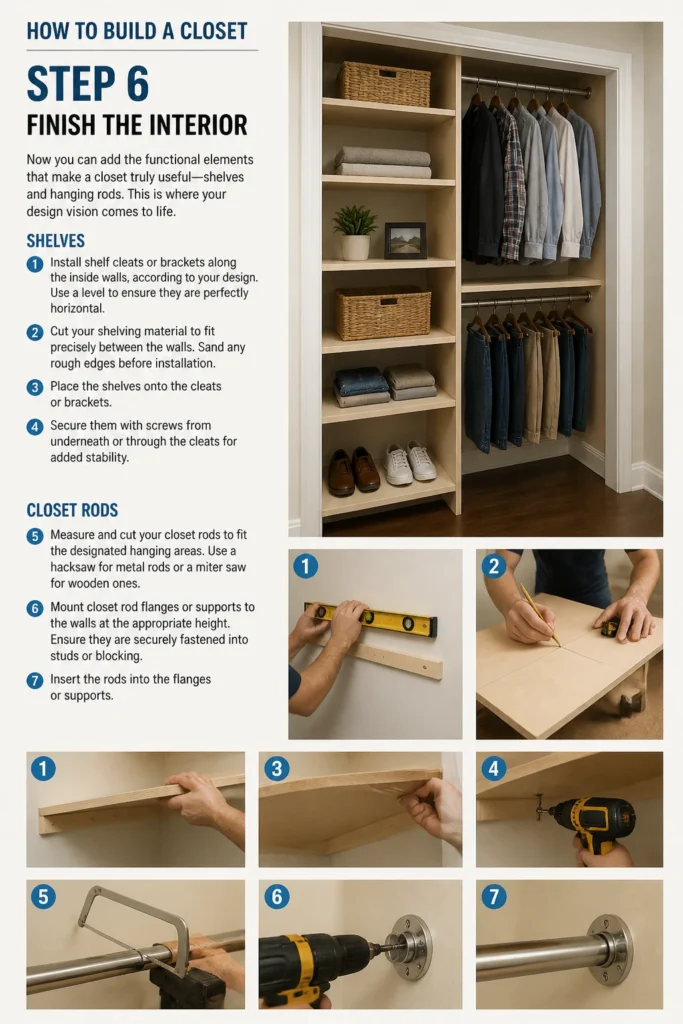
Cut your shelving material to fit precisely between the walls. Sand any rough edges before installation.
Place the shelves onto the cleats or brackets. Secure them with screws from underneath or through the cleats for added stability.
Measure and cut your closet rods to fit the designated hanging areas. Use a hacksaw for metal rods or a miter saw for wooden ones.
Mount closet rod flanges or supports to the walls at the appropriate height. Ensure they are securely fastened into studs or blocking.
Insert the rods into the flanges. Test the stability of all shelves and rods by applying light pressure.
Step 7: Add Trim and Doors
Trim work adds a finished, professional look to your closet, covering gaps and enhancing aesthetics. The door provides privacy and completes the enclosure.
Measure and cut baseboards and door casings to fit around the closet exterior and door opening. Use a miter saw for precise angle cuts.
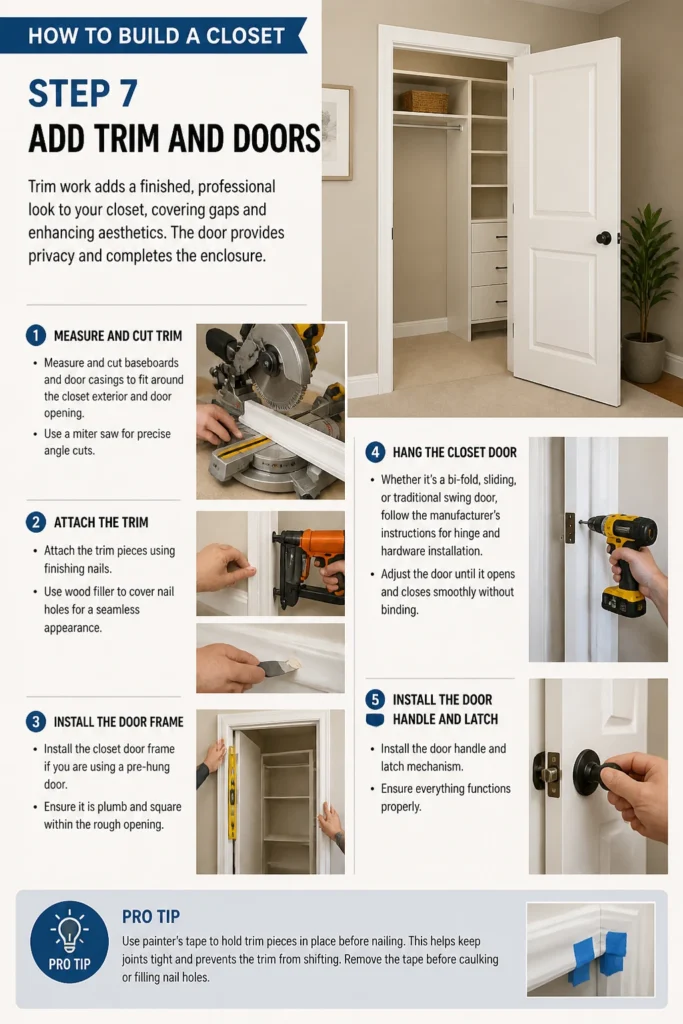
Attach the trim pieces using finishing nails. Use wood filler to cover nail holes for a seamless appearance.
Install the closet door frame if you are using a pre-hung door. Ensure it is plumb and square within the rough opening.
Hang the closet door. Whether it’s a bi-fold, sliding, or traditional swing door, follow the manufacturer’s instructions for hinge and hardware installation.
Adjust the door until it opens and closes smoothly without binding. Install the door handle and latch mechanism.
Pro Tip: Use a small block of wood when nailing trim to protect the wall and ensure a flush fit.
Step 8: Paint and Organize
The final touches bring your new closet to life, making it ready for use. This step is all about aesthetics and functionality.
Prepare the surfaces for painting. Mask off any areas you don’t want painted, such as door hinges or hardware.
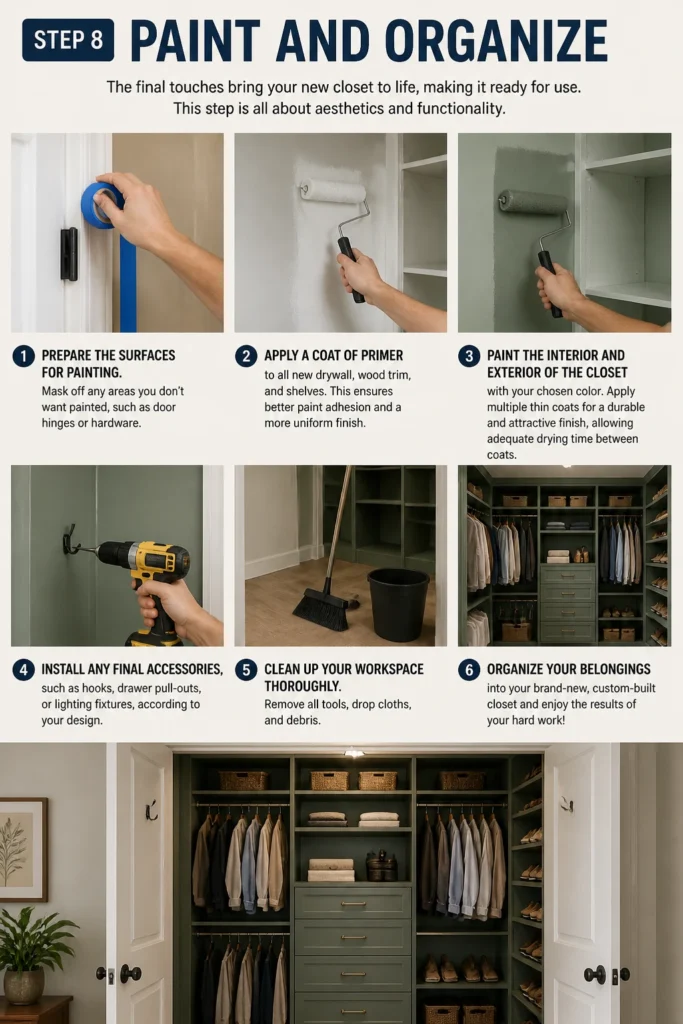
Apply a coat of primer to all new drywall, wood trim, and shelves. This ensures better paint adhesion and a more uniform finish.
Paint the interior and exterior of the closet with your chosen color. Apply multiple thin coats for a durable and attractive finish, allowing adequate drying time between coats.
Install any final accessories, such as hooks, drawer pull-outs, or lighting fixtures, according to your design.
Clean up your workspace thoroughly. Remove all tools, drop cloths, and debris.
Organize your belongings into your brand-new, custom-built closet. Enjoy the satisfaction of a tidy and functional space.
Common Mistakes to Avoid
Poor Planning and Measurements
Rushing the planning phase can lead to frustrating and costly errors. Incorrect measurements can result in walls that aren’t square, shelves that don’t fit, or a door opening that’s too small. Always measure twice, or even three times, and double-check your calculations before cutting any material. A detailed drawing helps visualize potential issues.
Skipping the Stud Finder
Failing to locate and use wall studs for anchoring can compromise the structural integrity of your closet. Attaching framing directly into drywall alone will result in a weak, unstable structure that could eventually sag or pull away from the wall. Always fasten into studs for maximum strength and safety.
Neglecting Level and Plumb
If your walls are not plumb (vertically straight) and your shelves are not level (horizontally straight), the entire closet will look unprofessional and function poorly. Doors won’t close correctly, and items on shelves might slide off. Use a good quality level frequently throughout the framing and shelving installation process.
Rushing the Finishing Touches
The details make all the difference in a custom build. Skimping on joint compound application, sanding, or painting steps will leave your closet looking unfinished and amateurish. Take your time with these final stages to achieve a smooth, professional-looking surface that you’ll be proud of.
Troubleshooting
Wobbly Structure
If your newly framed closet feels unstable, it likely means some connections aren’t sufficiently secured or aren’t anchored properly. Check all framing connections, especially where plates meet studs and where the frame attaches to existing walls, floor, and ceiling. Add more screws or bracing where needed, ensuring you’re fastening into solid structural elements like studs or joists.
Doors Don’t Close Properly
A door that sticks, scrapes, or doesn’t latch usually indicates that the door frame isn’t perfectly plumb and square. Use a level to check the vertical and horizontal alignment of the door frame. You may need to adjust shims behind the door frame or tighten/loosen hinge screws to correct the alignment until the door swings freely and latches securely.
Shelves Sagging
Sagging shelves are often a sign of insufficient support or using material that is too thin for the span and weight. Ensure your shelf cleats or brackets are securely fastened into studs. For longer spans, add an extra support bracket in the middle, or consider using thicker shelving material. Reinforce existing cleats with longer screws if they feel loose.
Key Takeaways
- Thorough planning and precise measurements are the foundation of a successful closet build.
- Always prioritize safety by wearing appropriate gear and using tools correctly.
- Securely anchor all framing into existing studs and joists for structural integrity.
- Take your time with drywall finishing and painting for a professional appearance.
- Regularly check for level and plumb throughout the entire construction process.
- Customize the interior to perfectly match your storage needs and personal style.
Frequently Asked Questions
Do I need a permit to build a closet?
In many cases, building a non-load-bearing interior closet does not require a permit. However, local regulations vary significantly. It’s always best to check with your local building department before starting your project, especially if you’re altering existing electrical, plumbing, or load-bearing walls.
What’s the best material for closet shelves?
The best material depends on your budget, desired look, and the weight of items you plan to store. Plywood (especially birch or cabinet-grade) offers excellent strength and durability. MDF (medium-density fiberboard) is cost-effective and smooth for painting but can sag over long spans. Solid wood is beautiful and strong but also the most expensive option.
Can I build a closet without existing walls?
Yes, you can build a freestanding closet or an “island” closet within a larger room. This involves constructing all four walls and potentially a ceiling for the closet structure. This approach offers maximum flexibility in placement but requires more framing and finishing work than building against existing walls.
How do I make my closet smell fresh?
Once your closet is built, maintaining freshness is easy. Use cedar blocks or sachets, which naturally repel moths and absorb odors. Good air circulation is also key, so avoid overstuffing your closet. You can also place a small dish of baking soda to absorb lingering smells.
Our Top Recommended Finds
- DEWALT 20V MAX Cordless Drill / Driver Kit: An indispensable tool for drilling pilot holes and driving screws quickly and efficiently.
- Stud Finder with AC Wire Detection: Crucial for safely locating wall studs and avoiding electrical wires when anchoring your frame.
- Speed Square (or Combination Square): Essential for making accurate 90-degree cuts and marking precise lines on lumber.
Your Custom Storage Awaits
Stepping into a perfectly organized space you built yourself is incredibly satisfying. This guide provides the framework, but your creativity fills in the details. Don’t let the thought of a big project deter you. Break it down, follow the steps, and enjoy the process of bringing your ideal closet to life.
Ready to reclaim your space and create the organized haven you’ve always wanted? Grab your tools and start planning your project today. The perfect storage solution is within your reach.