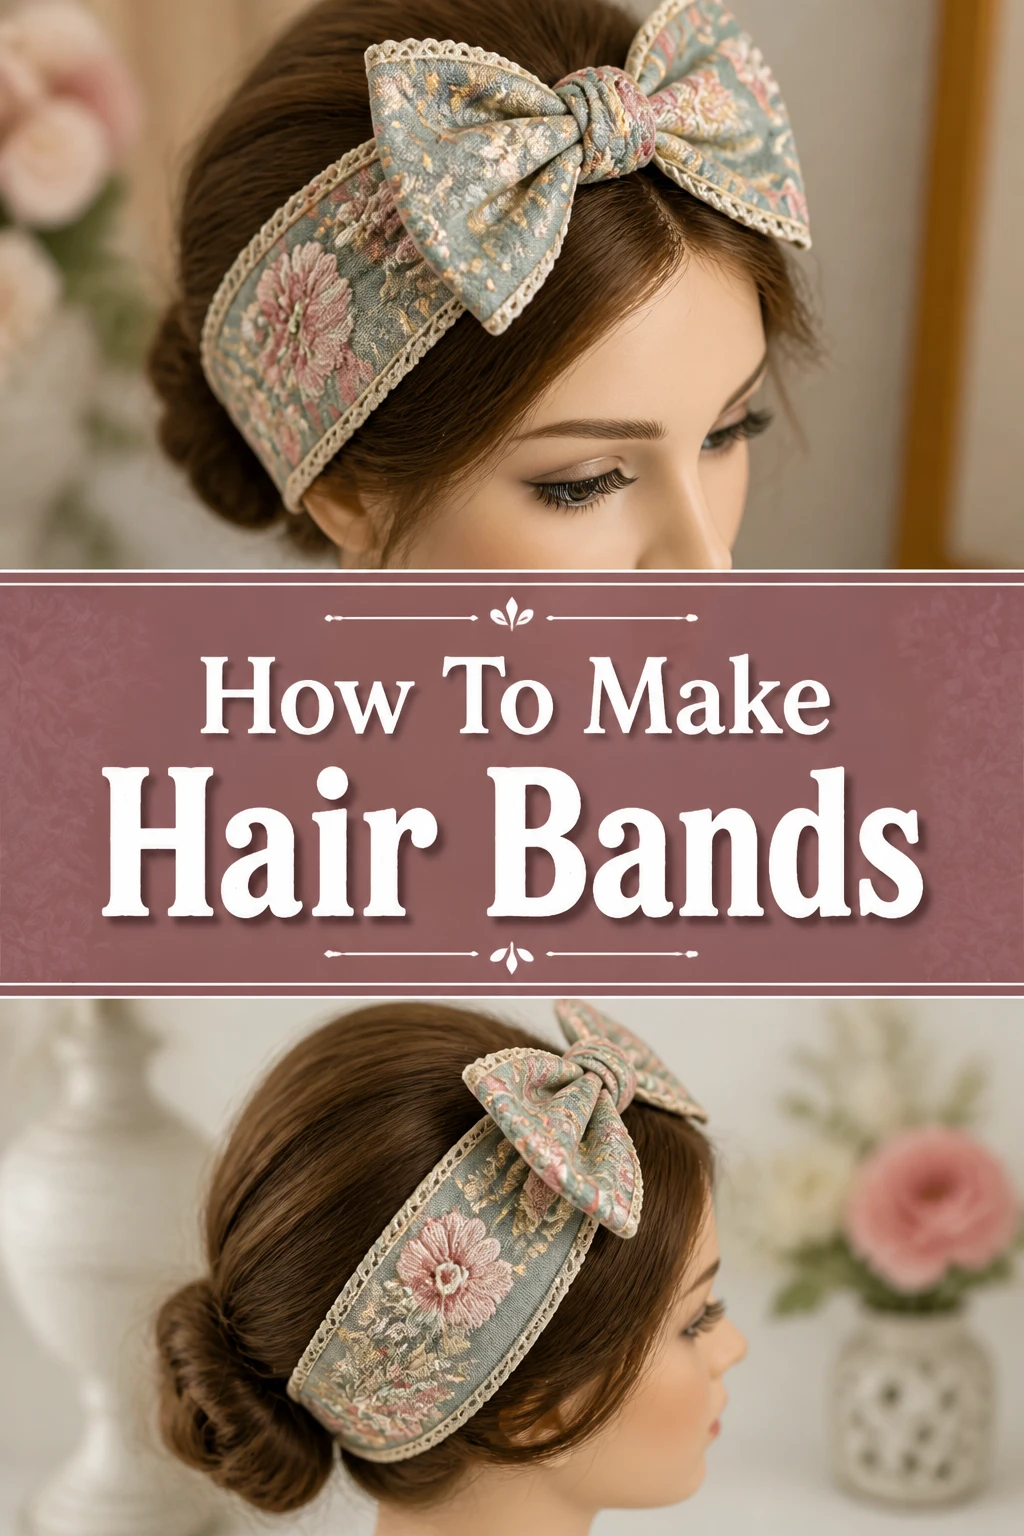
🎀 How To Make Hair Bands
Do you ever find yourself searching for the perfect hair band, only to come up short? Or perhaps you’re tired of them snapping, stretching, or simply disappearing?
I remember constantly losing my favorite scrunchies, which led me to dive into making my own. It quickly became clear how simple and satisfying it is to craft custom hair accessories.
This guide shares all the practical tips and tricks I’ve gathered, ensuring your homemade hair bands are not only stylish but also incredibly durable and exactly what you envision.
Quick Overview
In this guide, you will learn to create a classic fabric hair band, often known as a scrunchie. It’s a fantastic project for beginners and a wonderful way to use up fabric scraps.
- Time needed: 30-60 minutes, depending on your sewing experience.
- Difficulty: Beginner
- What you’ll need: Fabric, elastic, scissors, sewing machine (or needle and thread), pins, safety pin, iron.
Step-by-Step Instructions
Step 1: Gather Your Materials
Before you begin, collect all your supplies. Having everything ready streamlines the entire process and prevents interruptions.
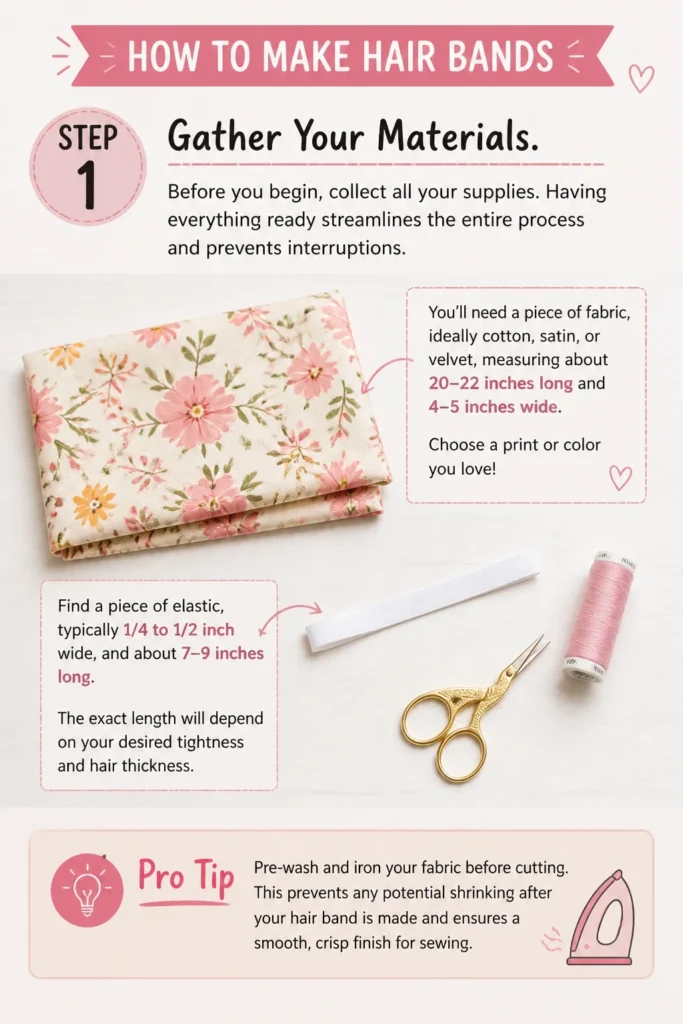
You’ll need a piece of fabric, ideally cotton, satin, or velvet, measuring about 20-22 inches long and 4-5 inches wide. Choose a print or color you love!
Find a piece of elastic, typically 1/4 to 1/2 inch wide, and about 7-9 inches long. The exact length will depend on your desired tightness and hair thickness.
Pro Tip: Pre-wash and iron your fabric before cutting. This prevents any potential shrinking after your hair band is made and ensures a smooth, crisp finish for sewing.
Step 2: Cut Your Fabric
Lay your chosen fabric flat and smooth out any wrinkles. Use your scissors or a rotary cutter to carefully cut your fabric strip.
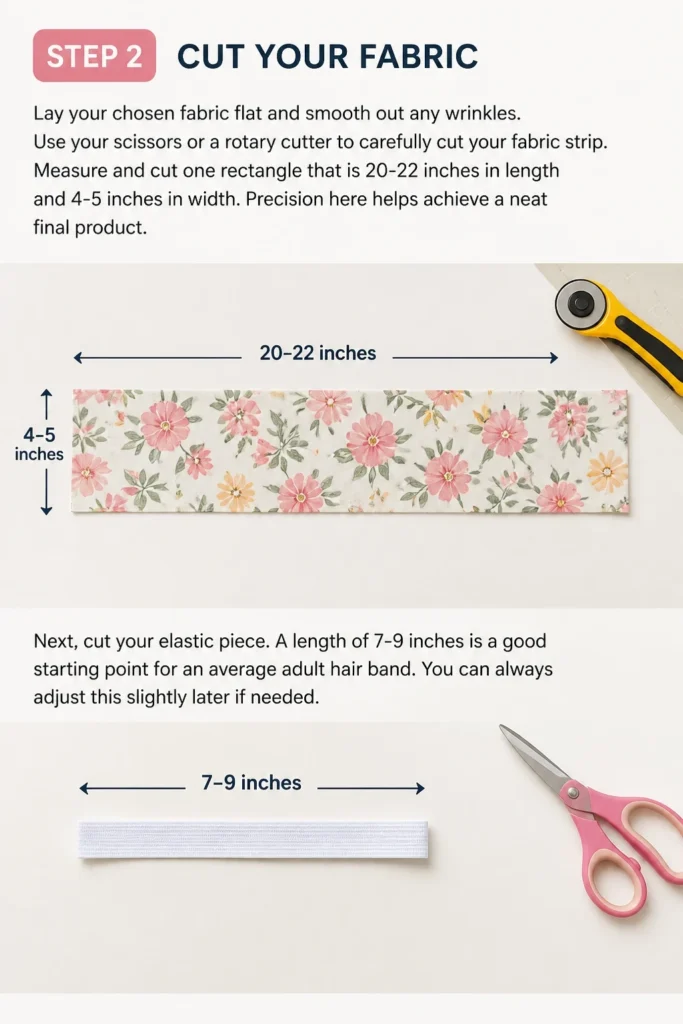
Measure and cut one rectangle that is 20-22 inches in length and 4-5 inches in width. Precision here helps achieve a neat final product.
Next, cut your elastic piece. A length of 7-9 inches is a good starting point for an average adult hair band. You can always adjust this slightly later if needed.
Step 3: Prepare the Fabric Strip
Fold your fabric strip lengthwise, bringing the two long raw edges together. Make sure the “right side” (the patterned or pretty side) of the fabric is facing inwards.
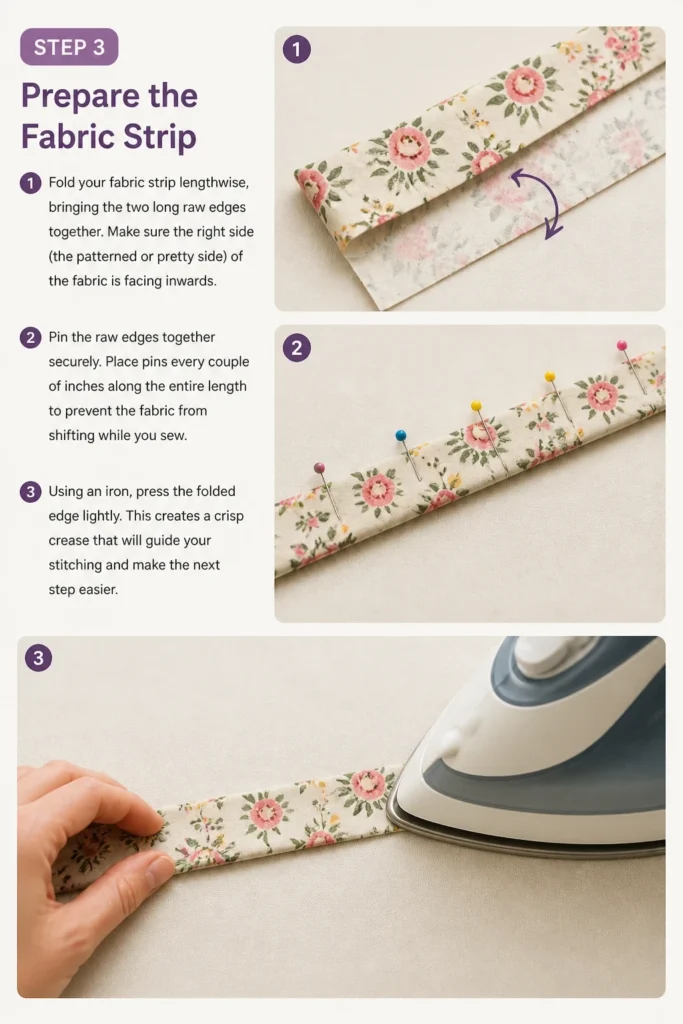
Pin the raw edges together securely. Place pins every couple of inches along the entire length to prevent the fabric from shifting while you sew.
Using an iron, press the folded edge lightly. This creates a crisp crease that will guide your stitching and make the next step easier.
Step 4: Sew the Fabric Tube
Now it’s time to sew the fabric into a tube. Take your pinned fabric strip to your sewing machine (or prepare your hand-sewing needle and thread).
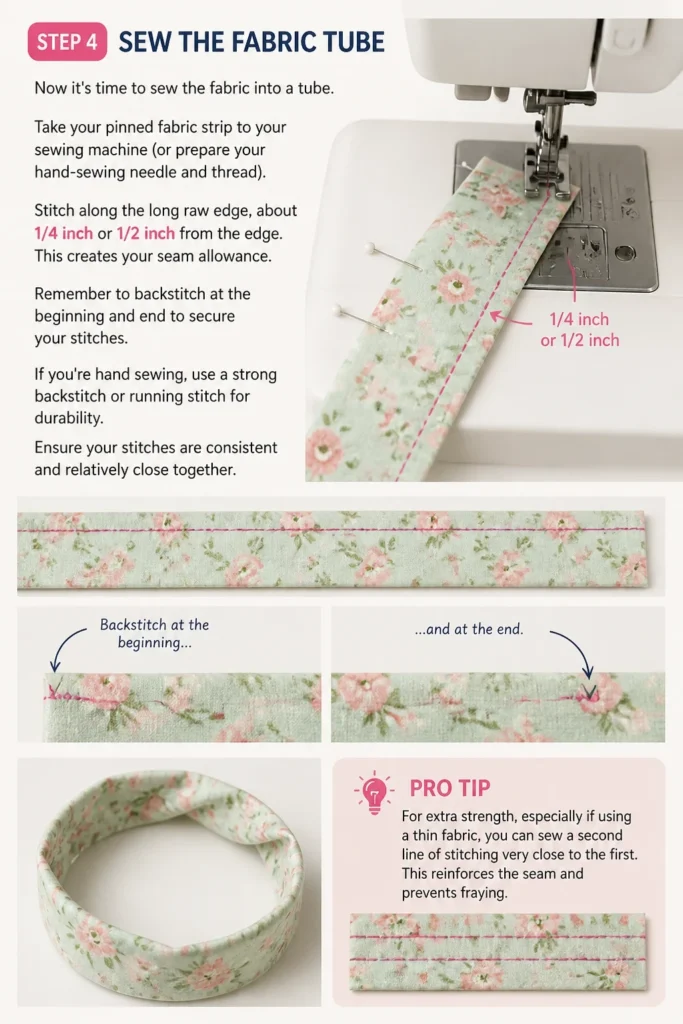
Stitch along the long raw edge, about 1/4 inch or 1/2 inch from the edge. This creates your seam allowance. Remember to backstitch at the beginning and end to secure your stitches.
If you’re hand sewing, use a strong backstitch or running stitch for durability. Ensure your stitches are consistent and relatively close together.
Pro Tip: For extra strength, especially if using a thin fabric, you can sew a second line of stitching very close to the first. This reinforces the seam and prevents fraying.
Step 5: Turn the Fabric Right Side Out
This step can feel a bit tricky, but it’s essential. Attach a safety pin to one end of the fabric tube.
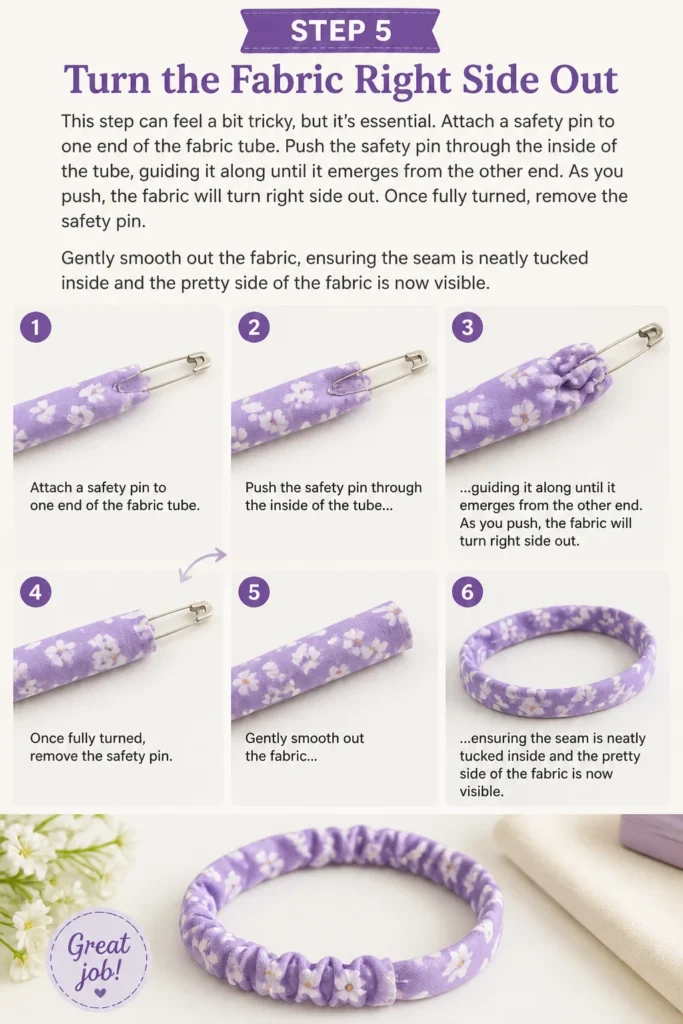
Push the safety pin through the inside of the tube, guiding it along until it emerges from the other end. As you push, the fabric will turn right side out.
Once fully turned, remove the safety pin. Gently smooth out the fabric, ensuring the seam is neatly tucked inside and the pretty side of the fabric is now visible.
Step 6: Insert the Elastic
Attach a small safety pin to one end of your cut elastic piece. This will be your guide for threading.
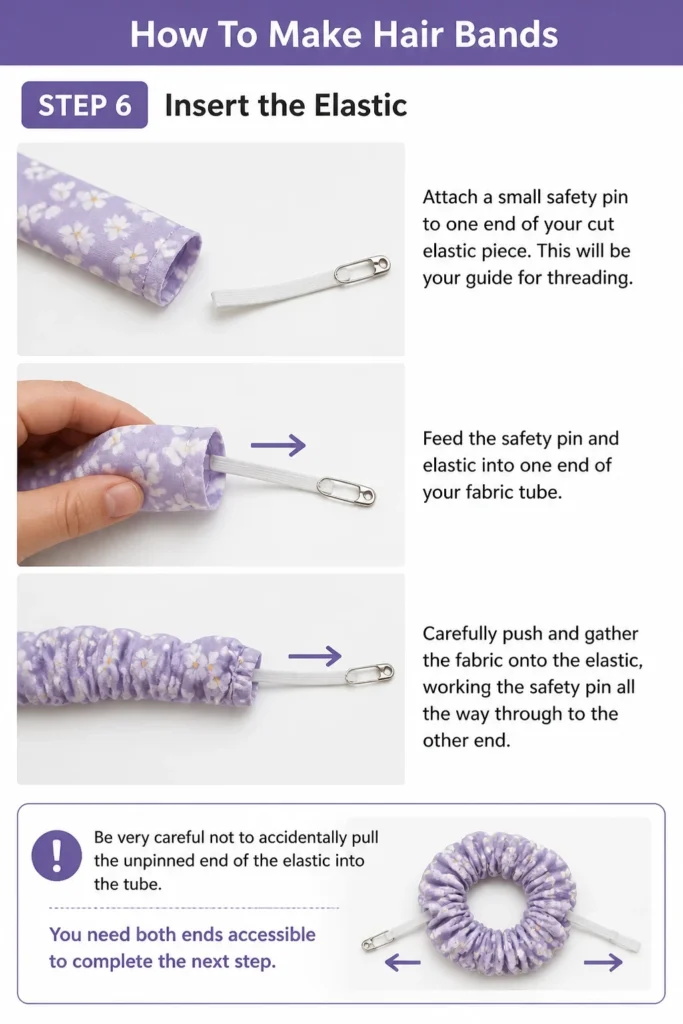
Feed the safety pin and elastic into one end of your fabric tube. Carefully push and gather the fabric onto the elastic, working the safety pin all the way through to the other end.
Be very careful not to accidentally pull the unpinned end of the elastic into the tube. You need both ends accessible to complete the next step.
Step 7: Secure the Elastic Ends
Once both ends of the elastic are protruding from the fabric tube, remove the safety pin from the threaded end.
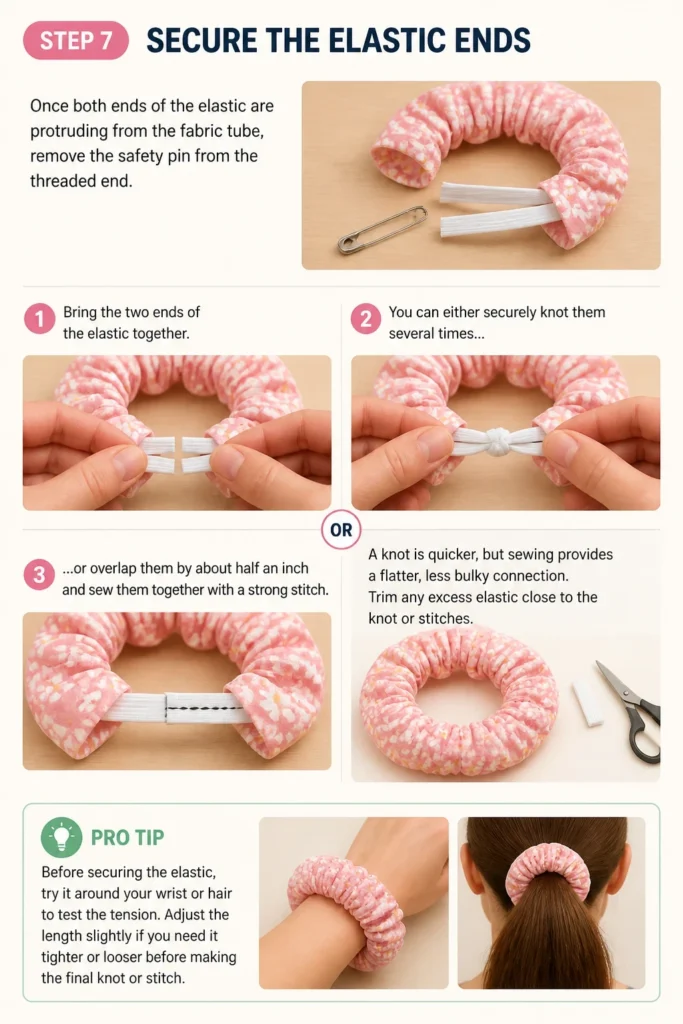
Bring the two ends of the elastic together. You can either securely knot them several times or overlap them by about half an inch and sew them together with a strong stitch.
A knot is quicker, but sewing provides a flatter, less bulky connection. Trim any excess elastic close to the knot or stitches.
Pro Tip: Before securing the elastic, try it around your wrist or hair to test the tension. Adjust the length slightly if you need it tighter or looser before making the final knot or stitch.
Step 8: Close the Fabric Tube
Now your hair band is taking shape! Tuck one raw end of the fabric tube inside itself by about half an inch.
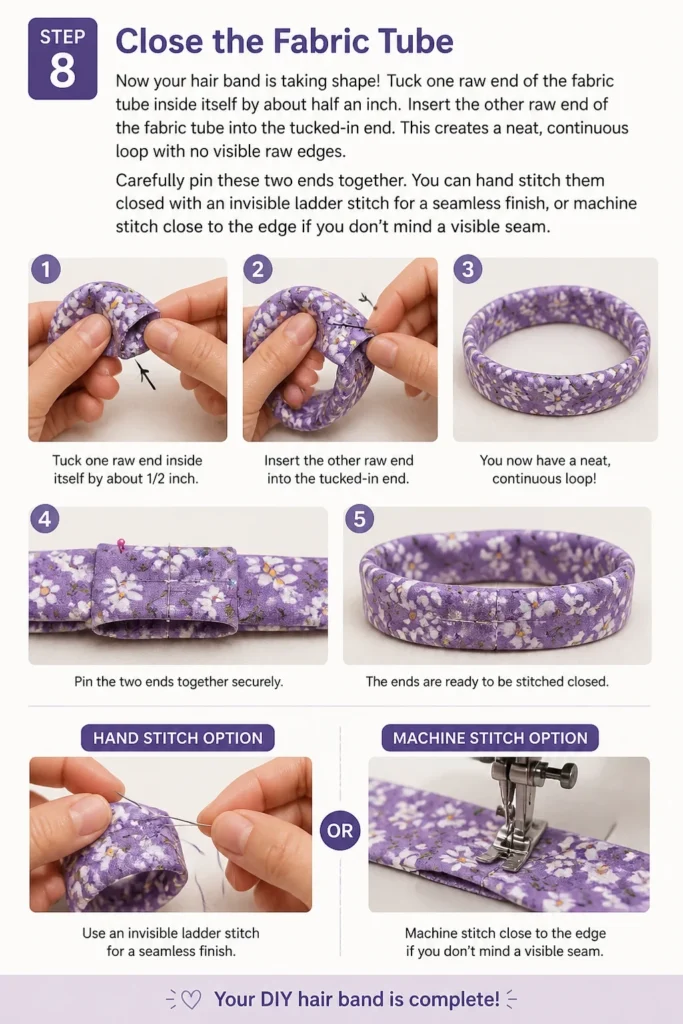
Insert the other raw end of the fabric tube into the tucked-in end. This creates a neat, continuous loop with no visible raw edges.
Carefully pin these two ends together. You can hand stitch them closed with an invisible ladder stitch for a seamless finish, or machine stitch close to the edge if you don’t mind a visible seam.
Step 9: Finishing Touches
After closing the tube, trim any loose threads. Give your new hair band a final gentle stretch and fluff.
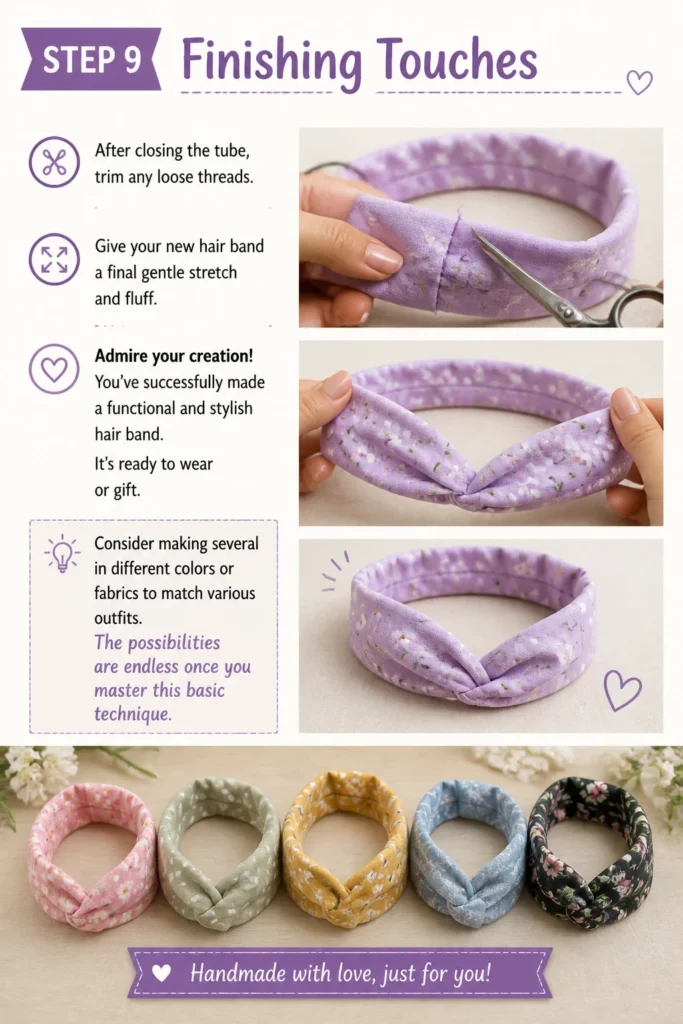
Admire your creation! You’ve successfully made a functional and stylish hair band. It’s ready to wear or gift.
Consider making several in different colors or fabrics to match various outfits. The possibilities are endless once you master this basic technique.
Common Mistakes to Avoid
Using Non-Stretch Fabric
Attempting to make a hair band with fabric that has no stretch, like heavy canvas or denim, can lead to a stiff and uncomfortable accessory. While technically possible, it won’t gather nicely around the elastic or sit comfortably in your hair.
Always opt for fabrics with a little give or those known for their drape, such as cotton, satin, silk, or velvet. These materials will create a much more functional and pleasing hair band.
Incorrect Elastic Length
Cutting the elastic too long will result in a hair band that doesn’t hold your hair securely, feeling loose and ineffective. Conversely, elastic that is too short will make the hair band overly tight and uncomfortable to wear, potentially causing headaches.
Always test the elastic length by looping it around your wrist or hair before securing the ends. This simple step allows you to adjust for personal comfort and ensures a perfect fit.
Poor Quality Thread or Stitching
Using weak thread or making loose, inconsistent stitches can cause your hair band to fall apart quickly. The seams will unravel under the tension of the elastic and daily wear, leading to disappointment.
Invest in good quality polyester all-purpose thread, which is strong and durable. Always backstitch at the beginning and end of your seams to lock them in place, preventing unraveling and ensuring longevity.
Forgetting to Backstitch
Skipping the backstitch at the start and end of your seams is a common oversight, especially for beginners. Without backstitching, the first and last few stitches are not secured and can easily come undone, causing the entire seam to unravel over time.
Always sew a few stitches forward, then a few stitches backward over the same path, and then continue sewing forward. Repeat this process at the very end of your seam to create a strong, durable finish.
Troubleshooting
Hair Band Feels Too Tight or Too Loose
If your finished hair band doesn’t feel quite right, the elastic length is likely the issue. A too-tight band can cause discomfort, while a too-loose one won’t hold your hair effectively.
Carefully unpick the seam where the fabric tube was closed. Locate the elastic and unknot or unpick the stitches connecting its ends. Adjust the elastic length (shorten for loose, lengthen for tight) and re-secure it. Then, re-close the fabric tube.
Fabric Bunches Unevenly After Elastic Insertion
Sometimes, after inserting the elastic, the fabric gathers more in one spot than another, creating an uneven look. This can happen if the fabric wasn’t evenly distributed along the elastic before tying.
Gently pull and push the fabric along the elastic until the gathers are evenly distributed all the way around the band. Once the fabric is smooth and even, you can proceed to close the fabric tube.
Elastic Breaks Inside the Fabric Tube
It’s frustrating when the elastic snaps or becomes disconnected inside the fabric tube, leaving you with a limp, unusable hair band. This usually happens due to old elastic, excessive tension, or a weak knot.
You’ll need to carefully open one end of the fabric tube. Use a safety pin to fish out the broken elastic ends. Replace the old elastic with a new piece, following the insertion and securing steps again. Then, re-close the fabric tube.
Key Takeaways
- Fabric choice significantly impacts comfort and style: Opt for soft, pliable fabrics like cotton, satin, or velvet for the best results.
- Accurate measurements are crucial for a good fit: Take time to measure your fabric and elastic precisely to achieve the desired size and tension.
- Secure stitching prevents unraveling: Always backstitch at the beginning and end of your seams to ensure your hair band lasts through many uses.
- Patience with turning out fabric pays off: Use a safety pin and gentle handling to turn your fabric tube right side out without tearing or snagging.
- Customization makes it unique: Experiment with different fabric patterns, widths, and elastic lengths to create a collection of personalized hair bands.
Frequently Asked Questions
What is the best fabric to use for hair bands?
The best fabrics are those that are soft, have a nice drape, and are gentle on hair. Cotton, satin, silk, and velvet are excellent choices. Satin and silk are particularly good for preventing hair breakage and reducing frizz.
Can I hand sew a hair band if I don’t have a sewing machine?
Absolutely! A hair band can be entirely hand-sewn. While it takes a bit more time, a strong backstitch will create a durable seam. The ladder stitch is perfect for closing the final opening invisibly.
How do I wash my homemade hair bands?
Most fabric hair bands can be gently hand-washed in cool water with a mild detergent. If using a delicate fabric like silk, special care is needed. For cotton, they can often go into a mesh laundry bag on a gentle machine cycle. Always air dry them to maintain their shape and elastic integrity.
What size elastic should I use for different hair types?
For fine hair or a lighter hold, 1/4-inch wide elastic is often sufficient. For thicker hair or a stronger hold, 3/8-inch to 1/2-inch wide elastic works best. The length also matters; shorter elastic provides more tension.
Our Top Recommended Finds
- High-Quality Fabric Shears: A sharp pair of fabric scissors makes all the difference in achieving clean, precise cuts.
- Assorted Elastic Spool: Having a variety of elastic widths on hand allows you to experiment and find the perfect fit for any hair band project.
- Basic Sewing Machine: A simple, entry-level sewing machine can significantly speed up the process and open up many more crafting possibilities.
Your Next Creative Project Awaits
You’ve just completed your first handmade hair band, a testament to your creativity and skill. This simple project is more than just a hair accessory; it’s a step into the rewarding world of DIY crafting.
Why stop at one? Consider making a set in various colors to match every outfit, or try incorporating different fabric textures like shimmering satin or cozy flannel.
Think about adding embellishments such as small bows, beads, or even embroidery for a truly personalized touch. These hair bands also make thoughtful, handmade gifts for friends and family.
Grab your materials today and start creating. Embrace the joy of making something beautiful and practical with your own hands!