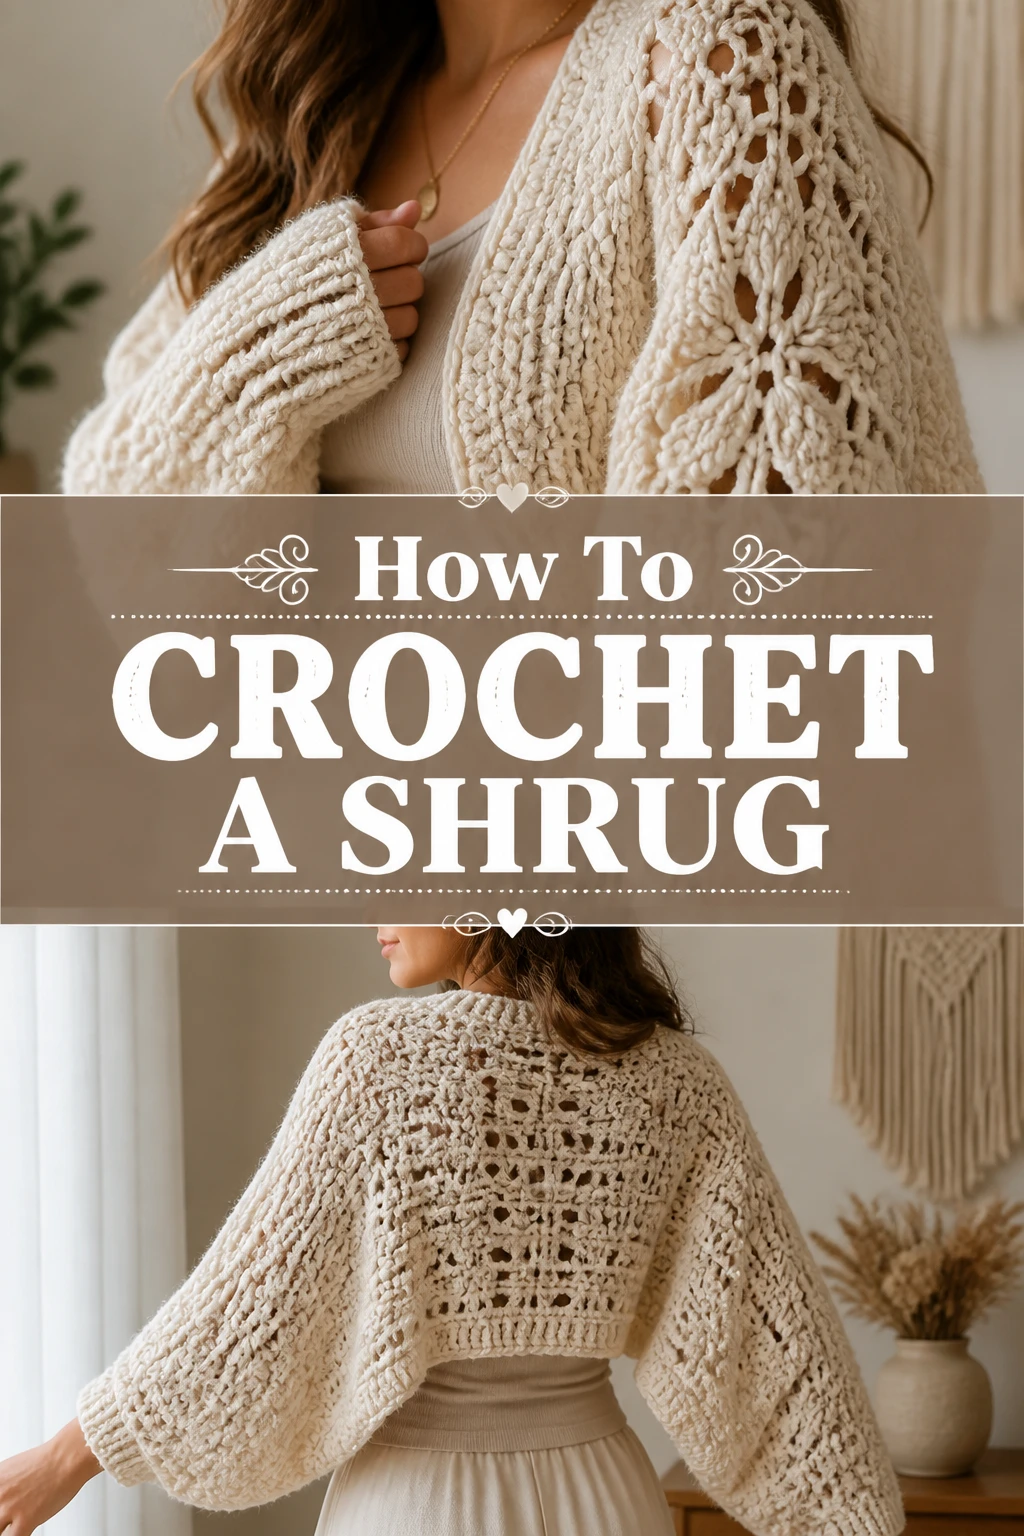
🧶 How To Crochet A Shrug
Are you looking for a cozy, stylish layering piece that’s surprisingly simple to make? Crocheting a shrug is a fantastic project, even for those new to the craft. I remember making my first one and feeling such a sense of accomplishment. This guide will walk you through every stitch, helping you create a beautiful shrug you’ll love to wear.
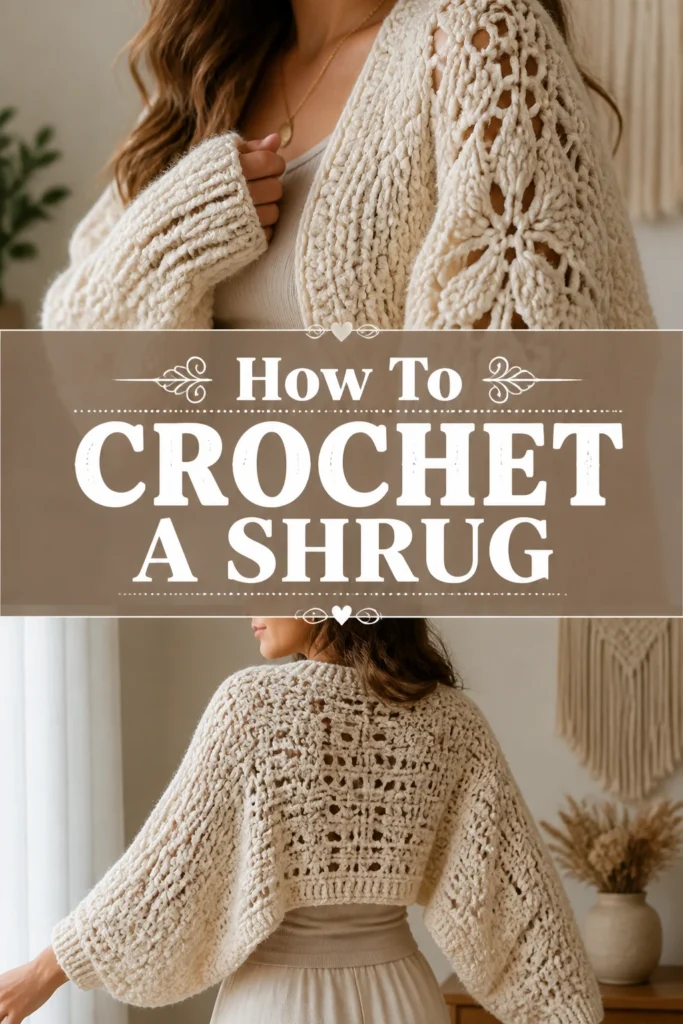
Quick Overview
You’re about to create a versatile, custom-fit shrug that will add a touch of handmade charm to any outfit. This project is a wonderful way to practice basic crochet stitches while producing a wearable item.
- Time needed: 8-15 hours (depending on yarn weight, hook size, and personal speed)
- Difficulty: Beginner to Intermediate
- What you’ll need: Yarn, crochet hook, scissors, yarn needle, tape measure
Step-by-Step Instructions
Step 1: Gather Your Supplies
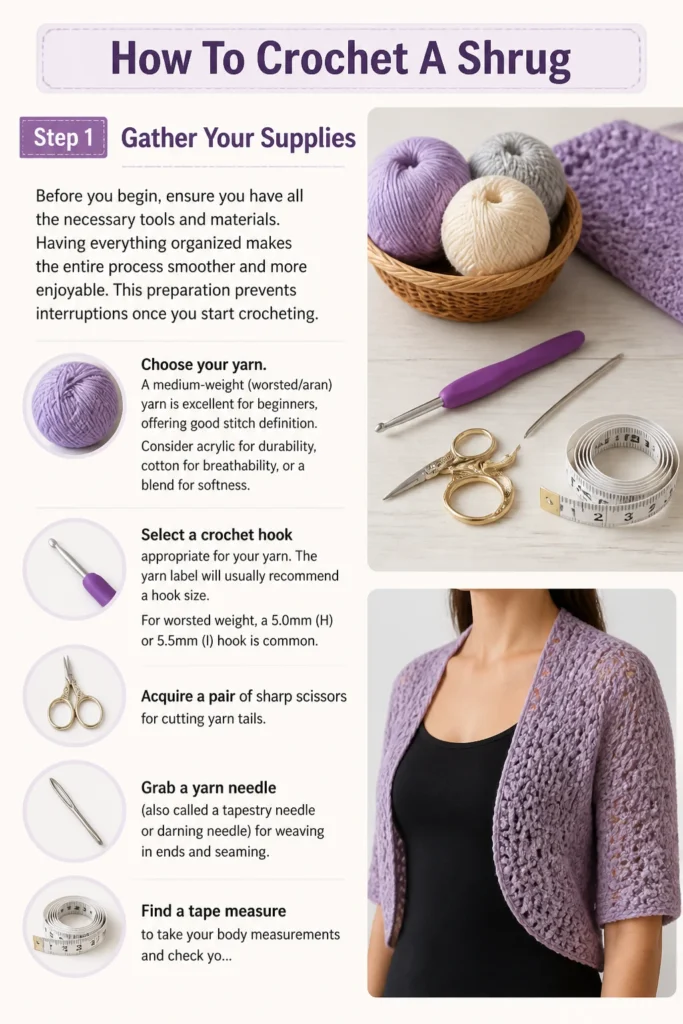
Before you begin, ensure you have all the necessary tools and materials. Having everything organized makes the entire process smoother and more enjoyable.
This preparation prevents interruptions once you start crocheting.
- Choose your yarn. A medium-weight (worsted/aran) yarn is excellent for beginners, offering good stitch definition. Consider acrylic for durability, cotton for breathability, or a blend for softness.
- Select a crochet hook appropriate for your yarn. The yarn label will usually recommend a hook size. For worsted weight, a 5.0mm (H) or 5.5mm (I) hook is common.
- Acquire a pair of sharp scissors for cutting yarn tails.
- Grab a yarn needle (also called a tapestry needle or darning needle) for weaving in ends and seaming.
- Find a tape measure to take your body measurements and check your work.
- Consider stitch markers to help keep track of rows or specific stitches, especially if you’re new to crocheting.
Step 2: Understand Shrug Construction and Take Measurements
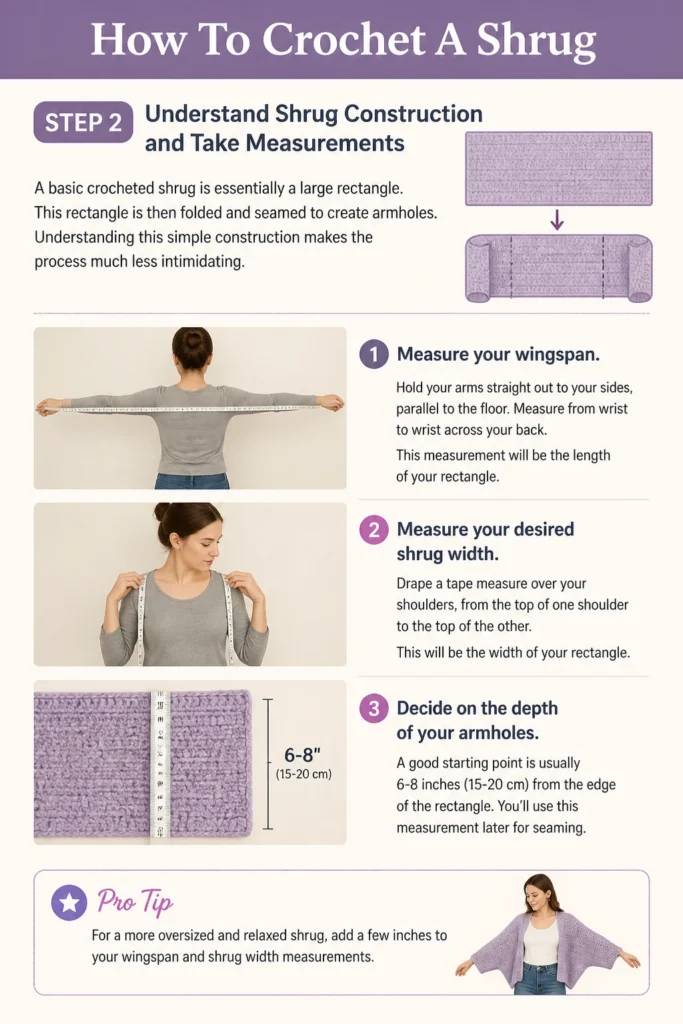
A basic crocheted shrug is essentially a large rectangle. This rectangle is then folded and seamed to create armholes.
Understanding this simple construction makes the process much less intimidating.
- Measure your wingspan. Hold your arms straight out to your sides, parallel to the floor. Measure from wrist to wrist across your back. This measurement will be the length of your rectangle.
- Measure your desired shrug width. Drape a tape measure over your shoulders, from the top of one shoulder to the top of the other. This will be the width of your rectangle.
- Decide on the depth of your armholes. A good starting point is usually 6-8 inches (15-20 cm) from the edge of the rectangle. You’ll use this measurement later for seaming.
Pro Tip: For a more oversized and relaxed shrug, add a few inches to both your wingspan and shoulder-to-shoulder measurements. This provides extra drape and comfort.
Step 3: Crochet a Gauge Swatch
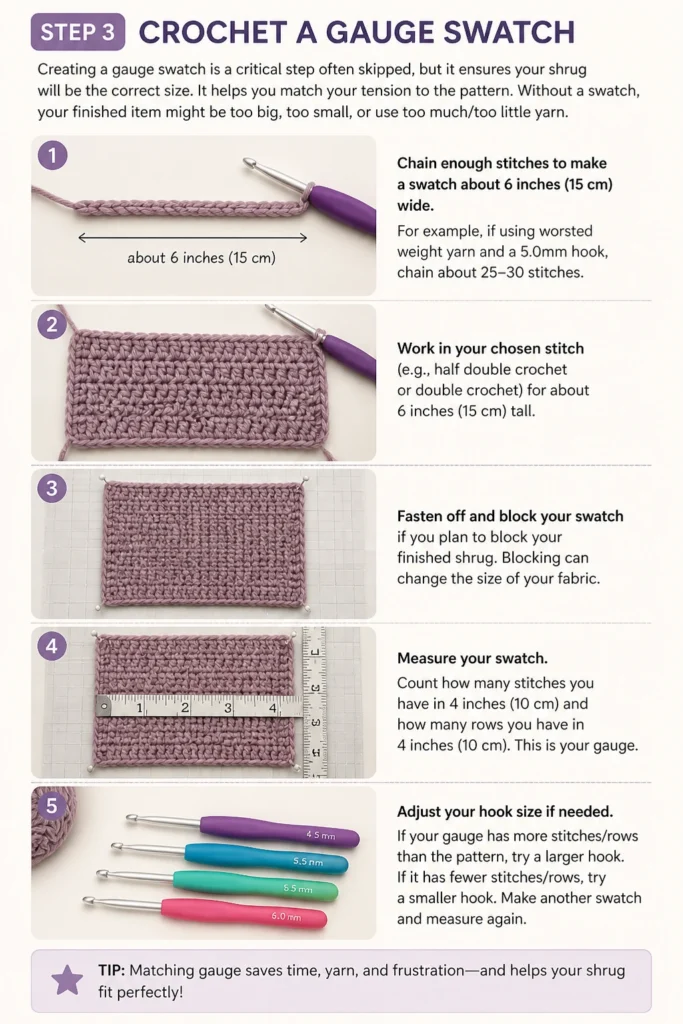
Creating a gauge swatch is a critical step often skipped, but it ensures your shrug will be the correct size. It helps you match your tension to the pattern.
Without a swatch, your finished item might be too big, too small, or use too much/too little yarn.
- Chain enough stitches to make a swatch about 6 inches (15 cm) wide. For example, if using worsted weight yarn and a 5.0mm hook, chain about 25-30 stitches.
- Work in your chosen stitch (e.g., half double crochet or double crochet) for about 6 inches (15 cm) tall.
- Fasten off and block your swatch if you plan to block your finished shrug. Blocking can change the size of your fabric.
- Measure your swatch. Count how many stitches you have in 4 inches (10 cm) and how many rows you have in 4 inches (10 cm). This is your gauge.
- Adjust your hook size if needed. If your swatch is too small (too many stitches/rows in 4 inches), go up a hook size. If it’s too large, go down a hook size. Repeat the swatch process until your gauge is close to your desired stitch count.
Step 4: Calculate Your Starting Chain and Begin Crocheting
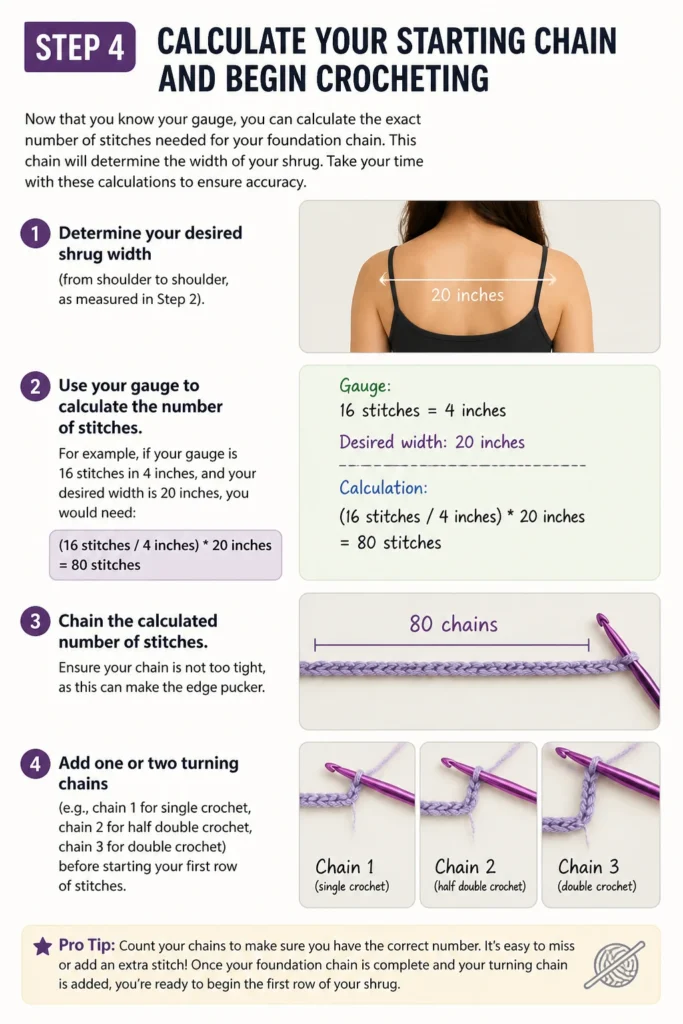
Now that you know your gauge, you can calculate the exact number of stitches needed for your foundation chain. This chain will determine the width of your shrug.
Take your time with these calculations to ensure accuracy.
- Determine your desired shrug width (from shoulder to shoulder, as measured in Step 2).
- Use your gauge to calculate the number of stitches. For example, if your gauge is 16 stitches in 4 inches, and your desired width is 20 inches, you would need (16 stitches / 4 inches) * 20 inches = 80 stitches.
- Chain the calculated number of stitches. Ensure your chain is not too tight, as this can make the edge pucker.
- Add one or two turning chains (e.g., chain 1 for single crochet, chain 2 for half double crochet, chain 3 for double crochet) before starting your first row of stitches.
Pro Tip: Place a stitch marker in your first and last stitch of the row to avoid accidentally adding or losing stitches. This is especially helpful for beginners.
Step 5: Crochet the Main Rectangle
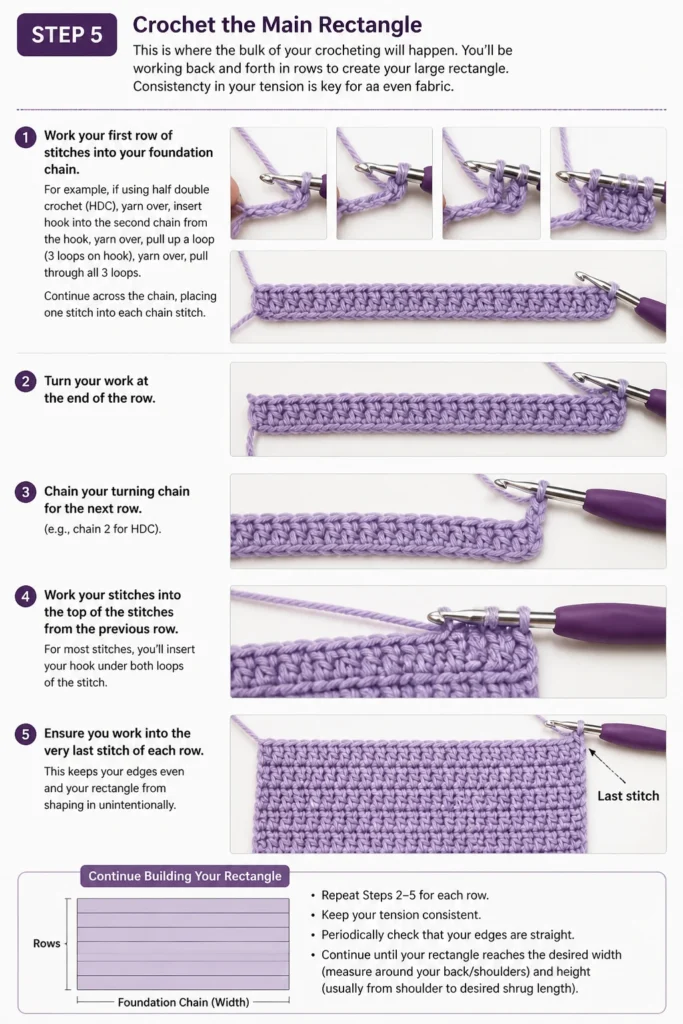
This is where the bulk of your crocheting will happen. You’ll be working back and forth in rows to create your large rectangle.
Consistency in your tension is key for an even fabric.
- Work your first row of stitches into your foundation chain. For example, if using half double crochet (HDC), yarn over, insert hook into the second chain from the hook, yarn over, pull up a loop (3 loops on hook), yarn over, pull through all 3 loops.
- Continue across the chain, placing one stitch into each chain stitch.
- Turn your work at the end of the row.
- Chain your turning chain for the next row (e.g., chain 2 for HDC).
- Work your stitches into the top of the stitches from the previous row. For most stitches, you’ll insert your hook under both loops of the stitch.
- Ensure you work into the very last stitch of each row to maintain straight edges.
Step 6: Continue Crocheting Until Desired Length
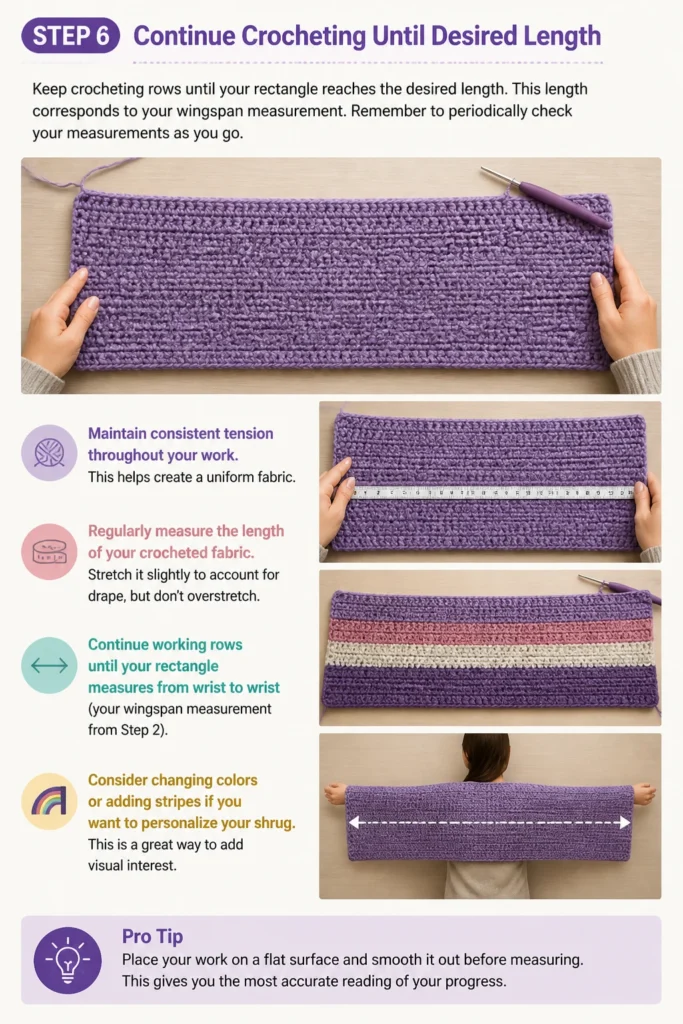
Keep crocheting rows until your rectangle reaches the desired length. This length corresponds to your wingspan measurement.
Remember to periodically check your measurements as you go.
- Maintain consistent tension throughout your work. This helps create a uniform fabric.
- Regularly measure the length of your crocheted fabric. Stretch it slightly to account for drape, but don’t overstretch.
- Continue working rows until your rectangle measures from wrist to wrist (your wingspan measurement from Step 2).
- Consider changing colors or adding stripes if you want to personalize your shrug. This is a great way to add visual interest.
Pro Tip: Place your work on a flat surface and smooth it out before measuring. This gives you the most accurate reading of your progress.
Step 7: Finish the Main Rectangle
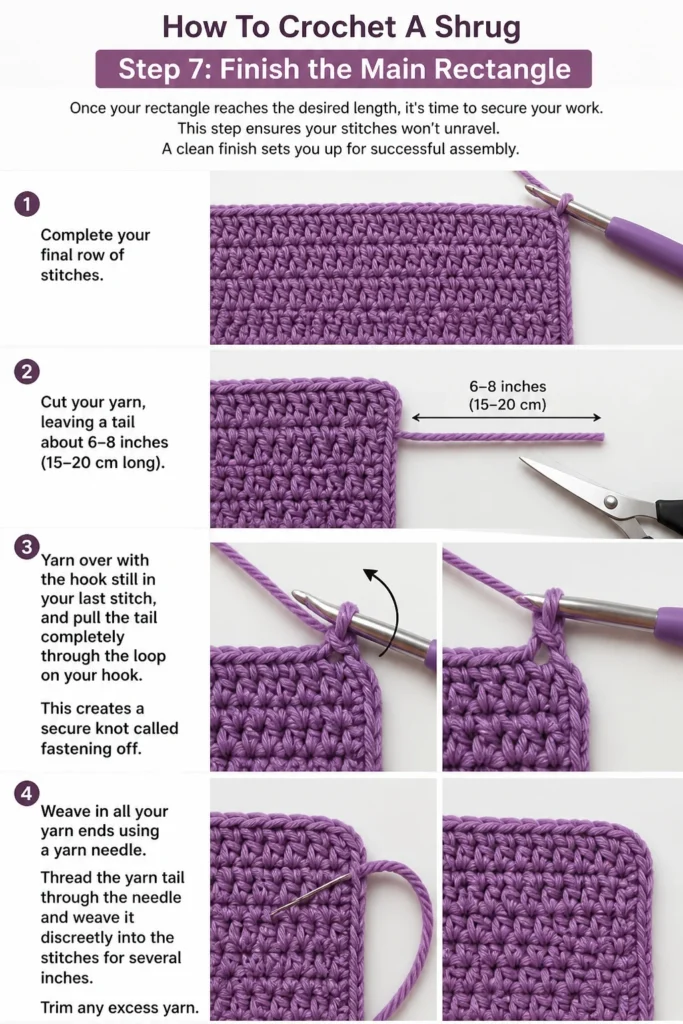
Once your rectangle reaches the desired length, it’s time to secure your work. This step ensures your stitches won’t unravel.
A clean finish sets you up for successful assembly.
- Complete your final row of stitches.
- Cut your yarn, leaving a tail about 6-8 inches (15-20 cm long).
- Yarn over with the hook still in your last stitch, and pull the tail completely through the loop on your hook. This creates a secure knot called “fastening off.”
- Weave in all your yarn ends using a yarn needle. Thread the yarn tail through the needle and weave it discreetly into the stitches for several inches. Trim any excess yarn.
Step 8: Block Your Work (Optional but Recommended)
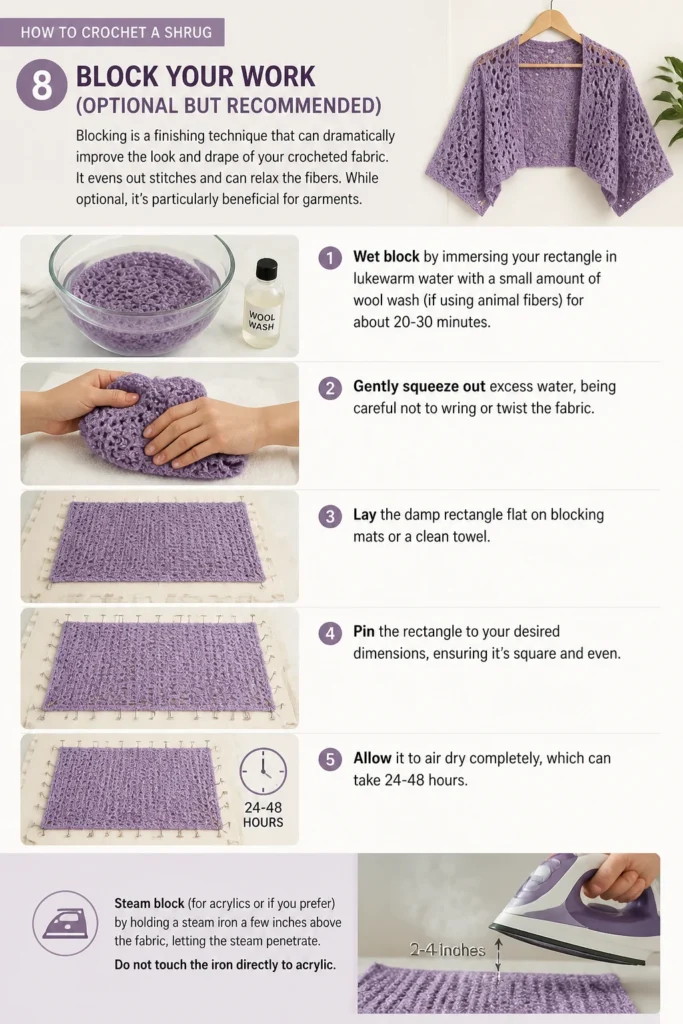
Blocking is a finishing technique that can dramatically improve the look and drape of your crocheted fabric. It evens out stitches and can relax the fibers.
While optional, it’s particularly beneficial for garments.
- Wet block by immersing your rectangle in lukewarm water with a small amount of wool wash (if using animal fibers) for about 20-30 minutes.
- Gently squeeze out excess water, being careful not to wring or twist the fabric.
- Lay the damp rectangle flat on blocking mats or a clean towel.
- Pin the rectangle to your desired dimensions, ensuring it’s square and even.
- Allow it to air dry completely, which can take 24-48 hours.
- Steam block (for acrylics or if you prefer) by holding a steam iron a few inches above the fabric, letting the steam penetrate. Do not touch the iron directly to acrylic yarn, as it can melt. Gently shape the fabric.
Step 9: Fold and Seam Your Shrug
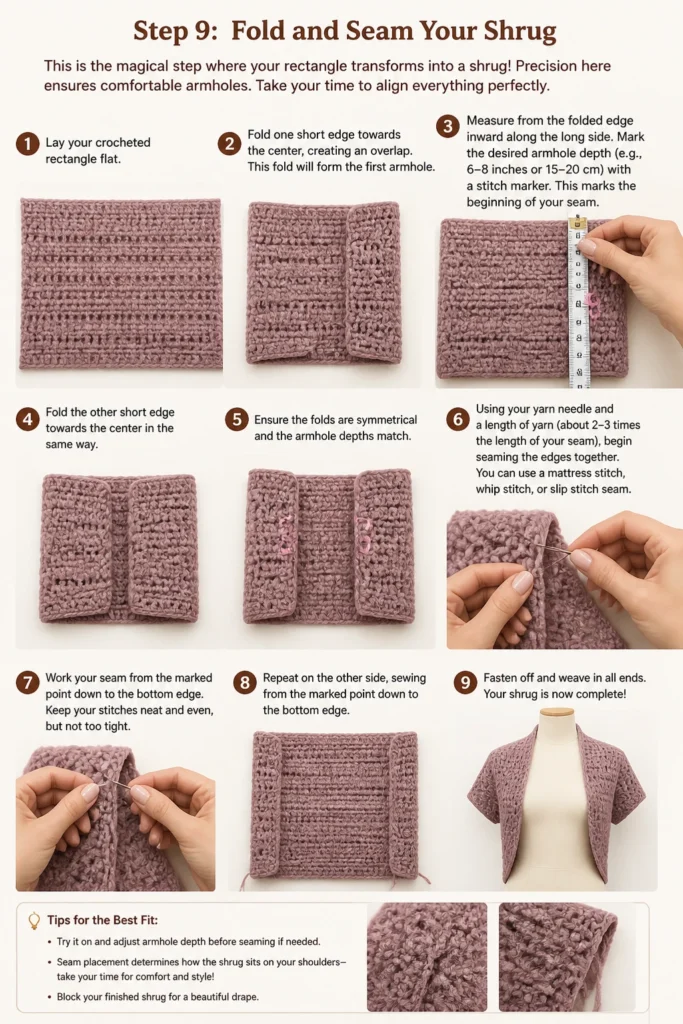
This is the magical step where your rectangle transforms into a shrug! Precision here ensures comfortable armholes.
Take your time to align everything perfectly.
- Lay your crocheted rectangle flat.
- Fold one short edge towards the center, creating an overlap. This fold will form the first armhole.
- Measure from the folded edge inward along the long side. Mark the desired armhole depth (e.g., 6-8 inches or 15-20 cm) with a stitch marker. This marks the beginning of your seam.
- Fold the other short edge towards the center in the same way. Ensure the folds are symmetrical and the armhole depths match.
- Using your yarn needle and a length of yarn (about 2-3 times the length of your seam), begin seaming the edges together. You can use a mattress stitch, whip stitch, or slip stitch seam.
- Work your seam from the outside edge (the wrist end) inward towards your stitch marker. Stop seaming at the marker.
- Repeat the seaming process for the other armhole.
- Weave in any remaining yarn tails from your seams.
Step 10: Add Edging (Optional)
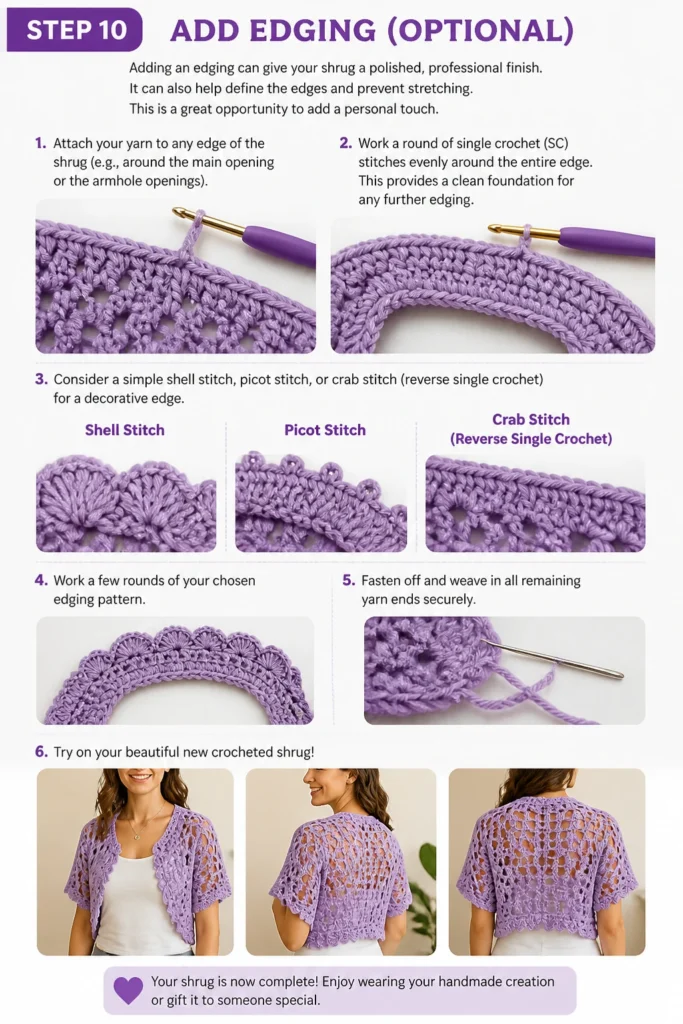
Adding an edging can give your shrug a polished, professional finish. It can also help define the edges and prevent stretching.
This is a great opportunity to add a personal touch.
- Attach your yarn to any edge of the shrug (e.g., around the main opening or the armhole openings).
- Work a round of single crochet (SC) stitches evenly around the entire edge. This provides a clean foundation for any further edging.
- Consider a simple shell stitch, picot stitch, or crab stitch (reverse single crochet) for a decorative edge.
- Work a few rounds of your chosen edging pattern.
- Fasten off and weave in all remaining yarn ends securely.
- Try on your beautiful new crocheted shrug!
Common Mistakes to Avoid
Inconsistent Tension
Many new crocheters struggle with maintaining even tension throughout their project. This can lead to fabric that is tight in some areas and loose in others, resulting in an uneven shape or size. Practice makes perfect, so be mindful of how you hold your yarn and hook. Try to relax your grip to avoid overly tight stitches.
Skipping the Gauge Swatch
Ignoring the gauge swatch is a common shortcut that often leads to disappointment. Without checking your gauge, your shrug might end up much larger or smaller than intended, making it unwearable or requiring a complete restart. Always take the time to swatch and adjust your hook size if necessary.
Not Weaving in Ends Securely
Loose yarn ends can unravel over time, compromising the integrity and appearance of your finished shrug. Weave in all ends by threading them through several stitches in different directions, ensuring they are well hidden and secure. This prevents your hard work from coming undone.
Incorrect Seaming
If your armhole seams are uneven or too tight, the shrug won’t sit comfortably or look right. Ensure you measure accurately when marking your armhole depth and use a consistent seaming technique. A mattress stitch creates an almost invisible seam, while a whip stitch is quick and strong.
Troubleshooting
My Shrug Edges Are Wavy or Puckered
Wavy edges often indicate that you’ve added too many stitches, while puckered edges suggest you’ve skipped stitches. Count your stitches at the end of every row to ensure you have the correct number. If your starting chain was too tight, it can also cause puckering; try using a larger hook for the foundation chain only, or chain more loosely.
My Shrug is Too Big/Small
This is almost always a gauge issue. If your finished shrug is not the size you intended, it means your personal stitch tension did not match the project’s requirements. For future projects, dedicate more time to creating and measuring your gauge swatch. If it’s already finished, consider if a different size is still wearable or if it needs to be gifted.
The Fabric is Stiff and Lacks Drape
Stiffness usually comes from using a hook that is too small for your chosen yarn, resulting in very dense stitches. Alternatively, your tension might be too tight. Try going up one or two hook sizes for a looser, more flexible fabric. Some yarns are also naturally stiffer; consider a yarn with more drape, like merino wool or a bamboo blend, for your next project.
Key Takeaways
- Gauge is essential: Always crochet a swatch to match your tension and achieve the correct size.
- Measurements matter: Accurately measure your wingspan and desired width for a well-fitting shrug.
- Consistent tension: Strive for even stitches throughout your work for a beautiful, uniform fabric.
- Secure your ends: Weave in all yarn tails properly to prevent unraveling and ensure durability.
- Blocking enhances: Don’t skip blocking; it improves drape, evens stitches, and shapes your garment.
- Simple construction: A shrug is just a rectangle folded and seamed, making it a great beginner project.
Frequently Asked Questions
What’s the best stitch for a beginner shrug?
Half double crochet (HDC) is an excellent choice for a beginner shrug. It creates a fabric that is not too dense, has good drape, and works up relatively quickly. Double crochet (DC) is also a popular option for a looser fabric.
How much yarn do I need for a shrug?
Yarn requirements vary significantly based on yarn weight, hook size, stitch pattern, and the desired size of your shrug. For a typical adult shrug made with worsted weight yarn, expect to need anywhere from 600 to 1200 yards (550-1100 meters). Always check your pattern or buy an extra skein just in case.
Can I make a shrug without seams?
Yes, you can! Some shrug patterns are worked in the round or use specific construction techniques to avoid seams. However, the rectangle-and-seam method is often the simplest for beginners to understand and execute. Once you’re comfortable, exploring seamless options is a great next step.
How do I choose the right yarn for my shrug?
Consider the season and desired drape. Acrylic is durable and easy to care for, suitable for everyday wear. Cotton is breathable, great for warmer weather. Wool offers warmth and elasticity. Blends often combine the best qualities of different fibers. Always check the yarn label for care instructions.
Our Top Recommended Finds
- Ergonomic Crochet Hook Set: A set with comfortable handles reduces hand fatigue, making long crafting sessions more enjoyable.
- Locking Stitch Markers: These handy tools securely mark stitches, helping you keep track of counts and specific points in your project without falling out.
- Yarn Winder and Swift: If you often buy skeins or hanks, a winder and swift transform them into neat cakes, preventing tangles and making storage easier.
Your Handmade Journey Awaits
You now have a comprehensive guide to crocheting your very own shrug. This project is a wonderful blend of practicality and creativity, resulting in a unique piece you can proudly say you made. Imagine the satisfaction of wearing something crafted by your own hands!
Don’t wait to start your next creative adventure. Pick up your hook and yarn today, and transform a simple rectangle into a beautiful, wearable shrug. Once you’ve mastered this, consider exploring more complex stitch patterns or even designing your own garment.